多表操作
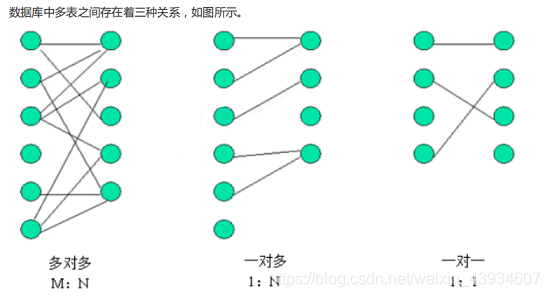
在实际开发中,数据库的表难免会有相互的关联关系,在操作表的时候就有可能会涉及到多张表的操作。 而在这种实现了ORM思想的框架中(如 JPA),可以通过操作实体类就实现对数据库表的操作。
配置实体之间的关联关系
- 第一步:首先确定两张表之间的关系
- 第二步:在实体类中描述出两个实体的关系
- 第三步:配置出实体类和数据库表的关系映射(重点)
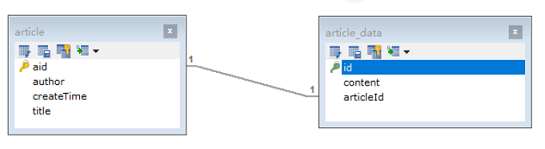
一对一关系
- 通过唯一的外键关联
1.数据准备:article和article_data的一对一关系,并给article_data建立好外键
2.创建实体类,并在类中配置表间关系
- 创建文章类
- 注意: cascade = CascadeType.PERSIST 这里必须设置级联
@Entity
@Table(name = "article")
@Data
public class Article {

    @Id
    @GeneratedValue(strategy = GenerationType.IDENTITY)
    private Integer aid;

    private String author;

    private Date createTime;

    private String title;


    /**
     * 声明类间关系
     * 声明主动放弃关系维护 mappedBy="当前类在对方类中的属性名"
     * 当保存Article的时候,同时保存ArticleData
     */
    @OneToOne(mappedBy = "article", cascade = CascadeType.PERSIST)
    private ArticleData articleData;

}
- 创建文章详情类
- 注意: unique = true 因为只有外键唯一才是一对一 不然就是多对一
@Entity
@Table(name = "article_data")
@Data
public class ArticleData {

    @Id
    @GeneratedValue(strategy = GenerationType.IDENTITY)
    private Integer id;

    private String content;


    /**
     * 让这个实体维护关系
     * JoinColumn 表示声明外键
     * name                    当前表中的外键名
     * referencedColumnName    指向的对方表中的主键名
     */
    @OneToOne
    @JoinColumn(name = "articleId", referencedColumnName = "aid", unique = true)
    private Article article;
}
3.添加ArticleDao接口
public interface ArticleDataDao extends JpaRepository<ArticleData, Integer>, JpaSpecificationExecutor<ArticleData> {
}
4.测试
@SpringBootTest
@RunWith(SpringRunner.class)
public class One2OneTest {

    @Autowired
    private ArticleDao articleDao;

    //保存
    @Test
    public void testSave() {
        //创建文章对象
        Article article = new Article();
        article.setTitle("t_1");
        article.setAuthor("a_1");
        article.setCreateTime(new Date());

        //创建文章内容对象
        ArticleData articleData = new ArticleData();
        articleData.setContent("真是一篇好文章");


        //建立两个对象间的关系
        article.setArticleData(articleData);
        articleData.setArticle(article);

        //保存操作
        articleDao.save(article);
    }
}
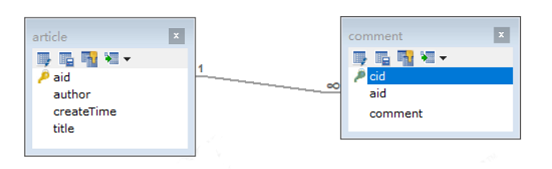
一对多关系
- 通过不唯一的外键关联
1.数据准备:article和comment的一对多关系,并给comment建立好外键
2.创建实体类,并在类中配置表间关系
- 修改文章类,添加文章跟评论的映射
@Entity
@Table(name = "article")
@Data
public class Article {

    @Id
    @GeneratedValue(strategy = GenerationType.IDENTITY)
    private Integer aid;

    private String author;

    private Date createTime;

    private String title;


    /**
     * 声明类间关系
     * 声明主动放弃关系维护 mappedBy="当前类在对方类中的属性名"
     * 当保存Article的时候,同时保存ArticleData
     */
    @OneToOne(mappedBy = "article", cascade = CascadeType.PERSIST)
    private ArticleData articleData;

	/**
	 * 建立文章对评论的一对多关系
	 * 在一的一方声明放弃维护关系
	 * 一对多使用 List 或者 Set
	 */
	@OneToMany(mappedBy = "article")
    private Set<Comment> comments = new HashSet<>(0);

}
- 创建文章评论类
@Entity
@Table(name = "comment")
@Data
public class Comment {

    @Id
    @GeneratedValue(strategy = GenerationType.IDENTITY)
    private Integer cid;

    private String comment;


    @ManyToOne()
    @JoinColumn(name = "aid", referencedColumnName = "aid")
    private Article article;
}
3.添加CommentDao接口
public interface CommentDao extends JpaRepository<Comment, Integer>, JpaSpecificationExecutor<Comment> {

}
4.测试
@SpringBootTest
@RunWith(SpringRunner.class)
public class One2ManyTest {

    @Autowired
    private ArticleDao articleDao;
    @Autowired
    private CommentDao commentDao;

    //保存
    @Test
    public void testSave() {
        //创建文章对象
        Article article = new Article();
        article.setTitle("t_1");
        article.setAuthor("a_1");
        article.setCreateTime(new Date());

        //创建文章评论对象
        Comment comment1 = new Comment();
        comment1.setComment("真不错");
        Comment comment2 = new Comment();
        comment2.setComment("挺好的");

        //建立两个对象间的关系
        comment1.setArticle(article);
        comment2.setArticle(article);

        Set<Comment> comments = new HashSet<>();
        comments.add(comment1);
        comments.add(comment2);
        article.setComments(comments);


        //保存操作
        articleDao.save(article);
        commentDao.save(comment1);
        commentDao.save(comment2);

    }
}
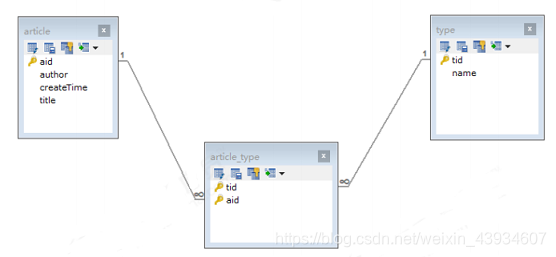
多对多关系
扫描二维码关注公众号,回复:
9305526 查看本文章

- 通过中间表关联
1.数据准备:article跟type之间的多对多关系,建立好中间表article_type 与article_type的两个外键
2.创建实体类,并在类中配置表间关系
- 修改文章类,添加文章跟评论用户的多对多关系
@Entity
@Table(name = "article")
@Data
public class Article {

    @Id
    @GeneratedValue(strategy = GenerationType.IDENTITY)
    private Integer aid;

    private String author;

    private Date createTime;

    private String title;


    /**
     * 声明类间关系
     * 声明主动放弃关系维护 mappedBy="当前类在对方类中的属性名"
     * 当保存Article的时候,同时保存ArticleData
     */
    @OneToOne(mappedBy = "article", cascade = CascadeType.PERSIST)
    private ArticleData articleData;

	/**
	 * 建立文章对评论的一对多关系
	 * 在一的一方声明放弃维护关系
	 * 一对多使用 List 或者 Set
	 */
	@OneToMany(mappedBy = "article")
    private Set<Comment> comments = new HashSet<>(0);

	/**
	 * 建立从文章到类型的多对多关系
	 */
	@ManyToMany(mappedBy = "articles")
    private Set<Type> types = new HashSet<>(0);

}
- 添加用户类,并在类中配置表间关系
@Entity
@Table(name = "type")
@Data
public class Type {

    @Id
    @GeneratedValue(strategy = GenerationType.IDENTITY)
    private Integer tid;

    private String name;

    @ManyToMany
    @JoinTable(
            //代表中间表名称
            name = "article_type",
            //中间表的外键对应到当前表的主键名称
            joinColumns = {@JoinColumn(name = "tid", referencedColumnName = "tid")},
            //中间表的外键对应到对方表的主键名称
            inverseJoinColumns = {@JoinColumn(name = "aid", referencedColumnName = "aid")}
    )
    private Set<Article> articles = new HashSet<>(0);

}
3.添加TypeDao接口
public interface TypeDao extends JpaRepository<Type, Integer>, JpaSpecificationExecutor<Type> {
}
4.测试
@SpringBootTest
@RunWith(SpringRunner.class)
public class Many2ManyTest {

    @Autowired
    private ArticleDao articleDao;
    @Autowired
    private TypeDao typeDao;

    //保存
    @Test
    public void testSave() {
        //创建文章对象
        Article article1 = new Article();
        article1.setTitle("t_11");
        article1.setAuthor("a_11");
        article1.setCreateTime(new Date());

        Article article2 = new Article();
        article2.setTitle("t_22");
        article2.setAuthor("a_22");
        article2.setCreateTime(new Date());


        //创建文章类型对象
        Type type1 = new Type();
        type1.setName("军事");
        Type type2 = new Type();
        type2.setName("民政");


        //建立两个对象间的关系
        Set<Type> types = new HashSet<>();
        types.add(type1);
        types.add(type2);
        article1.setTypes(types);
        article2.setTypes(types);

        Set<Article> articles = new HashSet<>();
        articles.add(article1);
        articles.add(article2);
        type1.setArticles(articles);
        type2.setArticles(articles);


        //保存操作
        articleDao.save(article1);
        articleDao.save(article2);
        typeDao.save(type1);
        typeDao.save(type2);
    }
}
小结
- 为什么都有外键和中间表了 但还要使用注解关联起来
- 在多对多的时候会自动给中间表增加关联的数据 不用手动添加
- 在查询的时候 会连带着把关联的数据查出来 不用手动查找
- 怎么选择哪方维护数据
- 一对一:与其他表关联少的一方
- 一对多:多的那方
- 多对多:与其他表关联少的一方
