前几天,我写了一篇关于如何使用GitHub+Hexo搭建个人博客的博文,接下来我会以我的博客为例,讲讲如何对NexT主题的个性化定制和一些细节的优化。
前言
这篇博客主要是next主题的个性化定制,还有一些细节的优化。在搭建的过程,有一些优化,也是参考了大量之前大佬的教程和结合了一些做的比较优秀的博客,我在这里做了一个集合,同时把自己做的而别人没有做的优化,写出来方便大家。
参考的文章我都会贴出原文链接,有一些优化,是我自己辛苦更改样式才做出来的效果,有些也是忘记了具体的修改方法,主要是直接审查元素,一点一点的定位到样式表,一点一点的测试修改,相信通过审查元素,你也可以做到。
安装NexT主题
我使用的是比较简约的NexT主题,如果你对其他主题感兴趣,可以点击这里。
安装方法:打开博客根目录下的themes文件夹,右键Git Bash,运行命令:
git clone https://github.com/iissnan/hexo-theme-next themes/next
下载好之后,把hexo-theme-next改为next,接着打开next目录下的主题配置文件_config.yml,找到theme字段,把参数改为theme: next,之后在根目录下运行:
hexo clean
hexo s -g
关于_config.yml
首先_config.yml,它是主题配置文件,有两个,名字一样比较容易混淆。
- 站点配置文件,位于站点文件夹的根目录下
例如我的是H:/blog/_config.yml
- 主题配置文件,位于主题文件夹的根目录下
例如我的是H:/blog/themes/next/_config.yml
Next这个主题包含4钟风格,默认的是Muse,我使用的是Pisces。你也可以尝试其他风格,具体操作:打开H:/blog/_config.yml,定位到Schemes,想要哪款主题就取消前面的**#**。
# Schemes
#scheme: Muse
#scheme: Mist
scheme: Pisces
#scheme: Gemini
Next主题美化
接下来就是主题的美化啦

添加Github丝带或者角标
效果图

实现方法
首先先点击这里或者这里挑选自己喜欢的样式,并复制代码。

打开themes/next/layout/_layout.swig文件,在<header></header>之前添加代码,并把href改为你的博客地址

添加RSS订阅
效果图

实现方法
首先在博客的根目录H:/blog,安装Hexo插件,插件会放在node_modules这个文件夹。
npm install --save hexo-generator-feed
接下来打开H:/blog/_config.yml文件,在末尾添加
# Extensions
## Plugins: http://hexo.io/plugins/
# RSS订阅
plugin: hexo-generator-feed
然后打开H:/blog/themes/next/_config.yml文件,找到rss,添加参数
# hexo-generator-feed required for rss support. Leave rss as blank to use site's feed link.
# Set rss to false to disable feed link. Set rss to specific value if you have burned your feed already.
rss: /atom.xml
添加动态背景
效果图

实现方法
打开H:/blog/_config.yml文件,找到canvas_nest,把false改为true
canvas_nest:
  enable: true
  onmobile: true # display on mobile or not
  color: "0,0,255" # 线条颜色,三个数字分别为(R,G,B)
  opacity: 0.5 # 线条透明度(0~1)
  zIndex: -1 # 背景的z-index属性
  count: 99 # 线条的总数量
鼠标点击特效
效果图

实现方法
打开H:/blog/themes/next/source/js/src,新建一个firework.js文件,加入以下代码:
"use strict";function updateCoords(e){pointerX=(e.clientX||e.touches[0].clientX)-canvasEl.getBoundingClientRect().left,pointerY=e.clientY||e.touches[0].clientY-canvasEl.getBoundingClientRect().top}function setParticuleDirection(e){var t=anime.random(0,360)*Math.PI/180,a=anime.random(50,180),n=[-1,1][anime.random(0,1)]*a;return{x:e.x+n*Math.cos(t),y:e.y+n*Math.sin(t)}}function createParticule(e,t){var a={};return a.x=e,a.y=t,a.color=colors[anime.random(0,colors.length-1)],a.radius=anime.random(16,32),a.endPos=setParticuleDirection(a),a.draw=function(){ctx.beginPath(),ctx.arc(a.x,a.y,a.radius,0,2*Math.PI,!0),ctx.fillStyle=a.color,ctx.fill()},a}function createCircle(e,t){var a={};return a.x=e,a.y=t,a.color="#F00",a.radius=0.1,a.alpha=0.5,a.lineWidth=6,a.draw=function(){ctx.globalAlpha=a.alpha,ctx.beginPath(),ctx.arc(a.x,a.y,a.radius,0,2*Math.PI,!0),ctx.lineWidth=a.lineWidth,ctx.strokeStyle=a.color,ctx.stroke(),ctx.globalAlpha=1},a}function renderParticule(e){for(var t=0;t<e.animatables.length;t++){e.animatables[t].target.draw()}}function animateParticules(e,t){for(var a=createCircle(e,t),n=[],i=0;i<numberOfParticules;i++){n.push(createParticule(e,t))}anime.timeline().add({targets:n,x:function(e){return e.endPos.x},y:function(e){return e.endPos.y},radius:0.1,duration:anime.random(1200,1800),easing:"easeOutExpo",update:renderParticule}).add({targets:a,radius:anime.random(80,160),lineWidth:0,alpha:{value:0,easing:"linear",duration:anime.random(600,800)},duration:anime.random(1200,1800),easing:"easeOutExpo",update:renderParticule,offset:0})}function debounce(e,t){var a;return function(){var n=this,i=arguments;clearTimeout(a),a=setTimeout(function(){e.apply(n,i)},t)}}var canvasEl=document.querySelector(".fireworks");if(canvasEl){var ctx=canvasEl.getContext("2d"),numberOfParticules=30,pointerX=0,pointerY=0,tap="mousedown",colors=["#FF1461","#18FF92","#5A87FF","#FBF38C"],setCanvasSize=debounce(function(){canvasEl.width=2*window.innerWidth,canvasEl.height=2*window.innerHeight,canvasEl.style.width=window.innerWidth+"px",canvasEl.style.height=window.innerHeight+"px",canvasEl.getContext("2d").scale(2,2)},500),render=anime({duration:1/0,update:function(){ctx.clearRect(0,0,canvasEl.width,canvasEl.height)}});document.addEventListener(tap,function(e){"sidebar"!==e.target.id&&"toggle-sidebar"!==e.target.id&&"A"!==e.target.nodeName&&"IMG"!==e.target.nodeName&&(render.play(),updateCoords(e),animateParticules(pointerX,pointerY))},!1),setCanvasSize(),window.addEventListener("resize",setCanvasSize,!1)}"use strict";function updateCoords(e){pointerX=(e.clientX||e.touches[0].clientX)-canvasEl.getBoundingClientRect().left,pointerY=e.clientY||e.touches[0].clientY-canvasEl.getBoundingClientRect().top}function setParticuleDirection(e){var t=anime.random(0,360)*Math.PI/180,a=anime.random(50,180),n=[-1,1][anime.random(0,1)]*a;return{x:e.x+n*Math.cos(t),y:e.y+n*Math.sin(t)}}function createParticule(e,t){var a={};return a.x=e,a.y=t,a.color=colors[anime.random(0,colors.length-1)],a.radius=anime.random(16,32),a.endPos=setParticuleDirection(a),a.draw=function(){ctx.beginPath(),ctx.arc(a.x,a.y,a.radius,0,2*Math.PI,!0),ctx.fillStyle=a.color,ctx.fill()},a}function createCircle(e,t){var a={};return a.x=e,a.y=t,a.color="#F00",a.radius=0.1,a.alpha=0.5,a.lineWidth=6,a.draw=function(){ctx.globalAlpha=a.alpha,ctx.beginPath(),ctx.arc(a.x,a.y,a.radius,0,2*Math.PI,!0),ctx.lineWidth=a.lineWidth,ctx.strokeStyle=a.color,ctx.stroke(),ctx.globalAlpha=1},a}function renderParticule(e){for(var t=0;t<e.animatables.length;t++){e.animatables[t].target.draw()}}function animateParticules(e,t){for(var a=createCircle(e,t),n=[],i=0;i<numberOfParticules;i++){n.push(createParticule(e,t))}anime.timeline().add({targets:n,x:function(e){return e.endPos.x},y:function(e){return e.endPos.y},radius:0.1,duration:anime.random(1200,1800),easing:"easeOutExpo",update:renderParticule}).add({targets:a,radius:anime.random(80,160),lineWidth:0,alpha:{value:0,easing:"linear",duration:anime.random(600,800)},duration:anime.random(1200,1800),easing:"easeOutExpo",update:renderParticule,offset:0})}function debounce(e,t){var a;return function(){var n=this,i=arguments;clearTimeout(a),a=setTimeout(function(){e.apply(n,i)},t)}}var canvasEl=document.querySelector(".fireworks");if(canvasEl){var ctx=canvasEl.getContext("2d"),numberOfParticules=30,pointerX=0,pointerY=0,tap="mousedown",colors=["#FF1461","#18FF92","#5A87FF","#FBF38C"],setCanvasSize=debounce(function(){canvasEl.width=2*window.innerWidth,canvasEl.height=2*window.innerHeight,canvasEl.style.width=window.innerWidth+"px",canvasEl.style.height=window.innerHeight+"px",canvasEl.getContext("2d").scale(2,2)},500),render=anime({duration:1/0,update:function(){ctx.clearRect(0,0,canvasEl.width,canvasEl.height)}});document.addEventListener(tap,function(e){"sidebar"!==e.target.id&&"toggle-sidebar"!==e.target.id&&"A"!==e.target.nodeName&&"IMG"!==e.target.nodeName&&(render.play(),updateCoords(e),animateParticules(pointerX,pointerY))},!1),setCanvasSize(),window.addEventListener("resize",setCanvasSize,!1)};
然后在H:/blog/themes/next/layout/_layout.swig文件中,</head>之前加入以下代码:
<!-- 爆炸红心效果 -->
<canvas class="fireworks" style="position: fixed;left: 0;top: 0;z-index: 1; pointer-events: none;" ></canvas>
<script type="text/javascript" src="//cdn.bootcss.com/animejs/2.2.0/anime.min.js"></script>
<script type="text/javascript" src="/js/src/yanhuatexiao.js"></script>

还可以换成点击出现爱心的特效,方法是一样的。
!function(e,t,a){function n(){c(".heart{width: 10px;height: 10px;position: fixed;background: #f00;transform: rotate(45deg);-webkit-transform: rotate(45deg);-moz-transform: rotate(45deg);}.heart:after,.heart:before{content: '';width: inherit;height: inherit;background: inherit;border-radius: 50%;-webkit-border-radius: 500%;-moz-border-radius: 50%;position: fixed;}.heart:after{top: -5px;}.heart:before{left: -5px;}"),o(),r()}function r(){for(var e=0;e<d.length;e++)d[e].alpha<=0?(t.body.removeChild(d[e].el),d.splice(e,1)):(d[e].y--,d[e].scale+=.004,d[e].alpha-=.013,d[e].el.style.cssText="left:"+d[e].x+"px;top:"+d[e].y+"px;opacity:"+d[e].alpha+";transform:scale("+d[e].scale+","+d[e].scale+") rotate(45deg);background:"+d[e].color+";z-index:99999");requestAnimationFrame(r)}function o(){var t="function"==typeof e.onclick&&e.onclick;e.οnclick=function(e){t&&t(),i(e)}}function i(e){var a=t.createElement("div");a.className="heart",d.push({el:a,x:e.clientX-5,y:e.clientY-5,scale:1,alpha:1,color:s()}),t.body.appendChild(a)}function c(e){var a=t.createElement("style");a.type="text/css";try{a.appendChild(t.createTextNode(e))}catch(t){a.styleSheet.cssText=e}t.getElementsByTagName("head")[0].appendChild(a)}function s(){return"rgb("+~~(255*Math.random())+","+~~(255*Math.random())+","+~~(255*Math.random())+")"}var d=[];e.requestAnimationFrame=function(){return e.requestAnimationFrame||e.webkitRequestAnimationFrame||e.mozRequestAnimationFrame||e.oRequestAnimationFrame||e.msRequestAnimationFrame||function(e){setTimeout(e,1e3/60)}}(),n()}(window,document);
修改超链接的颜色
效果图

实现方法
打开H:\blog\themes\next\source\css\_common\components\post文件夹下的post.styl,添加以下css样式:
.post-body p a {
  color: #0593d3;
  border-bottom: none;
  &:hover {
    color: #fc6423;
    text-decoration: underline;
  }
}
其中选择.post-body 是为了不影响标题,选择 p 是为了不影响首页“阅读全文”的显示样式,颜色可以自己定义。
文章结尾添加结束标记
效果图

实现方法
打开H:/blog/themes/next/layout/_macro文件夹,新建passage-end-tag.swig 文件,并添加以下内容:
<div>
    {% if not is_index %}
        <div style="text-align:center;color: #ccc;font-size:14px;">-------------本文结束<i class="fa fa-paw"></i>感谢您的阅读-------------</div>
    {% endif %}
</div>
然后打开H:/blog/themes/next/layout/_macro/post.swig文件,在post-body 之后, post-footer 之前添加以下代码:
<div>
  {% if not is_index %}
    {% include 'passage-end-tag.swig' %}
  {% endif %}
</div>

接着在H:/blog/themes/next/_config.yml末尾添加:
# 文章末尾添加“本文结束”标记
passage_end_tag:
  enabled: true
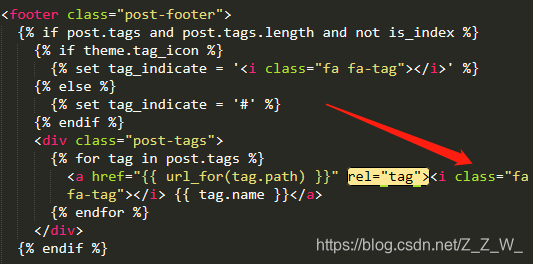
修改文章底部带#号的标签
效果图

实现方法
修改H:/blog/themes/next/layout/_macro/post.swig,搜索 rel="tag">#,将 # 换成<i class="fa fa-tag"></i>
设置博客头像并旋转
效果图

实现方法
打开H:/blog/themes/next/source/images,把头像放到该目录下,然后打开H:/blog/_config.yml,找到avatar:,修改为以下内容:
avatar:
  # In theme directory (source/images): /images/avatar.gif
  # In site directory (source/uploads): /uploads/avatar.gif
  # You can also use other linking images.
  url: /images/avatar.gif
  # If true, the avatar would be dispalyed in circle.
  rounded: true
  # The value of opacity should be choose from 0 to 1 to set the opacity of the avatar.
  opacity: 1
  # If true, the avatar would be rotated with the cursor.
  rotated: true
快速实现博客压缩
项目压缩也叫代码丑化, 分别对 html、css、js、images进行优化,即把重复的代码合并,把多余的空格去掉,用算法把 images 进行压缩。压缩后的博客,加载速度会有较大的提升,自然能留住更多游客。
蛮多朋友使用了gulp对博客进行压缩,这也是一个办法,但在社区逛了下,找到了一个比较好用的模块hexo-all-minifier,这个模块集成了对 html、css、js、image 的优化。
npm install hexo-all-minifier --save
安装上此模块后,只要在根目录下的_config.yml文件中加上如下字段就可对博客所有内容进行压缩。
html_minifier:
  enable: true
  ignore_error: false
  exclude:

css_minifier:
  enable: true
  exclude:
    - '*.min.css'

js_minifier:
  enable: true
  mangle: true
  output:
  compress:
  exclude:
    - '*.min.js'

image_minifier:
  enable: true
  interlaced: false
  multipass: false
  optimizationLevel: 2
  pngquant: false
  progressive: false
侧边栏添加社交图标
效果图

实现方法
打开主题配置文件_config.yml,搜索social:,在图标库找自己喜欢的小图标,并将名字复制在如下位置,保存即可

主页文章添加阴影效果
效果图

实现方法
打开H:\blog\themes\next\source\css\_common\components\post文件夹下的post.styl,添加以下css样式:
// 主页文章添加阴影效果
 .post {
   margin-top: 0px;
   margin-bottom: 60px;
   padding: 25px;
   -webkit-box-shadow: 0 0 5px rgba(202, 203, 203, .5);
   -moz-box-shadow: 0 0 5px rgba(202, 203, 204, .5);
  }
在博客底部添加访问量
效果图

实现方法
打开H:/blog/themes/next/_config.yml,找到busuanzi,修改为以下参数:
busuanzi_count:
  enable: true
  total_visitors: true
  total_visitors_icon: user
  total_views: true
  total_views_icon: eye
使用leancloud统计页面访问次数
效果图

实现方法
主题集成了leancloud,但是我们还需要去官网注册账号并实名,这里讲一下关键的步骤。
配置leancloud
- 创建应用:
控制台——创建应用(开发版)
应用名称可以随意输入,后面还可以修改,我的是blog
- 创建class:
点击刚创建的应用,创建一个 Class 表用来保存我们的博客访问数据。此处创建的 Class 名字必须为 Counter,ACL 权限选择 无限制。
- 创建 Class 完成之后,新创建的 Counter 表会显示在左侧,这时再切换到 test 应用的
设置 - 应用 Key界面:

- 复制ID和Key

启用leancloud
打开_config.yml主题配置文件,找到leancloud_visitors:,填入id和key。

修改热度
打开H:/blog/themes/next/layout/_macro/post.swig文件,找到leancloud,修改成如下代码:

最后打开H:/blog/themes/next/languages/zh-CN.yml,把views参数改成如下:

博客标题设置
这个相关的设置在H:/blog/_config.yml中修改,如下图所示:

博客底部添加网站的运行时间
效果图

实现方法
打开H:/blog/themes/next/layout/_partials/footer.swig,在末尾添加如下代码;
<!-- 网站运行时间的设置 -->
<span id="timeDate">载入天数...</span>
<span id="times">载入时分秒...</span>
<script>
    var now = new Date();
    function createtime() {
        var grt= new Date("07/12/2019 18:30:00");//此处修改你的建站时间或者网站上线时间
        now.setTime(now.getTime()+250);
        days = (now - grt ) / 1000 / 60 / 60 / 24; dnum = Math.floor(days);
        hours = (now - grt ) / 1000 / 60 / 60 - (24 * dnum); hnum = Math.floor(hours);
        if(String(hnum).length ==1 ){hnum = "0" + hnum;} minutes = (now - grt ) / 1000 /60 - (24 * 60 * dnum) - (60 * hnum);
        mnum = Math.floor(minutes); if(String(mnum).length ==1 ){mnum = "0" + mnum;}
        seconds = (now - grt ) / 1000 - (24 * 60 * 60 * dnum) - (60 * 60 * hnum) - (60 * mnum);
        snum = Math.round(seconds); if(String(snum).length ==1 ){snum = "0" + snum;}
        document.getElementById("timeDate").innerHTML = "网站已运行 "+dnum+" 天 ";
        document.getElementById("times").innerHTML = hnum + " 小时 " + mnum + " 分 " + snum + " 秒";
    }
setInterval("createtime()",250);
</script>
添加 README.md 文件
每个项目下一般都有一个 README.md 文件,但是使用 hexo 部署到仓库后,项目下是没有 README.md 文件的。
在 Hexo 目录下的 source 根目录下添加一个 README.md 文件,修改站点配置文件 _config.yml,将 skip_render 参数的值设置为skip_render: README.md
保存退出即可。再次使用 hexo d 命令部署博客的时候就不会在渲染 README.md 这个文件了。
自定义网站的图标
效果图

实现方法
我的图标是在阿里矢量图标库下载的,你也可以在其他地方下载或者制作,然后把图标放在H:/blog/themes/next/source/images里面,斌且修改主题配置文件:
favicon:
  small: /images/favicon-16x16-next.png
  medium: /images/favicon-32x32-next.png
  apple_touch_icon: /images/apple-touch-icon-next.png
  safari_pinned_tab: /images/logo.svg
  #android_manifest: /images/manifest.json
  #ms_browserconfig: /images/browserconfig.xml
文章字数、阅读时长统计
效果图

实现效果
打开博客根目录,运行以下命令,安装插件
npm install hexo-symbols-count-time --save
然后修改博客配置文件,在末尾添加以下代码:
symbols_count_time:
  symbols: true                # 文章字数统计
  time: true                   # 文章阅读时长
  total_symbols: true          # 站点总字数统计
  total_time: true             # 站点总阅读时长
  exclude_codeblock: false     # 排除代码字数统计
最后在主题配置文件里面,找到symbols_count_time,修改成以下内容:
symbols_count_time:
  separated_meta: true     # 是否另起一行(true的话不和发表时间等同一行)
  item_text_post: true     # 首页文章统计数量前是否显示文字描述(本文字数、阅读时长)
  item_text_total: true    # 页面底部统计数量前是否显示文字描述(站点总字数、站点阅读时长)
  awl: 1.5                 # Average Word Length
  wpm: 100                 # Words Per Minute(每分钟阅读词数)
  suffix: mins.
博客顶端添加加载条
效果图

实现方法
打开主题配置文件,找到pace:,修改为以下内容:
pace: true
# Themes list:
# pace-theme-big-counter | pace-theme-bounce | pace-theme-barber-shop | pace-theme-center-atom
# pace-theme-center-circle | pace-theme-center-radar | pace-theme-center-simple | pace-theme-corner-indicator
# pace-theme-fill-left | pace-theme-flash | pace-theme-loading-bar | pace-theme-mac-osx | pace-theme-minimal
pace_theme: pace-theme-minimal
在文章底部添加版权信息
效果图

实现方法
打开H:/blog/themes/next/layout/_macro,添加my-copyright.swig,代码如下:
{% if page.copyright %}
<div class="my_post_copyright">
  <script src="//cdn.bootcss.com/clipboard.js/1.5.10/clipboard.min.js"></script>

  <!-- JS库 sweetalert 可修改路径 -->
  <script type="text/javascript" src="http://jslibs.wuxubj.cn/sweetalert_mini/jquery-1.7.1.min.js"></script>
  <script src="http://jslibs.wuxubj.cn/sweetalert_mini/sweetalert.min.js"></script>
  <link rel="stylesheet" type="text/css" href="http://jslibs.wuxubj.cn/sweetalert_mini/sweetalert.mini.css">

  <p><span>本文标题:</span>{{ page.title }}</a></p>
  <p><span>文章作者:</span>{{ theme.author }}</a> | 【公众号:不会代码的程序猿】</p>
  <p><span>发布时间:</span>{{ page.date.format("YYYY年MM月DD日 HH:mm:ss") }}</p>
  <p><span>最后更新:</span>{{ page.updated.format("YYYY年MM月DD日 HH:mm:ss") }}</p>
  <p><span>原始链接:</span><a href="{{ url_for(page.path) }}" title="{{ page.title }}">{{ page.permalink }}</a></p>
  <p><span>许可协议:</span><i class="fa fa-creative-commons"></i> <a rel="license" href="https://creativecommons.org/licenses/by-nc-nd/4.0/" target="_blank" title="Attribution-NonCommercial-NoDerivatives 4.0 International (CC BY-NC-ND 4.0)">署名-非商业性使用-禁止演绎 4.0 国际</a> 转载请保留原文链接及作者。</p>
</div>
<script>
    var clipboard = new Clipboard('.fa-clipboard');
    clipboard.on('success', $(function(){
      $(".fa-clipboard").click(function(){
        swal({
          title: "",
          text: '复制成功',
          html: false,
          timer: 500,
          showConfirmButton: false
        });
      });
    }));
</script>
{% endif %}
然后在H:/blog/themes/next/source/css/_common/components/post/下添加my-post-copyright.styl:
.my_post_copyright {
  width: 85%;
  max-width: 45em;
  margin: 2.8em auto 0;
  padding: 0.5em 1.0em;
  border: 1px solid #d3d3d3;
  font-size: 0.93rem;
  line-height: 1.6em;
  word-break: break-all;
  background: rgba(255,255,255,0.4);
}
.my_post_copyright p{margin:0;}
.my_post_copyright span {
  display: inline-block;
  width: 5.2em;
  color: #333333; // title color
  font-weight: bold;
}
.my_post_copyright .raw {
  margin-left: 1em;
  width: 5em;
}
.my_post_copyright a {
  color: #808080;
  border-bottom:0;
}
.my_post_copyright a:hover {
  color: #0593d3; // link color
  text-decoration: underline;
}
.my_post_copyright:hover .fa-clipboard {
  color: #000;
}
.my_post_copyright .post-url:hover {
  font-weight: normal;
}
.my_post_copyright .copy-path {
  margin-left: 1em;
  width: 1em;
  +mobile(){display:none;}
}
.my_post_copyright .copy-path:hover {
  color: #808080;
  cursor: pointer;
}
然后打开H:/blog/themes/next/layout/_macro/post.swig文件,在post-body 之后, post-footer 之前添加以下代码:
<div>
   {% if not is_index %}
      {% include 'my-copyright.swig' %}
   {% endif %}
</div>

最后修改next/source/css/_common/components/post/post.styl文件,在最后一行增加代码:
@import "my-post-copyright"
添加来必力评论系统
效果图

实现方法
打开来必力的官网,注册,注册好之后打开设置页面,填写博客地址

然后在代码管理页面,把uid复制到主题配置文件_config.yml的livere_uid:


修改博客底部的红色跳动爱心
效果图

实现方法
打开主题配置文件,找到footer:,修改为以下内容:

DaoVoice在线联系
效果图

实现方法
先在 daovoice 注册账号,邀请码是dda712fb,注册完成后会得到一个 app_id :

然后打开/themes/next/layout/_partials/head.swig,在末尾添加如下代码:
{% if theme.daovoice %}
  <script>
  (function(i,s,o,g,r,a,m){i["DaoVoiceObject"]=r;i[r]=i[r]||function(){(i[r].q=i[r].q||[]).push(arguments)},i[r].l=1*new Date();a=s.createElement(o),m=s.getElementsByTagName(o)[0];a.async=1;a.src=g;a.charset="utf-8";m.parentNode.insertBefore(a,m)})(window,document,"script",('https:' == document.location.protocol ? 'https:' : 'http:') + "//widget.daovoice.io/widget/dda712fb.js","daovoice")
  daovoice('init', {
      app_id: "{{theme.daovoice_app_id}}"
    });
  daovoice('update');
  </script>
{% endif %}

最后打开主题配置文件,在末尾添加如下代码:
# Online contact
daovoice: true
daovoice_app_id: 这里填你的刚才获得的 app_id
设置博客摘要显示
打开主题配置文件,修改为以下内容:

这样就能实现在主页只展示部分文字,其他文字隐藏起来,通过点击’阅读更多’来阅读全文。在写每一篇文章的时候,也要在必要的地方添加<!-- more -->
---
title: 使用Github+Hexo搭建你的个人博客:搭建篇
copyright: true
date: 2019-07-21 15:25:12
categories: Hexo
tags: [GitHub,个人博客,Hexo]

---

<blockquote class="blockquote-center">海阔凭鱼跃,天高任鸟飞。
</blockquote>

  早在初中,就想着自己搭起一个属于自己的网站,但是没有技术又不肯学习的我,怯于尝试,一直停滞不前。大学期间终于学习了,又因为自己的懒惰,觉得很难,不肯去尝试。直至今日,我想试一试,捣鼓了好一阵子,发现认真去做了,也没有想象中的难。

<!-- more -->
文章链接唯一化
也许你会数次更改文章题目或者变更文章发布时间,在默认设置下,文章链接都会改变,不利于搜索引擎收录,也不利于分享。唯一永久链接才是更好的选择。
首先安装插件
npm install hexo-abbrlink --save
然后在站点配置文件中找到permalink,修改为如下内容:
permalink: posts/:abbrlink/ # “posts/” 可自行更换
这里有个知识点:
百度蜘蛛抓取网页的规则: 对于蜘蛛说网页权重越高、信用度越高抓取越频繁,例如网站的首页和内页。蜘蛛先抓取网站的首页,因为首页权重更高,并且大部分的链接都是指向首页。然后通过首页抓取网站的内页,并不是所有内页蜘蛛都会去抓取。
搜索引擎认为对于一般的中小型站点,3层足够承受所有的内容了,所以蜘蛛经常抓取的内容是前三层,而超过三层的内容蜘蛛认为那些内容并不重要,所以不经常爬取。出于这个原因所以permalink后面跟着的最好不要超过2个斜杠。
接着在站点配置文件中添加如下代码:
# abbrlink config
abbrlink:  alg: crc32  # 算法:crc16(default) and crc32
rep: hex    # 进制:dec(default) and hex
可选择模式:
-
crc16 & hex
-
crc16 & dec
-
crc32 & hex
-
crc32 & dec
修改顶端的线条颜色
next主题顶端的线条颜色默认是黑色的,我看着不舒服就把它改成了粉色
效果图

实现方法
打开themes/next/source/css/_variables/base.styl,找到headband,修改为以下内容:
// Headband
// --------------------------------------------------
$headband-height                = 2px
$headband-bg                    = #e3cae4
去除文章下方分类于的下划线
打开themes/next/source/css/_common/scaffolding/base.styl,找到span.exturl,修改为以下内容:
a, span.exturl {
  word-wrap();
  // Remove the gray background color from active links in IE 10.
  background-color: transparent;
  color: #999999;
  text-decoration: none;
  outline: none;
  border-bottom: 0px solid $link-decoration-color;

左侧社交图标居中
强迫症的我居然发现了左侧社交图标似乎不太居中啊,一定得把它搞居中。
效果图

实现方法
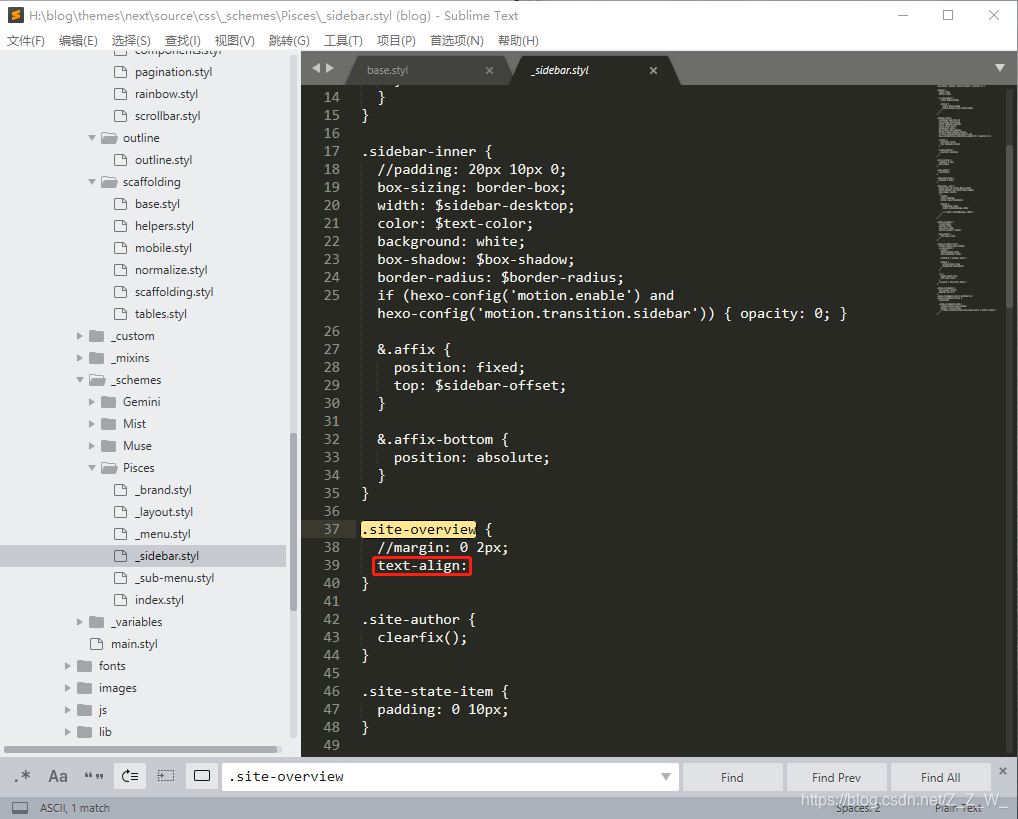
打开themes/next/source/css/_schemes/Pisces/_sidebar.styl,找到.site-overview,修改为以下内容:
.site-overview {
  //margin: 0 2px;
  text-align:
}
建立阅读排行榜
新建一个阅读排行榜界面,用于显示本站文章的阅读排行榜,基于lencloud进行统计
新建页面
hexo n page top 新建页面,生成 top 目录,编辑其中自动生成的 index.md 文件,将其中的代码替换如下:
<div id="top"></div>
<script src="https://cdn1.lncld.net/static/js/av-core-mini-0.6.4.js"></script>
<script>AV.initialize("leancloud_appid这里填入你的id", "leancloud_appkey这里填入你的key");</script>
<script type="text/javascript">
  var time=0
  var title=""
  var url=""
  var query = new AV.Query('Counter');
  query.notEqualTo('id',0);
  query.descending('time');
  query.limit(1000);
  query.find().then(function (todo) {
    for (var i=0;i<1000;i++){
      var result=todo[i].attributes;
      time=result.time;
      title=result.title;
      url=result.url;
      // var content="<a href='"+"https://hoxis.github.io"+url+"'>"+title+"</a>"+"<br>"+"<font color='#fff'>"+"阅读次数:"+time+"</font>"+"<br><br>";
      var content="<p>"+"<font color='#e20404'>"+"【热度"+time+"℃】"+":"+"<a href='"+"https://xiaoxiaoxiaoxiaolin.github.io"+url+"'>"+title+"</a>"+"</p>";
      document.getElementById("top").innerHTML+=content
    }
  }, function (error) {
    console.log("error");
  });
</script>
里面的leancloud_appid、leancloud_appkey 还有页面链接记得替换成你的。
编辑菜单
打开主题配置文件,添加top:
menu:
  home: / || home
  top: /top/ || signal
  categories: /categories/ || th
  tags: /tags/ || tags
  archives: /archives/ || archive
  about: /about/ || user
然后还需要对中文配置hexo/blog/themes/next/languages/zh-CN.yml进行修改,添加top对应的中文:
menu:
  home: 首页
  top: 热榜
  archives: 归档
  categories: 分类
  tags: 标签
  about: 关于
  search: 搜索
  schedule: 日程表
  sitemap: 站点地图
  commonweal: 公益 404
github分支管理博客
使用hexo发布博客最麻烦的地方在于,当你换了一台电脑后又想发布博客,又得把先前的环境重新搭建,拉取仓库。因为在github中的我们github.io项目是只有编译后的文件的,没有源文件的,也就是说,如果我们的电脑坏了,打不开了,我们的博客就不能进行更新了,所以我们要把我们的源文件也上传到github上。这个时候可以选择新建一个仓库来存放源文件,也可以把源文件 push 到 user.github.io 的其他分支。我选择了后者。
创建分支
创建两个分支:master 与 hexo,(这个hexo分支就是存放我们源文件的分支,我们只需要更新hexo分支上的内容据就好,master上的分支hexo编译的时候会更新的)
初始化仓库
然后我们再初始化仓库,重新对我们的代码进行版本控制
git init
git remote add origin <server>
<server>是指在线仓库的地址。origin是本地分支,remote add操作会将本地仓库映射到云端
将博客源文件上传到分支
.gitignore文件作用是声明不被git记录的文件,blog根目录下的.gitignore是hexo初始化带来的,可以先删除或者直接编辑,对hexo不会有影响。建议.gitignore内添加以下内容:
/.deploy_git
/public
/_config.yml
.deploy_git是hexo默认的.git配置文件夹,不需要同步
public内文件是根据source文件夹内容自动生成,不需要备份,不然每次改动内容太多
即使是私有仓库,除去在线服务商员工可以看到的风险外,还有云服务商被攻击造成泄漏等可能,所以不建议将配置文件传上去
依次执行
git add .
git commit -m "..."
git push origin hexo
更改标签云的颜色
打开/blog/themes/next/layout/page.swig,找到tagcloud,修改为以下内容:
{{ tagcloud({min_font: 13, max_font: 31, amount: 1000, color: true, start_color: '#9733EE', end_color: '#FF512F'}) }}
start_color和end_color的颜色你可以自己随意定义。
参考资料:
- 使用 Hexo 搭建 GitHub Page 博客(二)–使用 GitHub 分支保存 Hexo 环境和博文
- hexo 摸爬滚打之进阶教程
- GitHub–创建新的分支(转)
- 打造个性超赞博客 Hexo + NexT + GitHub Pages 的超深度优化
- hexo的next主题个性化教程:打造炫酷网站 | Moorez
- 4块钱,用Github+Hexo搭建你的个人博客:美化篇
还有一些参考的资料链接已经找不到了,所以就不一一列出了。第一次写,如有错误,欢迎指出,不胜感激。
