https://blog.csdn.net/BigData_Mining/article/details/88529157
第0章、前言
API Server作为Kubernetes网关,是访问和管理资源对象的唯一入口,其各种集群组件访问资源都需要经过网关才能进行正常访问和管理。每一次的访问请求都需要进行合法性的检验,其中包括身份验证、操作权限验证以及操作规范验证等,需要通过一系列验证通过之后才能访问或者存储数据到etcd当中。如下图:
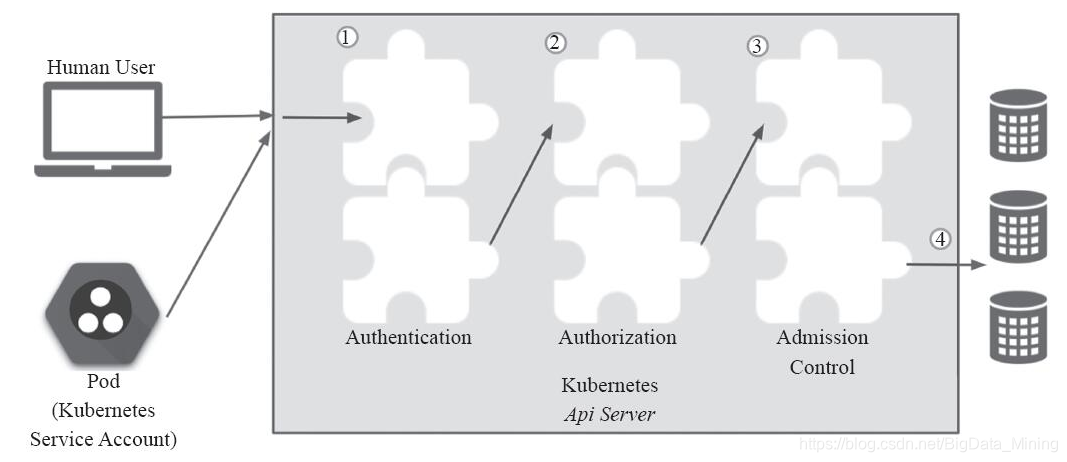
每一个用户对API资源进行操作都需要通经过以下三个步骤:
第一步:对客户端访问进行认证操作,确认是否具有访问k8s权限
    token(共享秘钥)
    SSL(双向SSL认证)
....通过任何一个认证即表示认证通过,进入下一步
第二步:授权检查,确认是否对资源具有相关的权限
    ABAC(基于属性的访问控制)
    RBAC(基于角色的访问控制)
    NODE(基于节点的访问控制)
    WEB HOOK(自定义HTTP回调方法的访问控制)
第三步:准入控制(对操作资源相关联的其他资源是否有权限操作)
Kubernetes只对以下的API请求属性进行检查:
user - username,uid
group - user group
"extra"- 额外信息
API - API资源的对象
Request path - 请求资源的路径(k8s使用resultful风格接口的API)
 http://Node_IPaddr:6443/apis/apps/v1/namespaces/namespaces_name/resource_name/
HTTP 请求动作 - HTTP verbs get,post,put,和delete用于非资源请求
HTTP 请求动作映射到 API资源操作-  get,list,create,update,patch,watch,proxy,redirect,delete,和deletecollection用于请求resource
Resource -被访问(仅用于resource 请求)的resource 的ID或名字- *对于使用resource 的请求get,update,patch,和delete,必须提供resource 名称。
Subresource - 正在访问的subresource (仅用于请求resource )
Namespace - 正在访问对象的命名空间(仅针对命名空间的请求资源)
API group - 正在访问的API组(仅用于请求资源)。空字符串指定核心API组。
Secret解决了密码、token、密钥等敏感数据的配置问题,而不需要把这些敏感数据暴露到镜像或者Pod Spec中。Secret可以以Volume或者环境变量的方式使用。
第一章、Secret
Secret有三种类型:
Opaque:base64编码格式的Secret,用来存储密码、密钥等;但数据也通过base64 –decode解码得到原始数据,所以加密性很弱。
kubernetes.io/dockerconfigjson:用来存储私有docker registry的认证信息。
kubernetes.io/service-account-token: 用于被serviceaccount引用。serviceaccout创建时Kubernetes会默认创建对应的secret。Pod如果使用了serviceaccount,对应的secret会自动挂载到Pod目录/run/secrets/ kubernetes.io/serviceaccount中。
Opaque Secret
Opaque类型的数据是一个map类型,要求value是base64编码格式:
$ echo -n "admin" | base64
YWRtaW4=
$ echo -n "1f2d1e2e67df" | base64
MWYyZDFlMmU2N2Rm


secrets.yml

apiVersion: v1
kind: Secret
metadata:
  name: mysecret
type: Opaque
data:
  password: MWYyZDFlMmU2N2Rm
  username: YWRtaW4=
创建secret:kubectl create -f secrets.yml。

# kubectl get secret
NAME                  TYPE                                  DATA      AGE
default-token-cty7p   kubernetes.io/service-account-token   3         45d
mysecret              Opaque                                2         7s
---------------------
注意:其中default-token-cty7p为创建集群时默认创建的secret,被serviceacount/default引用。
如果是从文件创建secret,则可以用更简单的kubectl命令,比如创建tls的secret:
 kubectl create secret generic helloworld-tls \
  --from-file=key.pem \
  --from-file=cert.pem
Opaque Secret的使用
创建好secret之后,有两种方式来使用它:
以Volume方式
以环境变量方式
以Volume方式挂载制定的key
将Secret挂载到Volume中
apiVersion: v1
kind: Pod
metadata:
  labels:
    name: db
  name: db
spec:
  volumes:
  - name: secrets
    secret:
      secretName: mysecret
  containers:
  - image: gcr.io/my_project_id/pg:v1
    name: db
    volumeMounts:
    - name: secrets
      mountPath: "/etc/secrets"
      readOnly: true
    ports:
    - name: cp
      containerPort: 5432
      hostPort: 5432
查看Pod中对应的信息:
# ls /etc/secrets
password  username
# cat  /etc/secrets/username
admin
# cat  /etc/secrets/password
1f2d1e2e67df
将Secret导出到环境变量中
apiVersion: extensions/v1beta1
kind: Deployment
metadata:
  name: wordpress-deployment
spec:
  replicas: 2
  strategy:
      type: RollingUpdate
  template:
    metadata:
      labels:
        app: wordpress
        visualize: "true"
    spec:
      containers:
      - name: "wordpress"
        image: "wordpress"
        ports:
        - containerPort: 80
        env:
        - name: WORDPRESS_DB_USER
          valueFrom:
            secretKeyRef:
              name: mysecret
              key: username
        - name: WORDPRESS_DB_PASSWORD
          valueFrom:
            secretKeyRef:
              name: mysecret
              key: password
将Secret挂载指定的key
apiVersion: v1
kind: Pod
metadata:
  labels:
    name: db
  name: db
spec:
  volumes:
  - name: secrets
    secret:
      secretName: mysecret
      items:
      - key: password
        mode: 511
        path: tst/psd
      - key: username
        mode: 511
        path: tst/usr
  containers:
  containers:
  - image: nginx
    name: db
    volumeMounts:
    - name: secrets
      mountPath: "/etc/secrets"
      readOnly: true
    ports:
    - name: cp
      containerPort: 80
      hostPort: 5432
创建Pod成功后,可以在对应的目录看到:
# kubectl exec db ls /etc/secrets/tst
psd
usr
kubernetes.io/dockerconfigjson
可以直接用kubectl命令来创建用于docker registry认证的secret:
$ kubectl create secret docker-registry myregistrykey
--docker-server=DOCKER_REGISTRY_SERVER
 --docker-username=DOCKER_USER
 --docker-password=DOCKER_PASSWORD
 --docker-email=DOCKER_EMAIL

secret "myregistrykey" created.
查看secret的内容:
# kubectl get secret myregistrykey  -o yaml
apiVersion: v1
data:
  .dockercfg: eyJjY3IuY2NzLnRlbmNlbnR5dW4uY29tL3RlbmNlbnR5dW4iOnsidXNlcm5hbWUiOiIzMzIxMzM3OTk0IiwicGFzc3dvcmQiOiIxMjM0NTYuY29tIiwiZW1haWwiOiIzMzIxMzM3OTk0QHFxLmNvbSIsImF1dGgiOiJNek15TVRNek56azVORG94TWpNME5UWXVZMjl0In19
kind: Secret
metadata:
  creationTimestamp: 2017-08-04T02:06:05Z
  name: myregistrykey
  namespace: default
  resourceVersion: "1374279324"
  selfLink: /api/v1/namespaces/default/secrets/myregistrykey
  uid: 78f6a423-78b9-11e7-a70a-525400bc11f0
type: kubernetes.io/dockercfg
也可以直接读取~/.dockercfg的内容来创建:
 kubectl create secret docker-registry myregistrykey \
  --from-file="~/.dockercfg"
在创建Pod的时候,通过imagePullSecrets来引用刚创建的myregistrykey:
apiVersion: v1
kind: Pod
metadata:
  name: foo
spec:
  containers:
    - name: foo
      image: janedoe/awesomeapp:v1
  imagePullSecrets:
    - name: myregistrykey
kubernetes.io/service-account-token
kubernetes.io/service-account-token: 用于被serviceaccount引用。serviceaccout创建时Kubernetes会默认创建对应的secret。Pod如果使用了serviceaccount,对应的secret会自动挂载到Pod的/run/secrets/kubernetes.io/serviceaccount目录中。
$ kubectl run nginx --image nginx
deployment "nginx" created
$ kubectl get pods
NAME                     READY     STATUS    RESTARTS   AGE
nginx-3137573019-md1u2   1/1       Running   0          13s
$ kubectl exec nginx-3137573019-md1u2 ls /run/secrets/kubernetes.io/serviceaccount
ca.crt
namespace
token
Secret与ConfigMap对比
相同点:
key/value的形式
属于某个特定的namespace
可以导出到环境变量
可以通过目录/文件形式挂载(支持挂载所有key和部分key)
不同点:
Secret可以被ServerAccount关联(使用)
Secret可以存储register的鉴权信息,用在ImagePullSecret参数中,用于拉取私有仓库的镜像
Secret支持Base64加密
Secret分为kubernetes.io/Service Account,kubernetes.io/dockerconfigjson,Opaque三种类型,Configmap不区分类型
Secret文件存储在tmpfs文件系统中,Pod删除后Secret文件也会对应的删除。
第二章、ServiceAccount
User Accounts 与 Service Accounts
Kubernetes区分普通帐户(user accounts)和服务帐户(service accounts)的原因:
-普通帐户是针对(人)用户的,服务账户针对Pod进程。
-普通帐户是全局性。在集群所有namespaces中,名称具有惟一性。
-通常,群集的普通帐户可以与企业数据库同步,新的普通帐户创建需要特殊权限。服务账户创建目的是更轻量化,允许集群用户为特定任务创建服务账户。
-普通帐户和服务账户的审核注意事项不同。
-对于复杂系统的配置包,可以包括对该系统的各种组件的服务账户的定义。
Token controller
TokenController作为controller-manager的一部分运行。异步行为:
-观察serviceAccount的创建,并创建一个相应的Secret 来允许API访问。
-观察serviceAccount的删除,并删除所有相应的ServiceAccountToken Secret
-观察secret 添加,并确保关联的ServiceAccount存在,并在需要时向secret 中添加一个Token。
-观察secret 删除,并在需要时对应 ServiceAccount 的关联
需要使用–service-account-private-key-file 参数选项将Service Account 密匙(key)文件传递给controller-manager中的Token controller。key用于 Service Account Token签名。同样,也需要使用–service-account-key-file 参数选项将相应的(public key)公匙传递给kube-apiserver ,公钥用于在认证期间验证Token。
Service Account Controller
Service Account Controller在namespaces里管理ServiceAccount,并确保每个有效的namespaces中都存在一个名为“default”的ServiceAccount。
什么是serviceaccount
Service Account 用来访问 kubernetes API,通过 kubernetes API 创建和管理,每个 account 只能在一个 namespace 上生效,存储在 kubernetes API 中的 Secrets 资源。kubernetes 会默认创建,并且会自动挂载到 Pod 中的 /run/secrets/kubernetes.io/serviceaccount 目录下。
Service account是为了方便Pod里面的进程调用Kubernetes API或其他外部服务而设计的。它与User account不同:
  1.User account是为人设计的,而service account则是为Pod中的进程调用Kubernetes API而设计;
  2.User account是跨namespace的,而service account则是仅局限它所在的namespace;
  3.每个namespace都会自动创建一个default service account
  4.Token controller检测service account的创建,并为它们创建secret
  5.开启ServiceAccount Admission Controller后
		1.每个Pod在创建后都会自动设置spec.serviceAccount为default(除非指定了其他ServiceAccout)
		2.验证Pod引用的service account已经存在,否则拒绝创建
		3.如果Pod没有指定ImagePullSecrets,则把service account的ImagePullSecrets加到Pod中
		4.每个container启动后都会挂载该service account的token和ca.crt到/var/run/secrets/kubernetes.io/serviceaccount/
当创建 pod 的时候,如果没有指定一个 service account,系统会自动在与该pod 相同的 namespace 下为其指派一个default service account。而pod和apiserver之间进行通信的账号,称为serviceAccountName。如下:
[root@k8s-master ~]# kubectl get pods
NAME                     READY     STATUS    RESTARTS   AGE
filebeat-ds-hxgdx        1/1       Running   1          34d
filebeat-ds-s466l        1/1       Running   2          34d
myapp-0                  1/1       Running   0          3h
myapp-1                  1/1       Running   0          3h
myapp-2                  1/1       Running   0          4h
myapp-3                  1/1       Running   0          4h
pod-vol-demo             2/2       Running   0          2d
redis-5b5d6fbbbd-q8ppz   1/1       Running   1          2d
[root@k8s-master ~]# kubectl get pods/myapp-0 -o yaml |grep "serviceAccountName"
 serviceAccountName: default
[root@k8s-master ~]# kubectl describe pods myapp-0
Name:               myapp-0
Namespace:          default
......
Volumes:
 ......
 default-token-j5pf5:
   Type:        Secret (a volume populated by a Secret)
   SecretName:  default-token-j5pf5
   Optional:    false
从上面可以看到每个Pod无论定义与否都会有个存储卷,这个存储卷为default-token-*** token令牌,这就是pod和serviceaccount认证信息。通过secret进行定义,由于认证信息属于敏感信息,所以需要保存在secret资源当中,并以存储卷的方式挂载到Pod当中。从而让Pod内运行的应用通过对应的secret中的信息来连接apiserver,并完成认证。每个 namespace 中都有一个默认的叫做 default 的 service account 资源。进行查看名称空间内的secret,也可以看到对应的default-token。让当前名称空间中所有的pod在连接apiserver时可以使用的预制认证信息,从而保证pod之间的通信。
验证:
[root@k8s-master01 ~]# kubectl create namespace qiangungun  #创建一个名称空间
namespace "qiangungun" created
[root@k8s-master01 ~]# kubectl get sa -n qiangungun  #名称空间创建完成后会自动创建一个sa
NAME      SECRETS   AGE
default   1         11s
[root@k8s-master01 ~]# kubectl get secret -n qiangungun  #同时也会自动创建一个secret
NAME                  TYPE                                  DATA      AGE
default-token-5jtz2   kubernetes.io/service-account-token   3         19s
在创建的名称空间中新建一个pod
[root@k8s-master01 pod-example]# cat pod_demo.yaml
kind: Pod
apiVersion: v1
metadata:
  name: task-pv-pod
  namespace: qiangungun
spec:
  containers:
  - name: nginx
    image: ikubernetes/myapp:v1
    ports:
     - containerPort: 80
       name: www
查看pod信息
[root@k8s-master01 pod-example]# kubectl apply -f  pod_demo.yaml
pod "task-pv-pod" created
[root@k8s-master01 pod-example]# kubectl get pod -n qiangungun
NAME          READY     STATUS    RESTARTS   AGE
task-pv-pod   1/1       Running   0          13s
[root@k8s-master01 pod-example]# kubectl get  pod task-pv-pod -o yaml   -n qiangungun
......
volumeMounts:
    - mountPath: /var/run/secrets/kubernetes.io/serviceaccount
      name: default-token-5jtz2
......
volumes:  #挂载sa的secret
  - name: default-token-5jtz2
    secret:
      defaultMode: 420
      secretName: default-token-5jtz2
#名称空间新建的pod如果不指定sa,会自动挂载当前名称空间中默认的sa(default)
而默认的service account 仅仅只能获取当前Pod自身的相关属性,无法观察到其他名称空间Pod的相关属性信息。如果想要扩展Pod,假设有一个Pod需要用于管理其他Pod或者是其他资源对象,是无法通过自身的名称空间的serviceaccount进行获取其他Pod的相关属性信息的,此时就需要进行手动创建一个serviceaccount,并在创建Pod时进行定义。那么serviceaccount该如何进行定义呢???实际上,service accout也属于一个k8s资源,如下查看service account的定义方式:
[root@k8s-master ~]# kubectl explain sa
KIND:     ServiceAccount
VERSION:  v1

DESCRIPTION:
     ServiceAccount binds together: * a name, understood by users, and perhaps
     by peripheral systems, for an identity * a principal that can be
     authenticated and authorized * a set of secrets

FIELDS:
   apiVersion    <string>
     APIVersion defines the versioned schema of this representation of an
     object. Servers should convert recognized schemas to the latest internal
     value, and may reject unrecognized values. More info:
     https://git.k8s.io/community/contributors/devel/api-conventions.md#resources

   automountServiceAccountToken    <boolean>
     AutomountServiceAccountToken indicates whether pods running as this service
     account should have an API token automatically mounted. Can be overridden
     at the pod level.

   imagePullSecrets    <[]Object>
     ImagePullSecrets is a list of references to secrets in the same namespace
     to use for pulling any images in pods that reference this ServiceAccount.
     ImagePullSecrets are distinct from Secrets because Secrets can be mounted
     in the pod, but ImagePullSecrets are only accessed by the kubelet. More
     info:
     https://kubernetes.io/docs/concepts/containers/images/#specifying-imagepullsecrets-on-a-pod

   kind    <string>
     Kind is a string value representing the REST resource this object
     represents. Servers may infer this from the endpoint the client submits
     requests to. Cannot be updated. In CamelCase. More info:
     https://git.k8s.io/community/contributors/devel/api-conventions.md#types-kinds

   metadata    <Object>
     Standard object's metadata. More info:
     https://git.k8s.io/community/contributors/devel/api-conventions.md#metadata

   secrets    <[]Object>
     Secrets is the list of secrets allowed to be used by pods running using
     this ServiceAccount. More info:
     https://kubernetes.io/docs/concepts/configuration/secret
创建serviceaccount(以下简称sa)
[root@k8s-master01 ~]#  kubectl create  serviceaccount admin   #创建一个sa 名称为admin
serviceaccount "admin" created
[root@k8s-master01 ~]# kubectl get sa
NAME      SECRETS   AGE
admin     1         6s
default   1         28d
[root@k8s-master01 ~]# kubectl describe sa admin   #查看名称为admin的sa的信息,系统会自动创建一个token信息
Name:                admin
Namespace:           default
Labels:              <none>
Annotations:         <none>
Image pull secrets:  <none>
Mountable secrets:   admin-token-rxtrc
Tokens:              admin-token-rxtrc
Events:              <none>
看到有一个 token 已经被自动创建,并被 service account 引用。设置非默认的 service account,只需要在 pod 的spec.serviceAccountName 字段中将name设置为您想要用的 service account 名字即可。在 pod 创建之初 service account 就必须已经存在,否则创建将被拒绝。需要注意的是不能更新已创建的 pod 的 service account。
---------------------
[root@k8s-master01 ~]# kubectl get secret  #会自动创建一个secret(admin-token-rxtrc),用于当前sa连接至当前API server时使用的认证信息
NAME                    TYPE                                  DATA      AGE
admin-token-rxtrc       kubernetes.io/service-account-token   3         1m
default-token-tcwjz     kubernetes.io/service-account-token   3         28d
myapp-ingress-secret    kubernetes.io/tls                     2         6h
mysql-passwd            Opaque                                1         17d
tomcat-ingress-secret   kubernetes.io/tls                     2         7h
创建一个pod应用刚刚创建的sa
[root@k8s-master01 service_account]# cat deploy-demon.yaml
apiVersion: v1
kind: Pod
metadata:
  name: sa-demo
  labels:
    app: myapp
    release: canary
spec:
  containers:
  - name: myapp
    image: ikubernetes/myapp:v2
    ports:
    - name: httpd
      containerPort: 80
  serviceAccountName: admin  #此处指令为指定sa的名称
[root@k8s-master01 service_account]# kubectl apply -f deploy-demon.yaml
pod "sa-demo" created
[root@k8s-master01 service_account]# kubectl describe pod sa-demo
......
Mounts:
      /var/run/secrets/kubernetes.io/serviceaccount from admin-token-rxtrc (ro) #pod会自动挂载自己sa的证书
......

  Volumes:
    admin-token-rxtrc:
      Type: Secret (a volume populated by a Secret)
      SecretName: admin-token-rxtrc

......
serviceaccount的自定义使用
这里在default名称空间创建了一个sa为admin,可以看到已经自动生成了一个Tokens:admin-token-7k5nr。
[root@k8s-master mainfests]# kubectl create serviceaccount admin
serviceaccount/admin created
[root@k8s-master mainfests]# kubectl get sa
NAME      SECRETS   AGE
admin     1         3s
default   1         50d
[root@k8s-master mainfests]# kubectl describe sa/admin
Name:                admin
Namespace:           default
Labels:              <none>
Annotations:         <none>
Image pull secrets:  <none>
Mountable secrets:   admin-token-7k5nr
Tokens:              admin-token-7k5nr
Events:              <none>
[root@k8s-master mainfests]# kubectl get secret
NAME                    TYPE                                  DATA      AGE
admin-token-7k5nr       kubernetes.io/service-account-token   3         31s
default-token-j5pf5     kubernetes.io/service-account-token   3         50d
mysecret                Opaque                                2         1d
tomcat-ingress-secret   kubernetes.io/tls                     2         10d
[root@k8s-master mainfests]# vim pod-sa-demo.yaml  #Pod中引用新建的serviceaccount
apiVersion: v1
kind: Pod
metadata:
  name: pod-sa-demo
  namespace: default
  labels:
    app: myapp
    tier: frontend
spec:
  containers:
  - name: myapp
    image: ikubernetes/myapp:v1
    ports:
    - name: http
      containerPort: 80
  serviceAccountName: admin
[root@k8s-master mainfests]# kubectl apply -f pod-sa-demo.yaml
pod/pod-sa-demo created
[root@k8s-master mainfests]# kubectl describe pods pod-sa-demo
......
Volumes:
  admin-token-7k5nr:
    Type:        Secret (a volume populated by a Secret)
    SecretName:  admin-token-7k5nr
    Optional:    false
......
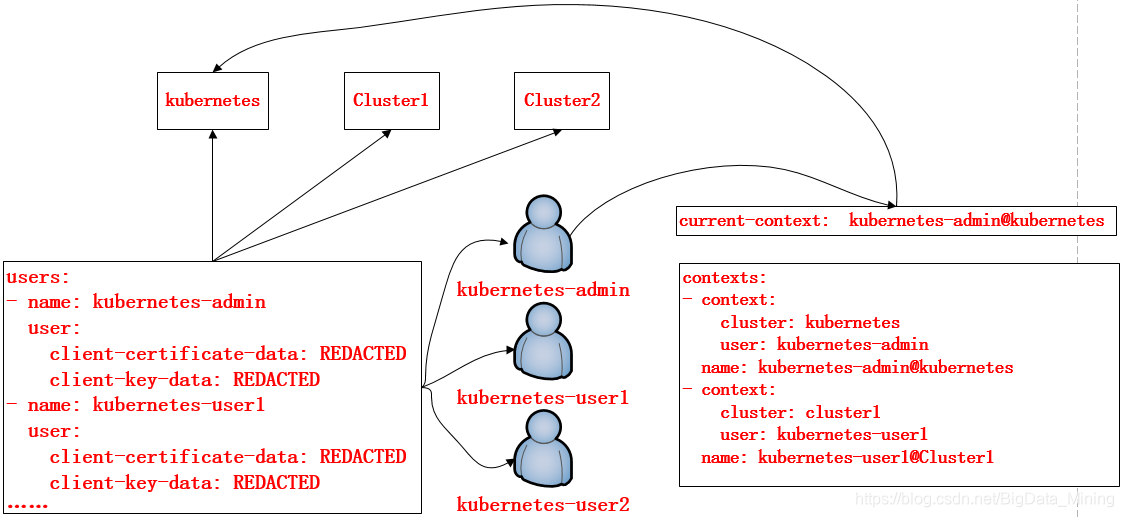
在K8S集群当中,每一个用户对资源的访问都是需要通过apiserver进行通信认证才能进行访问的,那么在此机制当中,对资源的访问可以是token,也可以是通过配置文件的方式进行保存和使用认证信息,可以通过kubectl config进行查看配置,如下:
在上面的配置文件当中,定义了集群、上下文以及用户。其中Config也是K8S的标准资源之一,在该配置文件当中定义了一个集群列表,指定的集群可以有多个;用户列表也可以有多个,指明集群中的用户;而在上下文列表当中,是进行定义可以使用哪个用户对哪个集群进行访问,以及当前使用的上下文是什么。如图:定义了用户kubernetes-admin可以对kubernetes该集群的访问,用户kubernetes-user1对Clluster1集群的访问:
集群交互的时候少不了的是身份认证,使用 kubeconfig(即证书) 和 token 两种认证方式是最简单也最通用的认证方式,下面我使用kubeconfing来进行认证。
使用kubeconfig文件来组织关于集群,用户,名称空间和身份验证机制的信息。使用 kubectl命令行工具对kubeconfig文件来查找选择群集并与群集的API服务器进行通信所需的信息。
默认情况下 kubectl使用的配置文件名称是在$HOME/.kube目录下 config文件,可以通过设置环境变量KUBECONFIG或者–kubeconfig指定其他的配置文件
查看系统的kubeconfig
[root@k8s-master01 ~]# kubectl config view
apiVersion: v1
clusters:   #集群列表
- cluster:
    certificate-authority-data: REDACTED  #认证集群的方式
    server: https://172.16.150.212:6443    #访问服务的APIserver的路径
  name: kubernetes #集群的名称
contexts: #上下文列表
- context:
    cluster: kubernetes  #访问kubernetes这个集群
    user: kubernetes-admin  #使用 kubernetes-admin账号
  name: kubernetes-admin@kubernetes #给定一个名称
current-context: kubernetes-admin@kubernetes #当前上下文,表示使用哪个账号访问哪个集群
kind: Config
preferences: {}
users:  #用户列表
- name: kubernetes-admin #用户名称
  user:
    client-certificate-data: REDACTED #客户端证书,用于与apiserver进行认证
    client-key-data: REDACTED #客户端私钥
[root@k8s-master01 ~]# kubectl get svc
NAME         TYPE        CLUSTER-IP       EXTERNAL-IP   PORT(S)             AGE
kubernetes   ClusterIP   10.96.0.1        <none>        443/TCP             29d
my-nginx     NodePort    10.104.13.148    <none>        80:32008/TCP        18h
myapp        ClusterIP   10.102.229.150   <none>        80/TCP              19h
tomcat       ClusterIP   10.106.222.72    <none>        8080/TCP,8009/TCP   19h
[root@k8s-master01 ~]# kubectl describe svc kubernetes
Name:              kubernetes
Namespace:         default
Labels:            component=apiserver
                   provider=kubernetes
Annotations:       <none>
Selector:          <none>
Type:              ClusterIP
IP:                10.96.0.1
Port:              https  443/TCP
TargetPort:        6443/TCP
Endpoints:         172.16.150.212:6443  #可以看到此处svc后端的Endpoint是当前节点的IP地址,通过svc的IP地址进行映射,以确保cluster中的pod可以通过该sa与集群内api进行通讯,仅仅是身份认证
Session Affinity:  ClientIP
Events:            <none>
查看kubeconfig命令行配置帮助
[root@k8s-master01 ~]# kubectl config --help
Modify kubeconfig files using subcommands like "kubectl config set current-context my-context"

The loading order follows these rules:

  1. If the --kubeconfig flag is set, then only that file is loaded.  The flag may only be set once
and no merging takes place.
  2. If $KUBECONFIG environment variable is set, then it is used a list of paths (normal path
delimitting rules for your system).  These paths are merged.  When a value is modified, it is
modified in the file that defines the stanza.  When a value is created, it is created in the first
file that exists.  If no files in the chain exist, then it creates the last file in the list.
  3. Otherwise, ${HOME}/.kube/config is used and no merging takes place.

Available Commands:
  current-context 显示 current_context
  delete-cluster  删除 kubeconfig 文件中指定的集群
  delete-context  删除 kubeconfig 文件中指定的 context
  get-clusters    显示 kubeconfig 文件中定义的集群
  get-contexts    描述一个或多个 contexts
  rename-context  Renames a context from the kubeconfig file.
  set             设置 kubeconfig 文件中的一个单个值
  set-cluster     设置 kubeconfig 文件中的一个集群条目
  set-context     设置 kubeconfig 文件中的一个 context 条目
  set-credentials 设置 kubeconfig 文件中的一个用户条目
  unset           取消设置 kubeconfig 文件中的一个单个值
  use-context     设置 kubeconfig 文件中的当前上下文
  view            显示合并的 kubeconfig 配置或一个指定的 kubeconfig 文件

Usage:
  kubectl config SUBCOMMAND [options]

Use "kubectl <command> --help" for more information about a given command.
Use "kubectl options" for a list of global command-line options (applies to all commands).
第三章、创建一个cluster用户及context
使用当前系统的ca证书认证一个私有证书
[root@k8s-master01 ~]# cd /etc/kubernetes/pki/
[root@k8s-master01 pki]# (umask 077;openssl genrsa -out qiangungun.key 2048)
Generating RSA private key, 2048 bit long modulus
.........................+++
..........................................................+++
e is 65537 (0x10001)
[root@k8s-master01 pki]# openssl req -new -key qiangungun.key -out qiangungun.csr -subj "/CN=qiangungun"  #qiangungun是后面我们创建的用户名称,需要保持一致
[root@k8s-master01 pki]# openssl x509 -req -in qiangungun.csr -CA ca.crt -CAkey ca.key -CAcreateserial -out qiangungun.crt -days 3650
Signature ok
subject=/CN=qiangungun
Getting CA Private Key
查看证书内容
[root@k8s-master01 pki]# openssl x509 -in qiangungun.crt -text -noout
Certificate:
    Data:
        Version: 1 (0x0)
        Serial Number:
            b6:06:cb:30:86:e3:fe:84
    Signature Algorithm: sha256WithRSAEncryption
        Issuer: CN=kubernetes  #由谁签署的
        Validity  #证书的有效时间
            Not Before: Nov 27 15:09:41 2018 GMT
            Not After : Nov 24 15:09:41 2028 GMT
        Subject: CN=qiangungun  #证书使用的用户
        Subject Public Key Info:
            Public Key Algorithm: rsaEncryption
                Public-Key: (2048
                 ......
创建一个当前集群用户
[root@k8s-master01 pki]#  kubectl config set-credentials qiangungun --client-certificate=./qiangungun.crt --client-key=./qiangungun.key --embed-certs=true
User "qiangungun" set.
[root@k8s-master01 pki]# kubectl config view
apiVersion: v1
clusters:
- cluster:
    certificate-authority-data: REDACTED
    server: https://172.16.150.212:6443
  name: kubernetes
contexts:
- context:
    cluster: kubernetes
    user: kubernetes-admin
  name: kubernetes-admin@kubernetes
current-context: kubernetes-admin@kubernetes
kind: Config
preferences: {}
users:
- name: kubernetes-admin
  user:
    client-certificate-data: REDACTED
    client-key-data: REDACTED
- name: qiangungun  #我们新建的用户
  user:
    client-certificate-data: REDACTED
    client-key-data: REDACTED
为qiangungun用户创建一个context
[root@k8s-master01 pki]# kubectl config set-context  qiangungun@kubernetes --cluster=kubernetes --user=qiangungun
Context "qiangungun@kubernetes" created.
[root@k8s-master01 pki]# kubectl config view
apiVersion: v1
clusters:
- cluster:
    certificate-authority-data: REDACTED
    server: https://172.16.150.212:6443
  name: kubernetes
contexts:
- context:
    cluster: kubernetes
    user: kubernetes-admin
  name: kubernetes-admin@kubernetes
- context:  #新创建的context
    cluster: kubernetes
    user: qiangungun
  name: qiangungun@kubernetes
current-context: kubernetes-admin@kubernetes
kind: Config
preferences: {}
users:
- name: kubernetes-admin
  user:
    client-certificate-data: REDACTED
    client-key-data: REDACTED- name: qiangungun
  user:
    client-certificate-data: REDACTED
    client-key-data: REDACTED
切换serviceaccount
[root@k8s-master01 pki]# kubectl config use-context qiangungun@kubernetes
Switched to context "qiangungun@kubernetes".
[root@k8s-master01 pki]# kubectl get pod
Error from server (Forbidden): pods is forbidden: User "qiangungun" cannot list pods in the namespace "default"
自定义一个cluster
[root@k8s-master01 pki]# kubectl config set-cluster  mycluster --kubeconfig=/tmp/test.conf --server="https://172.16.150.212:6443" --certificate-authority=/etc/kubernetes/pki/ca.crt --embed-certs=true
Cluster "mycluster" set.
[root@k8s-master01 pki]# kubectl config view --kubeconfig=/tmp/test.conf
apiVersion: v1
clusters:
- cluster:
    certificate-authority-data: REDACTED
    server: https://172.16.150.212:6443
  name: mycluster
contexts: []
current-context: ""
kind: Config
preferences: {}
users: []
第四章、 RBAC----基于角色的访问控制
Kubernetes的授权是基于插件形式的,其常用的授权插件有以下几种:Node(节点认证)
ABAC(基于属性的访问控制)
RBAC(基于角色的访问控制)
Webhook(基于http回调机制的访问控制)让一个用户(Users)扮演一个角色(Role),角色拥有权限,从而让用户拥有这样的权限,随后在授权机制当中,只需要将权限授予某个角色,此时用户将获取对应角色的权限,从而实现角色的访问控制。如图:

基于角色的访问控制(Role-Based Access Control, 即”RBAC”)使用”rbac.authorization.k8s.io” API Group实现授权决策,允许管理员通过Kubernetes API动态配置策略。
在k8s的授权机制当中,采用RBAC的方式进行授权,其工作逻辑是 把对对象的操作权限定义到一个角色当中,再将用户绑定到该角色,从而使用户得到对应角色的权限。此种方式仅作用于名称空间当中,这是什么意思呢?当User1绑定到Role角色当中,User1就获取了对该NamespaceA的操作权限,但是对NamespaceB是没有权限进行操作的,如get,list等操作。
另外,k8s为此还有一种集群级别的授权机制,就是定义一个集群角色(ClusterRole),对集群内的所有资源都有可操作的权限,从而将User2,User3通过ClusterRoleBinding到ClusterRole,从而使User2、User3拥有集群的操作权限。Role、RoleBinding、ClusterRole和ClusterRoleBinding的关系如下图:
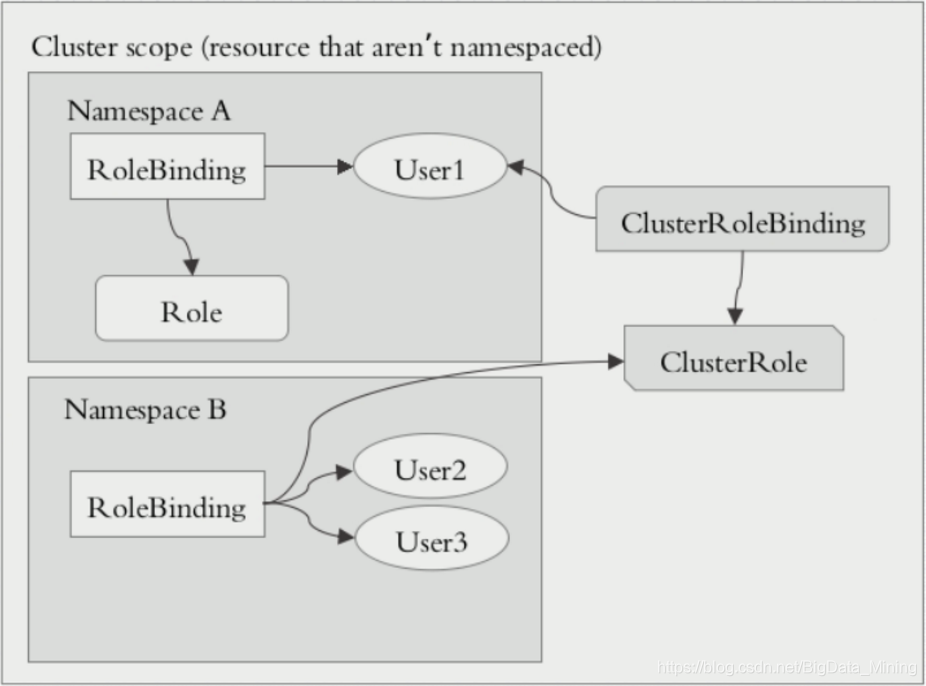
但是这里有2种绑定ClusterRoleBinding、RoleBinding。也可以使用RoleBinding去绑定ClusterRole。
当使用这种方式进行绑定时,用户仅能获取当前名称空间的所有权限。为什么这么绕呢??举例有10个名称空间,每个名称空间都需要一个管理员,而该管理员的权限都是一致的。那么此时需要去定义这样的管理员,使用RoleBinding就需要创建10个Role,这样显得更加繁重。为此当使用RoleBinding去绑定一个ClusterRole时,该User仅仅拥有对当前名称空间的集群操作权限,换句话说,此时只需要创建一个ClusterRole就解决了以上的需求。
这里要注意的是:RoleBinding仅仅对当前名称空间有对应的权限。
在RBAC API中,一个角色包含了一套表示一组权限的规则。 权限以纯粹的累加形式累积(没有”否定”的规则)。 角色可以由命名空间(namespace)内的Role对象定义,而整个Kubernetes集群范围内有效的角色则通过ClusterRole对象实现。
1、Kubernetes RBAC的演示
1、User --> Rolebinding --> Role
(1)角色的创建
一个Role对象只能用于授予对某一单一命名空间中资源的访问权限
复制代码
[root@k8s-master ~]# kubectl create role -h   #查看角色创建帮助
Create a role with single rule.

Examples:
  # Create a Role named "pod-reader" that allows user to perform "get", "watch" and "list" on pods
  kubectl create role pod-reader --verb=get --verb=list --verb=watch --resource=pods

  # Create a Role named "pod-reader" with ResourceName specified
  kubectl create role pod-reader --verb=get --resource=pods --resource-name=readablepod --resource-name=anotherpod

  # Create a Role named "foo" with API Group specified
  kubectl create role foo --verb=get,list,watch --resource=rs.extensions

  # Create a Role named "foo" with SubResource specified
  kubectl create role foo --verb=get,list,watch --resource=pods,pods/status

Options:
      --allow-missing-template-keys=true: If true, ignore any errors in templates when a field or map key is missing in
the template. Only applies to golang and jsonpath output formats.
      --dry-run=false: If true, only print the object that would be sent, without sending it.
  -o, --output='': Output format. One of:
json|yaml|name|go-template|go-template-file|templatefile|template|jsonpath|jsonpath-file.
      --resource=[]: Resource that the rule applies to
      --resource-name=[]: Resource in the white list that the rule applies to, repeat this flag for multiple items
      --save-config=false: If true, the configuration of current object will be saved in its annotation. Otherwise, the
annotation will be unchanged. This flag is useful when you want to perform kubectl apply on this object in the future.
      --template='': Template string or path to template file to use when -o=go-template, -o=go-template-file. The
template format is golang templates [http://golang.org/pkg/text/template/#pkg-overview].
      --validate=true: If true, use a schema to validate the input before sending it
      --verb=[]: Verb that applies to the resources contained in the rule

Usage:
  kubectl create role NAME --verb=verb --resource=resource.group/subresource [--resource-name=resourcename] [--dry-run]
[options]
使用kubectl create进行创建角色,指定角色名称,–verb指定权限,–resource指定资源或者资源组,–dry-run单跑模式并不会创建
Use "kubectl options" for a list of global command-line options (applies to all commands).

[root@k8s-master ~]# kubectl create role pods-reader --verb=get,list,watch --resource=pods --dry-run -o yaml #干跑模式查看role的定义

apiVersion: rbac.authorization.k8s.io/v1
kind: Role #资源类型
metadata:
  creationTimestamp: null
  name: pods-reader
rules:
- apiGroups:  #对那些api组内的资源进行操作
  - ""
  resources:  #对那些资源定义
  - pods
  verbs:      #操作权限定义
  - get
  - list
  - watch
[root@k8s-master ~]# cd mainfests/
[root@k8s-master mainfests]# kubectl create role pods-reader --verb=get,list,watch --resource=pods --dry-run -o yaml > role-demo.yaml

[root@k8s-master mainfests]# vim role-demo.yaml
apiVersion: rbac.authorization.k8s.io/v1
kind: Role
metadata:
  name: pods-reader
  namespace: default
rules:
- apiGroups:
  - ""  # 空字符串""表明使用core API group
  resources:
  - pods
  verbs:
  - get
  - list
  - watch
[root@k8s-master mainfests]# kubectl apply -f role-demo.yaml  #角色创建
role.rbac.authorization.k8s.io/pods-reader created
[root@k8s-master mainfests]# kubectl get role
NAME          AGE
pods-reader   3s
[root@k8s-master mainfests]# kubectl describe role pods-reader
Name:         pods-reader
Labels:       <none>
Annotations:  kubectl.kubernetes.io/last-applied-configuration={"apiVersion":"rbac.authorization.k8s.io/v1","kind":"Role","metadata":{"annotations":{},"name":"pods-reader","namespace":"default"},"rules":[{"apiGroup...
PolicyRule:
  Resources  Non-Resource URLs  Resource Names  Verbs
  ---------  -----------------  --------------  -----
  pods       []                 []              [get list watch]  #此处已经定义了pods-reader这个角色对pods资源拥有get、list、watch的权限
---------------------
(2)角色的绑定
RoleBinding可以引用在同一命名空间内定义的Role对象。
[root@k8s-master ~]# kubectl create rolebinding -h  #角色绑定创建帮助
Create a RoleBinding for a particular Role or ClusterRole.

Examples:
  # Create a RoleBinding for user1, user2, and group1 using the admin ClusterRole
  kubectl create rolebinding admin --clusterrole=admin --user=user1 --user=user2 --group=group1

Options:
      --allow-missing-template-keys=true: If true, ignore any errors in templates when a field or map key is missing in
the template. Only applies to golang and jsonpath output formats.
      --clusterrole='': ClusterRole this RoleBinding should reference
      --dry-run=false: If true, only print the object that would be sent, without sending it.
      --generator='rolebinding.rbac.authorization.k8s.io/v1alpha1': The name of the API generator to use.
      --group=[]: Groups to bind to the role
  -o, --output='': Output format. One of:
json|yaml|name|templatefile|template|go-template|go-template-file|jsonpath-file|jsonpath.
      --role='': Role this RoleBinding should reference
      --save-config=false: If true, the configuration of current object will be saved in its annotation. Otherwise, the
annotation will be unchanged. This flag is useful when you want to perform kubectl apply on this object in the future.
      --serviceaccount=[]: Service accounts to bind to the role, in the format <namespace>:<name>
      --template='': Template string or path to template file to use when -o=go-template, -o=go-template-file. The
template format is golang templates [http://golang.org/pkg/text/template/#pkg-overview].
      --validate=true: If true, use a schema to validate the input before sending it

Usage:
  kubectl create rolebinding NAME --clusterrole=NAME|--role=NAME [--user=username] [--group=groupname]
[--serviceaccount=namespace:serviceaccountname] [--dry-run] [options]
!
使用kubectl create进行创建角色绑定,指定角色绑定的名称,–role|–clusterrole指定绑定哪个角色,–user指定哪个用户
Use "kubectl options" for a list of global command-line options (applies to all commands).

[root@k8s-master mainfests]# kubectl create rolebinding magedu-read-pods --role=pods-reader --user=magedu --dry-run -o yaml > rolebinding-demo.yaml
[root@k8s-master mainfests]# cat rolebinding-demo.yaml
apiVersion: rbac.authorization.k8s.io/v1
kind: RoleBinding
metadata:
  creationTimestamp: null
  name: magedu-read-pods
roleRef:
  apiGroup: rbac.authorization.k8s.io
  kind: Role
  name: pods-reader
subjects:
- apiGroup: rbac.authorization.k8s.io
  kind: User
  name: magedu
[root@k8s-master mainfests]# kubectl apply -f rolebinding-demo.yaml  #创建角色绑定
rolebinding.rbac.authorization.k8s.io/magedu-read-pods created

[root@k8s-master mainfests]# kubectl describe rolebinding magedu-read-pods #查看角色绑定的信息,这里可以看到user:magedu绑定到了pods-reader这个角色上
Name:         magedu-read-pods
Labels:       <none>
Annotations:  kubectl.kubernetes.io/last-applied-configuration={"apiVersion":"rbac.authorization.k8s.io/v1","kind":"RoleBinding","metadata":{"annotations":{},"creationTimestamp":null,"name":"magedu-read-pods","name...
Role:
 Kind:  Role
 Name:  pods-reader
Subjects:
 Kind  Name    Namespace
 ----  ----    ---------
 User  magedu
 [root@k8s-master ~]# kubectl config use-context magedu@kubernetes #切换magedu这个用户,并使用get获取pods资源信息
Switched to context "magedu@kubernetes".
[root@k8s-master ~]# kubectl get pods
NAME                     READY     STATUS    RESTARTS   AGE
filebeat-ds-hxgdx        1/1       Running   1          36d
filebeat-ds-s466l        1/1       Running   2          36d
myapp-0                  1/1       Running   0          2d
myapp-1                  1/1       Running   0          2d
myapp-2                  1/1       Running   0          2d
myapp-3                  1/1       Running   0          2d
pod-sa-demo              1/1       Running   0          1d
pod-vol-demo             2/2       Running   0          3d
redis-5b5d6fbbbd-q8ppz   1/1       Running   1          4d
[root@k8s-master ~]# kubectl get pods -n ingress-nginx  #测试获取ingress-nginx这个名称空间的pods信息
No resources found.
Error from server (Forbidden): pods is forbidden: User "magedu" cannot list pods in the namespace "ingress-nginx"
从上面的操作,可以总结出,role的定义和绑定,仅作用于当前名称空间,在获取ingress-nginx名称空间时,一样会出现Forbidden!!!
2、User --> Clusterrolebinding --> Clusterrole
(1)clusterrole定义
ClusterRole对象可以授予与Role对象相同的权限,但由于它们属于集群范围对象, 也可以使用它们授予对以下几种资源的访问权限:
集群范围资源(例如节点,即node)
非资源类型endpoint(例如”/healthz”)
跨所有命名空间的命名空间范围资源(例如pod,需要运行命令kubectl get pods --all-namespaces来查询集群中所有的pod)
[root@k8s-master mainfests]# kubectl config use-context kubernetes-admin@kubernetes #切换到kubernetes-admin用户
Switched to context "kubernetes-admin@kubernetes".
[root@k8s-master mainfests]# kubectl create clusterrole cluster-read --verb=get,list,watch --resource=pods -o yaml > clusterrole-demo.yaml
[root@k8s-master mainfests]# vim clusterrole-demo.yaml #定义clusterrole和权限
apiVersion: rbac.authorization.k8s.io/v1
kind: ClusterRole
metadata:
name: cluster-read
rules:
- apiGroups:
- ""
resources:
- pods
verbs:
- get
- list
- watch
[root@k8s-master mainfests]# kubectl apply -f clusterrole-demo.yaml #创建clusterrole
clusterrole.rbac.authorization.k8s.io/cluster-read configured
这里我们需要切换回kubernetes-admin账户,是由于magedu账户不具备创建的权限,这也说明普通用户是无法进行创建K8S资源的,除非进行授权。如下,我们另开一个终端,将配置到一个普通用户ik8s上,使其使用magedu账户进行通信
[root@k8s-master ~]# useradd ik8s
[root@k8s-master ~]# cp -rp .kube/ /home/ik8s/
[root@k8s-master ~]# chown -R ik8s.ik8s /home/ik8s/
[root@k8s-master ~]# su - ik8s
[ik8s@k8s-master ~]$ kubectl config use-context magedu@kubernetes
Switched to context "magedu@kubernetes".
[ik8s@k8s-master ~]$ kubectl config view
apiVersion: v1
clusters:
- cluster:
    certificate-authority-data: REDACTED
    server: https://192.168.56.11:6443
  name: kubernetes
contexts:
- context:
    cluster: kubernetes
    user: kubernetes-admin
  name: kubernetes-admin@kubernetes
- context:
    cluster: kubernetes
    user: magedu
  name: magedu@kubernetes
current-context: magedu@kubernetes
kind: Config
preferences: {}
users:
- name: kubernetes-admin
  user:
    client-certificate-data: REDACTED
    client-key-data: REDACTED
- name: magedu
  user:
    client-certificate-data: REDACTED
    client-key-data: REDACTED
(2)clusterrolebinding定义
[root@k8s-master mainfests]# kubectl get rolebinding  #获取角色绑定信息
NAME               AGE
magedu-read-pods   1h
[root@k8s-master mainfests]# kubectl delete rolebinding magedu-read-pods #删除前面的绑定
rolebinding.rbac.authorization.k8s.io "magedu-read-pods" deleted

[ik8s@k8s-master ~]$ kubectl get pods  #删除后,在ik8s普通用户上进行获取pods资源信息,就立马出现forbidden了
No resources found.
Error from server (Forbidden): pods is forbidden: User "magedu" cannot list pods in the namespace "default"
[root@k8s-master mainfests]# kubectl create clusterrolebinding magedu-read-all-pods --clusterrole=cluster-read --user=magedu --dry-run -o yaml > clusterrolebinding-demo.yaml
[root@k8s-master mainfests]# vim clusterrolebinding-demo.yaml  #创建角色绑定,将magedu绑定到clusterrole:magedu-read-all-pods上
apiVersion: rbac.authorization.k8s.io/v1beta1
kind: ClusterRoleBinding
metadata:
  name: magedu-read-all-pods
roleRef:
  apiGroup: rbac.authorization.k8s.io
  kind: ClusterRole
  name: cluster-read
subjects:
- apiGroup: rbac.authorization.k8s.io
  kind: User
  name: magedu

[root@k8s-master mainfests]# kubectl get clusterrole
NAME                                                                   AGE
admin                                                                  52d
cluster-admin                                                          52d
cluster-read                                                           13m
......

[root@k8s-master mainfests]# kubectl apply -f clusterrolebinding-demo.yaml
clusterrolebinding.rbac.authorization.k8s.io/magedu-read-all-pods created
[root@k8s-master mainfests]# kubectl get clusterrolebinding
NAME                                                   AGE
......
magedu-read-all-pods                                   10s

[root@k8s-master mainfests]# kubectl describe clusterrolebinding magedu-read-all-pods
Name:         magedu-read-all-pods
Labels:       <none>
Annotations:  kubectl.kubernetes.io/last-applied-configuration={"apiVersion":"rbac.authorization.k8s.io/v1beta1","kind":"ClusterRoleBinding","metadata":{"annotations":{},"name":"magedu-read-all-pods","namespace":""...
Role:
  Kind:  ClusterRole
  Name:  cluster-read
Subjects:
  Kind  Name    Namespace
  ----  ----    ---------
  User  magedu
[ik8s@k8s-master ~]$ kubectl get pods  #角色绑定后在ik8s终端上进行获取pods信息,已经不会出现forbidden了
NAME                     READY     STATUS    RESTARTS   AGE
filebeat-ds-hxgdx        1/1       Running   1          36d
filebeat-ds-s466l        1/1       Running   2          36d
myapp-0                  1/1       Running   0          2d
myapp-1                  1/1       Running   0          2d
myapp-2                  1/1       Running   0          2d
myapp-3                  1/1       Running   0          2d
pod-sa-demo              1/1       Running   0          1d
pod-vol-demo             2/2       Running   0          4d
redis-5b5d6fbbbd-q8ppz   1/1       Running   1          4d
[ik8s@k8s-master ~]$ kubectl get pods -n ingress-nginx #更换名称空间进行查看也是可行的
NAME                                        READY     STATUS    RESTARTS   AGE
default-http-backend-7db7c45b69-nqxw9       1/1       Running   1          4d
nginx-ingress-controller-6bd7c597cb-9fzbw   1/1       Running   0          4d

[ik8s@k8s-master ~]$ kubectl delete pods pod-sa-demo  #但是进行删除pod就无法进行,因为在授权时是没有delete权限的
Error from server (Forbidden): pods "pod-sa-demo" is forbidden: User "magedu" cannot delete pods in the namespace "default"
从上面的实验,我们可以知道对用户magedu进行集群角色绑定,用户magedu将会获取对集群内所有资源的对应权限。
3、User --> Rolebinding --> Clusterrole
将maedu通过rolebinding到集群角色magedu-read-pods当中,此时,magedu仅作用于当前名称空间的所有pods资源的权限
[root@k8s-master mainfests]# kubectl delete clusterrolebinding magedu-read-all-pods
clusterrolebinding.rbac.authorization.k8s.io "magedu-read-all-pods" deleted

[root@k8s-master mainfests]# kubectl create rolebinding magedu-read-pods --clusterrole=cluster-read --user=magedu --dry-run -o yaml > rolebinding-clusterrole-demo.yaml
[root@k8s-master mainfests]# vim rolebinding-clusterrole-demo.yaml
apiVersion: rbac.authorization.k8s.io/v1
kind: RoleBinding
metadata:
  name: magedu-read-pods
  namespace: default
roleRef:
  apiGroup: rbac.authorization.k8s.io
  kind: ClusterRole
  name: cluster-read
subjects:
- apiGroup: rbac.authorization.k8s.io
  kind: User
  name: magedu

[root@k8s-master mainfests]# kubectl apply -f rolebinding-clusterrole-demo.yaml
rolebinding.rbac.authorization.k8s.io/magedu-read-pods created

[ik8s@k8s-master ~]$ kubectl get pods
NAME                     READY     STATUS    RESTARTS   AGE
filebeat-ds-hxgdx        1/1       Running   1          36d
filebeat-ds-s466l        1/1       Running   2          36d
myapp-0                  1/1       Running   0          2d
myapp-1                  1/1       Running   0          2d
myapp-2                  1/1       Running   0          2d
myapp-3                  1/1       Running   0          2d
pod-sa-demo              1/1       Running   0          1d
pod-vol-demo             2/2       Running   0          4d
redis-5b5d6fbbbd-q8ppz   1/1       Running   1          4d
[ik8s@k8s-master ~]$ kubectl get pods -n ingress-nginx
No resources found.
Error from server (Forbidden): pods is forbidden: User "magedu" cannot list pods in the namespace "ingress-nginx"
第五章、RBAC的三种授权访问
RBAC不仅仅可以对user进行访问权限的控制,还可以通过group和serviceaccount进行访问权限控制。当我们想对一组用户进行权限分配时,即可将这一组用户归并到一个组内,从而通过对group进行访问权限的分配,达到访问权限控制的效果。
从前面serviceaccount我们可以了解到,Pod可以通过 spec.serviceAccountName来定义其是以某个serviceaccount的身份进行运行,当我们通过RBAC对serviceaccount进行访问授权时,即可以实现Pod对其他资源的访问权限进行控制。也就是说,当我们对serviceaccount进行rolebinding或clusterrolebinding,会使创建Pod拥有对应角色的权限和apiserver进行通信。如图:

