1.Spring - IoC容器
1.1. IoC是什么?
在Spring介绍文档里是这样说的,
“. IoC is also known as dependency injection (DI). It is a process whereby objects define their dependencies (that is, the other objects they work with) only through constructor arguments, arguments to a factory method, or properties that are set on the object instance after it is constructed or returned from a factory method.The container then injects those dependencies when it creates the bean. ”
IoC一般被认为是dependency injection(DI),即依赖注入。这是对象仅通过构造函数,工厂方法或从工厂方法返回的实例对象上用set方法来定义这个对象的依赖项(对象工作所需要的其他类)的一个过程。这些过程会在Spring的IoC容器里执行,容器在创建bean时注入那些依赖项。
这个过程从根本上讲是通过使用类的直接构造机制来控制其依赖项的实例化的逆过程。
我觉得,把IoC当做是面向对象编程中的一种思想,而把DI当做是IoC的实现方式,这样来理解会更好点。Spring Framework的原理是基于IoC,而实现方式就是依赖注入。
1.2.IoC容器
Spring框架的IoC容器的基础是org.springframework.beans 和 org.springframework.context两个包。Spring提供了两种容器,BeanFactory和ApplicationContext,前者提供了配置框架和基本功能,后者则增加了更多企业级功能,是前者的一个子接口(扩展)
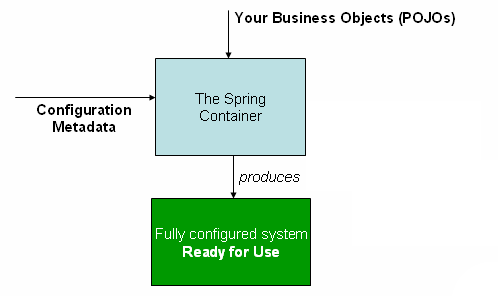
在Spring中,构成应用程序主干并由Spring IoC容器管理的对象称为bean。Bean是由Spring IoC容器实例化,组装和以其他方式管理的对象。否则,bean仅仅是应用程序中许多对象之一。Bean及其之间的依赖关系反映在容器使用的配置元数据中。
下图显示了Spring的工作原理的高级视图。应用程序类与配置元数据在Spring容器里结合一起,出来就是一个完全配置好的可以使用的系统或应用程序。
1.3.1.使用XML配置元数据
传统上,配置元数据以简单直观的XML格式提供。扩展:从Spring2.5引入了基于注释的配置元数据的支持,从Spring3.0开始可以使用java代替XML文件来定义应用程序类外部的bean。
XML配置元数据的基本结构:
1 <?xml version="1.0" encoding="UTF-8"?>
2 <beans    xmlns="http://www.springframework.org/schema/beans"
xmlns:xsi="http://www.w3.org/2001/XMLSchema-instance"
xsi:schemaLocation="http://www.springframework.org/schema/beans
http://www.springframework.org/schema/beans/spring-beans.xsd">
3
4 <bean id="..." class="...">
5  <!-- id 属性是标识bean 的key,class属性定义bean的类型,需要使用完全限定的类名 -->
6 </bean>
7
8 </beans>
配置bean的方法就是依赖注入,依赖注入可以分为两类:手动装配和自动装配。
手动装配主要是基于对象的构造函数和设置函数(setter方法)来手动进行对应的配置,如下
<?xml version="1.0" encoding="UTF-8"?>

<beans xmlns="http://www.springframework.org/schema/beans"

xmlns:p="http://www.springframework.org/schema/p"

xmlns:xsi="http://www.w3.org/2001/XMLSchema-instance"

xsi:schemaLocation="http://www.springframework.org/schema/beans

http://www.springframework.org/schema/beans/spring-beans-3.0.xsd">


<!-- -->


<!-- 基于设置函数的依赖注入  -->

   <bean id="..." class="...">

   <property name="message" value="Hello Spring!"/>

<property name="helloClass" ref="beanId"/>

<!-- property元素对应bean中的元素,name属性对应该元素的名称,value属性对应该元素的值,ref属性可以引用XML中已配置好的bean进行注入  -->

   </bean>


<!-- p命名空间,要想使用p命名空间需要在beans中定义p

xmlns:p=”http://www.springframework.org/schema/p”

使用p命名空间时,直接在bean里添加属性 p:propertyName=”value”,

比使用直接添加property标签的方法要更加简便

-->

<bean id="..." class="..."

p:propertyName=”value”

P:propertyName-ref=”beanId”>

<!-- -ref是引用声明,和之前的propertyName无关 ,propertyName 是属性名 ,beanId 是配置文件里的要引用的bean的id -->

</bean>


<!-- 基于构造函数的依赖注入 -->

<bean id="..." class="...">

<!-- 根据参数名称注入 -->

<constructor-arg name="..." value="..."></constructor-arg>

<constructor-arg name="..." ref="..."></constructor-arg>

<!-- 根据参数属性注入 -->

<constructor-arg type=”...” value="..."></constructor-arg>

<!-- 根据参数在构造函数中的顺序注入 -->

<constructor-arg index="..." value="..."></constructor-arg>

<constructor-arg index="..." value="..."></constructor-arg>


 </bean>


 <!-- 集合注入

一般有四种集合类型的配置元素,list、set、map和props

分别对应List、Set、Map和Properties类型结构

-->

 <beanid="Collection" class="...">

 <property name="myList">

 <list>

 <value>000</value>

 <value>001</value>

 <value>010</value>

 </list>

 </property>

 <property name="mySet">

 <list>

 <value>011</value>

 <value>100</value>

 <value>101</value>

 </list>

 </property>

 <property name="myMap">

 <map>

 <entry key="n0" value="110"/>

 <entry key="n1" value="111"/>

 <entry key="n2" value="000"/>

 </map>

 </property>

 <property name="myProps">

 <props>

 <prop key="m0">001</prop>

 <prop key="m1">010</prop>

 <prop key="m2">011</prop>

 </props>

 </property>

 </bean>


</beans>
除了以上基础的装配方法,spring还提供了自动装配的方法,自动装配会根据属性名称或类型去自动匹配bean中对应存在的bean,然后进行装配,比如有一个类如,
Class Example1{

Example2 ex2();

}
那么在xml中就可以这样配置,
<bean id="ex1" class="..." autowire="byName"></bean>

<bean id="ex2" class="..."> </bean>
spring就会根据ex1中存在的ex2(属性名)去匹配bean的id,然后把这个bean赋值给ex1.ex2 。
除了byName,autowire还有byType、constructor、autodetect等模式,byType会根据类(class)去匹配,constructor和byType很相似但是只会匹配构造函数里的参数,autodetect(自动检测)则会先使用constructor模式,如果匹配失败则使用byType去匹配注入。
1.3.2实例化容器
一般现在很少使用BeanFactory容器,大多都是使用ApplicationContext容器,只有在资源宝贵的移动设备或者基于 applet 的应用当中, BeanFactory 才会被优先选择。否则,一般使用的都是 ApplicationContext,除非你有更好的理由选择 BeanFactory。
下例使用DefaultListableBeanFactory和XmlBeanDefinitionReader实例化了BeanFactory容器,
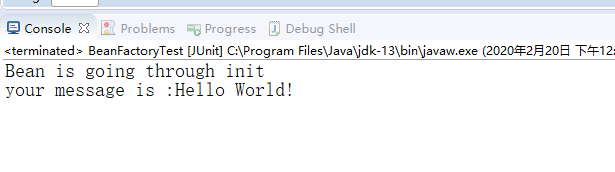
  <!-- hello world  xml配置-->

   <bean id="helloWorld" class="com.mine.myspring.HelloWorld" init-method="init" destroy-method="destroy">

    <!-- init-method/destroy-method 定义了初始化/销毁方法>

       <property name="message" value="Hello World!"/>

   </bean>
package com.mine.myspring;


public class HelloWorld {


private String message;


public String getMessage() {

System.out.println("your message is :"+message);

return message;

}


public void setMessage(String message) {

this.message = message;

}


public void init() {//初始化方法

System.out.println("Bean is going through init");

}


public void destroy() {//销毁方法

System.out.println("Bean will destroy now");

}


@Test

public void DefaultListableBeanFactoryTest() {

  DefaultListableBeanFactory factory = new DefaultListableBeanFactory();

  XmlBeanDefinitionReader reader = new XmlBeanDefinitionReader(factory);

  reader.loadBeanDefinitions("spring-ioc.xml");//读取xml元数据

  HelloWorld obj = (HelloWorld) factory.getBean("helloWorld");//使用getBean方法获取bean对象

  obj.getMessage();

}


}
输出结果:
ApplicationContext最常用的接口实现类有:
FileSystemXmlApplicationContext:该容器从 XML 文件中加载已被定义的 bean。在这里,你需要提供给构造器 XML 文件的完整路径
ClassPathXmlApplicationContext:该容器从 XML 文件中加载已被定义的 bean。在这里,你不需要提供 XML 文件的完整路径,只需正确配置 CLASSPATH 环境变量即可,因为,容器会从 CLASSPATH 中搜索 bean 配置文件。
两种实例化方法如下:
ApplicationContext context = new FileSystemXmlApplicationContext("G:\\workspace\\myspring\\src\\spring-ioc.xml");
ApplicationContext context = new ClassPathXmlApplicationContext("spring-ioc.xml");
1.3.3.使用容器
获取容器后,使用getBean方法获取配置文件里的bean的实例,这里简单说一下getBean的方法的几种类型
T getBean(String name, Class<T> requiredType),方法返回id为name,class为requiredType的bean,这个最精准
T getBean(String name),方法返回id为name的bean,这个最常用
T getBean(Class<T> requiredType),方法返回class为requiredType的bean
1.4扩展
一个XML文件还可以使用<import/>导入其它XML文件以此来构建一个完整的元数据配置文件,例如:
<beans>

<import resource="services.xml"/>

<import resource="resources/messageSource.xml"/>

<import resource="/resources/themeSource.xml"/>

<bean id="bean1" class="..."/>

<bean id="bean2" class="..."/>

</beans>