仅仅是整理的学习资料
【0】知识点罗列
1、输入映射和输出映射
a) 输入参数映射
b) 返回值映射
2、动态sql
a) If
b) Where
c) Foreach
d) Sql片段
3、关联查询
a) 一对一关联
b) 一对多关联
4、Mybatis整合spring
【1】 输入映射和输出映射
Mapper.xml映射文件中定义了操作数据库的sql,每个sql是一个statement,映射文件是mybatis的核心。
1.1 parameterType
1.输入映射(就是映射文件中可以传入哪些参数类型)
1) 基本类型
2) pojo类型
Mybatis使用ognl表达式解析对象字段的值,#{}或者${}括号中的值为pojo属性名称。
3) Vo类型(pojo包装类)
开发中通过pojo传递查询条件 ,查询条件是综合的查询条件,不仅包括用户查询条件还包括其它的查询条件(比如将用户购买商品信息也作为查询条件),这时可以使用包装对象传递输入参数。
Pojo类中包含pojo。需求:根据用户名查询用户信息,查询条件放到QueryVo的user属性中。
1.2 resultType
2.输出映射(返回的结果集可以有哪些类型)

1) 基本类型
2) pojo类型
3) List类型
【2】动态sql
动态sql:动态的拼接sql语句,因为sql中where条件有可能多也有可能少,通过mybatis提供的各种标签方法实现动态拼接sql。
1) where: 可以自动添加where关键字,还可以去掉第一个条件的and关键字
2) if: 判断传入的参数是否为空
3) foreach: 循环遍历传入的集合参数
4) sql: 封装查询条件,以达到重用的目的
2.1 if
注意要做不等于空字符串校验。
<!-- 传递pojo综合查询用户信息 -->
    <select id="findUserList" parameterType="user" resultType="user">
        select * from user
        where 1=1
        <if test="id!=null">
        and id=#{id}
        </if>
        <if test="username!=null and username!=''">
        and username like '%${username}%'
        </if>
    </select>
2.2 where
上边的sql也可以改为:
<select id="findUserList" parameterType="user" resultType="user">
        select * from user
        <!-- where标签作用:
                会自动向sql语句中添加where关键字
                会去掉第一个条件的and关键字 -->
        <where>
        <if test="id!=null and id!=''">
        and id=#{id}
        </if>
        <if test="username!=null and username!=''">
        and username like '%${username}%'
        </if>
        </where>
    </select>
<where />可以自动去掉第一个and。
2.3 foreach
向sql传递数组或List,mybatis使用foreach解析
需求
传入多个id查询用户信息,用下边sql实现:
SELECT * FROM USERS WHERE id IN (10,89,16)
操作
在pojo中定义list属性ids存储多个用户id,并添加getter/setter方法
public class QueryVo {
    private User user;
    //自定义用户扩展类
    private UserCustom userCustom;

    //传递多个用户ids
    private List<Integer> ids;
}
mapper.xml
<select id="findUserByIds" parameterType="cn.itheima.pojo.QueryVo" resultType="cn.itheima.pojo.User">
        select * from user

        select * from user
        <where>
            <if test="ids != null">
                <!--
                foreach:循环传入的集合参数
                collection:传入的集合的变量名称
                item:每次循环将循环出的数据放入这个变量中
                open:循环开始拼接的字符串
                close:循环结束拼接的字符串
                separator:循环中拼接的分隔符
                 -->
                <foreach collection="ids" item="id" open="id in (" close=")" separator=",">
                    #{id}
                </foreach>
            </if>
        </where>
    </select>
2.4 sql
Sql中可将重复的sql提取出来,使用时用include引用即可,最终达到sql重用的目的,如下:
<!-- 传递pojo综合查询用户信息 -->
    <select id="findUserList" parameterType="user" resultType="user">
        select * from user
        <where>
        <if test="id!=null and id!=''">
        and id=#{id}
        </if>
        <if test="username!=null and username!=''">
        and username like '%${username}%'
        </if>
        </where>
    </select>
将where条件抽取出来:
<!-- 封装sql条件,封装后可以重用.
    id:是这个sql条件的唯一标识 -->
<sql id="query_user_where">
    <where>
        <if test="id!=null and id!=''">
        and id=#{id}
        </if>
        <if test="username!=null and username!=''">
        and username like '%${username}%'
        </if>
    </where>
</sql>
使用include引用:
<select id="findUserList" parameterType="user" resultType="user">
        select * from user
        <include refid="query_user_where"/>
</select>
注意:如果引用其它mapper.xml的sql片段,则在引用时需要加上namespace,如下:
【3】关联查询
3.1 商品订单数据模型
3.2 数据库关联关系与java映射关系
在数据库中关联关系叫做一对多,多对一,多对多
java实体中的映射关系是单个对象映射关系,集合对象映射关系
3.3 一对一查询
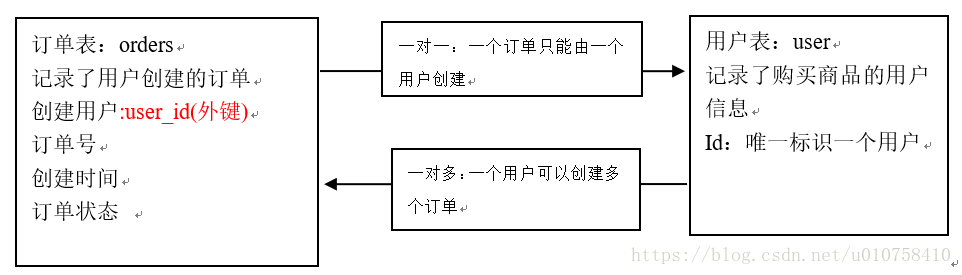
案例:查询所有订单信息,关联查询下单用户信息。
注意:因为一个订单信息只会是一个人下的订单,所以从查询订单信息出发关联查询用户信息为一对一查询(订单记录)。整体来讲订单与用户是多对一的关系。如果从用户信息出发查询用户下的订单信息则为一对多查询,因为一个用户可以下多个订单。
3.3.1 方式一:自动关联
自动关联(偷懒的办法):可以自定义一个大而全的pojo类,然后自动映射其实是根据数据库总的字段名称和
pojo中的属性名称对应.
使用resultType,定义订单信息po类,此po类中包括了订单信息和用户信息:
3.3.1.1 SQL语句
SELECT
  orders.*,
  user.username,
  userss.address
FROM
  orders,
  user
WHERE orders.user_id = user.id
3.3.1.2 定义po类
Po类中应该包括上边sql查询出来的所有字段,如下:
public class OrdersCustom extends Orders {

    private String username;// 用户名称
    private String address;// 用户地址
get/set。。。。
OrdersCustom类继承Orders类后OrdersCustom类包括了Orders类的所有字段,只需要定义用户的信息字段即可(在OrdersCustom中平铺User的属性字段即可)。
3.3.1.3 Mapper.xml
<!-- 查询所有订单信息 -->
    <select id="findOrdersList" resultType="cn.itcast.mybatis.po.OrdersCustom">
    SELECT
    orders.*,
    user.username,
    user.address
    FROM
    orders, user
    WHERE orders.user_id = user.id
    </select>
3.3.1.4 Mapper接口:
public List<OrdersCustom> findOrdersList() throws Exception;3.3.1.5 测试:
Public void testfindOrdersList()throws Exception{
        //获取session
        SqlSession session = sqlSessionFactory.openSession();
        //获限mapper接口实例
        UserMapper userMapper = session.getMapper(UserMapper.class);
        //查询订单信息
        List<OrdersCustom> list = userMapper.findOrdersList();
        System.out.println(list);
        //关闭session
        session.close();
    }
3.3.1.6 小结:
定义专门的po类作为输出类型,其中定义了sql查询结果集所有的字段。此方法较为简单,企业中使用普遍。
3.3.2 方式二:手动关联
手动关联::使用resultMap,定义专门的resultMap用于映射一对一查询结果。需要指定数据库中表的字段名称和java的pojo类中的属性名称的对应关系.
单个对象映射使用association标签
3.3.2.1 Sql语句:
SELECT
  orders.*,
  user.username,
  user.address
FROM
  orders,
  user
WHERE orders.user_id = user.id
3.3.2.2 定义po类
在Orders类中加入User属性,user属性中用于存储关联查询的用户信息,因为订单关联查询用户是一对一关系,所以这里使用单个User对象存储关联查询的用户信息。
import java.util.Date;

public class Orders {
    private Integer id;

    private Integer userId;

    private String number;

    private Date createtime;

    private String note;

    private User user;

    setter/getter...
3.3.2.3 Mapper.xml
<!-- 一对一:手动映射 -->
    <!--
    id:resultMap的唯一标识
    type:将查询出的数据放入这个指定的对象中
    注意:手动映射需要指定数据库中表的字段名与java中pojo类的属性名称的对应关系
     -->
    <resultMap type="cn.itheima.pojo.Orders" id="orderAndUserResultMap">
        <!-- id标签指定主键字段对应关系
        column:列,数据库中的字段名称
        property:属性,java中pojo中的属性名称
         -->
        <id column="id" property="id"/>

        <!-- result:标签指定非主键字段的对应关系 -->
        <result column="user_id" property="userId"/>
        <result column="number" property="number"/>
        <result column="createtime" property="createtime"/>
        <result column="note" property="note"/>

        <!-- 这个标签指定单个对象的对应关系
        property:指定将数据放入Orders中的user属性中
        javaType:user属性的类型
        -->
        <association property="user" javaType="cn.itheima.pojo.User">
            <id column="uid" property="id"/>
            <result column="username" property="username"/>
            <result column="birthday" property="birthday"/>
            <result column="sex" property="sex"/>
            <result column="address" property="address"/>
        </association>
    </resultMap>
    <select id="findOrdersAndUser2" resultMap="orderAndUserResultMap">
        select a.*, b.id uid, username, birthday, sex, address
        from orders a, user b
        where a.user_id = b.id
    </select>
这里resultMap指定orderUserResultMap。
association:表示进行关联查询单条记录
property:表示关联查询的结果存储在cn.itcast.mybatis.po.Orders的user属性中
javaType:表示关联查询的结果类型
<id property="id" column="user_id"/>:查询结果的user_id列对应关联对象的id属性,这里是表示user_id是关联查询对象的唯一标识。
<result property="username" column="username"/>:查询结果的username列对应关联对象的username属性。
3.3.2.4 Mapper接口:
public List<Orders> findOrdersListResultMap() throws Exception;3.3.2.5 测试:
Public void testfindOrdersListResultMap()throws Exception{
        //获取session
        SqlSession session = sqlSessionFactory.openSession();
        //获限mapper接口实例
        UserMapper userMapper = session.getMapper(UserMapper.class);
        //查询订单信息
        List<Orders> list = userMapper.findOrdersList2();
        System.out.println(list);
        //关闭session
        session.close();
    }
3.3.2.6 小结:
使用association完成关联查询,将关联查询信息映射到pojo对象中。
3.4 一对多查询
案例:查询所有用户信息及用户关联的订单信息。
用户信息和订单信息为一对多关系。
使用resultMap实现如下:
3.4.1 Sql语句:
SELECT
    u.*, o.id oid,
    o.number,
    o.createtime,
    o.note
FROM
    `user` u
LEFT JOIN orders o ON u.id = o.user_id
3.4.2 定义po类
在User类中加入List orders属性
import java.util.Date;
import java.util.List;

public class User {
    private int id;
    private String username;// 用户姓名
    private String sex;// 性别
    private Date birthday;// 生日
    private String address;// 地址

    private List<Orders> ordersList;
3.4.3 Mapper.xml
<resultMap type="cn.itheima.po.user" id="userOrderResultMap">
        <!-- 用户信息映射 -->
        <id property="id" column="id"/>
        <result property="username" column="username"/>
        <result property="birthday" column="birthday"/>
        <result property="sex" column="sex"/>
        <result property="address" column="address"/>

        <!-- 一对多关联映射 -->
        <!-- 指定对应的集合对象关系映射
        property:将数据放入User对象中的ordersList属性中
        ofType:指定ordersList属性的泛型类型
         -->
        <collection property="orders" ofType="cn.itheima.po.Orders">
            <id property="id" column="oid"/>
              <!--用户id已经在user对象中存在,此处可以不设置-->
            <!-- <result property="userId" column="id"/> -->
            <result property="number" column="number"/>
            <result property="createtime" column="createtime"/>
            <result property="note" column="note"/>
        </collection>
    </resultMap>
    <select id="getUserOrderList" resultMap="userOrderResultMap">
        SELECT
        u.*, o.id oid,
        o.number,
        o.createtime,
        o.note
        FROM
        `user` u
        LEFT JOIN orders o ON u.id = o.user_id
    </select>
collection部分定义了用户关联的订单信息。表示关联查询结果集
property=”orders”:关联查询的结果集存储在User对象的上哪个属性。
ofType=”orders”:指定关联查询的结果集中的对象类型即List中的对象类型。此处可以使用别名,也可以使用全限定名。
<id />及<result/>的意义同一对一查询。
3.4.4 Mapper接口
List<User> getUserOrderList();3.4.5 测试
private SqlSessionFactory factory;

    //作用:在测试方法前执行这个方法
    @Before
    public void setUp() throws Exception{
        String resource = "SqlMapConfig.xml";
        //通过流将核心配置文件读取进来
        InputStream inputStream = Resources.getResourceAsStream(resource);
        //通过核心配置文件输入流来创建会话工厂
        factory = new SqlSessionFactoryBuilder().build(inputStream);
    }

@Test
    public void getUserOrderList() {
        SqlSession session = sqlSessionFactory.openSession();
        UserMapper userMapper = session.getMapper(UserMapper.class);
        List<User> result = userMapper.getUserOrderList();
        for (User user : result) {
            System.out.println(user);
        }
        session.close();
    }
3.5 多表联合查询
如果是多表联合查询,可以在<collection />和<association />中继续嵌套<collection />或者<association />标签。
https://blog.csdn.net/sunrise_zhu/article/details/53310662
【4】 Mybatis整合spring
4.1 整合思路
1、SqlSessionFactory对象应该放到spring容器中作为单例存在。
2、传统dao的开发方式中,应该从spring容器中获得sqlsession对象。
3、Mapper代理形式中,应该从spring容器中直接获得mapper的代理对象。
4、数据库的连接以及数据库连接池事务管理都交给spring容器来完成。
4.2 整合需要的jar包
1、spring的jar包
2、Mybatis的jar包
3、Spring+mybatis的整合包。
4、Mysql的数据库驱动jar包。
5、数据库连接池的jar包。
4.3 整合的步骤
第一步:创建一个java工程。
第二步:导入jar包。(上面提到的jar包)
第三步:mybatis的配置文件sqlmapConfig.xml
第四步:编写Spring的配置文件
1、数据库连接及连接池
2、事务管理(暂时可以不配置)
3、sqlsessionFactory对象,配置到spring容器中
4、mapeer代理对象或者是dao实现类配置到spring容器中。
第五步:编写dao或者mapper文件
第六步:测试。
4.3.1 SqlMapConfig.xml
<?xml version="1.0" encoding="UTF-8" ?>
<!DOCTYPE configuration
PUBLIC "-//mybatis.org//DTD Config 3.0//EN"
"http://mybatis.org/dtd/mybatis-3-config.dtd">
<configuration>
    <typeAliases>
        <package name="cn.itcast.mybatis.pojo"/>
    </typeAliases>
    <mappers>
        <mapper resource="sqlmap/User.xml"/>
    </mappers>
</configuration>
4.3.2 applicationContext.xml
<?xml version="1.0" encoding="UTF-8"?>
<beans xmlns="http://www.springframework.org/schema/beans"
    xmlns:context="http://www.springframework.org/schema/context" xmlns:p="http://www.springframework.org/schema/p"
    xmlns:aop="http://www.springframework.org/schema/aop" xmlns:tx="http://www.springframework.org/schema/tx"
    xmlns:xsi="http://www.w3.org/2001/XMLSchema-instance"
    xsi:schemaLocation="http://www.springframework.org/schema/beans http://www.springframework.org/schema/beans/spring-beans-4.0.xsd
    http://www.springframework.org/schema/context http://www.springframework.org/schema/context/spring-context-4.0.xsd
    http://www.springframework.org/schema/aop http://www.springframework.org/schema/aop/spring-aop-4.0.xsd http://www.springframework.org/schema/tx http://www.springframework.org/schema/tx/spring-tx-4.0.xsd
    http://www.springframework.org/schema/util http://www.springframework.org/schema/util/spring-util-4.0.xsd">

    <!-- 加载配置文件 -->
    <context:property-placeholder location="classpath:db.properties" />
    <!-- 数据库连接池 -->
    <bean id="dataSource" class="org.apache.commons.dbcp.BasicDataSource"
        destroy-method="close">
        <property name="driverClassName" value="${jdbc.driver}" />
        <property name="url" value="${jdbc.url}" />
        <property name="username" value="${jdbc.username}" />
        <property name="password" value="${jdbc.password}" />
        <property name="maxActive" value="10" />
        <property name="maxIdle" value="5" />
    </bean>
    <!-- mapper配置 -->
    <!-- 让spring管理sqlsessionfactory 使用mybatis和spring整合包中的 -->
    <bean id="sqlSessionFactory" class="org.mybatis.spring.SqlSessionFactoryBean">
        <!-- 数据库连接池 -->
        <property name="dataSource" ref="dataSource" />
        <!-- 加载mybatis的全局配置文件 -->
        <property name="configLocation" value="classpath:mybatis/SqlMapConfig.xml" />
    </bean>

</beans>
4.3.3 db.properties
jdbc.driver=com.mysql.jdbc.Driver
jdbc.url=jdbc:mysql://localhost:3306/mybatis?characterEncoding=utf-8
jdbc.username=root
jdbc.password=root
4.4 Dao的开发
三种dao的实现方式:
1、传统dao的开发方式
2、使用mapper代理形式开发方式
3、使用扫描包配置mapper代理。
4.4.1 传统dao的开发方式
接口+实现类来完成。需要dao实现类需要继承SqlsessionDaoSupport类
4.4.1.1 Dao实现类
public class UserDaoImpl extends SqlSessionDaoSupport implements UserDao {

    @Override
    public User findUserById(int id) throws Exception {
        SqlSession session = getSqlSession();
        User user = session.selectOne("test.findUserById", id);
        //不能关闭SqlSession,让spring容器来完成
        //session.close();
        return user;
    }

    @Override
    public void insertUser(User user) throws Exception {
        SqlSession session = getSqlSession();
        session.insert("test.insertUser", user);
        session.commit();
        //session.close();
    }

}
4.4.1.2 配置dao
把dao实现类配置到spring容器中
<!-- 配置UserDao实现类 -->
    <bean id="userDao" class="cn.itcast.dao.UserDaoImpl">
        <property name="sqlSessionFactory" ref="sqlSessionFactory"/>
    </bean>
4.4.1.3 测试方法
//初始化:
private ApplicationContext applicationContext;
@Before
public void setUp() throws Exception{
    String configLocation = "classpath:spring/ApplicationContext.xml";
    //初始化spring运行环境
    applicationContext = new ClassPathXmlApplicationContext(configLocation);
}

//测试:
@Test
public void testFindUserById() throws Exception {
    UserDao userDao = (UserDao) applicationContext.getBean("userDao");
    User user = userDao.findUserById(1);
    System.out.println(user);
}
4.4.2 Mapper代理形式开发dao
4.4.2.1 开发mapper接口
4.4.2.2 配置mapper代理
<!-- 配置mapper代理对象 -->
    <bean class="org.mybatis.spring.mapper.MapperFactoryBean">
        <property name="mapperInterface" value="cn.itcast.mybatis.mapper.UserMapper"/>
        <property name="sqlSessionFactory" ref="sqlSessionFactory"></property>
    </bean>
4.4.2.3 测试方法
public class UserMapperTest {

    private ApplicationContext applicationContext;
    @Before
    public void setUp() throws Exception {
        applicationContext = new ClassPathXmlApplicationContext("classpath:spring/applicationContext.xml");
    }

    @Test
    public void testGetUserById() {
        UserMapper userMapper = applicationContext.getBean(UserMapper.class);
        User user = userMapper.getUserById(1);
        System.out.println(user);
    }

}
4.4.3 扫描包形式配置mapper
在ApplicationContext.xml中配置
<!-- 使用扫描包的形式来创建mapper代理对象 -->
    <bean class="org.mybatis.spring.mapper.MapperScannerConfigurer">
        <property name="basePackage" value="cn.itcast.mybatis.mapper"></property>
    </bean>
每个mapper代理对象的id就是类名,首字母小写
如果在ApplicationContext.xml中配置了此项,就不需要在SqlMapConfig.xml中进行包扫面配置
<?xml version="1.0" encoding="UTF-8" ?>
<!DOCTYPE configuration
PUBLIC "-//mybatis.org//DTD Config 3.0//EN"
"http://mybatis.org/dtd/mybatis-3-config.dtd">
<configuration>


    <typeAliases>
        <!-- 定义单个pojo类别名
        type:类的全路劲名称
        alias:别名
         -->
<!--        <typeAlias type="cn.itheima.pojo.User" alias="user"/> -->

        <!-- 使用包扫描的方式批量定义别名
        定以后别名等于类名,不区分大小写,但是建议按照java命名规则来,首字母小写,以后每个单词的首字母大写
        -->
        <package name="cn.itheima.pojo"/>
    </typeAliases>

    <mappers>
        <mapper resource="User.xml"/>

        <!--
        使用class属性引入接口的全路径名称:
        使用规则:
            1. 接口的名称和映射文件名称除扩展名外要完全相同
            2. 接口和映射文件要放在同一个目录下
         -->
<!--        <mapper class="cn.itheima.mapper.UserMapper"/> -->

        <!-- 使用包扫描的方式批量引入Mapper接口
                使用规则:
                1. 接口的名称和映射文件名称除扩展名外要完全相同
                2. 接口和映射文件要放在同一个目录下
        -->
                <!-- 如果在ApplicationContext.xml中配置了此项,就不需要再此处进行配置 -->
<!--        <package name="cn.itheima.mapper"/> -->
    </mappers>
</configuration>
4.4.4 ApplicationContext.xml文件
<?xml version="1.0" encoding="UTF-8"?>
<beans xmlns="http://www.springframework.org/schema/beans"
    xmlns:context="http://www.springframework.org/schema/context" xmlns:p="http://www.springframework.org/schema/p"
    xmlns:aop="http://www.springframework.org/schema/aop" xmlns:tx="http://www.springframework.org/schema/tx"
    xmlns:xsi="http://www.w3.org/2001/XMLSchema-instance"
    xsi:schemaLocation="http://www.springframework.org/schema/beans http://www.springframework.org/schema/beans/spring-beans-4.0.xsd
    http://www.springframework.org/schema/context http://www.springframework.org/schema/context/spring-context-4.0.xsd
    http://www.springframework.org/schema/aop http://www.springframework.org/schema/aop/spring-aop-4.0.xsd http://www.springframework.org/schema/tx http://www.springframework.org/schema/tx/spring-tx-4.0.xsd
    http://www.springframework.org/schema/util http://www.springframework.org/schema/util/spring-util-4.0.xsd">

    <!-- 加载配置文件 -->
    <context:property-placeholder location="classpath:db.properties" />
    <!-- 数据库连接池 -->
    <bean id="dataSource" class="org.apache.commons.dbcp.BasicDataSource"
        destroy-method="close">
        <property name="driverClassName" value="${jdbc.driver}" />
        <property name="url" value="${jdbc.url}" />
        <property name="username" value="${jdbc.username}" />
        <property name="password" value="${jdbc.password}" />
        <property name="maxActive" value="10" />
        <property name="maxIdle" value="5" />
    </bean>

    <!-- 整合Sql会话工厂归spring管理 -->
    <bean id="sqlSessionFactory" class="org.mybatis.spring.SqlSessionFactoryBean">
        <!-- 指定mybatis核心配置文件 -->
        <property name="configLocation" value="classpath:SqlMapConfig.xml"></property>
        <!-- 指定会话工厂使用的数据源 -->
        <property name="dataSource" ref="dataSource"></property>
    </bean>

    <!--
        配置原生Dao实现
        注意:class必须指定Dao实现类的全路径名称
    -->
    <bean id="userDao" class="cn.itheima.dao.UserDaoImpl">
        <property name="sqlSessionFactory" ref="sqlSessionFactory"></property>
    </bean>

    <!-- Mapper接口代理实现 -->
<!--    <bean id="userMapper" class="org.mybatis.spring.mapper.MapperFactoryBean"> -->
        <!-- 配置mapper接口的全路径名称 -->
<!--        <property name="mapperInterface" value="cn.itheima.mapper.UserMapper"></property> -->
<!--        <property name="sqlSessionFactory" ref="sqlSessionFactory"></property> -->
<!--    </bean> -->

    <!-- 使用包扫描的方式批量引入Mapper
    扫描后引用的时候可以使用类名,首字母小写.
     -->
    <bean class="org.mybatis.spring.mapper.MapperScannerConfigurer">
        <!-- 指定要扫描的包的全路径名称,如果有多个包用英文状态下的逗号分隔 -->
        <property name="basePackage" value="cn.itheima.mapper"></property>
    </bean>
</beans>
总结
- 输入映射(就是映射文件中可以传入哪些参数类型)
1)基本类型
2)pojo类型
3)Vo类型 - 输出映射(返回的结果集可以有哪些类型)
1)基本类型
2)pojo类型
3)List类型 动态sql:动态的拼接sql语句,因为sql中where条件有可能多也有可能少
1)where:可以自动添加where关键字,还可以去掉第一个条件的and关键字
2)if:判断传入的参数是否为空
3)foreach:循环遍历传入的集合参数
4)sql:封装查询条件,以达到重用的目的对单个对象的映射关系:
1)自动关联(偷懒的办法):可以自定义一个大而全的pojo类,然后自动映射其实是根据数据库总的字段名称和
pojo中的属性名称对应.
2)手动关联: 需要指定数据库中表的字段名称和java的pojo类中的属性名称的对应关系.
使用association标签- 对集合对象的映射关系
只能使用手动映射:指定表中字段名称和pojo中属性名称的对应关系
使用collection标签 spring和mybatis整合
整合后会话工厂都归spring管理
1)原生Dao实现:
需要在spring配置文件中指定dao实现类
dao实现类需要继承SqlSessionDaoSupport超类
在dao实现类中不要手动关闭会话,不要自己提交事务.
2)Mapper接口代理实现:
在spring配置文件中可以使用包扫描的方式,一次性的将所有mapper加载逆向工程:自动生成Pojo类,还可以自动生成Mapper接口和映射文件
注意:生成的方式是追加而不是覆盖,所以不可以重复生成,重复生成的文件有问题.
如果想重复生成将原来生成的文件删除