很不错的库,把英文翻译成中文版,方便查看。
face-api.js
在tensorflow.js核心(tensorflow/tfjs-core)之上实现的浏览器和nodejs的JavaScript人脸识别API
点击我查看演示!
教程
- face-api.js — 在浏览器中使用tensorflow.js进行人脸识别的JavaScript API
- 使用face-api.js’MTCNN(多任务级联卷积神经网络)人脸检测器的实时JavaScript人脸跟踪和识别
- 实时摄像头人脸检测和表情识别 - 视频
- 使用JavaScript的简单人脸识别教程 - 视频
- 将face-api.js与Vue.js和Electron一起使用
- 为用户添加遮罩 - Gant Laborde和Jason一起学习
目录
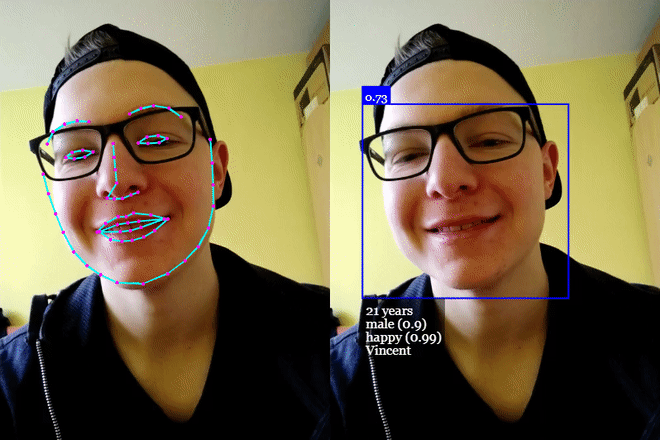
特点
人脸识别
人脸标记检测
人脸表情识别
年龄估计与性别识别
运行示例
克隆存储库:
git clone https://github.com/justadudewhohacks/face-api.js.git
运行浏览器示例
cd face-api.js/examples/examples-browser
npm i
npm start
浏览器打开 http://localhost:3000/.
运行Nodejs示例
cd face-api.js/examples/examples-nodejs
npm i
现在使用ts node运行以下示例之一:
ts-node faceDetection.ts
或者简单地编译和运行node:
tsc faceDetection.ts
node faceDetection.js
浏览器的face-api.js
只需包含 dist/face-api.js中的最新脚本。
或者通过npm安装:
npm i face-api.js
Nodejs的face-api.js
我们可以在nodejs环境中使用等价的API,方法是多填充一些浏览器细节,比如HTMLImageElement、htmlCanvaseElement和ImageData。最简单的方法是安装node canvas包。
或者,您可以简单地从图像数据构造自己的张量(tensors),并将张量(tensors)作为输入传递给API。
此外,您还需要安装@tensorflow/tfjs-node (不是必需,但强烈建议), 通过编译和绑定到本地的Tensorflow C++库,这大大加快了速度:
npm i face-api.js canvas @tensorflow/tfjs-node
现在,我们只需对环境进行修补即可使用polyfill:
// 将nodejs绑定导入到本机tensorflow,
// 不是必要,但会大大加快速度(需要python)
import '@tensorflow/tfjs-node';

// 为htmlcanvaseelement、HTMLImageElement、ImageData实现nodejs包装器
import * as canvas from 'canvas';

import * as faceapi from 'face-api.js';

// 修补nodejs环境,我们需要提供
// HTMLCanvasElement and HTMLImageElement
const { Canvas, Image, ImageData } = canvas
faceapi.env.monkeyPatch({ Canvas, Image, ImageData })
入门
加载模型
所有全局神经网络实例都通过faceapi.nets导出:
console.log(faceapi.nets)
// ageGenderNet
// faceExpressionNet
// faceLandmark68Net
// faceLandmark68TinyNet
// faceRecognitionNet
// ssdMobilenetv1
// tinyFaceDetector
// tinyYolov2
要加载模型,必须提供相应的manifest.json文件以及作为资源的模型权重文件(shard)。只需将它们复制到public或assets文件夹。模型的manifest.json和shard文件必须位于同一目录中/可以在同一路径下访问。
假设模型位于public/models中:
await faceapi.nets.ssdMobilenetv1.loadFromUri('/models')
// 相应的其它模型:
// await faceapi.nets.faceLandmark68Net.loadFromUri('/models')
// await faceapi.nets.faceRecognitionNet.loadFromUri('/models')
// ...
在nodejs环境中,您还可以直接从磁盘加载模型:
await faceapi.nets.ssdMobilenetv1.loadFromDisk('./models')
也可以从tf.namedSensorMap加载模型:
await faceapi.nets.ssdMobilenetv1.loadFromWeightMap(weightMap)
或者,也可以创建自己的神经网络实例:
const net = new faceapi.SsdMobilenetv1()
await net.loadFromUri('/models')
也可以将权重加载为Float32Array (如果你想使用未压缩的模型):
// 使用fetch
net.load(await faceapi.fetchNetWeights('/models/face_detection_model.weights'))

// 使用axios
const res = await axios.get('/models/face_detection_model.weights', { responseType: 'arraybuffer' })
const weights = new Float32Array(res.data)
net.load(weights)
高级API
在下面的input中可以是HTML img, video或canvas的元素,或是该元素的id。
<img id="myImg" src="images/example.png" />
<video id="myVideo" src="media/example.mp4" />
<canvas id="myCanvas" />
const input = document.getElementById('myImg')
// const input = document.getElementById('myVideo')
// const input = document.getElementById('myCanvas')
// 或是简单的:
// const input = 'myImg'
检测人脸
检测图像中的所有的人脸。 返回Array<FaceDetection>:
const detections = await faceapi.detectAllFaces(input)
检测图像中置信度最高的人脸。返回**FaceDetection | undefined**:
const detection = await faceapi.detectSingleFace(input)
默认情况下,detectAllFaces和detectSingleFace使用SSD Mobilenet V1 人脸检测。您可以通过传递相应的options对象来指定面部检测器:
const detections1 = await faceapi.detectAllFaces(input, new faceapi.SsdMobilenetv1Options())
const detections2 = await faceapi.detectAllFaces(input, new faceapi.TinyFaceDetectorOptions())
你可以调整每个人脸检测器的选项,如下所示。
检测68个人脸特征点
在人脸检测之后,我们还可以如下预测每个检测到的人脸的面部标记:
检测图像中的所有人脸 + 为每个检测到的人脸计算68个面部标记点。返回Array<WithFaceLandmarks<WithFaceDetection<{}>>>:
const detectionsWithLandmarks = await faceapi.detectAllFaces(input).withFaceLandmarks()
检测图像中置信度最高的人脸 + 计算该人脸的68个面部标记点。 返回**WithFaceLandmarks<WithFaceDetection<{}>> | undefined**:
const detectionWithLandmarks = await faceapi.detectSingleFace(input).withFaceLandmarks()
也可以指定使用微型模型而不是默认模型:
const useTinyModel = true
const detectionsWithLandmarks = await faceapi.detectAllFaces(input).withFaceLandmarks(useTinyModel)
计算人脸描述符
在人脸检测和面部标记预测之后,可以如下计算每个人脸的面部描述符:
检测图像中的所有人脸 + 为每个检测到的人脸计算68个点人脸标记和该人脸的面部描述符。 返回Array<WithFaceDescriptor<WithFaceLandmarks<WithFaceDetection<{}>>>>:
const results = await faceapi.detectAllFaces(input).withFaceLandmarks().withFaceDescriptors()
检测图像中置信度最高的人脸 + 计算68个点人脸标记和该人脸的面部描述符。返回**WithFaceDescriptor<WithFaceLandmarks<WithFaceDetection<{}>>> | undefined**:
const result = await faceapi.detectSingleFace(input).withFaceLandmarks().withFaceDescriptor()
识别面部表情
人脸表情识别可以对检测到的人脸执行如下操作:
检测图像中的所有人脸 + 识别每个人脸的面部表情。返回Array<WithFaceExpressions<WithFaceLandmarks<WithFaceDetection<{}>>>>:
const detectionsWithExpressions = await faceapi.detectAllFaces(input).withFaceLandmarks().withFaceExpressions()
检测图像中置信度最高的人脸 + 识别该人脸的表情。返回**WithFaceExpressions<WithFaceLandmarks<WithFaceDetection<{}>>> | undefined**:
const detectionWithExpressions = await faceapi.detectSingleFace(input).withFaceLandmarks().withFaceExpressions()
你还可以跳过.withFaceLandmarks(),它将跳过人脸对齐步骤(精度不太稳定):
检测所有未对齐的面 + 识别每个人脸的面部表情。返回Array<WithFaceExpressions<WithFaceDetection<{}>>>:
const detectionsWithExpressions = await faceapi.detectAllFaces(input).withFaceExpressions()
在没有人脸对齐的情况下检测置信度最高的人脸 + 识别该人脸的表情。返回**WithFaceExpressions<WithFaceDetection<{}>> | undefined**:
const detectionWithExpressions = await faceapi.detectSingleFace(input).withFaceExpressions()
年龄估计与性别识别
从检测到的人脸中进行年龄估计和性别识别的步骤如下:
检测图像中的所有人脸 + 估计每个人脸的年龄和性别。返回Array<WithAge<WithGender<WithFaceLandmarks<WithFaceDetection<{}>>>>>:
const detectionsWithAgeAndGender = await faceapi.detectAllFaces(input).withFaceLandmarks().withAgeAndGender()
检测图像中置信度最高的人脸 + 为该人脸估计年龄和识别性别。返回**WithAge<WithGender<WithFaceLandmarks<WithFaceDetection<{}>>>> | undefined**:
const detectionWithAgeAndGender = await faceapi.detectSingleFace(input).withFaceLandmarks().withAgeAndGender()
你也可以跳过.withFaceLandmarks(), 它将跳过人脸对齐步骤(精度不太稳定):
检测所有未对齐的面 + 估计每个人脸的年龄和性别。返回Array<WithAge<WithGender<WithFaceDetection<{}>>>>:
const detectionsWithAgeAndGender = await faceapi.detectAllFaces(input).withAgeAndGender()
在没有人脸对齐的情况下检测置信度最高的人脸 + 为该人脸估计年龄和识别性别。返回**WithAge<WithGender<WithFaceDetection<{}>>> | undefined**:
const detectionWithAgeAndGender = await faceapi.detectSingleFace(input).withAgeAndGender()
任务的构成
任务可以组成如下:
// 所有人脸
await faceapi.detectAllFaces(input)
await faceapi.detectAllFaces(input).withFaceExpressions()
await faceapi.detectAllFaces(input).withFaceLandmarks()
await faceapi.detectAllFaces(input).withFaceLandmarks().withFaceExpressions()
await faceapi.detectAllFaces(input).withFaceLandmarks().withFaceExpressions().withFaceDescriptors()
await faceapi.detectAllFaces(input).withFaceLandmarks().withAgeAndGender().withFaceDescriptors()
await faceapi.detectAllFaces(input).withFaceLandmarks().withFaceExpressions().withAgeAndGender().withFaceDescriptors()

// 单个人脸
await faceapi.detectSingleFace(input)
await faceapi.detectSingleFace(input).withFaceExpressions()
await faceapi.detectSingleFace(input).withFaceLandmarks()
await faceapi.detectSingleFace(input).withFaceLandmarks().withFaceExpressions()
await faceapi.detectSingleFace(input).withFaceLandmarks().withFaceExpressions().withFaceDescriptor()
await faceapi.detectSingleFace(input).withFaceLandmarks().withAgeAndGender().withFaceDescriptor()
await faceapi.detectSingleFace(input).withFaceLandmarks().withFaceExpressions().withAgeAndGender().withFaceDescriptor()
基于匹配描述符的人脸识别
要执行人脸识别,可以使用faceapi.FaceMatcher比较引用的人脸描述符来查询人脸描述符。
首先,我们使用参考数据初始化FaceMatcher,例如,我们可以简单地检测referenceImage中的人脸,并将检测到的人脸描述符与后续图像的人脸匹配:
const results = await faceapi
  .detectAllFaces(referenceImage)
  .withFaceLandmarks()
  .withFaceDescriptors()

if (!results.length) {
  return
}

// 根据参考图像的检测结果
// 创建自动分配标签的FaceMatcher
const faceMatcher = new faceapi.FaceMatcher(results)
现在我们可以识别queryImage1中的人物面部:
const singleResult = await faceapi
  .detectSingleFace(queryImage1)
  .withFaceLandmarks()
  .withFaceDescriptor()

if (singleResult) {
  const bestMatch = faceMatcher.findBestMatch(singleResult.descriptor)
  console.log(bestMatch.toString())
}
或者我们可以识别queryImage2中的所有人脸:
const results = await faceapi
  .detectAllFaces(queryImage2)
  .withFaceLandmarks()
  .withFaceDescriptors()

results.forEach(fd => {
  const bestMatch = faceMatcher.findBestMatch(fd.descriptor)
  console.log(bestMatch.toString())
})
您还可以创建标记的引用描述符,如下所示:
const labeledDescriptors = [
  new faceapi.LabeledFaceDescriptors(
    'obama',
    [descriptorObama1, descriptorObama2]
  ),
  new faceapi.LabeledFaceDescriptors(
    'trump',
    [descriptorTrump]
  )
]

const faceMatcher = new faceapi.FaceMatcher(labeledDescriptors)
显示检测结果
准备覆盖画布:
const displaySize = { width: input.width, height: input.height }
// resize the overlay canvas to the input dimensions
const canvas = document.getElementById('overlay')
faceapi.matchDimensions(canvas, displaySize)
face-api.js预定义了一些高级绘图功能,您可以利用这些功能:
/* 显示检测到的人脸边框 */
const detections = await faceapi.detectAllFaces(input)
// 如果显示的图像与原始图像的大小不同,调整检测框的大小
const resizedDetections = faceapi.resizeResults(detections, displaySize)
// 在画布上绘制检测
faceapi.draw.drawDetections(canvas, resizedDetections)

/* 显示脸部标记 */
const detectionsWithLandmarks = await faceapi
  .detectAllFaces(input)
  .withFaceLandmarks()
// 如果显示的图像与原始图像的大小不同,调整检测框和标记的大小
const resizedResults = faceapi.resizeResults(detectionsWithLandmarks, displaySize)
// 在画布上绘制检测
faceapi.draw.drawDetections(canvas, resizedResults)
// 把标记画到画布上
faceapi.draw.drawFaceLandmarks(canvas, resizedResults)


/* 显示面部表情结果 */
const detectionsWithExpressions = await faceapi
  .detectAllFaces(input)
  .withFaceLandmarks()
  .withFaceExpressions()
// 如果显示的图像与原始图像的大小不同,调整检测框和标记的大小
const resizedResults = faceapi.resizeResults(detectionsWithExpressions, displaySize)
// 在画布上绘制检测
faceapi.draw.drawDetections(canvas, resizedResults)
// 在画布中绘制一个文本框,以最小概率显示面部表达式
const minProbability = 0.05
faceapi.draw.drawFaceExpressions(canvas, resizedResults, minProbability)
也可以使用自定义文本绘制框 (DrawBox):
const box = { x: 50, y: 50, width: 100, height: 100 }
// 参见下面的Drawbox选项
const drawOptions = {
  label: 'Hello I am a box!',
  lineWidth: 2
}
const drawBox = new faceapi.draw.DrawBox(box, drawOptions)
drawBox.draw(document.getElementById('myCanvas'))
DrawBox绘图选项:
export interface IDrawBoxOptions {
  boxColor?: string
  lineWidth?: number
  drawLabelOptions?: IDrawTextFieldOptions
  label?: string
}
最后,您可以绘制自定义文本字段(DrawTextField):
const text = [
  'This is a textline!',
  'This is another textline!'
]
const anchor = { x: 200, y: 200 }
// see DrawTextField below
const drawOptions = {
  anchorPosition: 'TOP_LEFT',
  backgroundColor: 'rgba(0, 0, 0, 0.5)'
}
const drawBox = new faceapi.draw.DrawTextField(text, anchor, drawOptions)
drawBox.draw(document.getElementById('myCanvas'))
DrawTextField绘图选项:
export interface IDrawTextFieldOptions {
  anchorPosition?: AnchorPosition
  backgroundColor?: string
  fontColor?: string
  fontSize?: number
  fontStyle?: string
  padding?: number
}

export enum AnchorPosition {
  TOP_LEFT = 'TOP_LEFT',
  TOP_RIGHT = 'TOP_RIGHT',
  BOTTOM_LEFT = 'BOTTOM_LEFT',
  BOTTOM_RIGHT = 'BOTTOM_RIGHT'
}
人脸检测选项
SsdMobilenetv1Options
export interface ISsdMobilenetv1Options {
  // 最小置信阈值
  // 默认: 0.5
  minConfidence?: number

  // 返回的最大人脸数
  // 默认: 100
  maxResults?: number
}

// 例子
const options = new faceapi.SsdMobilenetv1Options({ minConfidence: 0.8 })
TinyFaceDetectorOptions
export interface ITinyFaceDetectorOptions {
  // 图像处理的大小,越小越快,
  // 但在检测较小的人脸时,精度较低,
  // 必须被32整除,常见的大小是128, 160, 224, 320, 416, 512, 608,
  // 对于通过网络摄像头进行面部跟踪,我建议使用较小的尺寸,
  // 例如128, 160, 对于检测较小的人脸,使用较大的尺寸,例如512, 608
  // 默认: 416
  inputSize?: number

  // 最小置信阈值
  // 默认: 0.5
  scoreThreshold?: number
}

// 例子
const options = new faceapi.TinyFaceDetectorOptions({ inputSize: 320 })
工具类
IBox
export interface IBox {
  x: number
  y: number
  width: number
  height: number
}
IFaceDetection
export interface IFaceDetection {
  score: number
  box: Box
}
IFaceLandmarks
export interface IFaceLandmarks {
  positions: Point[]
  shift: Point
}
WithFaceDetection
export type WithFaceDetection<TSource> = TSource & {
  detection: FaceDetection
}
WithFaceLandmarks
export type WithFaceLandmarks<TSource> = TSource & {
  unshiftedLandmarks: FaceLandmarks
  landmarks: FaceLandmarks
  alignedRect: FaceDetection
}
WithFaceDescriptor
export type WithFaceDescriptor<TSource> = TSource & {
  descriptor: Float32Array
}
WithFaceExpressions
export type WithFaceExpressions<TSource> = TSource & {
  expressions: FaceExpressions
}
WithAge
export type WithAge<TSource> = TSource & {
  age: number
}
WithGender
export type WithGender<TSource> = TSource & {
  gender: Gender
  genderProbability: number
}

export enum Gender {
  FEMALE = 'female',
  MALE = 'male'
}
其他有用的工具
使用低级API
您可以直接使用每个神经网络的正向方法,而不是使用高级API:
const detections1 = await faceapi.ssdMobilenetv1(input, options)
const detections2 = await faceapi.tinyFaceDetector(input, options)
const landmarks1 = await faceapi.detectFaceLandmarks(faceImage)
const landmarks2 = await faceapi.detectFaceLandmarksTiny(faceImage)
const descriptor = await faceapi.computeFaceDescriptor(alignedFaceImage)
为图像区域提取画布
const regionsToExtract = [
  new faceapi.Rect(0, 0, 100, 100)
]
// 实际上,提取面脸是指从边界框中提取面部区域
// 但你也可以用它来提取任何其他区域
const canvases = await faceapi.extractFaces(input, regionsToExtract)
欧几里得距离
// 用于计算两个面部描述符之间的欧几里德距离的元素
const dist = faceapi.euclideanDistance([0, 0], [0, 10])
console.log(dist) // 10
检索面部特征点和轮廓
const landmarkPositions = landmarks.positions

// 或者得到各个轮廓的位置,
// 仅适用于68点面部标记(FaceLandmarks68)
const jawOutline = landmarks.getJawOutline()
const nose = landmarks.getNose()
const mouth = landmarks.getMouth()
const leftEye = landmarks.getLeftEye()
const rightEye = landmarks.getRightEye()
const leftEyeBbrow = landmarks.getLeftEyeBrow()
const rightEyeBrow = landmarks.getRightEyeBrow()
从URL获取和显示图像
<img id="myImg" src="">
const image = await faceapi.fetchImage('/images/example.png')

console.log(image instanceof HTMLImageElement) // true

// 显示获取的图像内容
const myImg = document.getElementById('myImg')
myImg.src = image.src
获取JSON
const json = await faceapi.fetchJson('/files/example.json')
创建图像选取器
<img id="myImg" src="">
<input id="myFileUpload" type="file" onchange="uploadImage()" accept=".jpg, .jpeg, .png">
async function uploadImage() {
  const imgFile = document.getElementById('myFileUpload').files[0]
  // 从Blob创建HTMLImageElement
  const img = await faceapi.bufferToImage(imgFile)
  document.getElementById('myImg').src = img.src
}
从图像或视频元素创建画布元素
<img id="myImg" src="images/example.png" />
<video id="myVideo" src="media/example.mp4" />
const canvas1 = faceapi.createCanvasFromMedia(document.getElementById('myImg'))
const canvas2 = faceapi.createCanvasFromMedia(document.getElementById('myVideo'))
可用模型
人脸检测模型
SSD Mobilenet V1
对于人脸检测,本项目实现了一个基于MobileNetV1的SSD(单点多盒检测器Single Shot Multibox Detector)。神经网络将计算图像中每个人脸的位置,并返回边界框以及每个人脸的概率。该人脸检测器的目标是在检测人脸边界盒时获得较高的精度,而不是较低的推理时间。量化模型的大小约为5.4 MB(ssd_mobilenetv1_model)。
人脸检测模型在[WIDERFACE dataset](http://mmlab.ie.cuhk.edu.hk/projects/WIDERFACE/)上进行了训练,权重由[this](https://github.com/yeephycho)repo中的[yeephycho]提供(https://github.com/yeephycho/tensorflow-face-detection)。
微型人脸检测器
微型人脸检测仪是一种性能非常好的实时人脸检测器,与SSD Mobilenet V1人脸检测仪相比,它的速度更快、体积更小、资源消耗更少,相反,它在检测小人脸方面的性能稍差。该模型具有极佳的移动性和Web友好性,因此它应成为您在移动设备和资源受限的客户端上的GO-TO人脸检测器。量化模型的大小只有190kb(tiny_face_detector_model)。
人脸检测器已在约14K图像的自定义数据集上训练,该数据集带有边框。 此外,该模型已经过训练,可以预测完全覆盖面部特征点的边界框,因此与SSD Mobilenet V1相比,与随后的面部界标检测相结合,通常可以产生更好的结果。
该模型基本上是Tiny Yolo V2的甚至更细小的版本,用深度可分离的卷积代替了Yolo的常规卷积。 Yolo是完全卷积的,因此可以轻松地适应不同的输入图像大小,以牺牲性能(推理时间)的准确性。
68点人脸标记检测模型
该软件包实现了非常轻巧、快速,但准确的68点面部标记检测器。 默认模型的大小仅为350kb(** face_landmark_68_model ),微型模型的大小仅为80kb( face_landmark_68_tiny_model **)。 两种模型都采用了深度可分离卷积以及紧密连接的块的思想。 这些模型已经在约有35,000张面部图像的数据集上进行了训练,这些数据用68个面部标点标记。
人脸识别模型
对于面部识别,实现了类似于ResNet-34的体系结构,以从任何给定的面部图像计算面部描述符(具有128个值的特征向量),该描述符用于描述人脸的特征。 该模型“不限于”用于训练的一组面部,这意味着您可以将其用于任何人(例如您自己)的面部识别。 您可以通过比较两个人脸的面部描述符来确定两个人脸的相似性,例如通过计算欧式距离或使用您选择的任何其他分类器。
神经网络等效于face-recognition.js中使用的FaceRecognizerNet和dlib人脸识别示例中使用的网络。 权重已通过davisking进行了训练,该模型在LFW(野外被标记的脸Labeled Faces in the Wild)基准上的脸部识别上达到了99.38%的预测准确性。
量化模型的大小约为6.2 MB (face_recognition_model).
人脸表情识别模型
面部表情识别模型轻巧,快速,并提供合理的准确性。 该模型的大小约为310kb,采用深度可分离卷积和密集连接的块。 它已经过公开数据集上的各种图像以及从网络上抓取的图像的培训。 注意,戴眼镜可能会降低预测结果的准确性。
年龄和性别识别模型
年龄和性别识别模型是一个多任务网络,它使用特征提取层,年龄回归层和性别分类器。 该模型的大小约为420kb,特征提取器采用了与Xception非常细微但非常相似的体系结构。
该模型已在以下数据库中经过训练和测试,每个数据库分别进行80/20的训练/测试划分:UTK,FGNET,Chalearn,Wiki,IMDB *,CACD *,MegaAge,MegaAge-Asian。 *表示这些数据库已通过算法清除,因为初始数据库非常嘈杂。
总的测试结果
总的平均年龄误差MAE(Mean Age Error):4.54
总的性别准确率:95%*
每个数据库的测试结果
“-”表示这些数据库没有可用的性别标签。
| Database | UTK | FGNET | Chalearn | Wiki | IMDB* | CACD* | MegaAge | MegaAge-Asian |
|---|---|---|---|---|---|---|---|---|
| MAE | 5.25 | 4.23 | 6.24 | 6.54 | 3.63 | 3.20 | 6.23 | 4.21 |
| Gender Accuracy | 0.93 | - | 0.94 | 0.95 | - | 0.97 | - | - |
不同年龄组的测试结果
| Age Range | 0 - 3 | 4 - 8 | 9 - 18 | 19 - 28 | 29 - 40 | 41 - 60 | 60 - 80 | 80+ |
|---|---|---|---|---|---|---|---|---|
| MAE | 1.52 | 3.06 | 4.82 | 4.99 | 5.43 | 4.94 | 6.17 | 9.91 |
| Gender Accuracy | 0.69 | 0.80 | 0.88 | 0.96 | 0.97 | 0.97 | 0.96 | 0.9 |
