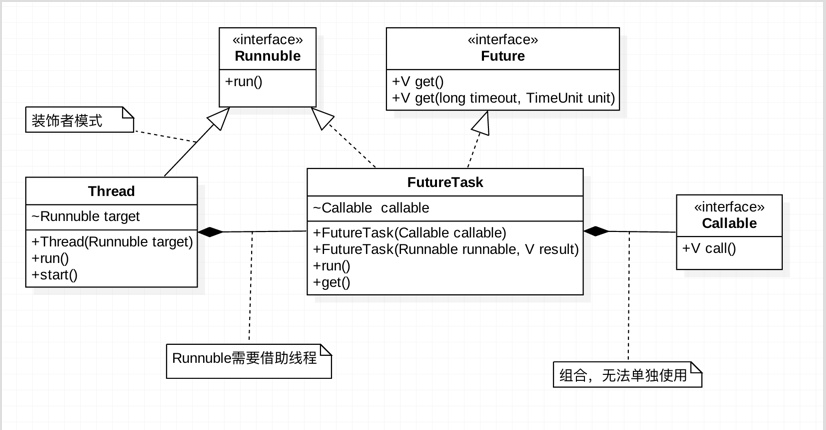
在Java中,开启一个线程的唯一方式是,是通过Thread的start()方法,并且在线程中执行的Runnable的run()方法。
先看下Thread的部分源码
public class Thread implements Runnable {
	Runnable target;

	public Thread(Runnable runnable) {
		target = Runnable;
		//省略其他初始化线程的任务
	}

	public void start() {
		 nativeCreate(this, stackSize, daemon);//native方法开启多线程,并调用run方法
	}

	public void run() {
	    if (target != null) {
	        target.run();
	    }
	}
}
1. 实例化Runnable接口
public interface Runnable {
    public abstract void run();
}
public class ThreadClient {
public static void main(String[] args) {
Thread thread = new Thread(new RunnaleImpl());
thread.start();
}
static class RunnaleImpl implements Runnable {
@Override
public void run() {
String threadName = Thread.currentThread().getName();
System.out.println(threadName + " is running");
}
}
}Thread-0 is running2. 继承Thread类
public class ThreadClient {

    public static void main(String[] args) {
        Thread thread = new ThreadImpl();
        thread.start();
    }

    static class ThreadImpl extends Thread {
        @Override
        public void run() {
            String threadName = Thread.currentThread().getName();
            System.out.println(threadName + " is running");
        }
    }
}
Thread-0 is running重点:启动线程,必须通过调用start()方法,不能直接调用run()方法。start()方法会调用native的方法,利用操作系统给线程分配资源。
通过下面的示例代码可以看出,直接调用run()方法,线程还是主线程。
public class ThreadClient {

    public static void main(String[] args) {
        Thread thread = new ThreadImpl();
        thread.run();
    }

    static class ThreadImpl extends Thread {
        @Override
        public void run() {
            String threadName = Thread.currentThread().getName();
            System.out.println(threadName + " is running");
        }
    }
}
main is running3. 使用Callable和Future
在JDK1.5后增加了Callable接口,用来实现线程的方式。
call()函数返回的类型就是创建Callable传进来的V类型。
/**
 * A task that returns a result and may throw an exception.
 * Implementors define a single method with no arguments called
 * {@code call}.
 *
 * <p>The {@code Callable} interface is similar to {@link
 * java.lang.Runnable}, in that both are designed for classes whose
 * instances are potentially executed by another thread.  A
 * {@code Runnable}, however, does not return a result and cannot
 * throw a checked exception.
 *
 * <p>The {@link Executors} class contains utility methods to
 * convert from other common forms to {@code Callable} classes.
 *
 * @see Executor
 * @since 1.5
 * @author Doug Lea
 * @param <V> the result type of method {@code call}
 */
@FunctionalInterface
public interface Callable<V> {
    /**
     * Computes a result, or throws an exception if unable to do so.
     *
     * @return computed result
     * @throws Exception if unable to compute a result
     */
    V call() throws Exception;
}
下面看下FutureTask的源码
public class FutureTask<V> implements RunnableFuture<V> {
    public void run() {
        if (state != NEW ||
            !U.compareAndSwapObject(this, RUNNER, null, Thread.currentThread()))
            return;
        try {
            Callable<V> c = callable;
            if (c != null && state == NEW) {
                V result;
                boolean ran;
                try {
                    result = c.call();
                    ran = true;
                } catch (Throwable ex) {
                    result = null;
                    ran = false;
                    setException(ex);
                }
                if (ran)
                    set(result);
            }
        } finally {
            // runner must be non-null until state is settled to
            // prevent concurrent calls to run()
            runner = null;
            // state must be re-read after nulling runner to prevent
            // leaked interrupts
            int s = state;
            if (s >= INTERRUPTING)
                handlePossibleCancellationInterrupt(s);
        }
    }
}
创建Thread需要Runnable对象,所以要使用Callable,需要通过FutureTask来创建。FutureTask会在run()方法中调用Callable的call()方法。
public class ThreadClient {

    public static void main(String[] args) {

        Callable callable = new Callable() {
            @Override
            public Object call() throws Exception {
                String threadName = Thread.currentThread().getName();
                System.out.println(threadName + " is running");
                return threadName + " is finish";
            }
        };

        FutureTask future = new FutureTask(callable);
        Thread thread = new Thread(future);
        thread.start();

        try {
            System.out.println((String)future.get());
        } catch (InterruptedException e) {
            e.printStackTrace();
        } catch (ExecutionException e) {
            e.printStackTrace();
        }
    }
}
通过get方法来获取结果,get()是个阻塞方法,直到结果返回,或者中断发生。还可以通过get(long timeout, TimeUnit unit)方法控制等待结果的最大时间。
创建FutureTask,还可以通过Runnable对象,系统会转换成Callable对象。
public class ThreadClient {

    /**
     * Creates a {@code FutureTask} that will, upon running, execute the
     * given {@code Runnable}, and arrange that {@code get} will return the
     * given result on successful completion.
     *
     * @param runnable the runnable task
     * @param result the result to return on successful completion. If
     * you don't need a particular result, consider using
     * constructions of the form:
     * {@code Future<?> f = new FutureTask<Void>(runnable, null)}
     * @throws NullPointerException if the runnable is null
     */
    public FutureTask(Runnable runnable, V result) {
        this.callable = Executors.callable(runnable, result);
        this.state = NEW;       // ensure visibility of callable
    }
}
4. 可以配合Executor来生成线程
public class ThreadClient {

    public static void main(String[] args) {

        Callable callable = new Callable() {
            @Override
            public Object call() throws Exception {
                String threadName = Thread.currentThread().getName();
                System.out.println(threadName + " is running");
                return threadName + " is finish";
            }
        };

        ExecutorService executor = Executors.newCachedThreadPool();
        Future future = executor.submit(callable);
        executor.shutdown();

        try {
            System.out.println((String)future.get());
        } catch (InterruptedException e) {
            e.printStackTrace();
        } catch (ExecutionException e) {
            e.printStackTrace();
        }
    }
}
Callable使用场景示例
多线程下载文件时,需要等每个线程下载的文件片下载完毕后,最终合成一个文件。这时就可以使用Callable来处理,减少对每个线程的监听。
public class DownloadTest {

    public static void main(String[] args) throws Exception {

        long start = System.currentTimeMillis();

        ExecutorService executor = Executors.newCachedThreadPool();

        DownloadCallable callable1 = new DownloadCallable("file_part1");
        DownloadCallable callable2 = new DownloadCallable("file_part2");

        Future future1 = executor.submit(callable1);
        Future future2 = executor.submit(callable2);

        // 所有线程都提交后,要关闭,即停止,不再接受线程任务
        executor.shutdown();

        // get()方法是线程阻塞的,会一直等待直到线程执行完。
        // 但isDone()不是,isDone()是瞬间状态,当方法执行时,判断线程是否执行完。
        if ((Boolean)future1.get() && (Boolean)future2.get()) {
            long stop = System.currentTimeMillis();
            System.out.println("all file finish download time " + (stop - start));
        }
    }
}

class DownloadCallable implements Callable {

    String fileName;
    public DownloadCallable(String name) {
        this.fileName = name;
    }
    @Override
    public Object call() throws Exception {
        System.out.println("start download " + fileName);
        long start = System.currentTimeMillis();
        Thread.sleep(new Random().nextInt(1000));
        long stop = System.currentTimeMillis();
        System.out.println("finish download " + fileName + " time " + (stop - start));
        return true;
    }
}
start download file_part1
start download file_part2
finish download file_part2 time 190
finish download file_part1 time 295
all file finish download time 304