所用到的有:eclipse+maven+testng+log4j+Excel
在这里将以登录163邮箱后新建联系人作为例子
框架搭建步骤:
1、新建maven工程,在pom.xml文件中导入项目需要的jar包,需要导入的有 selenium-java,testng,log4j,poi和poi-ooxml。最后两个是用于操作Excel的
2、在工程中新建4个Package,分别命名为:
cn.appModules:存放业务逻辑的封装方法
cn.pageObjects:存放页面元素
cn.testCase:存放测试用例
cn.util:存放工具类
3.在工程根目录下新建一个log4j.xml文件存放log4j的配置信息,一个objectMap.properties文件存放页面元素定位方式和定位表达式
pom.xml文件的内容如下:
<project xmlns="http://maven.apache.org/POM/4.0.0" xmlns:xsi="http://www.w3.org/2001/XMLSchema-instance"
  xsi:schemaLocation="http://maven.apache.org/POM/4.0.0 http://maven.apache.org/xsd/maven-4.0.0.xsd">
  <modelVersion>4.0.0</modelVersion>

  <groupId>Selenium</groupId>
  <artifactId>DataFrameWork</artifactId>
  <version>0.0.1-SNAPSHOT</version>
  <packaging>jar</packaging>

  <name>DataFrameWork</name>
  <url>http://maven.apache.org</url>

  <properties>
    <project.build.sourceEncoding>UTF-8</project.build.sourceEncoding>
  </properties>

  <dependencies>
    <dependency>
      <groupId>junit</groupId>
      <artifactId>junit</artifactId>
      <version>3.8.1</version>
      <scope>test</scope>
    </dependency>

    <!-- https://mvnrepository.com/artifact/org.seleniumhq.selenium/selenium-java -->
        <dependency>
            <groupId>org.seleniumhq.selenium</groupId>
            <artifactId>selenium-java</artifactId>
            <version>2.53.1</version>
        </dependency>


        <!-- https://mvnrepository.com/artifact/org.testng/testng -->
        <dependency>
            <groupId>org.testng</groupId>
            <artifactId>testng</artifactId>
            <version>6.9.9</version>
            <scope>test</scope>
        </dependency>

        <!-- https://mvnrepository.com/artifact/log4j/log4j -->
        <dependency>
            <groupId>log4j</groupId>
            <artifactId>log4j</artifactId>
            <version>1.2.17</version>
        </dependency>

        <!-- https://mvnrepository.com/artifact/org.apache.poi/poi -->
        <dependency>
            <groupId>org.apache.poi</groupId>
               <artifactId>poi</artifactId>
            <version>3.17</version>
        </dependency>

        <!-- https://mvnrepository.com/artifact/org.apache.poi/poi-ooxml -->
        <dependency>
            <groupId>org.apache.poi</groupId>
            <artifactId>poi-ooxml</artifactId>
            <version>3.17</version>
        </dependency>

  </dependencies>
</project>
一、首先实现log4j打印日志功能
log4j.xml文件内容如下:
<?xml version="1.0" encoding="UTF-8"?>
<!DOCTYPE log4j:configuration SYSTEM "log4j.dtd">
<log4j:configuration xmlns:log4j="http://jakarta.apache.org/log4j/" >

    <!-- 日志输出到控制台 -->
    <appender name="console" class="org.apache.log4j.ConsoleAppender">
        <!-- 日志输出格式 -->
        <layout class="org.apache.log4j.PatternLayout">
            <param name="ConversionPattern" value="%d %-5p [%c{1}]  %m %n"/>
        </layout>
    </appender>

    <!--定义了log4j将日志信息打印到日志文件,每天生成一个log文件-->
    <appender name="fileAppender" class="org.apache.log4j.DailyRollingFileAppender">

        <!-- 定义日志信息级别为 info -->
        <param name="Threshold" value="INFO"/>

        <!-- 定义日志文件名为logs.log,日志文件与xml文件在同一文件夹下,若不存在则自动创建 -->
        <param name="File" value="logs/log4j.log"/>

        <layout class="org.apache.log4j.PatternLayout">
            <!-- 定义日志格式 -->
            <param name= "ConversionPattern" value="%d %-5p [%c{1}]  %m %n"/>
        </layout>
    </appender>

    <!-- 输出到控制台和文件夹中的日志级别 -->
    <root>
        <priority value="info" />
        <appender-ref ref="console" />
        <appender-ref ref="fileAppender"/>
    </root>

</log4j:configuration>
在cn.util包下新建log类,代码如下
package cn.util;

import org.apache.log4j.Logger;


public class log {
        //初始化Logger对象
        private static Logger log=Logger.getLogger(log.class.getName());
        //定义一个静态方法,可以打印自定义的某个测试用例开始执行的日志信息
        public static void startTestCase(String CaseName){

            log.info("======================================================================");
            log.info("*************     "+CaseName+" 用例开始执行"+"     *************");
        }
        //定义一个静态方法,可以打印自定义的某个测试用例结束执行的日志信息
        public static void endTestCase(String CaseName){
            log.info("*************     "+CaseName+" 用例执行结束"+"     *************");
            log.info("======================================================================");
        }
        //定义一个静态info方法,打印自定义的info级别的日志信息
        public static void info(String message){
            log.info(message);
        }
        //定义一个静态的warn方法,打印自定义的warn级别的日志信息
        public static void warn(String message){
            log.warn(message);
        }
        //定义一个静态的error方法,打印自定义的error级别的日志信息
        public static void error(String message){
            log.error(message);
        }
        //定义一个静态的fatal方法,打印自定义的fatal级别的日志信息
        public static void fatal(String message){
            log.fatal(message);
        }
        //定义一个静态的debug方法,打印自定义的debug级别的日志信息
        public static void debug(String message){
            log.debug(message);
        }

}
二、封装截图方法。在cn.util包下新建FileUtil工具类、DataUtil工具类和Screenshot类
FileUtil类代码如下:
package cn.util;

import java.io.File;
import java.io.IOException;


//FileUtil 类用于创建目录和文件,此例子只是用此类的创建目录的方法
public class FileUtil{

    public static boolean createFile(String destFileName){
        File file=new File(destFileName);
        if(file.exists()){
            log.info("创建单个文件"+destFileName+"失败,目标文件已存在!");
            return false;
        }
        if(destFileName.endsWith(file.separator)){
            log.info("创建单个文件"+destFileName+"失败,目标文件不能为目录!");
            return false;
        }
        //判断目标文件所在目录是否存在
        if(!file.getParentFile().exists()){
            //如果目标文件所在的目录不存在,则创建父目录
            log.info("目录文件所在目录不存在,准备创建它!");
            if(!file.getParentFile().mkdirs()){
                log.info("创建目标文件所在目录失败!");
                return false;
            }
        }
        //创建目标问价
        try{
            if(file.createNewFile()){
                log.info("创建单个文件"+destFileName+"成功!");
                return true;
            }else{
                log.info("创建单个文件"+destFileName+"失败!");
                return false;
            }
        }catch(IOException e){
            e.printStackTrace();
            log.info("创建单个文件"+destFileName+"失败!"+e.getMessage());
            return false;
        }
    }
    public static boolean createDir(String destDirName){
        File dir=new File(destDirName);
        if(dir.exists()){
            log.info("创建目录"+destDirName+"失败,目标目录已存在");
            return false;
        }
        //创建目录
        if(dir.mkdirs()){
            log.info("创建目录"+destDirName+"成功!");
            return true;
        }else{
            log.info("创建目录"+destDirName+"失败!");
            return false;
        }
    }

}
DataUtil类代码如下:
package cn.util;

import java.util.Date;


//DataUtil类主要用于生成年、月、日、时、分、秒的信息,用于生成保存截图文件目录名和文件名
public class DataUtil{
    //格式化输入日期,@return 返回字符型日期
    public static String format(java.util.Date date,String format){
        String result="";
        try{
            if(date != null){
                java.text.DateFormat df=new java.text.SimpleDateFormat(format);
                result=df.format(date);
            }
        }catch(Exception e){
            e.printStackTrace();
        }
        return result;
    }

    //返回年份   @return返回年份
    public static int getYear(java.util.Date date){
        java.util.Calendar c=java.util.Calendar.getInstance();
        c.setTime(date);
        return c.get(java.util.Calendar.YEAR);
    }

    //返回月份 @return返回月份
    public static int getMonth(java.util.Date date){
        java.util.Calendar c= java.util.Calendar.getInstance();
        c.setTime(date);
        return c.get(java.util.Calendar.MONTH)+1;
    }

    //返回在月份中的第几天  @return返回月份中的第几天
    public static int getDay(java.util.Date date){
        java.util.Calendar c= java.util.Calendar.getInstance();
        c.setTime(date);
        return c.get(java.util.Calendar.DAY_OF_MONTH);
    }

    /*
     * 返回小时
     * @param date
     * 日期
     * @return返回小时
     */
    public static int getHour(java.util.Date date){
        java.util.Calendar c=java.util.Calendar.getInstance();
        c.setTime(date);
        return c.get(java.util.Calendar.HOUR_OF_DAY);
    }

    /*
     * 返回分钟
     * @param date
     * 日期
     * @return返回分钟
     */
    public static int getMinute(java.util.Date date){
        java.util.Calendar c=java.util.Calendar.getInstance();
        c.setTime(date);
        return c.get(java.util.Calendar.MINUTE);
    }

    /*
     * 返回秒
     * @param date
     * 日期
     * @return返回秒
     */
    public static int getSecond(java.util.Date date){
        java.util.Calendar c=java.util.Calendar.getInstance();
        c.setTime(date);
        return c.get(java.util.Calendar.SECOND);
    }
}
Screenshot类实现截图操作,代码如下:
package cn.util;

import java.io.File;
import java.util.Date;

import org.apache.commons.io.FileUtils;
import org.openqa.selenium.OutputType;
import org.openqa.selenium.TakesScreenshot;
import org.openqa.selenium.WebDriver;


public class Screenshot{


    public static void method(WebDriver driver,String CaseName) {
        try{
            //生成日期对象
            Date date=new Date();
            //调用DateUtil类中的方法,生成截图所在的文件夹日期类型
            String picDir="C:\\"+"errorScreenshot"+"\\"+String.valueOf(DataUtil.getYear(date))+"-"
            +String.valueOf(DataUtil.getMonth(date))+"-"+String.valueOf(DataUtil.getDay(date));
            if(!new File(picDir).exists()){
                FileUtil.createDir(picDir);
            }
            //调用DataUtil类中的方法,生成截图文件的时间名称
            String filePath=picDir+"//"+String.valueOf(DataUtil.getHour(new Date()))+"时"+
            String.valueOf(DataUtil.getMinute(new Date()))+"分"+
            String.valueOf(DataUtil.getSecond(new Date()))+"秒"+CaseName+".png";
            //进行截图,并将文件内容保存在srcFile对象中
            File srcFile=((TakesScreenshot)driver).getScreenshotAs(OutputType.FILE);
//            File scrFile = new File("");
//            scrFile = ((TakesScreenshot) driver).getScreenshotAs(OutputType.FILE);
            //将截图文件内容写入磁盘中,生成截图文件
            FileUtils.copyFile(srcFile, new File(filePath));
        }catch(Exception e){
            log.info("截图失败");
        }
    }

}
三、在cn.util包下新建ExcelUtil类,用于读写Excel表格。代码如下:
package cn.util;

import java.io.File;
import java.io.FileInputStream;
import java.io.FileOutputStream;
import java.io.IOException;
import java.util.ArrayList;
import java.util.List;

import org.apache.poi.hssf.usermodel.HSSFWorkbook;
import org.apache.poi.ss.usermodel.CellType;
import org.apache.poi.ss.usermodel.Row;
import org.apache.poi.ss.usermodel.Sheet;
import org.apache.poi.ss.usermodel.Workbook;
import org.apache.poi.xssf.usermodel.XSSFCell;
import org.apache.poi.xssf.usermodel.XSSFRow;
import org.apache.poi.xssf.usermodel.XSSFSheet;
import org.apache.poi.xssf.usermodel.XSSFWorkbook;

public class ExcelUtil {

    private static XSSFSheet excelWSheet;
    private static XSSFWorkbook excelWBook;
    private static XSSFCell cell;
    private static XSSFRow row;

    //指定要操作的excel文件的路径及sheet名称
    public static void setExcelFile(String path,String sheetName) throws Exception{

        FileInputStream excelFile;
        try {
            excelFile = new FileInputStream(path);
            excelWBook = new XSSFWorkbook(excelFile);
            excelWSheet = excelWBook.getSheet(sheetName);
        } catch (Exception e) {
            e.printStackTrace();
        }
    }

    //读取excel文件指定单元格数据(此方法只针对.xlsx后辍的Excel文件)
    public static String getCellData(int rowNum,int colNum) throws Exception{
        try {
            //获取指定单元格对象
            cell = excelWSheet.getRow(rowNum).getCell(colNum);
            //获取单元格的内容
            //如果为字符串类型,使用getStringCellValue()方法获取单元格内容,如果为数字类型,则用getNumericCellValue()获取单元格内容
            String cellData = cell.getStringCellValue();
            return cellData;
        } catch (Exception e) {
            return "";
        }
    }

    //在EXCEL的执行单元格中写入数据(此方法只针对.xlsx后辍的Excel文件) rowNum 行号,colNum 列号
    public static void setCellData(int rowNum,int colNum,String Result) throws Exception{
        try {
            //获取行对象
            row = excelWSheet.getRow(rowNum);
            //如果单元格为空,则返回null
            cell = row.getCell(colNum);
            if(cell == null){
                cell=row.createCell(colNum);
                cell.setCellValue(Result);
            }else{
                cell.setCellValue(Result);
            }
            FileOutputStream out = new FileOutputStream(Constant.TestDataExcelFilePath);
            //将内容写入excel中
            excelWBook.write(out);
            out.flush();
            out.close();
        } catch (Exception e) {
            e.printStackTrace();
        }
    }

    //从EXCEL文件中获取测试数据
    public static Object[][] getTestData(String excelFilePath,String sheetName) throws IOException{
        //声明一个file文件对象
        File file = new File(excelFilePath);
        //创建一个输入流
        FileInputStream in = new FileInputStream(file);
        //声明workbook对象
        Workbook workbook = null;
        //判断文件扩展名
        String fileExtensionName = excelFilePath.substring(excelFilePath.indexOf("."));
        if(fileExtensionName.equals(".xlsx")){
            workbook = new XSSFWorkbook(in);
        }else {
            workbook = new HSSFWorkbook(in);
        }

        //获取sheet对象
        Sheet sheet = workbook.getSheet(sheetName);
        //获取sheet中数据的行数,行号从0始
        int rowCount = sheet.getLastRowNum()-sheet.getFirstRowNum();

        List<Object[]> records = new ArrayList<Object[]>();
        //读取数据(省略第一行表头)
        for(int i=1; i<rowCount+1; i++){
            //获取行对象
            Row row = sheet.getRow(i);
            //声明一个数组存每行的测试数据,excel最后两列不需传值
            String[] fields = new String[row.getLastCellNum()-2];
            //excel倒数第二列为Y,表示数据行要被测试脚本执行,否则不执行
            if(row.getCell(row.getLastCellNum()-2).getStringCellValue().equals("y")){
                for(int j=0; j<row.getLastCellNum()-2; j++){
                    //判断单元格数据是数字还是字符
                    fields[j] = row.getCell(j).getCellTypeEnum() == CellType.STRING ? row.getCell(j).getStringCellValue() : ""+row.getCell(j).getNumericCellValue();
                    //使用下面这行代码会报错不知怎么解决,如果哪位知道解决方法求告知
//                    fields[j] = row.getCell(j).getCellType() == CellType.STRING ? row.getCell(j).getStringCellValue() : ""+row.getCell(j).getNumericCellValue();
                }
                records.add(fields);
            }
        }
        //将list转为Object二维数据
        Object[][] results = new Object[records.size()][];
        //设置二维数据每行的值,每行是一个object对象
        for(int i=0; i<records.size(); i++){
            results[i]=records.get(i);
        }
        return results;
    }

    public static int getLastColumnNum(){
        //返回数据文件最后一列的列号,如果有12列则返回11
        return excelWSheet.getRow(0).getLastCellNum()-1;
    }
}
四、封装显示等待方法(因为有些地方需要用到就做了个简单的封装)。在cn.util包下新建WaitMethod类,代码如下:
package cn.util;

import org.openqa.selenium.By;
import org.openqa.selenium.NoSuchElementException;
import org.openqa.selenium.WebDriver;
import org.openqa.selenium.support.ui.ExpectedConditions;
import org.openqa.selenium.support.ui.WebDriverWait;


//显示等待封装方法
public class WaitMethod {

    public static void xsWait(WebDriver driver,By by,int time){
        try{
                WebDriverWait wait=new WebDriverWait(driver,time);
                wait.until(ExpectedConditions.presenceOfAllElementsLocatedBy(by));
        }catch(NoSuchElementException e){
            log.info("等待:"+time+"秒没有找到 "+ by +" 元素");
            Screenshot.method(driver,"显示等待"+by+"元素"+time+"秒超时");
            log.info("调用Screenshot.method方法截图");
    }
    }

}
在cn.pageObjects包下新建WaitByElement类,代码如下:(因为上面所写的显示等待方法需要传入By类型的参数,这里为了方便就另写了显示等待需要传入的几个By类型元素)
package cn.pageObjects;

import org.openqa.selenium.By;

public class WaitByElement {
    //登录界面的frame
    public static By loginFrame=By.xpath("//*[@id='loginDiv']/iframe[@frameborder='0']");
    //首页未读邮件按钮
    public static By weiduButton=By.id("_mail_tabitem_0_3text");
    //通讯录页面的 新建联系人按钮
    public static By addLinMan=By.xpath("//span[text()='新建联系人']");
    //新建联系人界面的 确定按钮
    public static By confirmButton=By.xpath("//div[@role='button']/span[text()='确 定']");

}
五、定位元素,这里使用UI Map定位元素,目的是能够使用配置文件存储被测页面上元素的定位方式和定位表达式,做到定位数据和程序的分离。
在cn.util包下新建ObjectMap工具类,读取objectMap.properties文件中配置页面元素的定位表达式。代码如下:
package cn.util;

import java.io.FileInputStream;
import java.io.IOException;
import java.util.Properties;

import org.openqa.selenium.By;

public class ObjectMap {
    Properties properties;
    public ObjectMap(String propFile){
    properties =new Properties();
    try{
        FileInputStream in=new FileInputStream(propFile);
        properties.load(in);
        in.close();
    }catch(IOException e){
        log.info("读取文件对象出错");
        e.printStackTrace();
    }
    }

    public By getLocator(String ElenmentNameInpropFile) throws Exception{
        //根据变量ElenmentNameInpropFile,从属性配置文件中读取对应的配置对象
        String locator=properties.getProperty(ElenmentNameInpropFile);
        //将配置对象中定位类型存储到locatorType变量,将定位表达式的值存储到locatorValue变量
        String locatorType=locator.split(">")[0];
        String locatorValue=locator.split(">")[1];
        //在Eclipse中的配置文件均默认为ISO-8859-1编码存储,使用getBytes方法可以将字符
        //转换为UTF-8编码,以此解决在配置文件中读取中文乱码的问题
        locatorValue=new String(locatorValue.getBytes("ISO-8859-1"),"UTF-8");
        //输出locatorType变量值和locatorValue变量值,验证赋值是否正确
        log.info("获取的定位类型为:"+locatorType+"\t定位表达式为:"+locatorValue);
        //根据locatorType的变量值内容判断返回何种定位方式的By对象
        if(locatorType.toLowerCase().equals("id"))
            return By.id(locatorValue);
        else if(locatorType.toLowerCase().equals("name"))
            return By.name(locatorValue);
        else if((locatorType.toLowerCase().equals("classname"))||(locatorType.
                toLowerCase().equals("class")))
            return By.className(locatorValue);
        else if((locatorType.toLowerCase().equals("tagname"))||(locatorType.
                toLowerCase().equals("tag")))
            return By.tagName(locatorValue);
        else if((locatorType.toLowerCase().equals("linktext"))||(locatorType.
                toLowerCase().equals("link")))
            return By.linkText(locatorValue);
        else if(locatorType.toLowerCase().equals("partiallinktext"))
            return By.partialLinkText(locatorValue);
        else if((locatorType.toLowerCase().equals("cssselector"))||(locatorType.
                toLowerCase().equals("css")))
            return By.cssSelector(locatorValue);
        else if(locatorType.toLowerCase().equals("xpath"))
            return By.xpath(locatorValue);
        else
            log.info("输入的locator type未在程序中被定义:"+locatorType);
            throw new Exception("输入的locator type未在程序中被定义:"+locatorType);

    }

}
然后在新建的objectMap.properties文件中添加所需的元素定位方式和定位表达式,内容如下:
#登录页面
loginpage.intologin=id>lbNormal
loginpage.loginframe=xpath>//*[@id='loginDiv']/iframe[@frameborder='0']
loginpage.username=name>email
loginpage.password=name>password
loginpage.loginbutton=id>dologin
#首页
homepage.shouyetext=id>_mail_tabitem_0_3text
homepage.addressbook=id>_mail_tabitem_1_4text
#通讯录页面
addressbookpage.addlinkman=xpath>//span[text()='新建联系人']
#新建联系人页面
addressbookpage.name=id>input_N
addressbookpage.email=xpath>//div[@id='iaddress_MAIL_wrap']/dl/dd/div/input
addressbookpage.phonenumber=xpath>//div[@id='iaddress_TEL_wrap']/dl/dd/div/input
addressbookpage.confirmbutton=xpath>//div[@role='button']/span[text()='确 定']
最后实现各个页面元素的定位。在cn.pageObject包下新建LoginPage类实现登录页面各个元素的定位,代码如下:
package cn.pageObjects;

import org.openqa.selenium.WebDriver;
import org.openqa.selenium.WebElement;

import cn.util.ObjectMap;

public class LoginPage {
    //指定页面元素定位表达式配置文件的绝对路径
    private ObjectMap objectMap=new ObjectMap("F:\\Eclipse\\DataFrameWork\\objectMap.properties");
    private WebElement element;
    private WebDriver driver;

    public LoginPage(WebDriver driver){
        this.driver=driver;
    }
    //返回进入密码登录页面元素对象
    public WebElement intoLogin() throws Exception{
        //使用objectMap类中的getLocator方法获取配置文件中关于用户名的定位方式和定位表达式
        element=driver.findElement(objectMap.getLocator("loginpage.intologin"));
        return element;
    }
    //返回登录页面的frame元素对象
    public WebElement loginFrame() throws Exception{
        //使用objectMap类中的getLocator方法获取配置文件中关于用户名的定位方式和定位表达式
        element=driver.findElement(objectMap.getLocator("loginpage.loginframe"));
        return element;
        }
    //返回登录页面用户名输入框元素对象
    public WebElement userName() throws Exception{
        //使用objectMap类中的getLocator方法获取配置文件中关于用户名的定位方式和定位表达式
        element=driver.findElement(objectMap.getLocator("loginpage.username"));
        return element;
        }
    //返回登录页面密码输入框元素对象
    public WebElement passWord() throws Exception{
        //使用objectMap类中的getLocator方法获取配置文件中关于用户名的定位方式和定位表达式
        element=driver.findElement(objectMap.getLocator("loginpage.password"));
        return element;
        }
    //返回登录页面登录按钮元素对象
    public WebElement loginButton() throws Exception{
        //使用objectMap类中的getLocator方法获取配置文件中关于用户名的定位方式和定位表达式
        element=driver.findElement(objectMap.getLocator("loginpage.loginbutton"));
        return element;
        }

}
在cn.pageObject包下新建HomePage类实现首页各个元素的定位,代码如下:
package cn.pageObjects;

import org.openqa.selenium.WebDriver;
import org.openqa.selenium.WebElement;

import cn.util.ObjectMap;

public class HomePage {
    //指定页面元素定位表达式配置文件的绝对路径
        private ObjectMap objectMap=new ObjectMap("F:\\Eclipse\\DataFrameWork\\objectMap.properties");
        private WebElement element;
        private WebDriver driver;

        public HomePage(WebDriver driver){
            this.driver=driver;
        }
        //返回 首页 元素对象
        public WebElement shouyeText() throws Exception{
            //使用objectMap类中的getLocator方法获取配置文件中关于用户名的定位方式和定位表达式
            element=driver.findElement(objectMap.getLocator("homepage.shouyetext"));
            return element;
        }
        //返回 通讯录 元素对象
        public WebElement tongxunId() throws Exception{
            element=driver.findElement(objectMap.getLocator("homepage.addressbook"));
            return element;
        }

}
在cn.pageObject包下新建LinkmanPage类实现通讯录页面各个元素的定位,代码如下:
package cn.pageObjects;

import org.openqa.selenium.WebDriver;
import org.openqa.selenium.WebElement;

import cn.util.ObjectMap;

public class LinkmanPage {
    private WebElement element;
    private WebDriver driver;
    //指定元素定位表达式配置文件的绝对路径
    private ObjectMap objectMap=new ObjectMap("F:\\Eclipse\\DataFrameWork\\objectMap.properties");
    public LinkmanPage(WebDriver driver){
        this.driver=driver;
    }

    //返回通讯录页面中的 新建联系人 元素
    public WebElement addressBook() throws Exception{
        element=driver.findElement(objectMap.getLocator("addressbookpage.addlinkman"));
        return element;
    }
}
在cn.pageObject包下新建AddressBookPage类实现建联系人界面各个元素的定位,代码如下:
package cn.pageObjects;

import org.openqa.selenium.WebDriver;
import org.openqa.selenium.WebElement;

import cn.util.ObjectMap;

public class AddressBookPage {
    private WebElement element;
    private WebDriver driver;
    //指定定位元素表达式配置文件的绝对路径
    private ObjectMap objectMap=new ObjectMap("F:\\Eclipse\\DataFrameWork\\objectMap.properties");

    public AddressBookPage(WebDriver driver){
        this.driver=driver;
    }
    //返回新建联系人界面的 姓名输入框
    public WebElement inputName() throws Exception{
        element=driver.findElement(objectMap.getLocator("addressbookpage.name"));
        return element;
    }
    //返回新建联系人界面的 电子邮箱输入框
    public WebElement inputEmail() throws Exception{
        element=driver.findElement(objectMap.getLocator("addressbookpage.email"));
        return element;
    }
    //返回新建联系人界面的 手机号码输入框
    public WebElement inputPhonenumber() throws Exception{
        element=driver.findElement(objectMap.getLocator("addressbookpage.phonenumber"));
        return element;
    }
    //返回新建联系人界面的 确定按钮
    public WebElement inputConfirmbutton() throws Exception{
        element=driver.findElement(objectMap.getLocator("addressbookpage.confirmbutton"));
        return element;
    }

}
六、封装登录和新建联系人方法
在cn.appModules包下新建LoginAction类,实现登录操作的封装方法
package cn.appModules;
//封装登录操作

import org.openqa.selenium.WebDriver;
import cn.pageObjects.LoginPage;
import cn.pageObjects.WaitByElement;
import cn.util.WaitMethod;
import cn.util.log;

public class LoginAction {
    public static void execute(WebDriver driver,String userName,String passWord)
        throws Exception{
        log.info("浏览器最大化");
        //浏览器最大化
        driver.manage().window().maximize();
        log.info("实例化LoginPage对象");
        //实例化LoginPage对象
        LoginPage login=new LoginPage(driver);
        log.info("点击进入密码登录按钮");
        //点击进入密码登录按钮
        login.intoLogin().click();
        log.info("显示等待"+WaitByElement.loginFrame+" 元素5秒");
        //显示等待
        WaitMethod.xsWait(driver,WaitByElement.loginFrame,5);
        log.info("进入登录界面的frame");
        //控制权交给登录界面的frame
        driver.switchTo().frame(login.loginFrame());
        log.info("输入用户名"+userName);
        //输入用户名
        login.userName().sendKeys(userName);
        log.info("输入密码"+passWord);
        //输入密码
        login.passWord().sendKeys(passWord);
        log.info("点击登录按钮");
        //点击登录按钮
        login.loginButton().click();
//        Thread.sleep(5000);
    }

}
在cn.appModules包下新建AddContactPersonAction类,实现新建联系人操作的封装方法。代码如下:
package cn.appModules;

import org.openqa.selenium.WebDriver;

import cn.pageObjects.AddressBookPage;
import cn.pageObjects.HomePage;
import cn.pageObjects.LinkmanPage;
import cn.pageObjects.WaitByElement;
import cn.util.Screenshot;
import cn.util.WaitMethod;
import cn.util.log;

public class AddContactPersonAction {
    //新建联系人封装方法
    public static void execute(WebDriver driver,String userName,String passWord,
            String Name,String Email,String Phonenumber) throws Exception {
        log.info("调用登录封装方法");
        //调用登录封装方法
        try {
            LoginAction.execute(driver,userName, passWord);
        } catch (Exception e) {
            log.info("登录进入163邮箱首页失败");
            Screenshot.method(driver,"登录进入163邮箱首页失败");
        }
        log.info("显示等待"+WaitByElement.weiduButton+" 元素");
        //显示等待
        WaitMethod.xsWait(driver,WaitByElement.weiduButton,10);
        log.info("实例化HomePage对象");
        //实例化HomePage对象
        HomePage homePage=new HomePage(driver);
        log.info("点击 通讯录");
        //点击 通讯录
        homePage.tongxunId().click();
        log.info("显示等待"+WaitByElement.addLinMan+" 元素");
        //显示等待
        WaitMethod.xsWait(driver, WaitByElement.addLinMan, 5);
        log.info("实例化LinkmanPage对象");
        //实例化LinkmanPage对象
        LinkmanPage linkmanPage=new LinkmanPage(driver);
        log.info("点击 新建联系人");
        //点击 新建联系人
        linkmanPage.addressBook().click();
        log.info("显示等待"+ WaitByElement.confirmButton+" 元素");
        //显示等待
        WaitMethod.xsWait(driver, WaitByElement.confirmButton, 5);
        log.info("实例化AddressBookPage");
        //实例化AddressBookPage
        AddressBookPage addressbookPage=new AddressBookPage(driver);
        log.info("输入联系人姓名:"+Name);
        //输入联系人姓名
        addressbookPage.inputName().sendKeys(Name);
        log.info("输入联系人电子邮箱:"+Email);
        //输入联系人电子邮箱
        addressbookPage.inputEmail().sendKeys(Email);
        log.info("输入联系人手机号码:"+Phonenumber);
        //输入联系人手机号码
        addressbookPage.inputPhonenumber().sendKeys(Phonenumber);
        log.info("点击新建联系人界面的 确定按钮");
        //点击新建联系人界面的 确定按钮
        addressbookPage.inputConfirmbutton().click();
    }

}
七、建立常量类和Excel表格数据
在cn.util包下新建Constant类,代码如下:
package cn.util;
//定义常量
public class Constant {
    //定义测试网址
    public static final String url="https://mail.163.com/";
    //定义Excel测试数据文件的路径
    public static final String TestDataExcelFilePath="E:\\Datas\\data.xlsx";
    //定义在Excel 文件中包含测试数据的Sheet名称
    public static final String TestDataExcelFileSheet="Sheet1";


}
新建一个Excel表,命名为:data.xlsx ,数据入下图所示:

用户名、密码根据实际情况填写。注意:手机号这种超长数字类的单元格要设置成文本类型(单元格左上角有个绿三角)
八、测试类。
在cn.testCase包下新建TestEmail163addContactPerson类。代码如下:
package cn.testCase;

import java.io.IOException;

import org.apache.log4j.xml.DOMConfigurator;
import org.openqa.selenium.WebDriver;
import org.openqa.selenium.chrome.ChromeDriver;
import org.testng.Assert;
import org.testng.annotations.AfterMethod;
import org.testng.annotations.BeforeClass;
import org.testng.annotations.BeforeMethod;
import org.testng.annotations.DataProvider;
import org.testng.annotations.Test;

import cn.appModules.AddContactPersonAction;
import cn.util.Constant;
import cn.util.ExcelUtil;
import cn.util.Screenshot;
import cn.util.log;


public class TestEmail163addContactPerson {
    public WebDriver driver;
    String url=Constant.url;

    //定义dataprovider,并命名为testData
    @DataProvider(name="testData")
    public static Object[][] data() throws IOException{
        /*
         *调用ExcelUtil类中的getTestData静态方法,获取Excel数据文件中倒数第二列
         *标记为y的测试数据行,函数参数为常量Constant.TestDataExcelFilePath和常量
         *Constant.TestDataExcelFileSheet,指定数据文件的路径和Sheet名称
        */
//        System.out.println(Constant.TestDataExcelFilePath);
//        System.out.println(Constant.TestDataExcelFileSheet);
        log.info("调用ExcelUtil类中的getTestData静态方法获取Excel中标记为y的测试数据");
        return ExcelUtil.getTestData(Constant.TestDataExcelFilePath,Constant.TestDataExcelFileSheet);

    }
    //使用名称为testData的dataProvider作为测试方法的测试数据集
    //测试方法一个使用了10个参数,对应到Excel数据文件的1~10列
    @Test(dataProvider="testData")
    public void testAddContactPerson(String CaseRow,String CaseName,String UserName,
            String PassWord,String Name,String Email,String PhoneNumber,
            String AssertName,String AssertEmail,String AssertPhoneNumber) throws  Exception{

        log.startTestCase(CaseName);
            driver.get(url);
            log.info("访问网页"+url);

            try {
                log.info("调用AddContactPersonAction类的execute方法");
                //调用新建联系人封装方法,并传入相应参数
                AddContactPersonAction.execute(driver,UserName, PassWord,Name, Email,PhoneNumber);

            } catch (Exception e) {
                /*
                 * 执行AddContactPersonAction类的execute方法失败时,catch语句可以捕获AssertionError类型
                 * 的异常,并设置Excel中测试数据行的执行结果为“测试失败”。由于Excel中的序号格式被默认设定
                 * 为带有一位小数点,所以使用 split("[.]"[0]) 语句获取序号的整数部分,并传给setCellData函
                 * 数在对应序号的测试数据行的最后一列设定“测试失败”
                 */
                ExcelUtil.setCellData(Integer.parseInt(CaseRow.split("[.]")[0]),
                        ExcelUtil.getLastColumnNum(),"测试失败");
                log.info("添加联系人失败");
                Screenshot.method(driver,"添加联系人失败");
                log.info("调用Screenshot.method方法进行截图");
                log.endTestCase(CaseName);
                //调用Assert.fail方法将此测试用例设定为执行失败,后续测试代码将不被执行
                Assert.fail("执行AddContactPersonAction类的execute方法失败");

            }

        Thread.sleep(3000);
        log.info("调用AddContactPersonAction类的execute方法后休眠3秒");

        try{
            log.info("断言页面是否包含联系人姓名:"+AssertName);
            //断言页面是否包含AssertName变量的关键字
            Assert.assertTrue(driver.getPageSource().contains(AssertName));
            }catch(AssertionError error){
            log.info("断言通讯录页面是否包含联系人姓名:"+AssertName +" 失败");
            ExcelUtil.setCellData(Integer.parseInt(CaseRow.split("[.]")[0]),
                    ExcelUtil.getLastColumnNum(),"测试失败");
            Screenshot.method(driver, "断言联系人姓名为"+AssertName+"失败");
            log.info("调用Screenshot.method方法进行截图");
            log.endTestCase(CaseName);
            Assert.fail("断言通讯录页面是否包含联系人姓名的关键字失败");
        }


        try{
            log.info("断言页面是否包含联系人邮箱:"+AssertEmail);
            //断言页面是否包含AssertEmail变量的关键字
            Assert.assertTrue(driver.getPageSource().contains(AssertEmail));
        }catch(AssertionError error){
            log.info("断言通讯录页面是否包含联系人邮箱地址:"+AssertEmail+" 失败");
            ExcelUtil.setCellData(Integer.parseInt(CaseRow.split("[.]")[0]),
                    ExcelUtil.getLastColumnNum(),"测试失败");
            log.info("调用Screenshot.method方法进行截图");
            Screenshot.method(driver,"断言联系人邮箱为"+AssertEmail+"失败");
            log.endTestCase(CaseName);
            Assert.fail("断言通讯录页面是否包含联系人邮箱地址的关键字失败");
        }


        try{
            log.info("断言通讯录页面是否包含联系人手机号码:"+AssertPhoneNumber);
            //断言页面是否包含AssertPhoneNumber变量的关键字
            Assert.assertTrue(driver.getPageSource().contains(AssertPhoneNumber));
        }catch(AssertionError error){
            ExcelUtil.setCellData(Integer.parseInt(CaseRow.split("[.]")[0]),
                    ExcelUtil.getLastColumnNum(),"测试失败");
            log.info("断言通讯录页面是否包含联系人手机号码:"+AssertPhoneNumber+" 失败");
            Screenshot.method(driver,"断言联系人手机号码为"+AssertPhoneNumber+"失败");
            log.info("调用Screenshot.method方法进行截图");
            log.endTestCase(CaseName);
            Assert.fail("断言通讯录页面是否包含联系人手机号码关键字失败");
        }
        ExcelUtil.setCellData(Integer.parseInt(CaseRow.split("[.]")[0]),
                ExcelUtil.getLastColumnNum(),"测试成功");
        log.info("新建联系人全部断言成功,在Excel的测试数据文件“测试执行结果”列中写入“测试成功”");
        log.endTestCase(CaseName);

    }

    @BeforeClass
    public void beforeClass() throws Exception{
        //读取Log4j.xml配置文件信息
        DOMConfigurator.configure("Log4j.xml");

        //使用Constant类中的常量,设定测试数据的文件路径和Sheet名称
        ExcelUtil.setExcelFile(Constant.TestDataExcelFilePath,Constant.TestDataExcelFileSheet);
        log.info("使用Constant类中的常量,设定测试数据的文件路径:"+Constant.TestDataExcelFilePath);
        log.info("使用Constant类中的常量,设定测试数据的Sheet名称:"+Constant.TestDataExcelFileSheet);
    }

    @BeforeMethod
    public void beforeMethod(){
        System.setProperty("webdriver.chrome.driver","E://chromedriver.exe");
        driver=new ChromeDriver();
        log.info("启动浏览器");
    }

    @AfterMethod
    public void afterMethod(){
        driver.quit();
        log.info("关闭浏览器");

    }

}
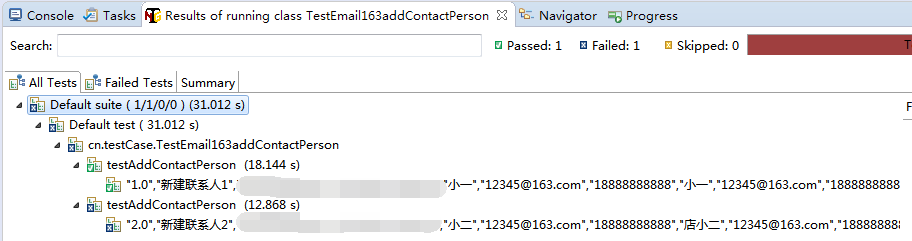
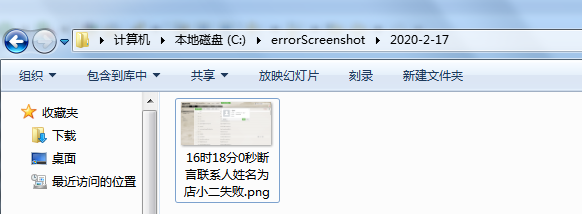
运行TestEmail163addContactPerson测试类后,结果如下几图所示:
testng运行结果:
log4j打印日志:

错误截图:
Excel表格用例执行结果列自动写入结果:

如果有错误或不足之处,欢迎指正(^∀^)