Solution 系列:Centos 7+devpi 工作室自建本地pypi缓存源
建立本地pypi源的目的
1.工作室使用python越来越多,每次使用pip下载,部分whl要下载很久。
2.大家一起请求,受限于出口带宽,总会有部分同学下载失败。
3.实验室今后做安全保密时有断广域网仍高可用的需求
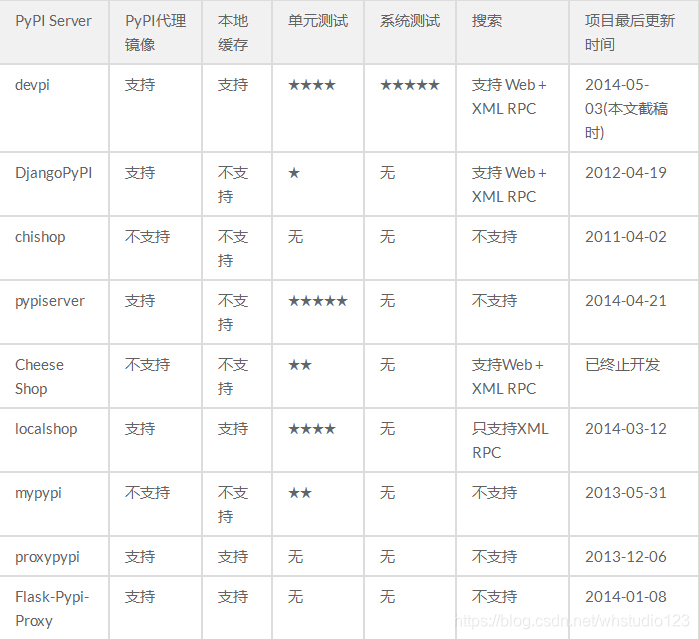
pypi源方案简介与对比
devpi服务器端安装过程
1.centos 7安装pip
centos 7安装完成后并不带有pip命令,需要先安装pip命令
0.1.安装依赖包,这个具体的作用我也不清楚,感觉好像是在安装的时候会要用到的工具。
yum install zlib-devel bzip2-devel openssl-devel ncurses-devel sqlite-devel readline-devel tk-devel gcc make
0.2.再执行安装一个工具,不安装会导致pip安装失败,这也是我遇到的最大的一个坑!
yum install libffi-devel -y
参考:https://blog.csdn.net/qq_36288025/article/details/82534508
说明:安装python3时按照了上述教程进行,但最后pip却没有成功安装。暂时无法确定上面两步对后面pip单独的安装有何影响。
1.安装EPEL扩展源
yum -y install epel-release
2.清空cache,并makecache
yum clean all
yum makecache
3.安装pip
yum -y install python-pip
4.升级pip

pip install --upgrade pip
安装完成后,python2与python3均可使用。
参考:https://www.jianshu.com/p/3132f897b314
2.使用pip安装安装 devpi 客户端和服务器端
pip install -U devpi
这将安装devpi-client,devpi-server 和 devpi-web 三个Python PyPi包。
3.启动devpi:
devpi-server --host=0.0.0.0 --init --start(初次启动需要加--init)
附相关管理命令:
devpi-server --init
devpi-server --start
devpi-server --stop
devpi-server --status
devpi-server --log
4.centos开启devpi端口(或者关闭防火墙并禁止firewall开机启动,但不建议)
firewall-cmd --permanent --zone=public —add-port=DEVPI_PORT/http
附firewall有关命令:
1:查看firewall防火墙状态
    firewall-cmd --state

    或者

    systemctl status firewalld
2:打开防火墙
systemctl start firewalld
3:关闭防火墙
systemctl stop firewalld
4:重启防火墙
    firewall-cmd --relaod

    或者

    systemctl reload firewalld
5:开机自启动防火墙
systemctl enable firewalld
6:禁止开机启动防火墙
systemctl disable firewalld
6:查看已打开的端口
firewall-cmd --list-ports
7:打开端口
    firewall-cmd --permanent --zone=public --add-port=8080/tcp

    其中permanent表示永久生效,public表示作用域,8080/tcp表示端口和类型
8:关闭端口
firewall-cmd --permanent --zone=public --remove-port=8080/tcp
客户端配置过程
请将PYPI_SERVER_IP和DEVPI_PORT换成本地源的ip和devpi端口
1.如果临时使用本地源:
pip install -i http://PYPI_SERVER_IP:DEVPI_PORT/root/pypi/+simple/ --trusted-host PYPI_SERVER_IP django
也就是说下载包时要在中间加上
-i http://PYPI_SERVER_IP:DEVPI_PORT/root/pypi/+simple/ --trusted-host PYPI_SERVER_IP
这个参数
2.当然也可以写入配置文件,这样就不用每次都需要输入参数:
# Linux:       $HOME/.pip/pip.conf  OR /etc/pip.conf(找不到就手动创建)
# Windows 7:   C:\ProgramData\pip\pip.ini
# windows xp:  C:\Documents and Settings\All Users\Application Data\pip\pip.ini
# or use environment variable PIP_CONFIG_FILE to specify location


[global]
index-url = http://PYPI_SERVER_IP:DEVPI_PORT/root/pypi/+simple/

[install]
trusted-host=PYPI_SERVER_IP

[search]
index = http://PYPI_SERVER_IP:DEVPI_PORT/root/pypi/
