一、写在前面的话
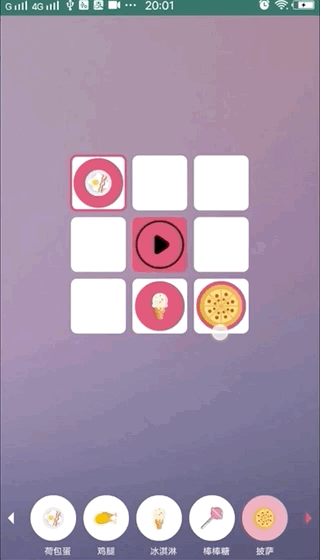
也不知道给这个取个啥名,就随便取了一个,主要功能就如上图显示的那样,待选区view可以拖拽进九宫格中,九宫格可以按照顺时针轮播。
二、分析需要的元素
1.待选区的item
选中底色有改变,item可以拖动到九宫格中,在即将进入九宫格的时候有一个吸附的效果。
2.九宫格
点击中间的开始按钮顺时针轮播九宫格
3.拖动的View
在底部待选栏中的item选中的时候绘制,模拟从待选栏拖入九宫格的效果。
三、动画效果
1、拖动的view(思路)
在手指触碰到备选栏中的item一定时间后(500ms左右),在手指的位置绘制一个选中的item并且跟随手指的位置移动。九宫格的轮播位置,在拖动的view进入到其范围(手指位置的坐标与九宫格item中心的直线距离小于九宫格item的内切圆半径)之后,在九宫格中绘制一个拖动的item,手指的位置取消绘制,模拟吸附效果。
2、九宫格的轮播动画
九宫格对于的位置为
123
456
789
轮播的时候顺序为12369874,在对应的位置颜色变为高亮色,再在该位置画上一个稍小的,圆角一致的矩形。(时至今日我都觉得这个方式有点蠢,等后面再优化了)
四、开始画(绘制)
1、准备工作
首先准备三个List去存放九宫格中item的位置,待选栏view的位置,待选栏view中的图片的位置。
    private List<RectF> mItemRectFList;

    private List<RectF> mSmallRectFList;

    private List<Bitmap> mBitmapList;
private void initItemRectf() {
if (mItemRectFList == null) {
mItemRectFList = new ArrayList<>();
}
mItemRectFList.clear();
int fristX = (int) (mWidth * 0.2);
//第一排
mItemRectFList.add(new RectF(fristX + mItemRectMagin, top + mItemRectMagin,
fristX + mItemRectMagin + mItemRectA, top + mItemRectMagin + mItemRectA));
mItemRectFList.add(new RectF(fristX + 2 * mItemRectMagin + mItemRectA, top + mItemRectMagin,
fristX + 2 * mItemRectMagin + 2 * mItemRectA, top + mItemRectMagin + mItemRectA));
mItemRectFList.add(new RectF(fristX + 3 * mItemRectMagin + 2 * mItemRectA, top + mItemRectMagin,
fristX + 3 * mItemRectMagin + 3 * mItemRectA, top + mItemRectMagin + mItemRectA));
//第二排
mItemRectFList.add(new RectF(fristX + mItemRectMagin, top + 2 * mItemRectMagin + mItemRectA,
fristX + mItemRectMagin + mItemRectA, top + 2 * mItemRectMagin + 2 * mItemRectA));
mItemRectFList.add(new RectF(fristX + 2 * mItemRectMagin + mItemRectA, top + 2 * mItemRectMagin + mItemRectA,
fristX + 2 * mItemRectMagin + 2 * mItemRectA, top + 2 * mItemRectMagin + 2 * mItemRectA));
mItemRectFList.add(new RectF(fristX + 3 * mItemRectMagin + 2 * mItemRectA, top + 2 * mItemRectMagin + mItemRectA,
fristX + 3 * mItemRectMagin + 3 * mItemRectA, top + 2 * mItemRectMagin + 2 * mItemRectA));
//第三排
mItemRectFList.add(new RectF(fristX + mItemRectMagin, top + mItemRectMagin * 3 + mItemRectA * 2,
fristX + mItemRectMagin + mItemRectA, top + mItemRectMagin * 3 + mItemRectA * 3));
mItemRectFList.add(new RectF(fristX + 2 * mItemRectMagin + mItemRectA, top + mItemRectMagin * 3 + mItemRectA * 2,
fristX + 2 * mItemRectMagin + 2 * mItemRectA, top + mItemRectMagin * 3 + mItemRectA * 3));
mItemRectFList.add(new RectF(fristX + 3 * mItemRectMagin + 2 * mItemRectA, top + mItemRectMagin * 3 + mItemRectA * 2,
fristX + 3 * mItemRectMagin + 3 * mItemRectA, top + mItemRectMagin * 3 + mItemRectA * 3));
}
对九宫格item的位置、大小等信息进行初始化
private void initSmallRectf() {
        if (mSmallRectFList == null) {
            mSmallRectFList = new ArrayList<>();
        }
        mSmallRectFList.clear();
        for (int i = 0; i < 8; i++) {
                if (i<5) {
                    mSmallRectFList.add(new RectF((i + 1) * mSmallRectMagin +  mSmallRectA / 2 + i * mSmallRectA, mSmallRectTop,
                            (i + 1) * mSmallRectMagin + (i + 1) * mSmallRectA +  mSmallRectA / 2, mSmallRectTop + mSmallRectA));
                }else {
                    mSmallRectFList.add(new RectF((i + 1) * mSmallRectMagin +  mSmallRectA*3/2  + i * mSmallRectA, mSmallRectTop,
                            (i + 1) * mSmallRectMagin + (i + 1) * mSmallRectA +  mSmallRectA*3/2 , mSmallRectTop + mSmallRectA));
                }
            }

    }
待选栏的item的位置、大小进行初始化。这里我一排显示5个,所以对大于5位置上进行了一些许的微调。
        Bitmap bitmap1 = BitmapFactory.decodeResource(getResources(), R.mipmap.food1);
...
图片的初始化。
private void initPath() {
        int centerX =  mSmallRectMagin;
        int centerY = (int) mSmallRectFList.get(0).centerY();
        mLeftPath = new Path();
        mLeftPath.moveTo(centerX+20,centerY+20);
        mLeftPath.lineTo(centerX,centerY);
        mLeftPath.lineTo(centerX+20,centerY-20);
        mLeftPath.close();

        mRightPath = new Path();
        mRightPath.moveTo(mWidth-mSmallRectMagin-20,centerY+20);
        mRightPath.lineTo(mWidth-mSmallRectMagin,centerY);
        mRightPath.lineTo(mWidth-mSmallRectMagin-20,centerY-20);
        mRightPath.close();

    }
待选栏的两个小三角,用path画一下,找不到适合的图片了。
2、绘制(onDraw)
下面的顺序就是在onDraw中的绘制顺序。
for (int i = 0; i < mItemRectFList.size(); i++) {
            if (i == 4) {
                canvas.drawRoundRect(mItemRectFList.get(i), 20, 20, mRectFItemSelectPaint);
                //画图片
                if (isPaly) {
                    //画图片
                    canvas.drawBitmap(mBitmapStop, mSrcPlay, mdesPlay, mTextPaint);
                } else {
                    canvas.drawBitmap(mBitmapStart, mSrcPlay, mdesPlay, mTextPaint);

                }

            } else {
                canvas.drawRoundRect(mItemRectFList.get(i), 20, 20, mRectFItemPaint);
            }

        }
画九宫格,位置4上为九宫格的中间那格,根据轮播状态画上不同的图片。
for (int i = 0; i < mSmallRectFList.size(); i++) {
            canvas.drawCircle(mSmallRectFList.get(i).centerX() + offset, mSmallRectFList.get(i).centerY(), mSmallRectA / 2, mRectFItemPaint);
            //画图片
            Rect des = new Rect((int) mSmallRectFList.get(i).left + offset + mSmallRectA / 4, (int) mSmallRectFList.get(i).top + mSmallRectA / 4
                    , (int) mSmallRectFList.get(i).right + offset - mSmallRectA / 4, (int) mSmallRectFList.get(i).bottom - mSmallRectA / 4);
            canvas.drawBitmap(mBitmapList.get(i), mSrcItem, des, mRectFItemPaint);
            des = null;
            //画text
            canvas.drawText(modeTextArray[i], mSmallRectFList.get(i).centerX() + offset - mTextSize, (float) (mSmallRectFList.get(i).bottom + 1.5 * mTextSize), mTextPaint);
            if (mDragIndex != -1 && mDragIndex == i && isDrag) {
                mRectFItemSelectPaint.setAlpha(128);
                canvas.drawCircle(mSmallRectFList.get(i).centerX() + offset, mSmallRectFList.get(i).centerY(), mSmallRectA / 2, mRectFItemSelectPaint);
                //画图片
                Rect desAlpha = new Rect((int) mSmallRectFList.get(i).left + offset + mSmallRectA / 4, (int) mSmallRectFList.get(i).top + mSmallRectA / 4
                        , (int) mSmallRectFList.get(i).right + offset - mSmallRectA / 4, (int) mSmallRectFList.get(i).bottom - mSmallRectA / 4);
                canvas.drawBitmap(mBitmapList.get(i), mSrcItem, desAlpha, mRectFItemPaint);
                mRectFItemSelectPaint.setAlpha(255);

            }
        }
//画箭头
if (offset < 0) {
canvas.drawPath(mLeftPath, mTitlePaint);
canvas.drawPath(mRightPath, mTextPaint);
}else {
canvas.drawPath(mLeftPath, mTextPaint);
canvas.drawPath(mRightPath, mTitlePaint);
}待选栏的绘制,因为有不同的两页,所以小箭头的颜色有些许的区别。
 //画选中效果
        canvas.drawRoundRect(mItemRectFList.get(selectIndex), 20, 20, mRectFSelectPaint);
        for (int z = 0; z < seletIndexArray.length; z++) {
            if (seletIndexArray[z] != -1) {
                canvas.drawCircle(mItemRectFList.get(z).centerX(), mItemRectFList.get(z).centerY(), (float) (mItemRectA / 2.2), mRectFItemSelectPaint);
                Rect des = new Rect((int) mItemRectFList.get(z).left + mItemRectA / 4, (int) mItemRectFList.get(z).top + mItemRectA / 4
                        , (int) mItemRectFList.get(z).right - mItemRectA / 4, (int) mItemRectFList.get(z).bottom - mItemRectA / 4);
                canvas.drawBitmap(mBitmapList.get(seletIndexArray[z]), mSrcItem, des, mRectFItemSelectPaint);
            }
        }
绘制选中效果以及从待选栏拖入的item。
   //画拖动中的view
        if (isDrag && mDragX != 0) {
            canvas.drawCircle(mDragX, mDragY, (float) (mItemRectA / 2.2), mRectFItemSelectPaint);
            matrix.setTranslate(mDragX - mBitmapList.get(mDragIndex).getWidth() / 2, mDragY - mBitmapList.get(mDragIndex).getHeight() / 2);
            Rect des = new Rect(mDragX - mBitmapList.get(mDragIndex).getWidth() / 2, mDragY - mBitmapList.get(mDragIndex).getHeight() / 2
                    , mDragX + mBitmapList.get(mDragIndex).getWidth() / 2, mDragY + mBitmapList.get(mDragIndex).getHeight() / 2);
            canvas.drawBitmap(mBitmapList.get(mDragIndex), mSrcItem, des, mRectFItemSelectPaint);
            des = null;
        }
绘制拖动中的item
五、触摸事件处理
1、判断触摸的有效范围
  //判断点击的是不是九宫格中的item
    private int checkItem(int x, int y) {
        int r = (int) ((mItemRectFList.get(0).right - mItemRectFList.get(0).left) / 2);
        for (int i = 0; i < mItemRectFList.size(); i++) {

            if (checkPoint(x, y, mItemRectFList.get(i).centerX(), mItemRectFList.get(i).centerY(), r)) {
                return i;
            }
        }
        return -1;
    }
判断触摸的是不是九宫格中的item
//判断点击的是不是待选栏的item
    private int checkSmallItem(int x, int y) {
        Log.d(TAG, "x=" + x + ",y=" + y);
        int r = (int) ((mSmallRectFList.get(0).right - mSmallRectFList.get(0).left) / 2);
        x = x - offset;
        Log.d(TAG, "x2=" + x);

        for (int i = 0; i < mSmallRectFList.size(); i++) {
            if (checkPoint(x, y, mSmallRectFList.get(i).centerX(), mSmallRectFList.get(i).centerY(), r)) {
                Log.d(TAG, "index=" + i);
                return i;
            }
        }

        return -1;
    }
判断触摸的是不是待选栏
 //计算两点间的距离
    private boolean checkPoint(float x1, float y1, float x2, float y2, int r) {
        double c;
        double i = Math.pow((x1 - x2), 2.0);
        double j = Math.pow((y1 - y2), 2.0);
        c = Math.sqrt(i + j);
        return c < r;

    }
两点间的距离公式
  public interface OnExpLoreViewEventListener {
        void onPlayIndexChange(int index);

        void onCenterClick();

    }
准备好监听器
if (checkItem(x, y) != -1 && event.getAction() == MotionEvent.ACTION_UP && !isDrag && !isMove) {
            //点击的是上面大正方形
            if (checkItem(x, y) == 4) {
                //点击播放按钮
                if (mEventListener != null) {
                    mEventListener.onCenterClick();
                }
            } else if (!isPaly) {
                selectIndex = checkItem(x, y);
                invalidate();
            }

        }
首先是九宫格的事件处理,如果点击的是中间控制item则回调事件,如果是其余的item则选中该item,这里的逻辑在拖拽view和移动时不可用。
 switch (event.getAction()) {
            case MotionEvent.ACTION_DOWN:
                mHandler.removeMessages(MSG_DRAG);
                mDragIndex = checkSmallItem(x, y);
                if (y > mSmallRectFList.get(0).top  && mDragIndex != -1) {

                    mHandler.sendEmptyMessageDelayed(MSG_DRAG, delayMillis);

                } else if (y < bgRectA + top && x > mWidth * 0.2 && x < mWidth * 0.8) {
                    int selectIndex = checkItem(x, y);
                    if (selectIndex != -1) {
                        Message m = Message.obtain();
                        m.what = MSG_DRAG;
                        m.obj = selectIndex;
                        mHandler.sendMessageDelayed(m, delayMillis);
                    }

                }

                if (y > mSmallRectFList.get(0).top && x < mSmallRectMagin +  mSmallRectA / 2){
                    offset = 0;
                    invalidate();
                }else if(y > mSmallRectFList.get(0).top && x > mWidth-(mSmallRectMagin +  mSmallRectA / 2)) {
                    offset = -mWidth+30;
                    invalidate();
                }


                break;
            case MotionEvent.ACTION_UP:
//                if (offset < 0 - (mSmallRectA * 3 + mSmallRectMagin * 3)) {
//                    offset = 0 - (mSmallRectA * 3 + mSmallRectMagin * 3);
//                } else if (offset > 0) {
//                    offset = 0;
//                }

                mHandler.removeMessages(MSG_DRAG);
                if (isDrag) {
                    if (y < bgRectA + top) {
                        int mSelectItem = checkItem(x, y);
                        if (mSelectItem != -1 && mSelectItem != 4) {
                            seletIndexArray[mSelectItem] = mDragIndex;
                        }
                    }
                }
                isDrag = false;
                mDragIndex = -1;
                mDragX = 0;
                mDragY = 0;
                isMove = false;

                invalidate();
                break;
            case MotionEvent.ACTION_MOVE:

                mMomentX = x;
                mMomentY = y;
                if (isDrag) {
                    mDragX = x;
                    mDragY = y;
                    if (y < bgRectA + top) {
                        int mSelectItem = checkItem(x, y);
                        if (mSelectItem != -1 && mSelectItem != 4) {
                            mDragX = (int) mItemRectFList.get(mSelectItem).centerX();
                            mDragY = (int) mItemRectFList.get(mSelectItem).centerY();
                        }
                    }
                    invalidate();
                }else {
                    if (!isMove) {
                        mDragIndex = checkSmallItem(x, y);
                        if (y > mSmallRectFList.get(0).top && mDragIndex != -1) {

                            mHandler.sendEmptyMessageDelayed(MSG_DRAG, delayMillis);

                        }
                    }
                }

                break;
        }
  case MSG_DRAG:
                    //判断出发长按的点与当前手指所处坐标的距离,在按钮上才触发长按
                    if (mDragIndex != -1 && checkPoint(mMomentX - offset, mMomentY, mSmallRectFList.get(mDragIndex).centerX(), mSmallRectFList.get(mDragIndex).centerY(), mSmallRectA / 2)) {
                        isDrag = true;
                        vibrator.vibrate(10);
                        invalidate();
                    }
                    if (msg.obj != null) {
                        int s = (int) msg.obj;
                        if (seletIndexArray[s] != -1) {
                            isDrag = true;
                            vibrator.vibrate(10);
                            mDragIndex = seletIndexArray[s];
                            seletIndexArray[s] = -1;
                            invalidate();
                        }
                    }

                    break;
这里我们在DOWN事件中做处理,如果Y的值在待选栏的返回内,激活isDrag变量,进入拖拽模式。
在MOVE事件中,如果isDrag被激活,就根据手指的移动位置,进行view的刷新。
接着在up事件中根据点的位置去判断是都需要在九宫格中添加item以及对一些控制变量进行重置,这样便完成一次拖拽流程。
六、总结
总之,这种复杂一点的控件还是需要一边做一边优化。由于代码写的有点乱,整理后再贴github的链接了,就这样。
