在原先的登录注册项目上再添加一项验证码验证登录的功能,验证码工具类引用的是其他博主的作品,附上链接在文章末尾
第一步先将工具类复制下来
public class RandomValidateCode {
    private Random random = new Random();
    private String randString = "0123456789ABCDEFGHIJKLMNOPQRSTUVWXYZ";// 随机产生的字符串

    private int width = 80;// 图片宽
    private int height = 26;// 图片高
    private int lineSize = 40;// 干扰线数量
    private int stringNum = 4;// 随机产生字符数量

    /*
     * 获得字体
     */
    private Font getFont() {
        return new Font("Fixedsys", Font.CENTER_BASELINE, 18);
    }

    /*
     * 获得颜色
     */
    private Color getRandColor(int fc, int bc) {
        if (fc > 255)
            fc = 255;
        if (bc > 255)
            bc = 255;
        int r = fc + random.nextInt(bc - fc - 16);
        int g = fc + random.nextInt(bc - fc - 14);
        int b = fc + random.nextInt(bc - fc - 18);
        return new Color(r, g, b);
    }

    /*
     * 绘制字符串
     */
    private String drowString(Graphics g, String randomString, int i) {
        g.setFont(getFont());
        g.setColor(new Color(random.nextInt(101), random.nextInt(111), random
                .nextInt(121)));
        String rand = String.valueOf(getRandomString(random.nextInt(randString
                .length())));
        randomString += rand;
        g.translate(random.nextInt(3), random.nextInt(3));
        g.drawString(rand, 13 * i, 16);
        return randomString;
    }

    /*
     * 绘制干扰线
     */
    private void drowLine(Graphics g) {
        int x = random.nextInt(width);
        int y = random.nextInt(height);
        int xl = random.nextInt(13);
        int yl = random.nextInt(15);
        g.drawLine(x, y, x + xl, y + yl);
    }

    /*
     * 获取随机的字符
     */
    public String getRandomString(int num) {
        return String.valueOf(randString.charAt(num));
    }

    /**
     * 生成随机图片
     */
    public void getRandcode(HttpServletRequest request, HttpServletResponse response, String key) {

        // BufferedImage类是具有缓冲区的Image类,Image类是用于描述图像信息的类
        BufferedImage image = new BufferedImage(width, height,BufferedImage.TYPE_INT_BGR);
        Graphics g = image.getGraphics();// 产生Image对象的Graphics对象,改对象可以在图像上进行各种绘制操作
        g.fillRect(0, 0, width, height);
        g.setFont(new Font("Times New Roman", Font.ROMAN_BASELINE, 18));
        g.setColor(getRandColor(110, 133));
//        // 绘制干扰线
//        for (int i = 0; i <= lineSize; i++) {
//            drowLine(g);
//        }
        // 绘制随机字符
        String randomString = "";
        for (int i = 1; i <= stringNum; i++) {
            randomString = drowString(g, randomString, i);
        }
        //1:将随机生成的验证码放入Cookie中
        Cookie cookie = new Cookie(key,randomString);
        response.addCookie(cookie);
        //2:将随机生成的验证码放入session中
        String sessionid = request.getSession().getId();
        request.getSession().setAttribute(sessionid+key, randomString);
        System.out.println("*************" + randomString);

        //总结:这两种方式都不是很好,
        //(1):使用cookie的方式,将验证码发送到前台浏览器,不安全!不建议使用。
        //(2):使用session的方式,虽然能解决验证码不发送到浏览器,安全性较高了,但是如果用户量太大,这样的存储方式会对服务器造成压力,影响服务器的性能。不建议使用。
        //这里暂时实现用这种方式,好的办法是,在项目中使用的缓存,将生成的验证码存放到缓存中,设置失效时间,这样既可以实现安全性也能减轻服务器的压力。
        g.dispose();
        try {
            ByteArrayOutputStream tmp = new ByteArrayOutputStream();
            ImageIO.write(image, "png", tmp);
            tmp.close();
            Integer contentLength = tmp.size();
            response.setHeader("content-length", contentLength + "");
            response.getOutputStream().write(tmp.toByteArray());// 将内存中的图片通过流动形式输出到客户端
        } catch (Exception e) {
            e.printStackTrace();
        }finally{
            try {
                response.getOutputStream().flush();
                response.getOutputStream().close();
            } catch (Exception e2) {
                e2.printStackTrace();
            }
        }
    }
}
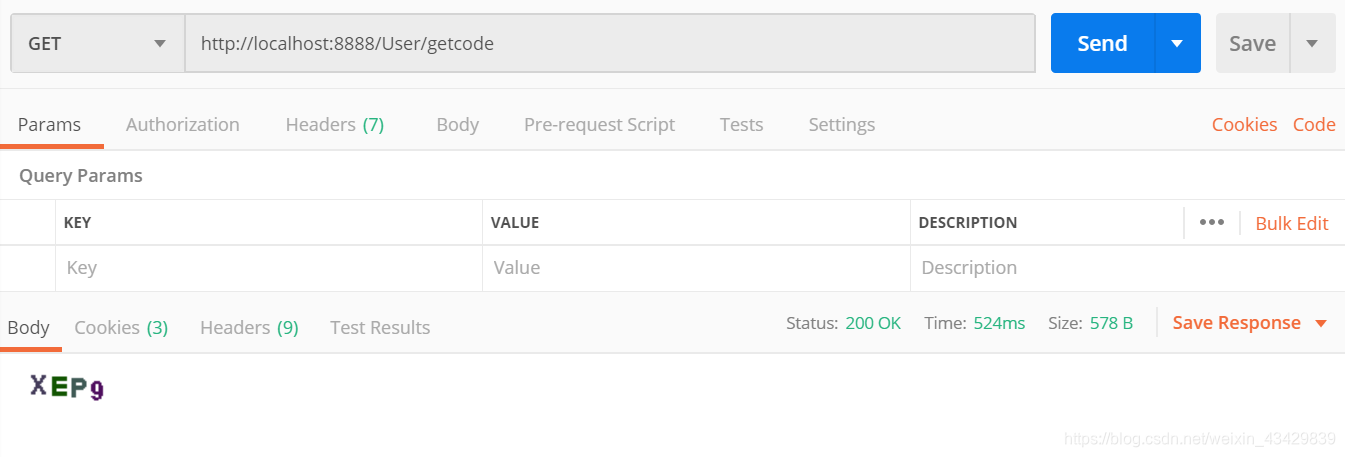
第二步因为没有前端页面所以写一个生成验证码的地址,通过接口来获取到验证码
@GetMapping(value = "/getcode")
    public RandomValidateCode getLoginSecurityCode(HttpServletResponse response, HttpServletRequest request){
        response.setContentType("image/jpeg");// 设置相应类型,告诉浏览器输出的内容为图片
        response.setHeader("Pragma","No-cache");// 设置响应头信息,告诉浏览器不要缓存此内容
        response.setHeader("Cache-Control","no-cache");
        response.setHeader("Set-Cookie","name=value;HttpOnly");//设置HttpOnly属性,防止Xss攻击
        response.setDateHeader("Expire",0);
        RandomValidateCode randomValidateCode=new RandomValidateCode();
        try {
            randomValidateCode.getRandcode(request,response,"imagecode");// 输出图片方法
        }catch (Exception e){
            e.printStackTrace();
        }
        return randomValidateCode;
    }
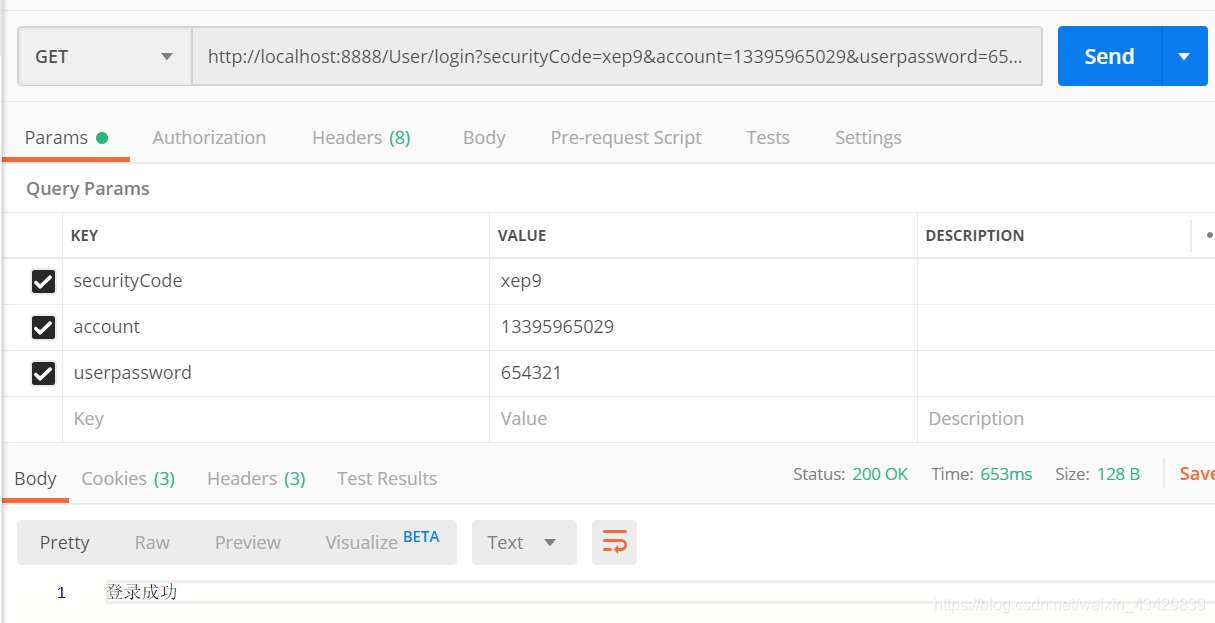
第三步在原有的登录login代码上进行添加验证码的验证
    @GetMapping(value ="/login")
    public String login(String account,
                        String userpassword,
                        String securityCode,
                        HttpServletRequest request
    ) throws UnsupportedEncodingException, NoSuchAlgorithmException {
        String userPwd=userService.login(account);//获取数据库的密码
        String code = null;
        //1:获取cookie里面的验证码信息
        Cookie[] cookies = request.getCookies();
        for (Cookie cookie : cookies) {
            if ("imagecode".equals(cookie.getName())) {
                code = cookie.getValue();
                break;
            }
        }
        code=code.toLowerCase();//转换成小写
        securityCode=securityCode.toLowerCase();//转换成小写
        if (securityCode.equals(code)) {//先判断验证码是否正确在执行账号密码验证
            boolean decodePwd = MD5Utils.validpassword(userpassword, userPwd);//通过MD5Utiles工具解密码,判断true or false
//            System.out.println("account:"+account);
//            System.out.println("userpassword:"+userpassword);
//            System.out.println("decodePwd:"+decodePwd);
//            System.out.println("userPwd:"+userPwd);
            if (decodePwd) {
                return "登录成功";
            }
            return "登录失败,账号或密码错误";
        }
        return "登录失败,验证码错误";
    }
下面是我用postman后端调试成功的截图
1.验证码获取
2.通过获取到的验证码进行登录操作
我的源码gitee地址:https://gitee.com/cj960302/myself-pojects.git
引用了该博主的验证码工具类的地址:https://blog.csdn.net/zyp1376308302/article/details/81257829#commentBox
