前言
记录学习过程
前接(2)搭建一个完整的项目 SpringBoot+SpringMVC+MyBatis
前后端结合
Thymeleaf是一个用于Web和独立Java环境的模板引擎,能够处理HTML、XML、JavaScript、CSS甚至纯文本。能轻易的与Spring MVC等Web框架进行集成作为Web应用的模板引擎。与其它模板引擎(比如FreeMaker)相比,Thymeleaf最大的特点是能够直接在浏览器中打开并正确显示模板页面,而不需要启动整个Web应用(更加方便前后端分离,比如方便类似VUE前端设计页面)
额,SpringBoot推荐用Thymeleaf
查了一下,发现SpringBoot默认不支持JSP,因为jsp相对于一些模板引擎,性能都比较低,官方推荐使用thymeleaf
那就用Thymeleaf吧。。。
使用Thymeleaf
- 在pom.xml中添加依赖
        <!--对 thymeleaf 的支持-->
        <dependency>
            <groupId>org.springframework.boot</groupId>
            <artifactId>spring-boot-starter-thymeleaf</artifactId>
        </dependency>
等下载完
- 属性文件
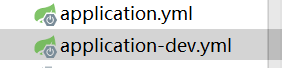
如果已经把application.propeties改成了application.yml等多套环境配置(SpringBoot底层会把application.yml文件解析为application.properties)
在环境配置里添加属性
例:设置的开发环境application-dev.yml里添加
thymeleaf:
    cache: false #关闭缓存
    mode: HTML5 #设置模板类型
    encoding: utf-8  #设置编码
如果还是application.propeties,就直接在里面加上属性:
#thymeleaf 配置
spring.thymeleaf.mode=HTML5
spring.thymeleaf.encoding=UTF-8
spring.thymeleaf.content-type=text/html
#缓存设置为false, 这样修改之后马上生效,便于调试
spring.thymeleaf.cache=false
- 静态界面
编写一个hello.html界面

<!DOCTYPE HTML>
<html xmlns:th="http://www.thymeleaf.org">
<head>
    <title>hello</title>
    <meta http-equiv="Content-Type" content="text/html; charset=UTF-8" />
</head>
<body>
<!--/*@thymesVar id="name" type=""*/-->
<p style="color: red">Welcome</p>
<p th:text="${name}" >name</p>
<p th:text="'Hello! ' + ${name} + '!'" >hello world</p>
</body>
</html>
声明当前文件是 thymeleaf, 里面可以用th开头的属性
<html xmlns:th="http://www.thymeleaf.org">
th:text是Thymeleaf获得后端数据的语言
- 控制器
其中model存储键值对数据
package com.test.springboottest.controller;

import org.springframework.stereotype.Controller;
import org.springframework.ui.Model;
import org.springframework.web.bind.annotation.RequestMapping;

@RequestMapping("/thymeleaf")
@Controller
public class helloController {

    @RequestMapping("/hello")
    public String sayHello(Model model){
        //model来存储数据,里面存储键值对
        model.addAttribute("name","thymeleaf");
        return "hello";
    }
}
然后就可以运行了
- 运行
NO BUG,稳
 输入地址:http://localhost:8080/thymeleaf/hello
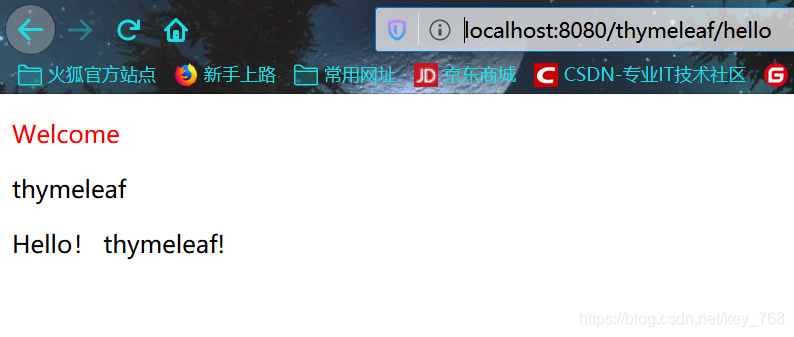
运行成功,前端获得了属性名为name的值
- 可以实验Thymeleaf与jsp的区别
我们编写的hello.html可以直接在浏览器打开
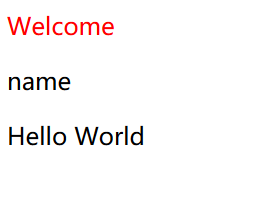
只是没有接收到后端的数据,th:text="${name}"没有用
