本次测试用例使用activemq-spring-5.15.3.jar,可以在maven官方仓库下载,其余jar包见下文项目结构
本次测试教程参考自activemq官方文档:
http://activemq.apache.org/spring-support.html
配置JMS客户端
![]()
spring-mvc.xml
![]()
要在Spring中配置ActiveMQ JMS客户端,只需在标准的Spring XML配置文件中配置ActiveMQConnectionFactory的实例,就像其他bean一样简单。 有几个例子和测试用例可用,这个例子展示了如何在Spring中构造一个ActiveMQConnectionFactory,然后将它传递给Spring JmsTemplate以供某些POJO使用。
以下XML片段显示我们为ActiveMQ创建JMS连接工厂,以连接到特定主机名和端口上的远程代理
使用Spring(Using Spring)
如果您使用Spring 2.0的基于XML模式的新配置,则可以在任何常规Spring.xml文件中嵌入ActiveMQ代理XML,而不需要上述工厂Bean。 例如 这里是Spring 2.0中一个常规的Spring XML文件的例子,它也配置了一个代理。
<beans
  xmlns="http://www.springframework.org/schema/beans"
  xmlns:amq="http://activemq.apache.org/schema/core"
  xmlns:xsi="http://www.w3.org/2001/XMLSchema-instance"
  xsi:schemaLocation="http://www.springframework.org/schema/beans http://www.springframework.org/schema/beans/spring-beans-2.0.xsd
  http://activemq.apache.org/schema/core http://activemq.apache.org/schema/core/activemq-core.xsd">

  <amq:broker useJmx="false" persistent="false">
    <amq:transportConnectors>
      <amq:transportConnector uri="tcp://localhost:61616" />
    </amq:transportConnectors>
  </amq:broker>

  <amq:connectionFactory id="jmsFactory" brokerURL="tcp://localhost:61616"/>
</beans>
这允许您将JMS构件(如目标和连接工厂)与整个代理一起配置。
使用Spring的JmsTemplate(Working with Spring's JmsTemplate)
Spring支持一个方便的抽象JmsTemplate,它允许您在发送消息时隐藏一些较低级别的JMS细节。
请注意,有一些JmsTemplate问题需要注意。
使用JmsTemplate时要记住的一点是,默认情况下,它会为每条发送的消息创建一个新的连接,会话,制作者 - 然后再关闭它们。 这是非常低效的! 这样做是为了在EJB容器中工作,这些容器倾向于使用特殊的ConnectionFactory进行池化。
如果您没有使用JCA容器来管理JMS连接,我们建议您使用我们的pooling JMS连接提供程序(activegq-pool库中的org.apache.activemq.pool.PooledConnectionFactory),它将池化JMS资源以进行工作 有效地使用Spring的JmsTemplate或EJB。
<!-- a pooling based JMS provider -->
  <bean id="jmsFactory" class="org.apache.activemq.pool.PooledConnectionFactory" destroy-method="stop">
    <property name="connectionFactory">
      <bean class="org.apache.activemq.ActiveMQConnectionFactory">
        <property name="brokerURL">
          <value>tcp://localhost:61616</value>
        </property>
      </bean>
    </property>
  </bean>

  <!-- Spring JMS Template -->
  <bean id="myJmsTemplate" class="org.springframework.jms.core.JmsTemplate">
    <property name="connectionFactory">
      <ref local="jmsFactory"/>
    </property>
  </bean>
PooledConnectionFactory支持连接,Session和MessageProducer实例的池化,因此它可以用于像Camel和Spring的JmsTemplate和MessagListenerContainer这样的工具。连接,会话和生产者在使用后返回到一个池中,以便以后可以重复使用它们,而不用再花费再次创建它们。
注意:虽然PooledConnectionFactory确实允许创建活动使用者集合,但它不会“集中”使用者。合并对于连接,会话和生产者来说是有意义的,这些资源可以是很少使用的资源,创建起来很昂贵,并且可以保持最小的成本。另一方面,消费者通常只是在启动时创建并离开,处理即将到来的消息。当一个用户完成时,最好关闭它,而不是让它闲置并将它返回到一个池以供以后再次使用:这是因为,即使用户闲置,ActiveMQ也会继续将消息传递到用户的预取缓冲区,在那里他们会被阻止直到消费者再次活跃。
如果您正在创建一组消费者(例如,为了消耗多线程消息),您应该考虑保持较低的预取值(例如10或20),以确保所有消息最终不会转到消费者。
在使用我们的JCA资源适配器时,我们也会在JCA / MDB容器(org.apache.activemq.ra.InboundConnectionProxyFactory)中使用合并的JMS ConnectionFactory,这将重用与入站邮件相同的JMS连接/会话。
spring内部使用JMS(Consuming JMS from inside Spring)
spring的MessagListenerContainer应该用于消息消费。 这提供了MDB的所有功能 - 有效的JMS消费和消息监听器池 - 但不需要完整的EJB容器。
您可以使用activemq-pool org.apache.activemq.pool.PooledConnectionFactory来高效地为您的消费者集合集中连接和会话,或者您可以使用Spring JMS org.springframework.jms.connection.CachingConnectionFactory来实现相同 影响。
实战
搭建springweb项目
使用jar包如下
jar包见附件
web.xml如下:
<?xml version="1.0" encoding="UTF-8"?>
<web-app xmlns:xsi="http://www.w3.org/2001/XMLSchema-instance" xmlns="http://java.sun.com/xml/ns/javaee"
         xsi:schemaLocation="http://java.sun.com/xml/ns/javaee http://java.sun.com/xml/ns/javaee/web-app_2_5.xsd"
         id="WebApp_ID" version="2.5">

    <context-param>
    <param-name>contextConfigLocation</param-name>
    <param-value>
      classpath*:resource/spring/spring-application.xml;
      classpath*:resource/spring/spring-activemq.xml;
    </param-value>
  </context-param>

  <listener>
    <listener-class>org.springframework.web.context.ContextLoaderListener</listener-class>
  </listener>

  <servlet>
    <servlet-name>springMVC</servlet-name>
    <servlet-class>org.springframework.web.servlet.DispatcherServlet</servlet-class>
    <init-param>
      <param-name>contextConfigLocation</param-name>
      <param-value>classpath:resource/spring/spring-mvc.xml</param-value>
    </init-param>
    <load-on-startup>1</load-on-startup>
  </servlet>
  <servlet-mapping>
    <servlet-name>springMVC</servlet-name>
    <url-pattern>/</url-pattern>
  </servlet-mapping>

  <!-- 处理编码格式 -->
  <filter>
    <filter-name>characterEncodingFilter</filter-name>
    <filter-class>org.springframework.web.filter.CharacterEncodingFilter</filter-class>
    <init-param>
      <param-name>encoding</param-name>
      <param-value>UTF-8</param-value>
    </init-param>
    <init-param>
      <param-name>forceEncoding</param-name>
      <param-value>true</param-value>
    </init-param>
  </filter>
  <filter-mapping>
    <filter-name>characterEncodingFilter</filter-name>
    <url-pattern>/*</url-pattern>
  </filter-mapping>

    <session-config>
        <session-timeout>1440</session-timeout>
    </session-config>

</web-app>
<?xml version="1.0" encoding="UTF-8"?>
<!-- 查找最新的schemaLocation 访问 http://www.springframework.org/schema/ -->
<beans xmlns="http://www.springframework.org/schema/beans"
       xmlns:aop="http://www.springframework.org/schema/aop"
       xmlns:context="http://www.springframework.org/schema/context"
       xmlns:mvc="http://www.springframework.org/schema/mvc"
       xmlns:tx="http://www.springframework.org/schema/tx"
       xmlns:xsi="http://www.w3.org/2001/XMLSchema-instance"
       xsi:schemaLocation="http://www.springframework.org/schema/aop
        http://www.springframework.org/schema/aop/spring-aop-4.0.xsd
        http://www.springframework.org/schema/beans
        http://www.springframework.org/schema/beans/spring-beans-4.0.xsd
        http://www.springframework.org/schema/context
        http://www.springframework.org/schema/context/spring-context-4.0.xsd
        http://www.springframework.org/schema/mvc
        http://www.springframework.org/schema/mvc/spring-mvc-4.0.xsd
        http://www.springframework.org/schema/tx
        http://www.springframework.org/schema/tx/spring-tx-4.0.xsd">

    <!-- 启用MVC注解 -->
    <mvc:annotation-driven />
    <!-- 指定Sping组件扫描的基本包路径 -->
    <context:component-scan base-package="com.yly" >
        <!-- 这里只扫描Controller,不可重复加载Service -->
        <context:include-filter type="annotation" expression="org.springframework.stereotype.Controller"/>
    </context:component-scan>

    <!-- JSP视图解析器-->
    <bean class="org.springframework.web.servlet.view.InternalResourceViewResolver">
        <property name="prefix" value="/WEB-INF/views/" />
        <property name="suffix" value=".jsp" />
        <!--  定义其解析视图的order顺序为1 -->
        <property name="order" value="1" />
    </bean>
</beans>
spring-application.xml
<?xml version="1.0" encoding="UTF-8"?>
<beans xmlns="http://www.springframework.org/schema/beans"
       xmlns:xsi="http://www.w3.org/2001/XMLSchema-instance"
       xmlns:amq="http://activemq.apache.org/schema/core"
       xmlns:jms="http://www.springframework.org/schema/jms"
       xmlns:context="http://www.springframework.org/schema/context"
       xmlns:mvc="http://www.springframework.org/schema/mvc"
       xsi:schemaLocation="
        http://www.springframework.org/schema/beans
        http://www.springframework.org/schema/beans/spring-beans-4.1.xsd
        http://www.springframework.org/schema/context
        http://www.springframework.org/schema/context/spring-context-4.1.xsd
        http://www.springframework.org/schema/mvc
        http://www.springframework.org/schema/mvc/spring-mvc-4.1.xsd
        http://www.springframework.org/schema/jms
        http://www.springframework.org/schema/jms/spring-jms-4.1.xsd
        http://activemq.apache.org/schema/core
        http://activemq.apache.org/schema/core/activemq-core-5.14.3.xsd">

    <bean class="org.springframework.beans.factory.annotation.AutowiredAnnotationBeanPostProcessor"/>
    <!-- 配置扫描路径 -->
    <context:component-scan base-package="com.yly">
        <!-- 只扫描Service,也可以添加Repostory,但是要把Controller排除在外,Controller由spring-mvc.xml去加载 -->
       <context:exclude-filter type="annotation" expression="org.springframework.stereotype.Controller"/>
    </context:component-scan>

</beans>
spring-activemq.xml
<?xml version="1.0" encoding="UTF-8"?>
<beans xmlns="http://www.springframework.org/schema/beans"
    xmlns:xsi="http://www.w3.org/2001/XMLSchema-instance"
    xmlns:amq="http://activemq.apache.org/schema/core"
    xmlns:jms="http://www.springframework.org/schema/jms"
    xmlns:context="http://www.springframework.org/schema/context"
    xmlns:mvc="http://www.springframework.org/schema/mvc"
    xsi:schemaLocation="
        http://www.springframework.org/schema/beans
        http://www.springframework.org/schema/beans/spring-beans-4.0.xsd
        http://www.springframework.org/schema/context
        http://www.springframework.org/schema/context/spring-context-4.0.xsd
        http://www.springframework.org/schema/mvc
        http://www.springframework.org/schema/mvc/spring-mvc-4.0.xsd
        http://www.springframework.org/schema/jms
        http://www.springframework.org/schema/jms/spring-jms-4.0.xsd
        http://activemq.apache.org/schema/core
        http://activemq.apache.org/schema/core/activemq-core-5.10.0.xsd"
        >

    <context:component-scan base-package="com.yly" />
    <mvc:annotation-driven />

    <amq:connectionFactory id="amqConnectionFactory"
                           brokerURL="tcp://localhost:61616"
                           userName="admin"
                           password="admin" />

    <!-- 配置JMS连接工厂 -->
    <bean id="connectionFactory"
          class="org.springframework.jms.connection.CachingConnectionFactory">
        <constructor-arg ref="amqConnectionFactory" />
        <property name="sessionCacheSize" value="100" />
    </bean>


    <!-- 消息队列模板 -->
    <!-- 定义JmsTemplate的Queue类型 -->
    <bean id="jmsQueueTemplate" class="org.springframework.jms.core.JmsTemplate">
        <constructor-arg ref="connectionFactory" />
        <property name="receiveTimeout" value="10000" />
        <property name="pubSubDomain" value="false" />
    </bean>

    <!-- 定义JmsTemplate的Topic类型 -->
    <bean id="jmsTopicTemplate" class="org.springframework.jms.core.JmsTemplate">
        <constructor-arg ref="connectionFactory" />
        <property name="deliveryPersistent" value="true" ></property>
        <!-- pub/sub模型(发布/订阅) -->
        <property name="pubSubDomain" value="true" />
    </bean>
    <!-- 消息队列模板 -->

    <!-- 定义Queue监听器 -->
    <jms:listener-container destination-type="queue" container-type="default" connection-factory="connectionFactory" acknowledge="auto">
        <jms:listener destination="yly.queue" ref="queueReceiverA"/>
        <jms:listener destination="yly.queue" ref="queueReceiverB"/>
    </jms:listener-container>

    <!-- 定义Topic监听器 -->
    <jms:listener-container destination-type="topic" container-type="default" connection-factory="connectionFactory" acknowledge="auto">
        <jms:listener destination="yly.topic" ref="topicReceiverA"/>
        <jms:listener destination="yly.topic" ref="topicReceiverB"/>
    </jms:listener-container>


</beans>
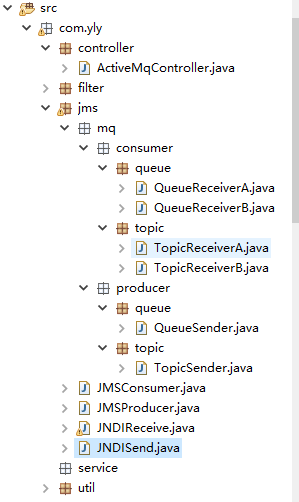
项目结构
QueueReceiverA
package com.yly.jms.mq.consumer.queue;

import javax.jms.MessageListener;
import javax.jms.JMSException;
import javax.jms.Message;
import javax.jms.TextMessage;

import org.springframework.stereotype.Component;
/**
* @author Dougest
* @version 创建时间:2018年5月16日 下午5:26:34
* @describe :
*    队列消息监听器
*/
@Component
public class QueueReceiverA implements MessageListener {
    @Override
    public void onMessage(Message message) {
        try {
            System.err.println("-------------------A-start--------------------------");
            System.err.println("QueueReceiverA接收到消息:"+((TextMessage)message).getText());
            System.err.println("-------------------A-end--------------------------");
        } catch (JMSException e) {
            e.printStackTrace();
        }
    }
}
TopicReceiverA
package com.yly.jms.mq.consumer.topic;

import javax.jms.JMSException;
import javax.jms.Message;
import javax.jms.MessageListener;
import javax.jms.TextMessage;

import org.springframework.stereotype.Component;
/**
* @author Dougest
* @version 创建时间:2018年5月16日 下午5:28:41
* @describe :
*    Topic消息监听器
*/
@Component
public class TopicReceiverA implements MessageListener{

    @Override
    public void onMessage(Message message) {
        try {
            System.err.println("-------------------A-start--------------------------");
            System.err.println("TopicReceiverA接收到消息:"+((TextMessage)message).getText());
            System.err.println("-------------------A-end--------------------------");
        } catch (JMSException e) {
            e.printStackTrace();
        }
    }

}
QueueSender
package com.yly.jms.mq.producer.queue;

import javax.jms.JMSException;
import javax.jms.Message;
import javax.jms.Session;

import org.springframework.beans.factory.annotation.Autowired;
import org.springframework.beans.factory.annotation.Qualifier;
import org.springframework.jms.core.JmsTemplate;
import org.springframework.jms.core.MessageCreator;
import org.springframework.stereotype.Component;

import com.yly.util.ConstString;
/**
* @author Dougest
* @version 创建时间:2018年5月16日 下午5:30:22
* @describe :
*    队列消息生产者,发送消息到队列
*/
@Component("queueSender")
public class QueueSender {

    @Autowired
    @Qualifier("jmsQueueTemplate")
    private JmsTemplate jmsTemplate;

    private volatile String messageID = "";
    /**
     * 发送一条消息到指定的队列(目标)
     * @param queueName 队列名称
     * @param message 消息内容
     */
    public String send(final String message){
        jmsTemplate.send(ConstString.QUEUE_NAME, new MessageCreator() {
            @Override
            public Message createMessage(Session session) throws JMSException {
                Message msg = session.createTextMessage(message);
                messageID = msg.getJMSMessageID();
                return msg;
            }
        });
        return messageID;
    }

}
TopicSender
package com.yly.jms.mq.producer.topic;

import javax.jms.JMSException;
import javax.jms.Message;
import javax.jms.Session;

import org.springframework.beans.factory.annotation.Autowired;
import org.springframework.beans.factory.annotation.Qualifier;
import org.springframework.jms.core.JmsTemplate;
import org.springframework.jms.core.MessageCreator;
import org.springframework.stereotype.Component;

import com.yly.util.ConstString;
/**
* @author Dougest
* @version 创建时间:2018年5月16日 下午5:31:27
* @describe :
*    Topic生产者发送消息到Topic
*/
@Component("topicSender")
public class TopicSender {
    @Autowired
    @Qualifier("jmsTopicTemplate")
    private JmsTemplate jmsTemplate;

    private volatile String messageID = "";

    /**
     * 发送一条消息到指定的队列(目标)
     * @param queueName 队列名称
     * @param message 消息内容
     */
    public String send(final String message){

        jmsTemplate.send(ConstString.TOPIC_NAME, new MessageCreator() {
            @Override
            public Message createMessage(Session session) throws JMSException {
                Message msg = session.createTextMessage(message);
                msg.acknowledge();
                messageID = msg.getJMSMessageID();
            return msg;
            }
        });

        return messageID;
    }

}
ActiveMqController
package com.yly.controller;

import javax.annotation.Resource;

import org.springframework.stereotype.Controller;
import org.springframework.web.bind.annotation.RequestMapping;
import org.springframework.web.bind.annotation.RequestParam;
import org.springframework.web.bind.annotation.ResponseBody;

import com.yly.jms.mq.producer.queue.QueueSender;
import com.yly.jms.mq.producer.topic.TopicSender;

/**
* @author Dougest
* @version 创建时间:2018年5月16日 下午5:36:20
* @describe :
*
*/
@Controller
@RequestMapping("/activemq")
public class ActiveMqController {
    @Resource
    QueueSender queueSender;
    @Resource
    TopicSender topicSender;


    /**
     * 发送消息到队列
     * Queue队列:仅有一个订阅者会收到消息,消息一旦被处理就不会存在队列中
     * @param message
     * @return String
     */
    @ResponseBody
    @RequestMapping("queueSender")
    public String queueSender(@RequestParam("message")String message){
        String opt="";
        try {
            return queueSender.send(message);
        } catch (Exception e) {
            opt = e.getCause().toString();
        }
        return opt;
    }

    /**
     * 发送消息到主题
     * Topic主题 :放入一个消息,所有订阅者都会收到
     * 这个是主题目的地是一对多的
     * @param message
     * @return String
     */
    @ResponseBody
    @RequestMapping("topicSender")
    public String topicSender(@RequestParam("message")String message){
        String opt = "";
        try {
            return topicSender.send( message);
        } catch (Exception e) {
            opt = e.getCause().toString();
        }
        return opt;
    }
}
点对点模型(Queue)测试结果
-------------------B---------------------------
-------------------A---------------------------
QueueReceiverB接收到消息:ActiveMQ 发送消息1
QueueReceiverA接收到消息:ActiveMQ 发送消息0
-------------------B---------------------------
QueueReceiverB接收到消息:ActiveMQ 发送消息3
-------------------A---------------------------
QueueReceiverA接收到消息:ActiveMQ 发送消息2
-------------------B---------------------------
QueueReceiverB接收到消息:ActiveMQ 发送消息5
-------------------A---------------------------
QueueReceiverA接收到消息:ActiveMQ 发送消息4
-------------------B---------------------------
QueueReceiverB接收到消息:ActiveMQ 发送消息7
-------------------A---------------------------
QueueReceiverA接收到消息:ActiveMQ 发送消息6
-------------------B---------------------------
QueueReceiverB接收到消息:ActiveMQ 发送消息9
-------------------A---------------------------
QueueReceiverA接收到消息:ActiveMQ 发送消息8
发布/订阅(Topic)测试结果如下
-------------------A-start--------------------------
-------------------B-start--------------------------
TopicReceiverB接收到消息:测试消息:helloworld
TopicReceiverA接收到消息:测试消息:helloworld
-------------------B-end--------------------------
-------------------A-end--------------------------