YUV学习笔记
YUV
笔记整理于网上其他人的博客和维基百科,以及雷霄骅先生的博客。
基本概念
YUV最初提出是为了解决彩色电视和黑白电视的兼容问题,YUV分别为亮度信息(Y)与色彩信息(UV)。YUV比RGB的优势在于不要求三个独立视频信号同时传输,所以占用带宽(频宽)更少。历史原因,YUV和Y’UV通常用来编码电视的模拟信号,而YCbCr则是用来描述数字的影像信号,适合影片与图片压缩以及传输,有时候看到有用Cb和Cr的方式来表示,其实等同于U和V,但应该严格区分YUV和YCbCr这两个专有名词有时并非完全相同,今天大家所讲的YUV其实就是指YCbCr。
YUV种类很多,可以理解为二维的,即“空间-间”,和“空间-内”这样的表述,借鉴了h264中的帧间和帧内的思想。
- 空间-间:不同空间,即描述一个像素的bit数不同,如YUV444,、YUV422、YUV411、YUV420
- 空间-内:相同空间,即描述一个像素的bit数相同,但存储方式不同,比如对于YUV420而言,又可以细分为YUV420P、YUV420SP、NV21、NV12、YV12、YU12,I420
在理解YUV格式时,时刻记住从bit数、存储结构两方面考察。
YUV Formats格式分为两类:
- 平面格式(planar formats):先连续存储所有像素点的Y,紧接着存储所有像素点的U,随后是所有像素点的V
- 紧缩格式(packed formats):每个像素点的Y、U、V是连续交叉存储的
YUV,分为三个分量,“Y”表示明亮度(Luminance或Luma),也就是灰度值;而“U”和“V” 表示的则是色度(Chrominance或Chroma),作用是描述影像色彩及饱和度,用于指定像素的颜色。
YUV码流的存储格式其实与其采样的方式密切相关,主流的采样方式有四种:
- YUV444:4:4:4表示完全取样。
- YUV422:4:2:2表示2:1的水平取样,垂直完全采样。
- YUV420:4:2:0表示2:1的水平取样,垂直2:1采样。
- YUV411:4:1:1表示4:1的水平取样,垂直完全采样。
YUV和RGB互相转换
U和V组件可以被表示成原始的R,G,和B(R,G,B为γ预校正后的)
- YUV转换为RGB
- RGB转换为YUV
YUV数据的存储方式
-
YUYV(属于YUV422)
相邻的两个Y共用其相邻的两个Cb、Cr,例如对于Y’00和Y’01而言,其Cb、Cr的均值为Cb00、Cr00,其他像素点以此类推。

-
UYVY(属于YUV422)
相邻的两个Y共用其相邻的两个Cb、Cr,只不过和上面的YUYV不同的是Cb和Cr的顺序不同,其他像素点以此类推。

-
YUV422P
YUV422P的P表示Planar formats(平面格式),也就是说YUV不是交错存储而是先存Y,再存U和V,对于Y’00和Y’01而言,其Cb、Cr的均值为Cb00、Cr00。

-
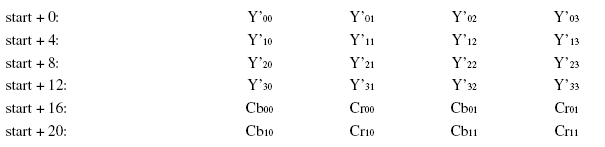
YV12(属于YUV420)
YV12属于YUV420,也是Planar formats(平面格式),存储方式是先存储Y,再存储V,再存储U,4个Y分量共用一组UV,所以下图中Y’00、Y’01、Y’10、Y’11共用Cr00、Cb00。
许多重要的编码器都采用YV12空间存储视频:MPEG-4(x264,XviD,DivX),DVD-Video存储格式MPEG-2,MPEG-1以及MJPEG。
YU12则和YV12除存储方式略有不同外,其他类似,存储方式是先存储Y,再存储U,再存储V。

-
NV12(YUV420)
NV12属于YUV420格式,只不过存储方式为先存储Y,再交叉存储U和V,其提取方式与YV12类似,即Y’00、Y’01、Y’10、Y’11共用Cb00、Cr00。
NV21和NV12略有不同,先存储Y,再交叉存储V和U。
yuvplayer查看YUV图像
一开始打开yuv图像全是花花绿绿的,还以为是文件坏了,直到看到一句ffplay需要指定yuv图像大小,因为yuv文件不包含宽高数据所以必须用-video_size指定宽和高,这才反应过来yuvplayer需要设置宽高才能正常显示。
- Size->Custom->修改宽高
- Color->选择对应的YUV格式
ffmpeg转换及查看YUV图像
通过ffmpeg利用原始测试图片,来得到YUV420P的图像:
./ffmpeg -i ./originnal_pic/lena512color.tiff -pix_fmt yuv420p ./YUV/lena512_yuv420p.yuv
通过ffplay显示YUV图像:
./ffplay.exe -video_size 512*512 ./YUV/lena512_yuv420p.yuv
YUV Parser
简单的解析YUV图像代码,代码均来自于雷霄骅先生的博客。
运行环境:Windows10、VS2017
1. 分离YUV420P像素数据中的Y、U、V分量
分离YUV420P的Y、U、V保存为3个文件。
bool YuvParser::yuv420_split(const std::string input_url, int width, int height, int frame_num)
{
    FILE *input_file = fopen(input_url.c_str(), "rb+");
    FILE *output_y = fopen("output_420_y.y", "wb+");
    FILE *output_u = fopen("output_420_u.y", "wb+");
    FILE *output_v = fopen("output_420_v.y", "wb+");

    unsigned char *picture = new unsigned char[width * height * 3 / 2];

    for (int i = 0; i < frame_num; i++) {
        fread(picture, 1, width * height * 3 / 2, input_file);

        fwrite(picture, 1, width * height, output_y);
        fwrite(picture + width * height, 1, width * height / 4, output_u);
        fwrite(picture + width * height * 5 / 4, 1, width * height / 4, output_v);
    }

    delete[] picture;
    fclose(input_file);
    fclose(output_y);
    fclose(output_u);
    fclose(output_v);
    return true;
}
解析出来的图像需要用yuvplayer查看,原始图片为512*512,如下图:

解析后图片分为3个分量,Y、U、V,使用yuvplayer,在Color选项卡中选中分量Y,首先查看Y分量,尺寸为512*512。

U、V如下图,尺寸为256*256。


2. 分离YUV444P像素数据中的Y、U、V分量
分离YUV444P的Y、U、V保存为3个文件。
bool YuvParser::yuv444_split(const std::string input_url, int width, int height, int frame_num)
{
    FILE *input_file = fopen(input_url.c_str(), "rb+");
    FILE *output_y = fopen("output_444_y.y", "wb+");
    FILE *output_u = fopen("output_444_u.y", "wb+");
    FILE *output_v = fopen("output_444_v.y", "wb+");

    unsigned char *picture = new unsigned char[width * height * 3];

    for (int i = 0; i < frame_num; i++) {
        fread(picture, 1, width * height * 3, input_file);

        fwrite(picture, 1, width * height, output_y);
        fwrite(picture + width * height, 1, width * height, output_u);
        fwrite(picture + width * height * 2, 1, width * height, output_v);
    }

    delete[] picture;
    fclose(input_file);
    fclose(output_y);
    fclose(output_u);
    fclose(output_v);
    return true;
}
原图依旧是lena标准图,用ffmpeg转换为YUV444P,分离后效果如下


3. 将YUV420P像素数据去掉颜色(灰度图)
将YUV420P格式像素数据的彩色去掉,变成纯粹的灰度图。
bool YuvParser::yuv420_gray(const std::string input_url, int width, int height, int frame_num)
{
    FILE *input_file = fopen(input_url.c_str(), "rb+");
    FILE *output_gray = fopen("output_420_gray.yuv", "wb+");

    unsigned char *picture = new unsigned char[width * height * 3 / 2];

    for (int i = 0; i < frame_num; i++) {
        fread(picture, 1, width * height * 3 / 2, input_file);
        memset(picture + width * height, 128, width * height / 2);
        fwrite(picture, 1, width * height * 3 / 2, output_gray);
    }

    delete[] picture;
    fclose(input_file);
    fclose(output_gray);
    return true;
}
处理结果如下:

4. 将YUV420P像素数据的亮度减半
在YUV中Y代表亮度,所以只需要将Y减半,图像便会出现亮度减半。
bool YuvParser::yuv420_half_bright(const std::string input_url, int width, int height, int frame_num)
{
    FILE *input_file = fopen(input_url.c_str(), "rb+");
    FILE *output_half_bright = fopen("output_420_half_bright.yuv", "wb+");

    unsigned char *picture = new unsigned char[width * height * 3 / 2];

    for (int i = 0; i < frame_num; i++) {
        fread(picture, 1, width * height * 3 / 2, input_file);
        for (int cur_pixel = 0; cur_pixel < width * height; cur_pixel++) {
            // half Y
            picture[cur_pixel] /= 2;
        }
        fwrite(picture, 1, width * height * 3 / 2, output_half_bright);
    }

    delete[] picture;
    fclose(input_file);
    fclose(output_half_bright);
    return true;
}
亮度减半效果如下

5. 将YUV420P像素数据周围加上边框
通过修改YUV数据中特定位置的亮度分量Y的数值,将Y值调到最亮(255),给图像添加一个“边框”的效果。
bool YuvParser::yuv420_border(const std::string input_url, int width, int height, int border_length, int frame_num)
{
    FILE *input_file = fopen(input_url.c_str(), "rb+");
    FILE *output_border = fopen("output_420_border.yuv", "wb+");

    unsigned char *picture = new unsigned char[width * height * 3 / 2];

    for (int i = 0; i < frame_num; i++) {
        fread(picture, 1, width * height * 3 / 2, input_file);
        for (int cur_height = 0; cur_height < height; cur_height++) {
            for (int cur_width = 0; cur_width < width; cur_width++) {
                if (cur_width < border_length || cur_width > width - border_length ||
                    cur_height < border_length || cur_height > height - border_length) {
                    picture[cur_height * width + cur_width] = 255;
                }
            }
        }
        fwrite(picture, 1, width * height * 3 / 2, output_border);
    }

    delete[] picture;
    fclose(input_file);
    fclose(output_border);
    return true;
}
20像素的边框效果图如下

6. 生成YUV420P格式的灰阶测试图
以下函数可以生成一张灰阶测试图。
bool YuvParser::yuv420_graybar(int width, int height, int y_min, int y_max, int bar_num)
{
    FILE *output_graybar = fopen("output_420_graybar.yuv", "wb+");

    unsigned char *picture = new unsigned char[width * height * 3 / 2];

    if (bar_num == 1 && y_max != y_min) {
        return false;
    }

    float luma_range = (float)(y_max - y_min) / (float)(bar_num > 1 ? bar_num - 1 : bar_num);
    unsigned char cur_luma = y_min;
    int cur_block = 0;
    int bar_width = width / bar_num;

    // write Y
    for (int cur_height = 0; cur_height < height; cur_height++) {
        for (int cur_width = 0; cur_width < width; cur_width++) {
            cur_block = (cur_width / bar_width == bar_num) ? (bar_num - 1) : (cur_width / bar_width);
            cur_luma = y_min + (unsigned char)(cur_block * luma_range);
            picture[cur_height * width + cur_width] = cur_luma;
        }
    }

    // NOTE: write U and write V can use memset to set,
    //       write them separately to make them easier
    //       to understand

    // write U
    for (int cur_height = 0; cur_height < height / 2; cur_height++) {
        for (int cur_width = 0; cur_width < width / 2; cur_width++) {
            picture[height * width + cur_height * width / 2 + cur_width] = 128;
        }
    }

    // write V
    for (int cur_height = 0; cur_height < height / 2; cur_height++) {
        for (int cur_width = 0; cur_width < width / 2; cur_width++) {
            picture[height * width * 5 / 4 + cur_height * width / 2 + cur_width] = 128;
        }
    }

    fwrite(picture, 1, width * height * 3 / 2, output_graybar);

    delete[] picture;
    fclose(output_graybar);
    return true;
}
简单学雷神测试下10阶灰阶测试图,宽1024像素,高512,效果如下图。

各个灰度条Y、U、V值如下
| Y | U | V |
|---|---|---|
| 0 | 128 | 128 |
| 28 | 128 | 128 |
| 56 | 128 | 128 |
| 85 | 128 | 128 |
| 113 | 128 | 128 |
| 141 | 128 | 128 |
| 170 | 128 | 128 |
| 198 | 128 | 128 |
| 226 | 128 | 128 |
| 255 | 128 | 128 |
7. 计算两个YUV420P像素数据的PSNR
PSNR是最基本的视频质量评价方法,对于8bit量化的像素数据来说,计算方法如下:
其中MSE计算方式为:
其中M、N代表图像的宽和高,
和
分别为两张图像每一个像素值,用来计算受损图像和原始图像之间的差别,评估受损图像的质量。PSNR取值通常情况下都在20-50的范围内,取值越高,代表两张图像越接近,反映出受损图像质量越好。
bool YuvParser::yuv420_psnr(const std::string input_url1, const std::string input_url2, int width, int height, int frame_num)
{
    FILE *input_file1 = fopen(input_url1.c_str(), "rb+");
    FILE *input_file2 = fopen(input_url2.c_str(), "rb+");

    unsigned char *picture1 = new unsigned char[width * height * 3 / 2];
    unsigned char *picture2 = new unsigned char[width * height * 3 / 2];

    for (int i = 0; i < frame_num; i++) {
        fread(picture1, 1, width * height * 3 / 2, input_file1);
        fread(picture2, 1, width * height * 3 / 2, input_file2);

        double mse_total = 0, mse = 0, psnr = 0;
        for (int cur_pixel = 0; cur_pixel < width * height; cur_pixel++) {
            mse_total += pow((double)(picture1[cur_pixel] - picture2[cur_pixel]), 2);
        }
        mse = mse_total / (width * height);
        psnr = 10 * log10(255.0 * 255.0 / mse);
        printf("frame_num=%d psnr=%5.3f\n", frame_num, psnr);

        // Skip the UV component
        fseek(input_file1, width * height / 2, SEEK_CUR);
        fseek(input_file2, width * height / 2, SEEK_CUR);
    }

    delete[] picture1;
    delete[] picture2;
    fclose(input_file1);
    fclose(input_file2);
    return true;
}
由于我不晓得怎么让图片损坏,所以图片选用雷神的256*256的lena素材。
结果如下,为26.693:

未完待续
YUV整理弄了两天,代码跟着都敲了一遍,感觉现在格式已经搞懂了, 但是还有不懂得地方:
- 为什么U、V分量的无色是128?
- 如果像素不是4的倍数,那么YUV是怎么存储的?
- YUV4:2:0这些数字的解释是啥,虽然上面有总结到,但是还是一知半解?
后面还要做的:
-
利用ffmpeg搞一个YUV视频分离工具。
我已经看到有人做过了,后面写~~~链接先贴着
https://blog.csdn.net/longjiang321/article/details/103229035
