文章目录
一、源码和yum安装数据库的配置文件对比
源码安装mysql程序:
mysql 主配置目录:/usr/local/mysql
mysql 数据目录:/data/mysql
mysql 命令目录:/usr/local/mysql/bin/ 比如:mysql、mysqld、mysqlshow 等。
mysql 默认配置文件:/etc/my.cnf
mysql 启动文件:/usr/local/mysql/support-files/mysql.server 或者
是/etc/init.d/mysqld
mysql 日志文件:/data/mysql

yum 安装mariadb程序
mariadb 主配置目录:/var/lib/mysql
mariadb 数据目录:/var/lib/mysql
mariadb 命令目录:/usr/bin
mariadb 默认配置文件:/etc/my.cnf
mariadb 启动文件:/usr/bin
mariadb 日志文件:/var/log/mariadb
二、安装
1、
yum install mariadb mariadb-server -y
2、
systemctl restart mariadb
3、手动初始化mysql
[root@MySQL-server ~]#mysql_secure_installation

NOTE: RUNNING ALL PARTS OF THIS SCRIPT IS RECOMMENDED FOR ALL MariaDB
      SERVERS IN PRODUCTION USE!  PLEASE READ EACH STEP CAREFULLY!


In order to log into MariaDB to secure it, we'll need the current
password for the root user.  If you've just installed MariaDB, and
you haven't set the root password yet, the password will be blank,
so you should just press enter here.


Enter current password for root (enter for none):
OK, successfully used password, moving on...


Setting the root password ensures that nobody can log into the MariaDB
root user without the proper authorisation.


Set root password? [Y/n] Y
New password:
Re-enter new password:
Password updated successfully!
Reloading privilege tables..
 ... Success!


By default, a MariaDB installation has an anonymous user, allowing anyone
to log into MariaDB without having to have a user account created for
them.  This is intended only for testing, and to make the installation
go a bit smoother.  You should remove them before moving into a
production environment.


Remove anonymous users? [Y/n] Y
 ... Success!


Normally, root should only be allowed to connect from 'localhost'.  This
ensures that someone cannot guess at the root password from the network.


Disallow root login remotely? [Y/n] n
 ... skipping.


By default, MariaDB comes with a database named 'test' that anyone can
access.  This is also intended only for testing, and should be removed
before moving into a production environment.


Remove test database and access to it? [Y/n] n
 ... skipping.


Reloading the privilege tables will ensure that all changes made so far
will take effect immediately.


Reload privilege tables now? [Y/n] Y
 ... Success!


Cleaning up...


All done!  If you've completed all of the above steps, your MariaDB
installation should now be secure.


Thanks for using MariaDB!
开始做MySQL多实例
4、创建mysql用户
groupadd mysql
useradd -s /sbin/nologin -M mysql -g mysql
5、创建三个数据库实例的数据文件,并给权限
[root@MySQL-server ~]# mkdir -p /data/mysql/{3307,3308,3309};
chown -R mysql:mysql /data
chmod -R 731 /data
6、mysql_install_db生成即将使用的多个实例的数据文件
注意:在执行下面的操作后,如果后面把3308、3307、3309这三个目录删除了,再创建了,需要重新执行下面这个命令。
mysql_install_db --basedir=/usr --datadir=/data/mysql/3307 --user=mysql

mysql_install_db --basedir=/usr --datadir=/data/mysql/3308 --user=mysql

mysql_install_db --basedir=/usr --datadir=/data/mysql/3309 --user=mysql
其中的参数–basedir指定mysql的二进制文件目录,–datadir指定即将安装到的数据库文件目录,如果不知道–basedir该怎么填,可以登录进mysql后查询:

7、分别创建三个实例的配置文件
[root@MySQL-server mysql]# cd /etc/my.cnf.d/
[root@MySQL-server my.cnf.d] vim my3307.cnf
[client]
port = 3307
socket = /data/mysql/3307/mysql3307.sock
[mysqld]
datadir=/data/mysql/3307/
port = 3307
socket = /data/mysql/3307/mysql3307.sock
[root@localhost my.cnf.d]# cp my3307.cnf my3308.cnf
[root@localhost my.cnf.d]# cp my3307.cnf my3309.cnf
//把文件里面所有的3307改成3308或者3309即可:
8、编写三个启动脚本
(1)编写3307端口的数据库的启动脚本
mkdir /var/lib/mysql/bin
vim /var/lib/mysql/bin/mysql3307
#!/bin/bash
mysql_port=3307
mysql_username="root"
mysql_password="" #root用户的密码,注意这个不能自己随便改,改了便无法关闭这个mysql数据库实例。
function_start_mysql()
{
printf "Starting MySQL...\n"
mysqld_safe --defaults-file=/etc/my.cnf.d/my${mysql_port}.cnf 2>&1 > /dev/null &
}
function_stop_mysql()
{
printf "Stoping MySQL...\n"
mysqladmin -u ${mysql_username} -p${mysql_password} -S /data/mysql/${mysql_port}/mysql${mysql_port}.sock shutdown
}
function_restart_mysql()
{
printf "Restarting MySQL...\n"
function_stop_mysql
function_start_mysql
}
function_kill_mysql()
{
kill -9 $(ps -ef | grep 'bin/mysqld_safe' | grep ${mysql_port} | awk '{printf $2}')
kill -9 $(ps -ef | grep 'libexec/mysqld' | grep ${mysql_port} | awk '{printf $2}')
}
case $1 in
start)
function_start_mysql;;
stop)
function_stop_mysql;;
kill)
function_kill_mysql;;
restart)
function_stop_mysql
function_start_mysql;;
*)
echo "Usage: /data/dbdata_${mysql_port}/mysqld {start|stop|restart|kill}";;
esac
(2)编写3308端口的数据库的启动脚本
vim /var/lib/mysql/bin/mysql3308
#!/bin/bash
mysql_port=3308
mysql_username="root"
mysql_password="" #root用户的密码,注意这个不能自己随便改,改了便无法关闭这个mysql数据库实例。
function_start_mysql()
{
printf "Starting MySQL...\n"
mysqld_safe --defaults-file=/etc/my.cnf.d/my${mysql_port}.cnf 2>&1 > /dev/null &
}
function_stop_mysql()
{
printf "Stoping MySQL...\n"
mysqladmin -u ${mysql_username} -p${mysql_password} -S /data/mysql/${mysql_port}/mysql${mysql_port}.sock shutdown
}
function_restart_mysql()
{
printf "Restarting MySQL...\n"
function_stop_mysql
function_start_mysql
}
function_kill_mysql()
{
kill -9 $(ps -ef | grep 'bin/mysqld_safe' | grep ${mysql_port} | awk '{printf $2}')
kill -9 $(ps -ef | grep 'libexec/mysqld' | grep ${mysql_port} | awk '{printf $2}')
}
case $1 in
start)
function_start_mysql;;
stop)
function_stop_mysql;;
kill)
function_kill_mysql;;
restart)
function_stop_mysql
function_start_mysql;;
*)
echo "Usage: /data/dbdata_${mysql_port}/mysqld {start|stop|restart|kill}";;
esac
(3)编写3308端口的数据库的启动脚本
vim /var/lib/mysql/bin/mysql3308
#!/bin/bash
mysql_port=3309
mysql_username="root"
mysql_password="" #root用户的密码,注意这个不能自己随便改,改了便无法关闭这个mysql数据库实例。
function_start_mysql()
{
printf "Starting MySQL...\n"
mysqld_safe --defaults-file=/etc/my.cnf.d/my${mysql_port}.cnf 2>&1 > /dev/null &
}
function_stop_mysql()
{
printf "Stoping MySQL...\n"
mysqladmin -u ${mysql_username} -p${mysql_password} -S /data/mysql/${mysql_port}/mysql${mysql_port}.sock shutdown
}
function_restart_mysql()
{
printf "Restarting MySQL...\n"
function_stop_mysql
function_start_mysql
}
function_kill_mysql()
{
kill -9 $(ps -ef | grep 'bin/mysqld_safe' | grep ${mysql_port} | awk '{printf $2}')
kill -9 $(ps -ef | grep 'libexec/mysqld' | grep ${mysql_port} | awk '{printf $2}')
}
case $1 in
start)
function_start_mysql;;
stop)
function_stop_mysql;;
kill)
function_kill_mysql;;
restart)
function_stop_mysql
function_start_mysql;;
*)
echo "Usage: /data/dbdata_${mysql_port}/mysqld {start|stop|restart|kill}";;
esac
9、授予执行权限,可以启动脚本
[root@MySQL-server my.cnf.d]# chmod 777 /var/lib/mysql/bin/mysql3307
[root@MySQL-server my.cnf.d]# chmod 777 /var/lib/mysql/bin/mysql3308
[root@MySQL-server my.cnf.d]# chmod 777 /var/lib/mysql/bin/mysql3309
10、关闭yum安装的MySQL进程
systemctl stop mariadb
11、启动MySQL三个实例进程
/var/lib/mysql/bin/mysql3307 start
/var/lib/mysql/bin/mysql3308 start
/var/lib/mysql/bin/mysql3309 start
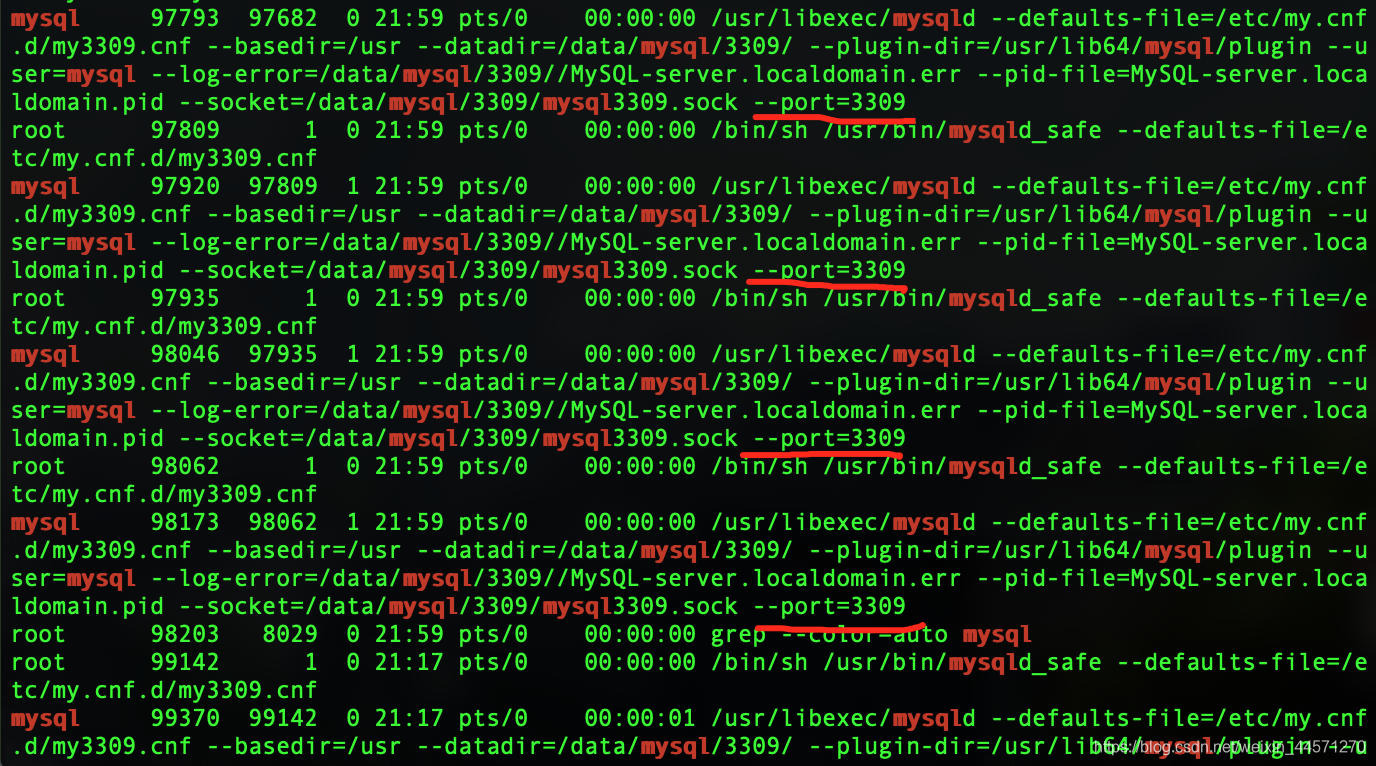
查看是否开启了三个mysql实例:
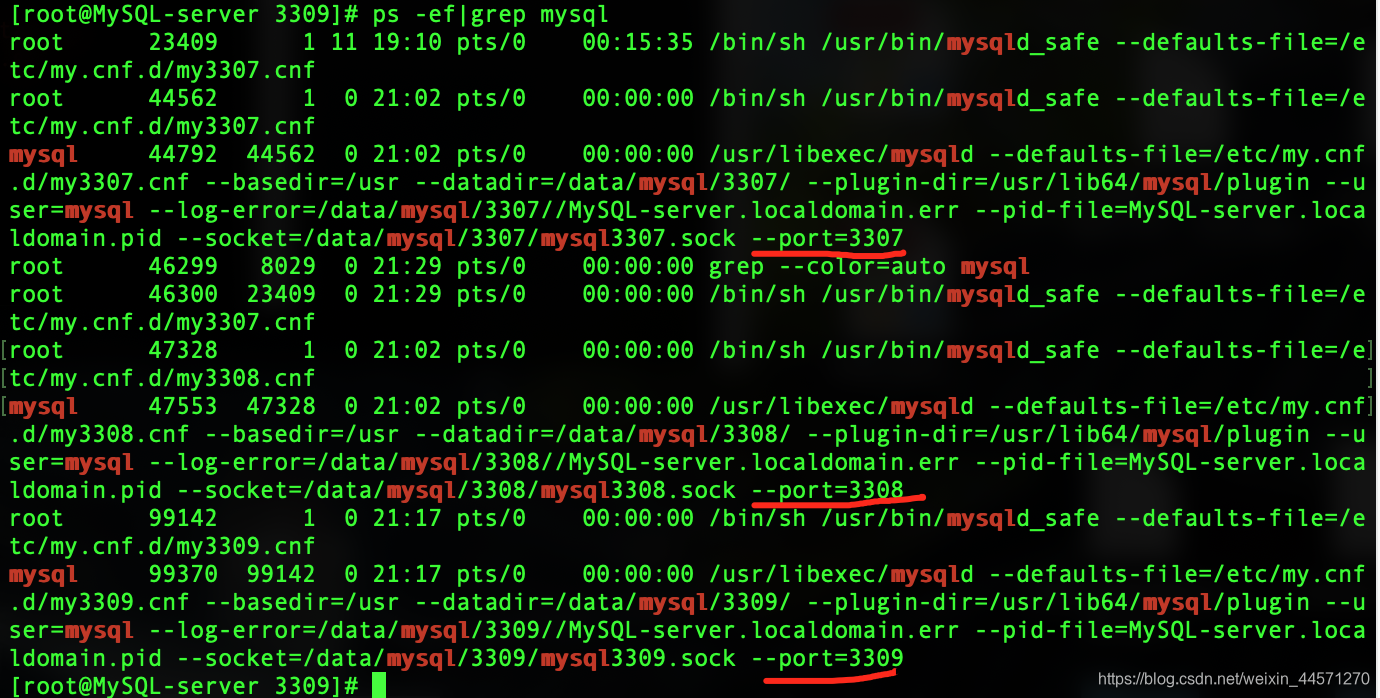
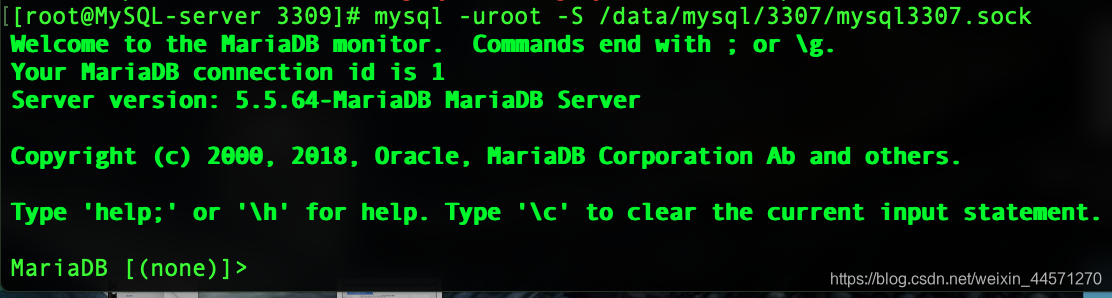
12、连接3307实例数据库
mysql -uroot -S /data/mysql/3307/mysql3307.sock
//因为我们在写数据库多实例启动脚本时,password设置为空,所以这里就不需要-p就可以直接登录进去。
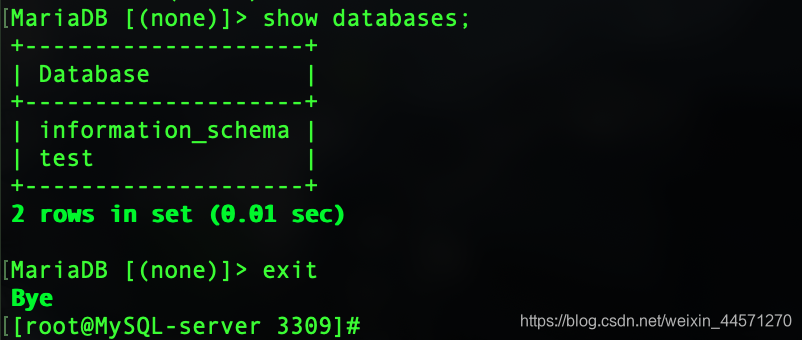
连接成功如下图所示:
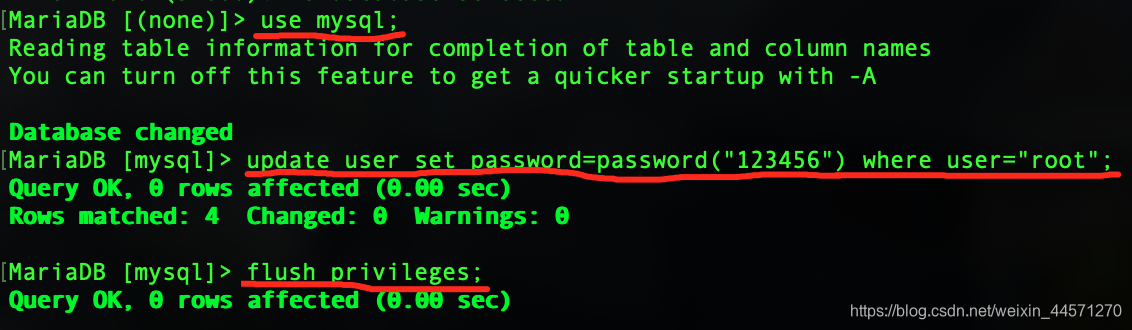
13、修改root用户的登录密码
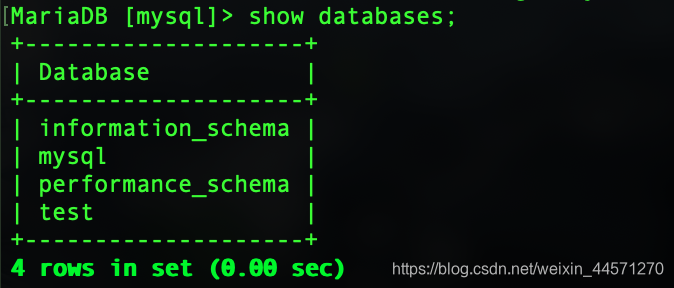
查看有没有mysql库:
14、我在安装好mysql多实例过后出现过两个问题
1、3309数据库实例可以反复创建多个:
2、3309数据库实例进去后没有mysql、performance数据库
 注:用户信息就在mysql数据库中,没有它就不能改root用户密码,且不需要密码和用户就可以登录进数据库。
上述这些问题,第一个问题一直都没有解决,第二个问题,睡了一觉,第二天就好了,登录进去数据库就都在了。
