为了更好的模拟生产服务器,可以在本地虚拟机进行相关测试。一般实际的生产服务器是仅能与本地主机或内网相同,所以虚拟机设置固定IP,选择仅主机模式做测试尤为重要。
虚拟机网络模式选择Hostonly,即仅主机模式,设置固定IP,和主机相同。
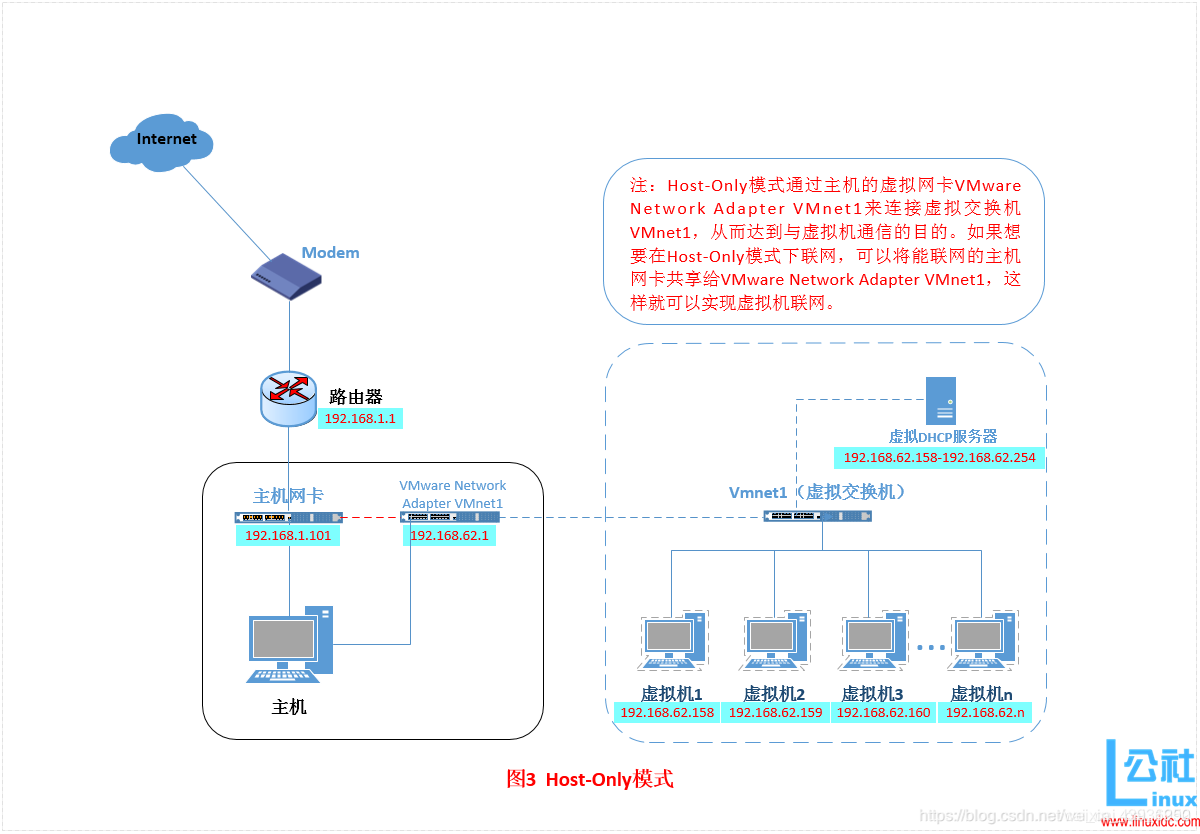
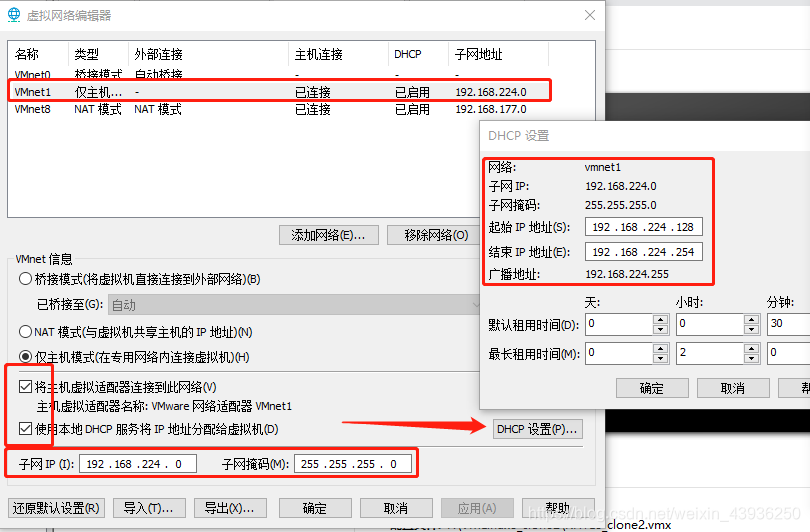
仅主机模式虚拟机使用的网卡是:VMware Network Adapter VMnet1网卡
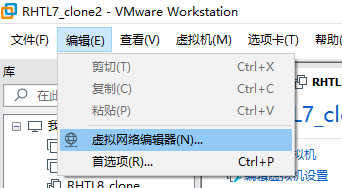
查看虚拟网络编辑器
菜单栏->“编辑”->“虚拟网络编辑器”
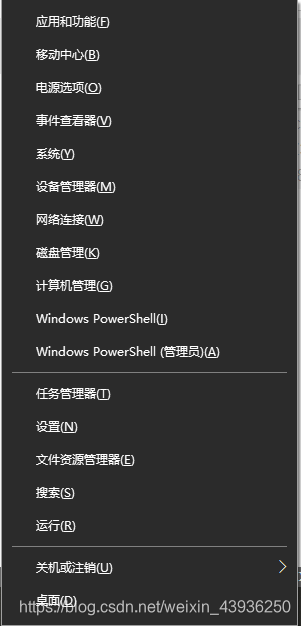
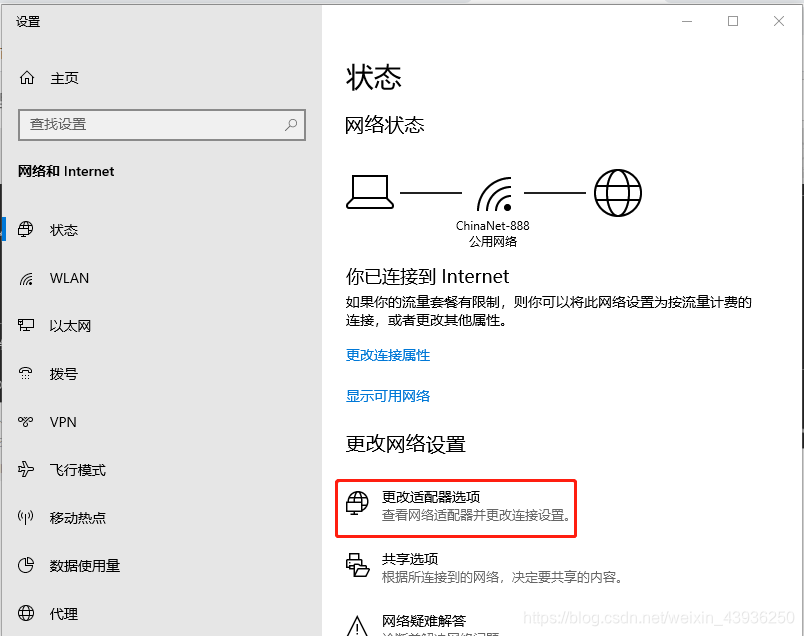
设置主机网卡
Windows键+X->“网络连接”->更改适配器选项
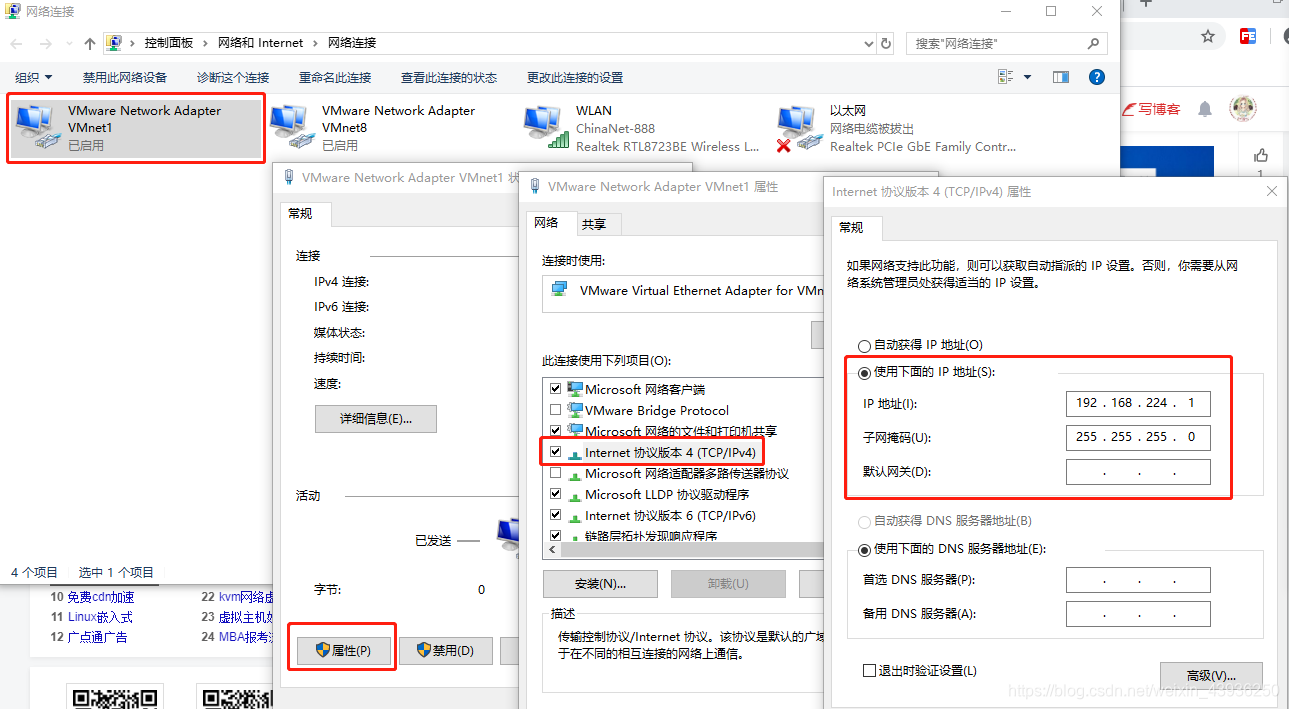
这里的ip与虚拟机ip的网段一致
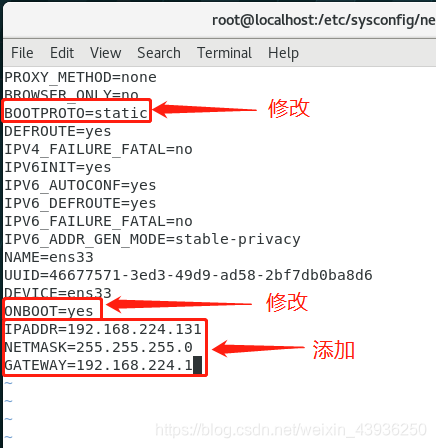
在Linux7中设置静态ip
[root@localhost ~]# cd /etc/sysconfig/network-scripts/
[root@localhost network-scripts]# vim ifcfg-ens33         ##编辑配置文件
[root@localhost network-scripts]# systemctl stop NetworkManager
[root@localhost network-scripts]# systemctl restart network
[root@localhost network-scripts]# systemctl start NetworkManager
[root@localhost network-scripts]# ifconfig
ens33: flags=4163<UP,BROADCAST,RUNNING,MULTICAST>  mtu 1500
        inet 192.168.224.131  netmask 255.255.255.0  broadcast 192.168.224.255
        inet6 fe80::20c:29ff:fe34:6ea1  prefixlen 64  scopeid 0x20<link>
        ether 00:0c:29:34:6e:a1  txqueuelen 1000  (Ethernet)
        RX packets 2  bytes 501 (501.0 B)
        RX errors 0  dropped 0  overruns 0  frame 0
        TX packets 30  bytes 4168 (4.0 KiB)
        TX errors 0  dropped 0 overruns 0  carrier 0  collisions 0

lo: flags=73<UP,LOOPBACK,RUNNING>  mtu 65536
        inet 127.0.0.1  netmask 255.0.0.0
        inet6 ::1  prefixlen 128  scopeid 0x10<host>
        loop  txqueuelen 1000  (Local Loopback)
        RX packets 152  bytes 15108 (14.7 KiB)
        RX errors 0  dropped 0  overruns 0  frame 0
        TX packets 152  bytes 15108 (14.7 KiB)
        TX errors 0  dropped 0 overruns 0  carrier 0  collisions 0

virbr0: flags=4099<UP,BROADCAST,MULTICAST>  mtu 1500
        inet 192.168.122.1  netmask 255.255.255.0  broadcast 192.168.122.255
        ether 52:54:00:14:c3:5c  txqueuelen 1000  (Ethernet)
        RX packets 0  bytes 0 (0.0 B)
        RX errors 0  dropped 0  overruns 0  frame 0
        TX packets 0  bytes 0 (0.0 B)
        TX errors 0  dropped 0 overruns 0  carrier 0  collisions 0
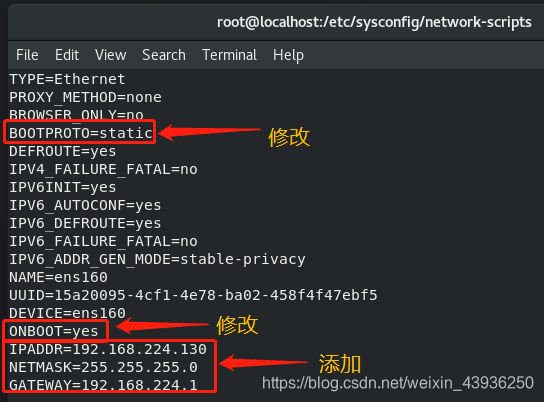
在Linux8中设置静态ip
[root@localhost ~]# cd /etc/sysconfig/network-scripts/
[root@localhost network-scripts]# ls
ifcfg-ens160
[root@localhost network-scripts]# vim ifcfg-ens160     ##编辑配置文件
[root@localhost network-scripts]# systemctl restart NetworkManager   ##重启网络
[root@localhost network-scripts]# ifconfig
ens160: flags=4163<UP,BROADCAST,RUNNING,MULTICAST>  mtu 1500
        inet 192.168.224.130  netmask 255.255.255.0  broadcast 192.168.224.255
        inet6 fe80::b277:6c55:4e4b:dd88  prefixlen 64  scopeid 0x20<link>
        ether 00:0c:29:4b:bd:69  txqueuelen 1000  (Ethernet)
        RX packets 1003  bytes 70769 (69.1 KiB)
        RX errors 0  dropped 0  overruns 0  frame 0
        TX packets 24  bytes 2905 (2.8 KiB)
        TX errors 0  dropped 0 overruns 0  carrier 0  collisions 0

lo: flags=73<UP,LOOPBACK,RUNNING>  mtu 65536
        inet 127.0.0.1  netmask 255.0.0.0
        inet6 ::1  prefixlen 128  scopeid 0x10<host>
        loop  txqueuelen 1000  (Local Loopback)
        RX packets 104  bytes 9380 (9.1 KiB)
        RX errors 0  dropped 0  overruns 0  frame 0
        TX packets 104  bytes 9380 (9.1 KiB)
        TX errors 0  dropped 0 overruns 0  carrier 0  collisions 0

virbr0: flags=4099<UP,BROADCAST,MULTICAST>  mtu 1500
        inet 192.168.122.1  netmask 255.255.255.0  broadcast 192.168.122.255
        ether 52:54:00:01:f1:c4  txqueuelen 1000  (Ethernet)
        RX packets 0  bytes 0 (0.0 B)
        RX errors 0  dropped 0  overruns 0  frame 0
        TX packets 0  bytes 0 (0.0 B)
        TX errors 0  dropped 0 overruns 0  carrier 0  collisions 0
测试两个虚拟机是否能联通
[root@localhost network-scripts]# ping 192.168.224.130 -c 3   ##Linux7 ping Linux8
PING 192.168.224.130 (192.168.224.130) 56(84) bytes of data.
64 bytes from 192.168.224.130: icmp_seq=1 ttl=64 time=0.372 ms
64 bytes from 192.168.224.130: icmp_seq=2 ttl=64 time=0.753 ms
64 bytes from 192.168.224.130: icmp_seq=3 ttl=64 time=0.686 ms

--- 192.168.224.130 ping statistics ---
3 packets transmitted, 3 received, 0% packet loss, time 2001ms
rtt min/avg/max/mdev = 0.372/0.603/0.753/0.168 ms
##############################################################
[root@localhost network-scripts]# ssh [email protected]    ##远程登陆Linux8
The authenticity of host '192.168.224.130 (192.168.224.130)' can't be established.
ECDSA key fingerprint is SHA256:wbmHVDDkVLCBLJXwY6zD+dS0vJpzqpEsXInY8CE0D9I.
ECDSA key fingerprint is MD5:d5:8a:f6:4e:71:10:de:75:c1:70:39:b6:6c:72:57:26.
Are you sure you want to continue connecting (yes/no)? yes
Warning: Permanently added '192.168.224.130' (ECDSA) to the list of known hosts.
[email protected]'s password:
Activate the web console with: systemctl enable --now cockpit.socket

Last login: Fri Feb 14 02:10:39 2020
[root@localhost ~]# ping 192.168.224.131 -c 3			  ##Linux8 ping Linux7
PING 192.168.224.131 (192.168.224.131) 56(84) bytes of data.
64 bytes from 192.168.224.131: icmp_seq=1 ttl=64 time=0.793 ms
64 bytes from 192.168.224.131: icmp_seq=2 ttl=64 time=0.752 ms
64 bytes from 192.168.224.131: icmp_seq=3 ttl=64 time=0.740 ms

--- 192.168.224.131 ping statistics ---
3 packets transmitted, 3 received, 0% packet loss, time 64ms
rtt min/avg/max/mdev = 0.740/0.761/0.793/0.039 ms
至此,成功在VMWare Workstation的仅主机模式下建立局域网。
