1、AOP思想
(1)在解决中文乱码的应用:
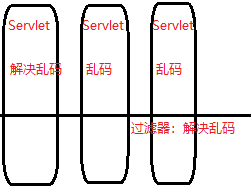
一般情况下如果在Servlet中要解决中文乱码问题需要在每一个Servlet中书写解决乱码的代码,但是,在运用了过滤器之后,就不再需要每一个Servlet中都写解决乱码的函数,减少了代码量。
AOP思想又叫做“面向切面编程”,过滤器就是面向每一个Servlet的,每一个Servlet都需要执行过滤器。
(2)动态代理:

代理类的那部分代码被固定下来了,不会因为业务的增加而逐渐庞大。
(3)拦截器:
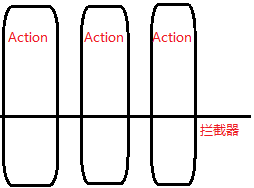
不需要在每一个Action中书写拦截器的代码,只需要在Action需要的时候在配置文件中将相应的拦截器配置进去即可。
2、Spring中的AOP:
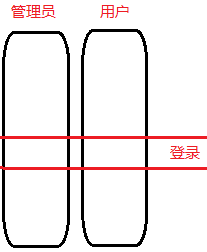
Spring能够为容器中管理的对象生成动态代理对象。这样做是有好处的,如果把登录功能写在每一个业务中当需要修改代码的时候,就需要对每一个业务进行修改,但是,如果把登录功能抽取出来形成独立的模块,问题就迎刃而解了。
3、Spring实现aop的原理
(1)动态代理(优先使用):被代理对象必须要实现接口,才能产生代理对象,如果没有接口将不能实现动态代理。

假如登录需要分为登录前、登录、登录后三部分,也就是说登录部分是相同的代码,而登录前和登录后的代码根据用户的不同进行不同的操作,那么,登录接口可以这样写:
public class LoginService {
public void userLogin(){
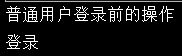
System.out.println("登录前的操作");
System.out.println("登录");
System.out.println("登录后的操作");
}
public void managerLogin(){ System.out.println("登录前的操作"); System.out.println("登录"); System.out.println("登录后的操作"); } }
这样写的话不仅会造成代码的冗余,而且,如果要修改登录的代码的话两个都要分别作出修改,可以使用动态代理的方式将公共部分抽取出来:
定义登录接口:
public interface LoginService {
    public void userLogin();
    public void managerLogin();
}
定义接口的实现类:
public class LoginProxyImp implements LoginService{
    public void userLogin(){
        System.out.println("普通用户登录前的操作");

    }
    public void managerLogin(){
        System.out.println("管理员登录前的操作");

    }
}
创建代理类:
import java.lang.reflect.InvocationHandler;
import java.lang.reflect.Method;
import java.lang.reflect.Proxy;
public class LoginProxy implements InvocationHandler {
    private  LoginService ls;
    public LoginProxy(LoginService ls) { super(); this.ls = ls; } public LoginService getloginProxy(){ LoginService loginService= (LoginService) Proxy.newProxyInstance(LoginService.class.getClassLoader(),//创建接口实例 LoginProxyImp.class.getInterfaces(),//与目标对象有相同的类加载器 this); //被代理的类所实现的接口(可以是多个) return loginService;//产生代理对象  } @Override public Object invoke(Object proxy, Method method, Object[] arg2) throws Throwable { Object invoke=method.invoke(ls,arg2); System.out.println("登录");//抽取出来的公共部分 return invoke; } }
测试类:
public class TestProxy {
    public static void main(String [] args){
        LoginService loginService=new LoginProxyImp();
        LoginProxy loginProxy=new LoginProxy(loginService);
        LoginService loginService1=loginProxy.getloginProxy();
        loginService1.userLogin();
    }
}
(2)cglib技术:可以对任何类生成代理对象,原理是对目标对象进行继承代理,如果该目标对象被final修饰,将无法使用cglib技术
登录接口:
public interface LoginService {
    public void userLogin();
    public void managerLogin();
}
接口的实现类:
public class LoginProxyImp implements LoginService{
    public void userLogin(){
        System.out.println("普通用户登录前的操作");

    }
    public void managerLogin(){
        System.out.println("管理员登录前的操作");

    }
}
创建代理类:
public class LoginProxy implements MethodInterceptor {

    public LoginService getLoginServiceProxy(){
        Enhancer enhancer=new Enhancer();//帮我们生成代理对象
        enhancer.setSuperclass(LoginProxyImp.class);//设置对谁进行代理
        enhancer.setCallback(this);//代理要做什么
        LoginService loginService=(LoginService) enhancer.create();//创建代理对象
        return loginService;
    }

    @Override
    public Object intercept(Object o, Method method, Object[] objects, MethodProxy methodProxy) throws Throwable {
        Object invokeSuper = methodProxy.invokeSuper(o,objects);
        return invokeSuper; } }
测试类:
public class TestProxy {
    public static void main(String [] args){
        LoginProxy loginProxy=new LoginProxy();
        LoginService loginService=loginProxy.getLoginServiceProxy();
        loginService.userLogin();
        System.out.println("登录");
    }
}

这种方式是代理对象继承了被代理对象。
4、aop中的名词
(1)连接点:目标对象中可以增强的的方法
public class LoginProxyImp implements LoginService{
    public void userLogin(){
        System.out.println("普通用户登录前的操作");

    }
    public void managerLogin(){
        System.out.println("管理员登录前的操作");

    }
}
该方法还可以通过动态代理增加登录的功能。
(2)切入点:目标对象已经增强的方法
    public void userLogin(){
        System.out.println("普通用户登录前的操作");

    }
    public void managerLogin(){
        System.out.println("管理员登录前的操作");

    }
例如:上述两个登录的方法通过动态代理已经增强的方法。
(3)advice(通知 / 增强):Spring中一共有五种通知类型
  public Object invoke(Object proxy, Method method, Object[] arg2) throws Throwable {
        Object invoke=method.invoke(ls,arg2);
        System.out.println("登录");//抽取出来的公共部分
        return invoke;
    }
加入了登录的功能,这部分代码是advice。
(4)Target(目标对象):
被代理的对象。
(5)weaving(织入):
将通知应用到切入点的过程。
(6)proxy(代理):
将通知织入到目标对象以后,形成代理对象
(7)切面(aspect):
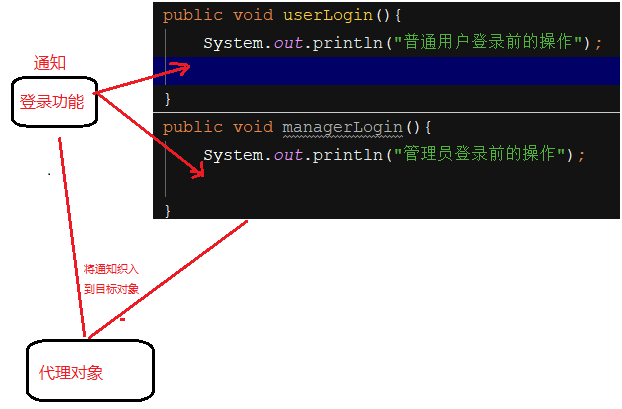
切入点加通知。
5、Spring中的aop演示
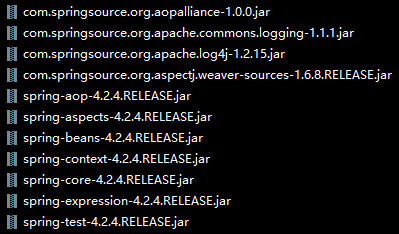
(1)导包:
(2)对配置文件进行配置:
需要先导入aop约束:

(3)创建接口:
public interface LoginService {
    public void userLogin();
    public void managerLogin();
}
(4)创建目标对象:
public class LoginServiceImp {
    public void userLogin(){
        System.out.println("普通用户登录前的操作");

    }
    public void managerLogin(){
        System.out.println("管理员登录前的操作");

    }
}
(5)创建通知类:
public class LoginServiceImp {
    public void userLogin(){
        System.out.println("普通用户登录前的操作");

    }
    public void managerLogin(){
        System.out.println("管理员登录前的操作");

    }
}
(6)配置Spring的配置文件:
<?xml version="1.0" encoding="UTF-8"?>
<beans xmlns:xsi="http://www.w3.org/2001/XMLSchema-instance"
       xmlns="http://www.springframework.org/schema/beans" xmlns:util="http://www.springframework.org/schema/util"
       xmlns:context="http://www.springframework.org/schema/context"
       xmlns:aop="http://www.springframework.org/schema/aop"
       xsi:schemaLocation="http://www.springframework.org/schema/beans http://www.springframework.org/schema/beans/spring-beans-4.2.xsd http://www.springframework.org/schema/util http://www.springframework.org/schema/util/spring-util.xsd http://www.springframework.org/schema/context http://www.springframework.org/schema/context/spring-context.xsd http://www.springframework.org/schema/aop http://www.springframework.org/schema/aop/spring-aop.xsd">
    <bean name="loginserviceTarget" class="pers.zhb.test.LoginServiceImp"></bean><!--配置目标对象-->
    <bean name="myadvice" class="pers.zhb.test.MyAdvice"></bean><!--配置通知对象-->
    <aop:config>
        <aop:pointcut  expression="execution(* pers.zhb.test.LoginServiceImp.userLogin())" id="pointcut"/>
        <aop:aspect ref="myadvice">
            <aop:before method="before" pointcut-ref="pointcut"/>
            <aop:after method="after" pointcut-ref="pointcut"/>
            <aop:after-throwing method="afterException" pointcut-ref="pointcut"/>
            <aop:around method="around" pointcut-ref="pointcut"/>
        </aop:aspect>
    </aop:config>

</beans>
(1)配置目标对象,即被代理的对象。
(2)配置通知对象,即需要加入的那部分代码。
(3)将通知织入目标对象:需要先配置接入点,即:userLogin(),将通知对象加入目标对象。
好处:通过配置文件的形式实现aop的开发,我们就不需要手动书写动态代理的代码了,可以进行任何类的代理,不需要接口也可以。
6、使用注解完成Spring的aop配置
配置文件的书写:
<?xml version="1.0" encoding="UTF-8"?>
<beans xmlns:xsi="http://www.w3.org/2001/XMLSchema-instance"
       xmlns="http://www.springframework.org/schema/beans" xmlns:util="http://www.springframework.org/schema/util"
       xmlns:context="http://www.springframework.org/schema/context"
       xmlns:aop="http://www.springframework.org/schema/aop"
       xsi:schemaLocation="http://www.springframework.org/schema/beans http://www.springframework.org/schema/beans/spring-beans-4.2.xsd http://www.springframework.org/schema/util http://www.springframework.org/schema/util/spring-util.xsd http://www.springframework.org/schema/context http://www.springframework.org/schema/context/spring-context.xsd http://www.springframework.org/schema/aop http://www.springframework.org/schema/aop/spring-aop.xsd">
    <bean name="loginserviceTarget" class="pers.zhb.test.LoginServiceImp"></bean><!--配置目标对象-->
    <bean name="myadvice" class="pers.zhb.test.MyAdvice"></bean><!--配置通知对象-->
    <aop:aspectj-autoproxy></aop:aspectj-autoproxy><!--开启使用注解完成织入-->
</beans>
使用注解配置:
package pers.zhb.test;
//通知类,即用于增强目标对象的代码
import org.aspectj.lang.ProceedingJoinPoint;
import org.aspectj.lang.annotation.*;

@Aspect//表示该类是一个通知类
public class MyAdvice {
    @Before("execution(* pers.zhb.test.LoginServiceImp.userLogin())")//指定切入点(前置通知)
    public void before(){
       System.out.println("我是前置通知!"); } @Around("execution(* pers.zhb.test.LoginServiceImp.userLogin())") public Object around(ProceedingJoinPoint proceedingJoinPoint) throws Throwable { System.out.println("这是环绕通知之前的部分!"); Object process=proceedingJoinPoint.proceed();//环绕通知 System.out.println("这是环绕通知之后的部分!"); return process; } @AfterThrowing("execution(* pers.zhb.test.LoginServiceImp.userLogin())") public void afterException(){ System.out.println("异常出现了!"); } @After("execution(* pers.zhb.test.LoginServiceImp.userLogin())") public void after(){ System.out.println("后置通知,出现异常也能被调用!"); } @AfterReturning("execution(* pers.zhb.test.LoginServiceImp.userLogin())") public void AfterReturning(){ System.out.println("我是后置通知,出现异常不会执行!!"); } }

但是,用上面的方法配置的注解不利于修改,可以进行下面的配置:
package pers.zhb.test;
//通知类,即用于增强目标对象的代码
import org.aspectj.lang.ProceedingJoinPoint;
import org.aspectj.lang.annotation.*;

@Aspect//表示该类是一个通知类
public class MyAdvice {
    @Pointcut("execution(* pers.zhb.test.LoginServiceImp.userLogin())")
    public void pc(){ } @Before("MyAdvice.pc()")//指定切入点(前置通知) public void before(){ System.out.println("我是前置通知!"); } @Around("MyAdvice.pc()") public Object around(ProceedingJoinPoint proceedingJoinPoint) throws Throwable { System.out.println("这是环绕通知之前的部分!"); Object process=proceedingJoinPoint.proceed();//环绕通知 System.out.println("这是环绕通知之后的部分!"); return process; } @AfterThrowing("MyAdvice.pc()") public void afterException(){ System.out.println("异常出现了!"); } @After("MyAdvice.pc()") public void after(){ System.out.println("后置通知,出现异常也能被调用!"); } @AfterReturning("execution(* pers.zhb.test.LoginServiceImp.userLogin())") public void AfterReturning(){ System.out.println("我是后置通知,出现异常不会执行!!"); } }