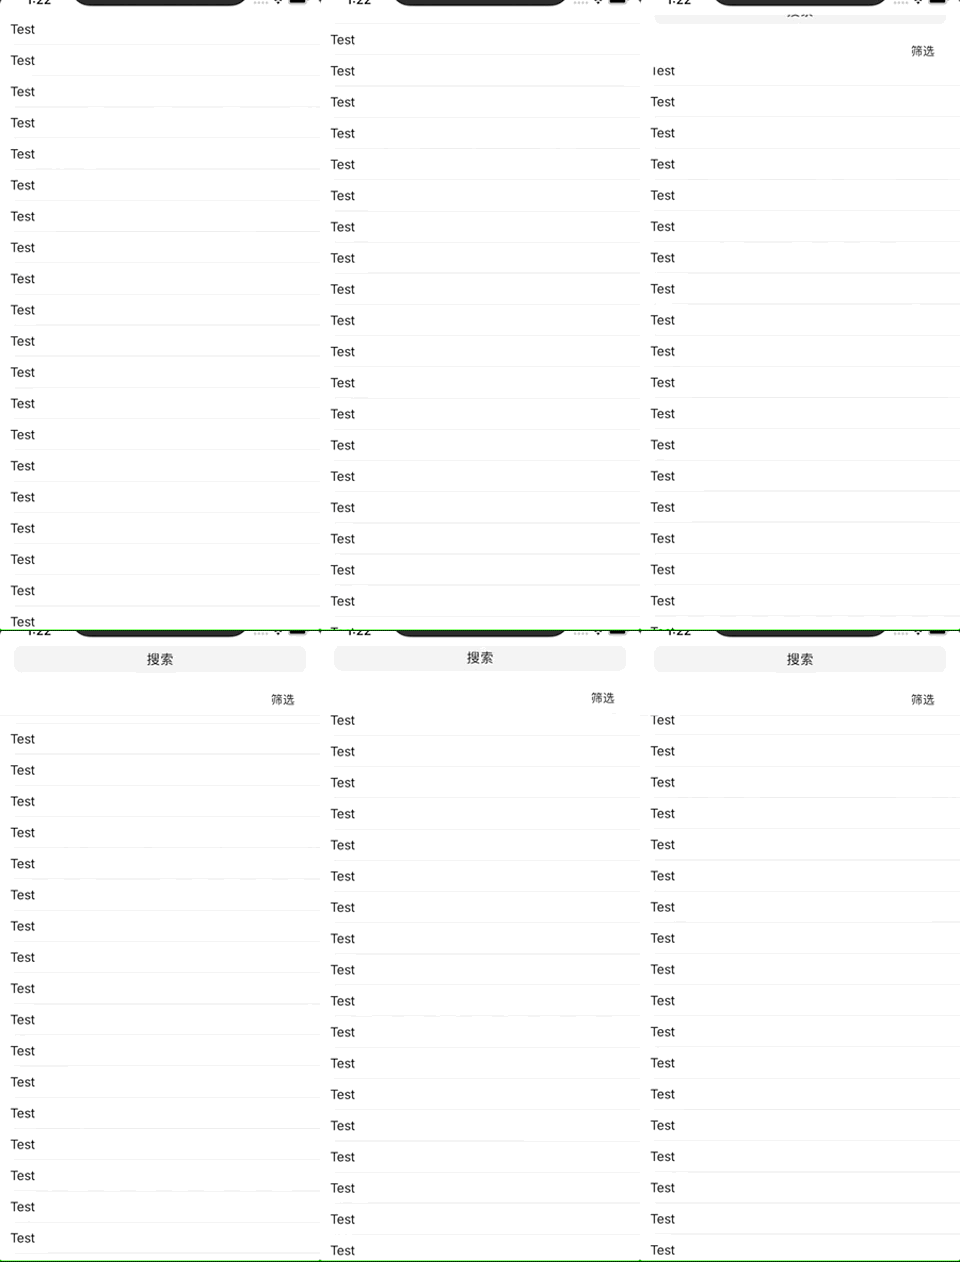
最近疫情爆发,在家里没事看看闲鱼IOSApp,发现商品列表导航栏自动隐藏的功能还是很不错的,于是决定自己动手写一个。
闲鱼:

思路:
导航会跟随底下的的tableView的向上移动实现隐藏。会根据上拉重新出现。那就是通过tableView的delegate获取偏移量contentOffset实现,同时判断一下上拉 下拉等动作。
自己的效果:

步骤
初始化项目:
新建项目。我是纯代码的。所以不使用storyBoard。使用了SnapKit。
不适配iPad,project Genral里取消勾选iPad,然后和SceneSession有关的都注释掉。有两部分,一部分在AppDelegate里,一部分在SceneDelegate里。SceneDelegate可以删除或者全代码注释掉。
IOS 13 以上项目初始化配置:
- project Genral里取消勾选iPad
AppDelegate里注释掉Mark为SceneSession部分的代码- 注释掉
SceneDelegate里全部的代码、或者删除 - info.plist 里删除
Application Scene Manifest项 - 在
AppDelegate里添加一些初始化代码,如下:
    var window: UIWindow?


    func application(_ application: UIApplication, didFinishLaunchingWithOptions launchOptions: [UIApplication.LaunchOptionsKey: Any]?) -> Bool {
        // Override point for customization after application launch.

        window = UIWindow(frame: UIScreen.main.bounds)
        window?.backgroundColor = UIColor.white
        let navVc = UINavigationController()
        navVc.viewControllers = [ViewController()]
        window?.rootViewController = navVc

        window?.makeKeyAndVisible()
        return true
    }
运行模拟器,正常出现白色背景加上一个导航栏则初始化完成。
自定义一个navBar:
比较简单,我直接放代码,替换一下原本的navBar即可。
class CustomNavBar:UINavigationBar{
    //存BarContentView的引用
    private var rootBackView:UIView?
    //具体的内容
    private var contentView:UIView?
    private var isInit = false
    private let contentViewHeight:CGFloat = 90

    override func layoutSubviews() {
        super.layoutSubviews()
        for subview in self.subviews {
            let stringFromClass = NSStringFromClass(subview.classForCoder)
            if stringFromClass.contains("BarBackground") {
                subview.frame = self.bounds
            } else if stringFromClass.contains("UINavigationBarContentView") {
                subview.frame = CGRect(x: 0, y: 0, width: self.frame.width, height: contentViewHeight + statusBarHeight)
                subview.snp.makeConstraints { (make) in
                    make.edges.equalToSuperview()
                }
                subview.backgroundColor = UIColor.white
                if rootBackView == nil{
                    rootBackView = subview
                }
            }
        }
        if !isInit{
            initSelf()
        }
    }
    //隐藏自己的方法
    public func toggleVisible(_ value:Bool){
        if value{
            UIView.animate(withDuration: 0.2, animations: {
                self.frame = CGRect(x: 0, y: 0, width: self.frame.width, height:self.contentViewHeight + statusBarHeight)
                self.layoutIfNeeded()
            })
        }
        else{
            UIView.animate(withDuration: 0.2, animations: {
                self.frame = CGRect(x: 0, y: 0, width: self.frame.width, height: statusBarHeight)
                self.layoutIfNeeded()
            })
        }
    }

    private func initSelf(){
        isInit = true

        contentView = UIView()
        self.rootBackView?.addSubview(contentView!)
        contentView?.snp.makeConstraints({ (make) in
            make.height.equalTo(contentViewHeight)
            make.left.right.equalToSuperview()
            make.bottom.equalToSuperview()
        })

        let titleLabel:UILabel = UILabel()
        self.contentView?.addSubview(titleLabel)
        titleLabel.text = "搜索"
        titleLabel.textColor = UIColor.black
        titleLabel.backgroundColor = UIColor(red: 240/255, green: 240/255, blue: 240/255, alpha: 1)
        titleLabel.layer.cornerRadius = 10
        titleLabel.clipsToBounds = true
        titleLabel.textAlignment = .center
        titleLabel.snp.makeConstraints { (make) in
            make.top.equalToSuperview()
            make.left.equalTo(20)
            make.right.equalTo(-20)
            make.height.equalTo(35)
        }

        let flit_btn = UIButton()
        self.contentView?.addSubview(flit_btn)
        flit_btn.setTitle("筛选", for: .normal)
        flit_btn.setTitleColor(UIColor.black, for: .normal)
        flit_btn.titleLabel?.font = UIFont.systemFont(ofSize: 15)
        //flit_btn.backgroundColor = UIColor.lightGray
        flit_btn.snp.makeConstraints { (make) in
            make.bottom.equalToSuperview().offset(-1)
            make.right.equalToSuperview()
            make.width.equalTo(100)
            make.height.equalTo(40)
        }

        //navBar的分割线
        let darkLine = UIView()
        self.contentView?.addSubview(darkLine)
        darkLine.backgroundColor = UIColor(red: 235/255, green: 235/255, blue: 235/255, alpha: 1)
        darkLine.snp.makeConstraints { (make) in
            make.bottom.equalToSuperview()
            make.left.right.equalToSuperview()
            make.height.equalTo(1)
        }

        //用来遮挡进入statusBar的内容
        let maskView = UIView()
        self.rootBackView?.addSubview(maskView)
        maskView.backgroundColor = rootBackView?.backgroundColor
        maskView.snp.makeConstraints { (make) in
            make.left.top.right.equalToSuperview()
            make.height.equalTo(statusBarHeight)
        }


    }
}
在ViewController里添加这个navBar和一个UITableView:
自定义cell的代码这里就不给出了。太简单了。就是一个nib
class ViewController: UIViewController ,UITableViewDelegate,UITableViewDataSource{


    private lazy var navBar:CustomNavBar = {
        let navBar = CustomNavBar()
        navBar.frame = CGRect(x: 0, y: 0, width: kScreenW, height: statusBarHeight+90)
        navBar.clipsToBounds = true
        return navBar
    }()
    private lazy var tableView:UITableView = {
        let view = UITableView()
        view.delegate = self
        view.dataSource = self
        view.showsVerticalScrollIndicator = false
        view.register(UINib(nibName: "CustomTableViewCell", bundle: nil), forCellReuseIdentifier: "itemCell")
        return view
    }()
    private var navBarItem:UINavigationItem = UINavigationItem()
    override func viewDidLoad() {
        super.viewDidLoad()
        setupUI()
        navigationController?.setNavigationBarHidden(true, animated: false)
        self.view.addSubview(navBar)
        navBar.items = [navBarItem]
        self.view.backgroundColor = UIColor(red: 235/255, green: 235/255, blue: 235/255, alpha: 1)
    }

    private func setupUI(){
        self.view.addSubview(tableView)
        tableView.snp.makeConstraints { (make) in
            make.edges.equalToSuperview()
        }
    }

}

extension ViewController {

    func tableView(_ tableView: UITableView, numberOfRowsInSection section: Int) -> Int {
        return 100
    }

    func tableView(_ tableView: UITableView, heightForRowAt indexPath: IndexPath) -> CGFloat {
        return 40
    }

    func tableView(_ tableView: UITableView, cellForRowAt indexPath: IndexPath) -> UITableViewCell {
        let cell = tableView.dequeueReusableCell(withIdentifier: "itemCell", for: indexPath) as! CustomTableViewCell
        cell.setText("Test")
        return cell
    }

}
UI结束了,接下来进入核心:
定义几个私有变量
    //上次触碰TableView时的offset
    private var lastContentOffset:CGFloat = 0
    //触碰拖拽距离
    private var tempValue:CGFloat = 0
    //上次拖拽的方向 (1)-向上 (-1)-向下
    private var lastDirection:Int = 0
在extension里添加三个方法:
//当scollView被滑动时
func scrollViewDidScroll(_ scrollView: UIScrollView) {
        //当scrollView被手指滑动时,如果不判断,在tableView被载入时会调用几次这个方法,造成自己隐藏。
        if scrollView.isTracking{
            //向下正 向上负
            let currentOffset = scrollView.contentOffset.y
            let offset = currentOffset - lastContentOffset
            //单次动作的幅度
            tempValue += offset
            if offset <= 0{
                //向上
                //变向清零
                if lastDirection != 0{
                    tempValue = 0
                    lastDirection = 0
                }
                scroll_handler(direct: -1, range: tempValue)
            }else{
                //向下
                //变向清零
                if lastDirection != 1{
                    tempValue = 0
                    lastDirection = 1
                }
                scroll_handler(direct: 1, range: tempValue)
            }
            lastContentOffset = currentOffset
        }

    }
    //当手指结束拖拽离开屏幕时
    func scrollViewWillEndDragging(_ scrollView: UIScrollView, withVelocity velocity: CGPoint, targetContentOffset: UnsafeMutablePointer<CGPoint>) {
        //如果没有完全隐藏
        if self.navBar.frame.height > statusBarHeight {
            //如果有向下的惯性
            if velocity.y > 0{
                //自动隐藏
                self.navBar.toggleVisible(false)
                tempValue = 0
            }
        }
    }
    //处理
    public func scroll_handler(direct:Int,range:CGFloat){
        if direct < 0{
            //向上移动的话直接显示navBar
            self.navBar.toggleVisible(true)
        }
        else{
            //向下移动就根据range来调整navBar的高度
            if self.navBar.frame.height > statusBarHeight {
                let _f = navBar.frame
                var height = statusBarHeight + 90 + range * -1
                height = height >= statusBarHeight ? height :statusBarHeight
                navBar.frame = CGRect(x: 0, y: 0, width: _f.width, height: height)

            }
        }
    }
运行就可以看到效果了。
这是我的第一篇博文,纯手打,转载请注明出处。如果觉得有用,还请点个赞呢。
