使用AppBarLayout实现程序栏布局
在上一篇TabLayout基础上增加顶部程序栏可收起和滚动显示多图
程序编写思路:
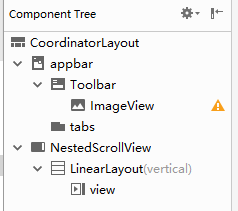
1.主界面AppBarLayout+NestedScrollView布局。
AppBarLayout=TabLayout+ToolBar在TabLayout基础上实现顶部程序栏可收起功能。NestedScrolView实现下拉进度条显示多幅图片。
2.其他与上一篇基本一致,创建3个XML,并通过Fragment加载。主程序覆写onCreate方法,创建FragmentPagerAdapter,动态调用Fragment。
<?xml version="1.0" encoding="utf-8"?>
<android.support.design.widget.CoordinatorLayout xmlns:android="http://schemas.android.com/apk/res/android"
    xmlns:tools="http://schemas.android.com/tools"
    xmlns:app="http://schemas.android.com/apk/res-auto"
    android:layout_width="match_parent"
    android:layout_height="match_parent">

    <android.support.design.widget.AppBarLayout
        android:id="@+id/appbar"
        android:layout_height="wrap_content"
        android:layout_width="match_parent">

        <android.support.v7.widget.Toolbar
            android:layout_width="match_parent"
            android:layout_height="?attr/actionBarSize"
            android:gravity="center"
            app:layout_scrollFlags="scroll|enterAlways">

            <ImageView
                android:layout_width="match_parent"
                android:layout_height="wrap_content"
                android:src="@mipmap/ic_launcher" />
        </android.support.v7.widget.Toolbar>

        <android.support.design.widget.TabLayout
            android:id="@+id/tabs"
            app:tabMinWidth="100dp"
            android:layout_width="match_parent"
            android:layout_height="wrap_content"
            app:layout_scrollFlags="scroll|enterAlways"
            app:tabMode="scrollable">

        </android.support.design.widget.TabLayout>
    </android.support.design.widget.AppBarLayout>

    <android.support.v4.widget.NestedScrollView
        android:layout_width="match_parent"
        android:layout_height="match_parent"
        android:fillViewport="true"
        app:layout_behavior="android.support.design.widget.AppBarLayout$ScrollingViewBehavior">

        <LinearLayout
            android:layout_width="match_parent"
            android:layout_height="match_parent"
            android:orientation="vertical"
            tools:context=".MainActivity">

            <android.support.v4.view.ViewPager
                android:id="@+id/view"
                android:layout_width="match_parent"
                android:layout_height="match_parent" />

        </LinearLayout>
    </android.support.v4.widget.NestedScrollView>
</android.support.design.widget.CoordinatorLayout>
<?xml version="1.0" encoding="utf-8"?>
<LinearLayout xmlns:android="http://schemas.android.com/apk/res/android"
    xmlns:tools="http://schemas.android.com/tools"
    android:orientation="vertical"
    xmlns:app="http://schemas.android.com/apk/res-auto"
    android:layout_width="match_parent"
    android:layout_height="match_parent">

    <android.support.v4.widget.NestedScrollView
        android:layout_width="match_parent"
        android:layout_height="match_parent"
        android:layout_weight="1"
        android:fillViewport="true">

        <LinearLayout
            android:layout_width="match_parent"
            android:layout_height="wrap_content"
            android:orientation="vertical" >

            <ImageView
                android:id="@+id/imageView9"
                android:layout_width="match_parent"
                android:layout_height="328dp"
                app:srcCompat="@drawable/ic_launcher_background" />

            <ImageView
                android:id="@+id/imageView10"
                android:layout_width="match_parent"
                android:layout_height="330dp"
                app:srcCompat="@mipmap/ic_launcher" />

            <ImageView
                android:id="@+id/imageView12"
                android:layout_width="match_parent"
                android:layout_height="264dp"
                app:srcCompat="@mipmap/ic_launcher_round" />

            <ImageView
                android:id="@+id/imageView13"
                android:layout_width="match_parent"
                android:layout_height="wrap_content"
                tools:srcCompat="@tools:sample/backgrounds/scenic[0]" />

        </LinearLayout>
    </android.support.v4.widget.NestedScrollView>

</LinearLayout>

package com.example.wxt.appbarlayout;

import android.os.Bundle;
import android.support.annotation.NonNull;
import android.support.annotation.Nullable;
import android.support.v4.app.Fragment;
import android.view.LayoutInflater;
import android.view.View;
import android.view.ViewGroup;

public class MyFragment2 extends Fragment {
    @Nullable
    @Override
    public View onCreateView(@NonNull LayoutInflater inflater, @Nullable ViewGroup container, @Nullable Bundle savedInstanceState) {
        View view1 = inflater.inflate(R.layout.layout_page2,container,false);
        return view1;
    }
}
package com.example.wxt.appbarlayout;
import android.support.annotation.Nullable;
import android.support.design.widget.TabLayout;
import android.support.v4.app.Fragment;
import android.support.v4.app.FragmentManager;
import android.support.v4.app.FragmentPagerAdapter;
import android.support.v4.view.ViewPager;
import android.support.v7.app.AppCompatActivity;
import android.os.Bundle;
import java.util.ArrayList;
import java.util.List;
public class MainActivity extends AppCompatActivity {
TabLayout tabLayout;
ViewPager viewPager;
List<Fragment>fragments;
String[]title={"新闻","财经","文学"};
@Override
protected void onCreate(Bundle savedInstanceState) {
super.onCreate(savedInstanceState);
setContentView(R.layout.activity_main);
tabLayout=findViewById(R.id.tabs);
viewPager=findViewById(R.id.view);
fragments= new ArrayList<>();
fragments.add(new MyFragment1());
fragments.add(new MyFragment2());
fragments.add(new MyFragment3());
adapter myadpter = new adapter(getSupportFragmentManager(),fragments);
viewPager.setAdapter(myadpter);
tabLayout.setupWithViewPager(viewPager);
}
private class adapter extends FragmentPagerAdapter{
private List<Fragment> list;
public adapter(FragmentManager fm,List<Fragment> list) {
super(fm);
this.list = list;
}
@Override
public Fragment getItem(int position) {
return list.get(position);
}
@Override
public int getCount() {
return list.size();
}
@Nullable
@Override
public CharSequence getPageTitle(int position) {
return title[position];
}
}
}