案例编写
一、新建maven项目

二、在pom.xml文件中添加依赖
<?xml version="1.0" encoding="UTF-8"?>
<project xmlns="http://maven.apache.org/POM/4.0.0"
         xmlns:xsi="http://www.w3.org/2001/XMLSchema-instance"
         xsi:schemaLocation="http://maven.apache.org/POM/4.0.0
         http://maven.apache.org/xsd/maven-4.0.0.xsd">
    <modelVersion>4.0.0</modelVersion>

    <groupId>com.itheima</groupId>
    <artifactId>spring_day02_ioc_xml_crud</artifactId>
    <version>1.0-SNAPSHOT</version>
    <!--打包方式为jar-->
    <packaging>jar</packaging>

    <dependencies>
    	<!--添加spring框架的依赖-->
        <dependency>
            <groupId>org.springframework</groupId>
            <artifactId>spring-context</artifactId>
            <version>5.0.2.RELEASE</version>
        </dependency>
        <!--添加dbutils的依赖-->
        <dependency>
            <groupId>commons-dbutils</groupId>
            <artifactId>commons-dbutils</artifactId>
            <version>1.4</version>
        </dependency>
        <!--添加mysql的依赖-->
        <dependency>
            <groupId>mysql</groupId>
            <artifactId>mysql-connector-java</artifactId>
            <version>8.0.15</version>
        </dependency>
        <!--添加c3p0的依赖-->
        <dependency>
            <groupId>c3p0</groupId>
            <artifactId>c3p0</artifactId>
            <version>0.9.1.2</version>
        </dependency>
        <!--添加junit的依赖-->
        <dependency>
            <groupId>junit</groupId>
            <artifactId>junit</artifactId>
            <version>4.10</version>
        </dependency>

    </dependencies>

</project>
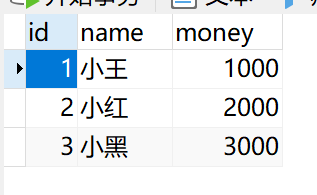
三、准备数据库
在spring数据库下新建一个表account
其中id为自动递增

先写入一些数据
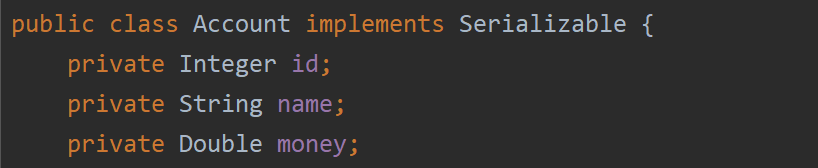
四、新建Account实体类

实现Serializable序列化接口,写入与数据库相对应的字段,并生成对应的set&get&toString
五、新建dao层和service的接口和实现类

IAccountDao接口
public interface IAccountDao {
    /**
     * 查询所有账户
     * @return
     */
    List<Account> findAllAccount();
    /**
     * 查找对应id的账户信息
     */
    Account findAccountById(Integer id);
    /**
     * 新建一个账户
     */
    void saveAccount(Account account);
    /**
     * 更新对应id的账户信息
     */
    void updateAccount(Account account);
    /**
     * 通过id,删除一个账户
     */
    void deleteAccount(Integer id);

}
编写IAccountDao接口的实现类AccountDaoImpl
注意这里使用了dbutil的类:QueryRunner,并对此生成set方法,以便在xml中注入
编写各个方法的时候,注意,查类的都用queryRunner.query,改类的都用queryRunner.update
public class AccountDaoImpl implements IAccountDao {
    private QueryRunner queryRunner;
    public void setQueryRunner(QueryRunner queryRunner) {
        this.queryRunner = queryRunner;
    }

    public List<Account> findAllAccount() {
        try {
            return queryRunner.query("select * from account ", new BeanListHandler<Account>(Account.class));
        } catch (SQLException e) {
            e.printStackTrace();
        }
        return null;
    }

    public Account findAccountById(Integer id) {
        try {
            return queryRunner.query("select * from account where id = ?", new BeanHandler<Account>(Account.class),id);
        } catch (SQLException e) {
            e.printStackTrace();
        }
        return null;
    }

    public void saveAccount(Account account) {
        try {
            queryRunner.update("insert into account(id,name,money)values(?,?,?)", account.getId(),account.getName(),account.getMoney());
        } catch (SQLException e) {
            e.printStackTrace();
        }
    }

    public void updateAccount(Account account) {
        try {
            queryRunner.update("update account set name=?,money=? where id =?", account.getName(),account.getMoney(),account.getId());
        } catch (SQLException e) {
            e.printStackTrace();
        }

    }

    public void deleteAccount(Integer id) {
        try {
            queryRunner.update("delete from account where id = ?",id);
        } catch (SQLException e) {
            e.printStackTrace();
        }
    }
}
编写IAccountService接口,内容其实和IAccountDao接口一样
public interface IAccountService {
    /**
     * 查询所有账户
     * @return
     */
    List<Account> findAllAccount();
    /**
     * 查找对应id的账户信息
     */
    Account findAccountById(Integer id);
    /**
     * 新建一个账户
     */
    void saveAccount(Account account);
    /**
     * 更新对应id的账户信息
     */
    void updateAccount(Account account);
    /**
     * 通过id,删除一个账户
     */
    void deleteAccount(Integer id);
}
编写IAccountService的实现类AccountServiceImpl
注意其中对accountDao生成了set方法,也是为了依赖注入
public class AccountServiceImpl implements IAccountService {
    private IAccountDao accountDao;

    public void setAccountDao(IAccountDao accountDao) {
        this.accountDao = accountDao;
    }

    public List<Account> findAllAccount() {
        return accountDao.findAllAccount();
    }

    public Account findAccountById(Integer id) {
        return accountDao.findAccountById(id);
    }

    public void saveAccount(Account account) {
        accountDao.saveAccount(account);
    }

    public void updateAccount(Account account) {
        accountDao.updateAccount(account);
    }

    public void deleteAccount(Integer id) {
        accountDao.deleteAccount(id);
    }
}
六、编写bean.xml
值得注意的点在注释已经说明,特别是数据源dataSourece的配置
<?xml version="1.0" encoding="UTF-8" ?>
<beans xmlns="http://www.springframework.org/schema/beans"
xmlns:xsi="http://www.w3.org/2001/XMLSchema-instance"
xsi:schemaLocation="http://www.springframework.org/schema/beans
http://www.springframework.org/schema/beans/spring-beans.xsd">
<!--创建accountServiceImpl对象-->
<bean id="accountService" class="com.itheima.service.impl.AccountServiceImpl">
<!--由于在accountService里面需要注入accountDao对象,
但是没有这个类,于是往下创建accountDao的bean,并添加引用-->
<property name="accountDao" ref="accountDao"></property>
</bean>
<!--创建accountDao的bean对象-->
<bean id="accountDao" class="com.itheima.dao.impl.AccountDaoImpl">
<!--由于在accountDao的实现类中,我们写了一个QueryRunner对象,所以继续注入-->
<property name="queryRunner" ref="queryRunner"></property>
</bean>
<!--编写queryRunner的bean对象,注意次数将作用域改成了多例,每次使用都创建一个新的QueryRunner对象-->
<bean id="queryRunner" class="org.apache.commons.dbutils.QueryRunner" scope="prototype">
<!--由于queryRunner对象用dataSource来初始化数据库连接,这里注入含参构造函数-->
<constructor-arg name="ds" ref="dataSource"></constructor-arg>
</bean>
<!--以下是dataSource数据源的基本配置,里面包括了
如下注意:
1、drive驱动,由于我的mysql是8.0版本,所以驱动这里加上一个cj,否则报错
2、url为jdbcUrl,值得注意的是高版本mysql需要设置时区,故在参数加上serverTimezone-UTC
3、参数间隔符号&如果直接写在字符串里面会报错,使用&来表示
-->
<bean id="dataSource" class="com.mchange.v2.c3p0.ComboPooledDataSource">
<property name="driverClass" value="com.mysql.cj.jdbc.Driver"></property>
<property name="jdbcUrl" value="jdbc:mysql://localhost:3306/springdb?serverTimezone=UTC&characterEncoding=utf8&useUnicode=true"></property>
<property name="user" value="root"></property>
<property name="password" value="root"></property>
</bean>
</beans>
七、编写测试类

public class AccountServiceTest {

    @Test
    public void testFindAll(){
        ApplicationContext ac = new ClassPathXmlApplicationContext("bean.xml");
        IAccountService as = ac.getBean("accountService",IAccountService.class);
        List<Account> accounts= as.findAllAccount();
        for (Account account:accounts){
            System.out.println(account);
        }
    }
    @Test
    public void testFindById(){
        ApplicationContext ac = new ClassPathXmlApplicationContext("bean.xml");
        IAccountService as = ac.getBean("accountService",IAccountService.class);
        Account account = as.findAccountById(1);
        System.out.println(account);
    }
    @Test
    public void testSaveAccount(){
        ApplicationContext ac = new ClassPathXmlApplicationContext("bean.xml");
        IAccountService as = ac.getBean("accountService",IAccountService.class);
        Account account = new Account();
        account.setName("小新");
        account.setMoney(4000d);
        as.saveAccount(account);
        System.out.println("插入后如下:");
        testFindAll();
    }
    @Test
    public void testUpdateAccount(){
        ApplicationContext ac = new ClassPathXmlApplicationContext("bean.xml");
        IAccountService as = ac.getBean("accountService",IAccountService.class);
        Account account = as.findAccountById(4);
        account.setMoney(5000d);
        as.updateAccount(account);
        System.out.println("更新后如下:");
        testFindAll();
    }
    @Test
    public void testDeleteAccount(){
        ApplicationContext ac = new ClassPathXmlApplicationContext("bean.xml");
        IAccountService as = ac.getBean("accountService",IAccountService.class);
        as.deleteAccount(4);
        System.out.println("删除后如下:");
        testFindAll();
    }
}
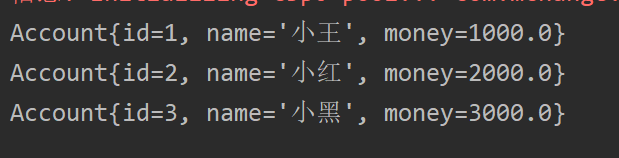
testFindAll测试:
testFindById测试:

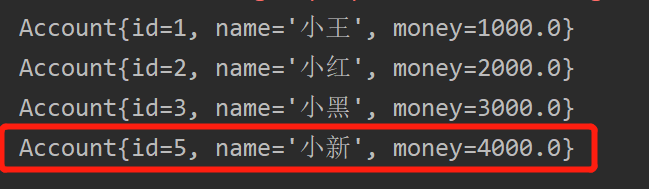
testSaveAccount测试:
由于我之前做过一次测试,新增了id4又删除了id4,所以这次新增的id为5,则我们对上面代码的update和delete都传入id为5再进行下列测试
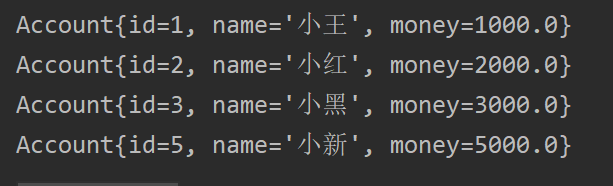
testUpadateAccount测试:
可以看到money已经改为了5000
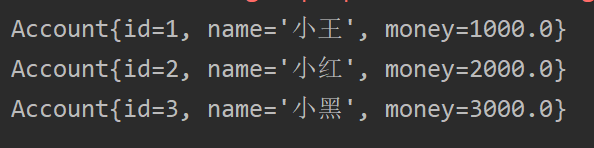
testDeleteUpdate测试:
可以看到id为5已经删除
至此 大功告成,将前面学习的xml的ioc有关知识系统的结合了,并完成了码畜基础搬砖操作
踩坑总结
1、刚开始配的时候,我的c3p0迟迟下载不好,弄了好久,不报红了但是maven里面没有导进来。此时右键项目->maven->reimport,耐心等待
2、刚开始我的mysql-connector-java选择的版本是5.1.6,运行时出现了如下错误:java.sql.SQLException: Unknown system variable ‘tx_isolation’,原因是mysql-connector-java版本太低,和mysql的版本不兼容,后来改成了8.0.15,重新添加依赖,解决问题
3、填写dataSource数据库连接信息的时候,&转义符的问题,在字符串中使用&,要用&;来代替。
