在上一篇文章中,我们创建了一个服务注册(或服务发现)服务,一个可乐服务,一个用户服务,并且后两个服务都注册到了服务注册服务上。
在真实环境中我们的微服务架构通常要承载几十万,几百万,几千万甚至更高级别的流量考验,面对这种高并发场景,服务往往都是分布式部署。那么问题来了,我们如何让服务器集群的每个节点处理的请求数量相当呢,不至于一台服务器快要撑爆了,一台服务器无人问津,如何让每台服务器负载均衡呢?
在单体架构中,我们一般会到nginx来做负载均衡,正向代理,反向代理等等。那么在Spring Cloud微服务架构中如何实现均衡负载呢?接下来我们有请ribbon登场。ningx是服务器端的负载均衡组件,ribbon是客户端的负载均衡组件。
源码托管地址:https://github.com/cddofficial/SpringCloudRepo
目录
2.2.1 复制得到eureka-client-coke-ribbon微服务
2.2.2 启动用户服务eureka-client-user多个节点
2.2.3 处理eureka-client-coke-ribbon微服务
1 ribbon介绍
1.1 简介
ribbon也是Netflix公司的,英文直译为丝带,准确的是指 蝴蝶结。大家立马能够想到蝴蝶结两边是对称的,这不正好有点均衡负载的意思在里面吗,所以把ribbon翻译为蝴蝶结更好些。
Ribbon是Netflix发布的云中间层服务开源项目,其主要功能是提供客户端侧负载均衡算法。Ribbon客户端组件提供一系列完善的配置项如连接超时,重试等。简单的说,Ribbon是一个客户端负载均衡器,我们可以在配置文件中列出Load Balancer后面所有的机器,Ribbon会自动的帮助你基于某种规则(如简单轮询,随机连接等)去连接这些机器,我们也很容易使用Ribbon实现自定义的负载均衡算法。
1.2 原理
1.2.1 Eureka使用Ribbon时的架构
架构图如下:

在上图中,假如:服务提供者是我们的用户服务,有多个节点。服务的消费者是我们的可乐服务。
有3个用户服务节点,1个可乐服务节点注册到服务注册服务;有一个请求过来时,可乐服务要向用户服务发送请求。
可乐服务先从服务注册服务获取到可以请求的用户服务节点,再根据负载均衡规则命中到其中一个用户服务节点。
这时候请求处理了,3个用户服务节点处理的请求数也差不多达到均衡。
1.2.2 工作流程
第一步先选择 Eureka Server, 它优先选择在同一个Zone且负载较少的Server;
第二步再根据用户指定的策略,在从Server取到的服务注册列表中选择一个地址。其中Ribbon提供了多种策略,例如轮询round robin、随机Random、根据响应时间加权等。
默认策略为轮询方式。
2 实战
下面的实战在上一篇文章所编写代码的基础上进行,如有问题可查看上篇文章eureka实战。
2.1 RestTemplate应用实例
在学习用ribbon负载均衡前,我们先要会微服务间的通信,即,可乐微服务向用户微服务发送请求。在这里可乐微服务就是服务消费者,用户服务就是服务提供者。、
那么如何实现微服务间的通信呢?我们可以采用HttpClient等一些其他技术,但是太过复杂。在这里我们使用RestTemplate,是Spring提供的用于访问Rest服务的客户端,RestTemplate提供了多种便捷访问远程Http服务的方法,能够大大提高客户端的编写效率。
2.1.1 测试用户微服务
启动服务eureka-client-user,启动成功。在浏览器中输入:http://localhost:9002/user/2,响应页面如下:

说明用户微服务正常,如果有问题,一定要先解决。
2.1.2. 修改可乐微服务
修改eureka-client-coke微服务的代码。
1. 在启动类里注册RestTemplate的bean
代码如下:
package com.cdd.demo;

import org.springframework.boot.SpringApplication;
import org.springframework.boot.autoconfigure.SpringBootApplication;
import org.springframework.cloud.netflix.eureka.EnableEurekaClient;
import org.springframework.context.annotation.Bean;
import org.springframework.web.client.RestTemplate;

@SpringBootApplication
@EnableEurekaClient  //eureka client 注解
public class EurekaClientCokeApplication {

	public static void main(String[] args) {
		SpringApplication.run(EurekaClientCokeApplication.class, args);
	}

	// 向spring容器中中注册RestTemplate
	@Bean
	public RestTemplate restTemplate() {
		return new RestTemplate();
	}
}
2 创建User类
在启动类所在包下新建entity包,entity包下创建一个User类,属性和用户微服务中的User类相同,代码如下:
package com.cdd.demo.entity;

public class User {

	private Long id;

	private String name;

	private Short age;

	public Long getId() {
		return id;
	}

	public void setId(Long id) {
		this.id = id;
	}

	public String getName() {
		return name;
	}

	public void setName(String name) {
		this.name = name;
	}

	public Short getAge() {
		return age;
	}

	public void setAge(Short age) {
		this.age = age;
	}

}
3.创建CokeController类
在启动类所在包下新建controller包,controller包下创建一个CokeController类,代码如下:
package com.cdd.demo.controller;

import org.springframework.beans.factory.annotation.Autowired;
import org.springframework.web.bind.annotation.GetMapping;
import org.springframework.web.bind.annotation.PathVariable;
import org.springframework.web.bind.annotation.RestController;
import org.springframework.web.client.RestTemplate;

import com.cdd.demo.entity.User;

@RestController
public class CokeController {

	// 注入RestTemplate
	@Autowired
	private RestTemplate restTemplate;

	// 通过RestTemplate向用户微服务发送请求
	@GetMapping("/coke/{id}")
	public User findById(@PathVariable Long id) {
		return this.restTemplate.getForObject("http://localhost:9002/user/" + id, User.class);
	}
}
4. 启动可乐微服务eureka-client-coke(确定用户微服务eureka-client-user也要在启动状态),启动成功。
2.1.3 测试
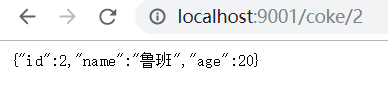
在浏览器中输入:http://localhost:9001/coke/2,响应页面如下:

说明我们通过RestTemplate进行微服务间的通信成功了。
2.2 Ribbon应用
上面的示例,是确定要访问那个用户服务节点,可以看到CokeController类中restTemplate.getForObject方法的请求地址(主机+端口)是写死的。那么现在如果这种请求特别多呢,有多个用户微服务节点,那么我们怎么用ribbon来实现负载均衡呢?请往下看。
从这里开始,每学习一个新技术点,都要在一个新微服务上去实现。保证对应的微服务例子对应的技术点,这些代码我会上传的github上。到时候可以随时下载下拉看。
2.2.1 复制得到eureka-client-coke-ribbon微服务
复制eureka-client-coke服务重命名为eureka-client-coke-ribbon,导入到工作IDE工具STS中(至于如何复制这里不再赘述,请看eureka——实战中的 “2.4.1 创建可乐微服务” 的 “复制得到eureka-client-coke“)。导入到STS中后,如下图:

大家这里有问题的话一定尝试解决或者要问我,很简单的,不能被这个步骤挡住了前进了脚步。
2.2.2 启动用户服务eureka-client-user多个节点
这个时候其他微服务全部关闭,先启动服务注册服务eureka-server-service-discover。
1. 修改eureka-client-user微服务的实例化id
在application.yml中,如下:

2.修改eureka-client-user微服务的启动端口为8001
修改文件为application.yml,修改后代码如下:
server:
  port: 8001  #修改端口为8001

spring:
  application:
    name: eureka-client-user   #应用程序名称
  jpa:
    generate-ddl: false
    show-sql: true
    hibernate:
      ddl-auto: none
  datasource:
    platform: h2
    schema: classpath:schema.sql   #一般是创建表结构的sql
    data: classpath:data.sql   #一般是处理表数据的sql

logging:
  level:
    root: INFO
    org.hibernate: INFO
    com.cdd: DEBUG

eureka:
  client:
    service-url:
      defaultZone: http://localhost:8761/eureka/
  instance:
    prefer-ip-address: true
    instance-id: ${spring.application.name}:${spring.application.instance_id:${server.port}}  #实例id
修改完成之后,启动eureka-client-user微服务。从控制台我们可以看到这个8001端口的用户服务节点启动时间为:下午5:50:57

3. 再次修改eureka-client-user微服务的启动端口为8002
修改文件为application.yml,修改后代码如下:
server:
  port: 8002  #修改端口为8002

spring:
  application:
    name: eureka-client-user   #应用程序名称
  jpa:
    generate-ddl: false
    show-sql: true
    hibernate:
      ddl-auto: none
  datasource:
    platform: h2
    schema: classpath:schema.sql   #一般是创建表结构的sql
    data: classpath:data.sql   #一般是处理表数据的sql

logging:
  level:
    root: INFO
    org.hibernate: INFO
    com.cdd: DEBUG

eureka:
  client:
    service-url:
      defaultZone: http://localhost:8761/eureka/
  instance:
    prefer-ip-address: true
    instance-id: ${spring.application.name}:${spring.application.instance_id:${server.port}}  #实例id
修改完成之后,再启动一次eureka-client-user微服务。从控制台我们可以看到这个8002端口的用户服务节点启动时间为:下午5:52:50

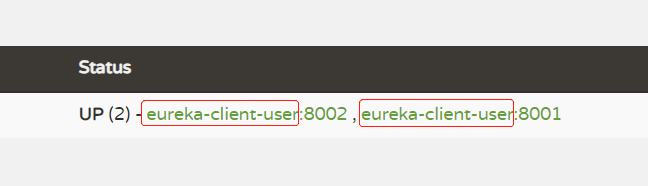
4. 查看服务注册列表
在浏览器中输入:http://localhost:8761/ 响应页面如下:

此时我们的用户微服务eureka-client-user已经有2个节点注册打服务注册服务了。
2.2.3 处理eureka-client-coke-ribbon微服务
1.添加ribbon依赖
eureka-client-coke-ribbon项目中需要ribbon依赖,首先我们先搜索下已有的依赖中是否包含ribbon依赖,
(1)如果有我们就不用添加了,如下图:

(2)如果没有这个依赖,就要我们自己手动添加了,如下:

我们这里是不用再手动添加ribbon依赖的,在spring-cloud-starter-netflix-eureka-client依赖中包含着。
2.修改启动类
启动类名称改为:EurekaClientCokeRibbonApplication,并且给启动类的restTemplate方法添加@LoadBalanced注解,
修改后代码如下:
package com.cdd.demo;

import org.springframework.boot.SpringApplication;
import org.springframework.boot.autoconfigure.SpringBootApplication;
import org.springframework.cloud.client.loadbalancer.LoadBalanced;
import org.springframework.cloud.netflix.eureka.EnableEurekaClient;
import org.springframework.context.annotation.Bean;
import org.springframework.web.client.RestTemplate;

@SpringBootApplication
@EnableEurekaClient  //eureka client 注解
public class EurekaClientCokeRibbonApplication {

	public static void main(String[] args) {
		SpringApplication.run(EurekaClientCokeRibbonApplication.class, args);
	}


	@Bean   // 向spring容器中中注册RestTemplate
	@LoadBalanced  // 负载均衡注解
	public RestTemplate restTemplate() {
		return new RestTemplate();
	}
}
3.修改CokeController类,修改后代码如下:
package com.cdd.demo.controller;

import org.springframework.beans.factory.annotation.Autowired;
import org.springframework.web.bind.annotation.GetMapping;
import org.springframework.web.bind.annotation.PathVariable;
import org.springframework.web.bind.annotation.RestController;
import org.springframework.web.client.RestTemplate;

import com.cdd.demo.entity.User;

@RestController
public class CokeController {

	// 注入RestTemplate
	@Autowired
	private RestTemplate restTemplate;

	// 通过RestTemplate向用户微服务发送请求
	@GetMapping("/coke/{id}")
	public User findById(@PathVariable Long id) {
		// 方法getForObject当前请求路径参数已经换成了用户微服务的 serviceId,
		return this.restTemplate.getForObject("http://eureka-client-user/user/" + id, User.class);
	}
}
补充:用户微服务serviceId的来源
来自服务注册列表(localhost:8761/页面),如下图:
4. 启动微服务eureka-client-coke-ribbon,启动成功后,查看服务注册列表,如下图:

说明该微服务已经注册上来了。
2.2.4 测试
清空控制台所以微服务的日志。
在浏览器中输入:http://localhost:9001/coke/2,去请求可乐微服务,可乐微服务又回去请求用户微服务,不过用户微服务有两个节点,端口分别为8001和8002,响应页面如下:
再次清空所有实例的控制台日志,连续点击刷新http://localhost:9001/coke/2页面4次,接下来看控制台日志。
启动时间为下午5:50:57启动的端口为8001的用户微服务实例,执行了2次(看打印sql条数),

启动时间为下午5:52:50启动的端口为8002的用户微服务实例,也执行了2次,

从上面日志可以看出,可乐服务发送了4次请求,用户微服务的2个实例分别执行处理了2次,说明已经实现负载均衡了。
