如果代码中有什么不清楚请查看以下基础知识
Shader基础知识
unity3d 中 七种坐标知识详解
一个将贴图转为马赛克效果的shader:
万恶的马赛克其实也是一种艺术风格,如果你在开发2d游戏不妨加上马赛克效果,不仅可以帮助你在美术上统一风格,还能有效规避一些细节瑕疵,而且马赛克还有一股浓浓的怀旧风。
实现原理是将指定范围的uv坐标step化,并应用再像素上
下面奉上笑狗图:
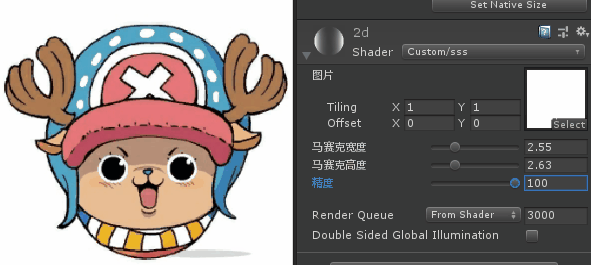
Shader "Custom/马赛克"
{
    Properties
    {
        //图片入口
        _MainTex ("图片", 2D) = "black" {}
        //图片尺寸
        _MosaicWidth("马赛克宽度", Range(0.1, 10.)) = 1.
        _MosaicHeight("马赛克高度", Range(0.1, 10.)) = 1.
        //马赛克宽度
        _Accuracy("精度", Range(1., 100.)) = 10.
    }

    SubShader
    {
        LOD 200

        Tags
        {
            //透明队列
            "Queue" = "Transparent"
            //关闭灯光环境光等影响
            "IgnoreProjector" = "True"
            //渲染类型透明物体
            "RenderType" = "Transparent"
        }

        Pass
        {
            // 2d关闭提高性能
            Cull Off
            Lighting Off
            ZWrite Off
            Fog { Mode Off }
            Offset -1, -1
            //透明混合,原透明度与1-原透明度
            Blend SrcAlpha OneMinusSrcAlpha

            CGPROGRAM
                //顶点片元着色器
                #pragma vertex vert
                #pragma fragment frag
                #include "UnityCG.cginc"

                sampler2D _MainTex;
                float _MosaicWidth;
                float _MosaicHeight;
                float _Accuracy;

                struct a2v
                {
                    //顶点坐标、贴图坐标、顶点颜色
                    float4 vertex : POSITION;
                    float2 uv : TEXCOORD0;
                    fixed4 color : COLOR;
                };

                struct v2f
                {
                    //像素坐标、uv坐标、像素颜色
                    float4 vertex : SV_POSITION;
                    half2 uv : TEXCOORD0;
                    fixed4 color : COLOR;
                };
                //顶点着色器
                v2f vert (a2v v)
                {
                    v2f o;
                    //顶点坐标从模型空间转为裁剪空间(因为是2d,可以直接使用映射坐)
                    o.vertex = UnityObjectToClipPos(v.vertex);
                    o.uv = v.uv;
                    o.color = v.color;
                    return o;
                }
                //片元着色器
                fixed4 frag (v2f o) : COLOR
                {
                    _Accuracy = 1. / _Accuracy;
                    // 像素的x坐标 = uv的x坐标位置 * 马赛克宽度 / 精度   再归整,这样所有小数范围内的坐标就都算在同一个范围了
                    float x= int(o.uv.x * _MosaicWidth / _Accuracy) * _Accuracy;
                    float y = int(o.uv.y * _MosaicHeight / _Accuracy) * _Accuracy;
                    // uv = 像素的x坐标 / 马赛克宽度     作用是拉伸uv贴图,在当前像素位置铺上归整的颜色
                    float2 uv = float2(x / _MosaicWidth, y / _MosaicHeight);
                    //将uv应用到贴图上
                    fixed4 col = tex2D(_MainTex, uv);
                    return col;
                }
            ENDCG
        }
    }
}
