前言
Springbatch开启任务通常有如下两种方式,通过定时任务或者通过接口调用,定时任务使用简单,适用于数据来源稳定不需要过多外部参数干扰的情形,而接口的方式更加灵活,可以通过外部进行参数配置满足复杂的数据批处理场景,下面通过一个简单的例子来作说明
项目结构
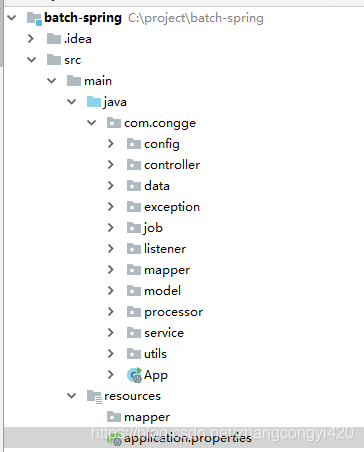
为了演示方便,同时更加贴合真实的使用场景,本例中使用的技术栈为:springboot+mybatisplus+mysql整合springbatch的方式
1、引入必要的pom依赖文件
<parent>
        <groupId>org.springframework.boot</groupId>
        <artifactId>spring-boot-starter-parent</artifactId>
        <version>2.1.5.RELEASE</version>
        <!-- lookup parent from repository -->
    </parent>

    <properties>
        <project.build.sourceEncoding>UTF-8</project.build.sourceEncoding>
        <project.reporting.outputEncoding>UTF-8</project.reporting.outputEncoding>
        <java.version>1.8</java.version>
    </properties>

    <dependencies>

        <dependency>
            <groupId>org.springframework.boot</groupId>
            <artifactId>spring-boot-starter-web</artifactId>
        </dependency>

        <dependency>
            <groupId>org.springframework.boot</groupId>
            <artifactId>spring-boot-starter-test</artifactId>
            <scope>test</scope>
        </dependency>

        <dependency>
            <groupId>mysql</groupId>
            <artifactId>mysql-connector-java</artifactId>
        </dependency>

        <!--jdbc -->
        <dependency>
            <groupId>org.springframework.boot</groupId>
            <artifactId>spring-boot-starter-jdbc</artifactId>
        </dependency>

        <dependency>
            <groupId>com.alibaba</groupId>
            <artifactId>druid-spring-boot-starter</artifactId>
        </dependency>

        <dependency>
            <groupId>com.alibaba</groupId>
            <artifactId>druid-spring-boot-starter</artifactId>
            <version>1.1.14</version>
        </dependency>

        <dependency>
            <groupId>com.alibaba</groupId>
            <artifactId>easyexcel</artifactId>
            <version>1.1.2-beat1</version>
        </dependency>

        <dependency>
            <groupId>org.projectlombok</groupId>
            <artifactId>lombok</artifactId>
            <version>1.18.2</version>
        </dependency>

        <dependency>
            <groupId>org.apache.commons</groupId>
            <artifactId>commons-lang3</artifactId>
            <version>3.5</version>
        </dependency>

        <dependency>
            <groupId>org.springframework.boot</groupId>
            <artifactId>spring-boot-starter-batch</artifactId>
            <version>2.2.1.RELEASE</version>
        </dependency>

        <!-- https://mvnrepository.com/artifact/org.springframework.batch/spring-batch-core -->
        <dependency>
            <groupId>org.springframework.batch</groupId>
            <artifactId>spring-batch-core</artifactId>
            <version>4.2.1.RELEASE</version>
        </dependency>

        <dependency>
            <groupId>org.projectlombok</groupId>
            <artifactId>lombok</artifactId>
            <version>1.18.0</version>
        </dependency>

        <dependency>
            <groupId>com.baomidou</groupId>
            <artifactId>mybatis-plus-boot-starter</artifactId>
            <version>3.1.1</version>
        </dependency>

        <dependency>
            <groupId>com.baomidou</groupId>
            <artifactId>mybatis-plus-generator</artifactId>
            <version>3.1.1</version>
        </dependency>

        <dependency>
            <groupId>com.alibaba</groupId>
            <artifactId>druid-spring-boot-starter</artifactId>
            <version>1.1.14</version>
        </dependency>

    </dependencies>

    <build>
        <plugins>
            <plugin>
                <groupId>org.springframework.boot</groupId>
                <artifactId>spring-boot-maven-plugin</artifactId>
            </plugin>
        </plugins>
    </build>
2、配置application.properties
server.port=8083

spring.datasource.type=com.alibaba.druid.pool.DruidDataSource
spring.datasource.driver-class-name=com.mysql.jdbc.Driver
spring.datasource.url=jdbc:mysql://IP:3306/dbname?useSSL=false
spring.datasource.username=用户名
spring.datasource.password=密码

#启动时不启动job
spring.batch.job.enabled=false

#初始化批量
spring.batch.initializer.enabled=true

#mybatisplus配置
mybatis-plus.mapper-locations=classpath:mapper/*.xml
mybatis-plus.global-config.db-config.id-type=uuid
mybatis-plus.global-config.db-config.field-strategy=not_null
mybatis-plus.global-config.refresh=true
mybatis-plus.configuration.map-underscore-to-camel-case=false
mybatis-plus.configuration.log-impl=org.apache.ibatis.logging.stdout.StdOutImpl
注意提前把springbatch的数据库脚本执行以下,或者动态开启以下相关参数,让框架启动的时候自动生成,然后再关闭配置即可
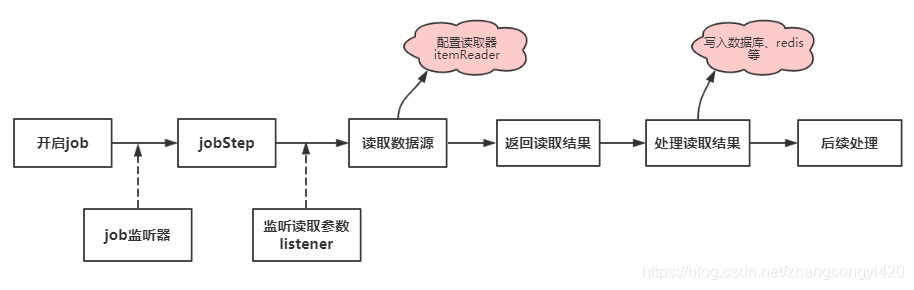
Springbatch读取数据源数据,到处理数据、入库等一系列的操作,大致的流程如上图所示,可以看到,在上述的流程中,除了正常的读写流程,还能动态植入监听器,通过监听器去干预数据处理过程,当然,里面还可以配置异常处理器等,这里没有列举出来,有兴趣的同学可以继续研究
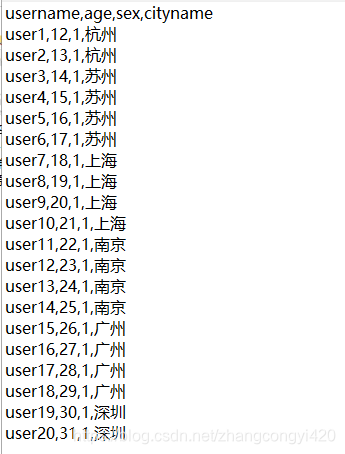
首先,我们在本地磁盘上准备一个txt的文件,也可以是csv等其他类型的文件
创建对应的实体类
@Data
@TableName("t_user")
public class UserEntity {

	@TableField("id")
	private String id;

	@TableField("user_name")
	private String userName;

	@TableField("age")
	private int age;

	@TableField("sex")
	private String sex;

	@TableField("city_name")
	private String cityName;

}
相关的配置类、mapper、service类,因为比较简单,这里直接列举出来,
mybatisplus配置
@Configuration
@MapperScan(basePackages = {"com.congge.mapper"})
public class MybatisPlusConfig {

    /**
     * mybatis-plus分页插件
     */
    @Bean
    public PaginationInterceptor paginationInterceptor() {
        return new PaginationInterceptor();
    }

}
mapper类
public interface TUserMapper extends BaseMapper<UserEntity> {

}
service
public interface TUserService extends IService<UserEntity> {
    void batchInsertUser(List<? extends UserEntity> users);
}
实现类
@Service
public class TUserServiceImpl extends ServiceImpl<TUserMapper, UserEntity> implements TUserService {

    @Autowired
    private TUserMapper tUserMapper;

    AtomicInteger integer = new AtomicInteger(1);

    @Override
    public void batchInsertUser(List<? extends UserEntity> users) {
        List<UserEntity> inserts = new ArrayList<>();
        users.stream().forEach(single ->{
            int value = integer.incrementAndGet();
            UserEntity entity = new UserEntity();
            entity.setId(String.valueOf(value));
            entity.setUserName(((UserEntity) single).getUserName());
            entity.setSex(((UserEntity) single).getSex());
            entity.setAge(12 + value);
            entity.setCityName(((UserEntity) single).getCityName());
            inserts.add(entity);
        });
        if(inserts.size()>0){
            saveBatch(inserts);
        }
    }

}
3、开启一个job类
该类通常和一个具体的业务场景关联在一起的
package com.congge.config;

import com.congge.exception.BatchStepExceptionHandler;
import com.congge.listener.BatchJobListener;
import com.congge.model.UserEntity;
import com.congge.processor.BatchItemProcessor;
import org.slf4j.Logger;
import org.slf4j.LoggerFactory;
import org.springframework.batch.core.*;
import org.springframework.batch.core.configuration.annotation.JobBuilderFactory;
import org.springframework.batch.core.configuration.annotation.StepBuilderFactory;
import org.springframework.batch.item.file.FlatFileItemReader;
import org.springframework.batch.item.file.mapping.DefaultLineMapper;
import org.springframework.batch.item.file.mapping.FieldSetMapper;
import org.springframework.batch.item.file.transform.DelimitedLineTokenizer;
import org.springframework.batch.item.file.transform.FieldSet;
import org.springframework.beans.factory.annotation.Autowired;
import org.springframework.context.annotation.Bean;
import org.springframework.context.annotation.Configuration;
import org.springframework.core.io.FileSystemResource;
import org.springframework.core.task.SimpleAsyncTaskExecutor;
import org.springframework.transaction.PlatformTransactionManager;
import org.springframework.validation.BindException;

import java.io.File;
import java.util.Map;

@Configuration
public class BatchJob implements StepExecutionListener {

    private static final Logger logger = LoggerFactory.getLogger(BatchJob.class);

    @Autowired
    public JobBuilderFactory jobBuilderFactory;

    @Autowired
    public StepBuilderFactory stepBuilderFactory;

    @Autowired
    public PlatformTransactionManager platformTransactionManager;

    @Autowired
    public BatchStepExceptionHandler exceptionHandler;

    @Autowired
    public BatchItemWriter batchitemwriter;

    @Autowired
    public BatchItemProcessor batchitemprocessor;

    private Map<String, JobParameter> jobParams;

    /**
     * 构建job
     * @param listener
     * @return
     */
    @Bean("messagebatchinsertjob")
    public Job MessageBatchInsertJob(BatchJobListener listener) {
        return jobBuilderFactory.get("MessageBatchInsertJob").listener(listener).flow(MessageBatchInsertStep()).end()
                .build();
    }

    /**
     * 1、Skip:如果处理过程中某条记录是错误的,如CSV文件中格式不正确的行,那么可以直接跳过该对象,继续处理下一个。
     * 2、在chunk元素上定义skip-limit属性,告诉Spring最多允许跳过多少个items,超过则job失败
     * 3、Restart:如果将job状态存储在数据库中,而一旦它执行失败,	那么就可以选择重启job实例,	并继续上次的执行位置。
     * 4、最后,对于执行失败的job作业,我们可以重新启动,并让他们从上次断开的地方继续执行。要达到这一点,只需要使用和上次 一模一样的参数来启动job,
     * 则Spring	Batch会自动从数据库中找到这个实例然后继续执行。你也可以拒绝重启,或者参数控 制某个
     * job中的一个tep可以重启的次数(一般来说多次重试都失败了,那我们可能需要放弃。)
     *
     * @return
     */
    @Bean
    public Step MessageBatchInsertStep() {
        logger.info("MessageBatchInsertStep");
        return
                stepBuilderFactory.get("MessageBatchInsertStep")
                        .listener(this).
                        <UserEntity, UserEntity>chunk(5).reader(fileRead()).processor(batchitemprocessor)
                        //新增的逻辑,监听传入过来的参数
                        .writer(batchitemwriter)
                        .faultTolerant()
                        .skip(Exception.class).skipLimit(5)
                        .taskExecutor(new SimpleAsyncTaskExecutor()).startLimit(5).allowStartIfComplete(true)
                        .exceptionHandler(exceptionHandler) // 设置并发方式执行exceptionHandler,异常时打印日志并抛出异常
                        .throttleLimit(5) // 并发任务数为 10,默认为4
                        .transactionManager(platformTransactionManager).build();
    }

    public FlatFileItemReader<UserEntity> fileRead() {
        System.out.println("fileRead()方法开始");
        FlatFileItemReader<UserEntity> fileRead = new FlatFileItemReader<>();
        fileRead.setEncoding("UTF-8");
        fileRead.setResource(new FileSystemResource(new File("C:\\soft_ware\\myvideo\\user.txt")));
        fileRead.setLinesToSkip(1);//跳过开头多少行,一般开头行是字段的名,可以跳过,便于数据封装
        DefaultLineMapper<UserEntity> lineMapper = new DefaultLineMapper<UserEntity>();
        lineMapper.setLineTokenizer(new DelimitedLineTokenizer(","));
        lineMapper.setFieldSetMapper(new FieldSetMapper<UserEntity>() {

            @Override
            public UserEntity mapFieldSet(FieldSet fieldSet) throws BindException {
                UserEntity user = new UserEntity();
                try {
                    user.setUserName(fieldSet.readString(0));
                    user.setAge(fieldSet.readInt(1));
                    user.setSex(fieldSet.readString(2));
                    user.setCityName(fieldSet.readString(3));
                } catch (Exception e) {
                    logger.error("解析异常:"+e.getMessage());
                }
                return user;
            }
        });
        fileRead.setLineMapper(lineMapper);
        return fileRead;
    }

    @Override
    public void beforeStep(StepExecution stepExecution) {
        jobParams = stepExecution.getJobParameters().getParameters();
        System.out.println("读取到的参数是:" + jobParams);
    }

    @Override
    public ExitStatus afterStep(StepExecution stepExecution) {
        return null;
    }
}
BatchJobListener,job开始的时候进行监听
@Component
public class BatchJobListener implements JobExecutionListener {

	private static final Logger log = LoggerFactory.getLogger(BatchJobListener.class);

	public void afterJob(JobExecution jobExecution) {
		log.info("任务处理结束");
	}

	public void beforeJob(JobExecution jobExecution) {
		log.info("任务处理开始");
	}

}
BatchItemProcessor,相当于是一个中继站,将传入过来的封装好的数据直接返回,返回到itemWriter中
@Component
public class BatchItemProcessor implements ItemProcessor<UserEntity, UserEntity> {

	@Override
	public UserEntity process(UserEntity user) throws Exception {
		return user;
	}

}
BatchItemWriter,处理封装后的数据
@Component
@StepScope
public class BatchItemWriter implements ItemWriter<UserEntity> {

    @Autowired
    private TUserService tUserService;

    @Override
    public void write(List<? extends UserEntity> users) {
        //打印到本地
        for (UserEntity user : users) {
            System.out.println(user.getCityName());
        }
        //写入数据库
//        tUserService.batchInsertUser(users);
    }

}
BatchStepExceptionHandler,异常处理类
@Component
public class BatchStepExceptionHandler extends DefaultExceptionHandler {

	private static final Logger logger = LoggerFactory.getLogger(BatchStepExceptionHandler.class);

	@Override
	public void handleException(RepeatContext context, Throwable throwable) throws Throwable {
		logger.error("Step运行时异常:"+throwable.getMessage());
		throw new JobInterruptedException("Step运行时异常:"+throwable.getMessage());
	}
}
5、启动类
@SpringBootApplication
@EnableBatchProcessing
@EnableScheduling
public class App {
    public static void main(String[] args) {
        SpringApplication.run(App.class);
    }
}
方式一,定时任务启动
@Component
public class BatchTaskJob {

	@Autowired
    JobLauncher jobLauncher;

	@Autowired
    JobOperator jobOperator;

	@Resource(name="messagebatchinsertjob")
	private Job batchJob;

	/**
	 * 每天读取txt文件,
	 * @throws Exception
	 */
	//@Scheduled(cron = "0 0/1 * * * ?")
	@Scheduled(cron = "*/10 * * * * ?")
	public void job3() throws Exception {
		JobParameters jobParameter = new JobParametersBuilder().addLong("time",System.currentTimeMillis()).toJobParameters()
		JobExecution run = jobLauncher.run(batchJob, jobParameter);
		run.getId();
	}

}
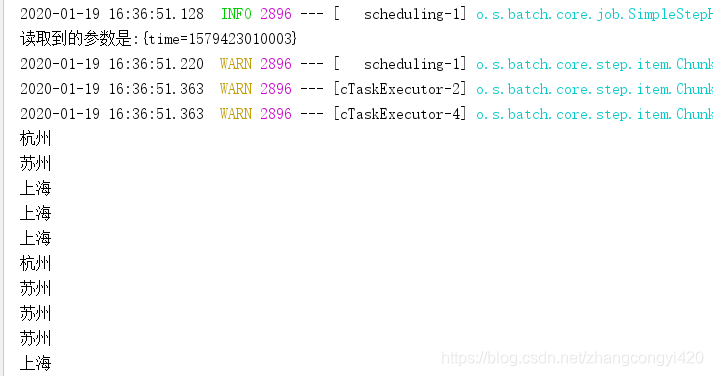
启动项目,可以看到每隔10秒中就能将数据读取出来,这里为了简便直接打印到控制台
方式一,接口调用
@RestController
public class JobController {

    @Autowired
    JobLauncher jobLauncher;

    @Autowired
    JobOperator jobOperator;

    @Resource(name="messagebatchinsertjob")
    private Job batchJob;

    @GetMapping("/runJob")
    public void runJob(@RequestParam("job1param") String job1param) throws Exception {
        JobParameters jobParameters = new JobParametersBuilder().addString("job1param",job1param).toJobParameters();
        //JobExecution run = jobLauncher.run(batchJob, new JobParametersBuilder().addLong("time",System.currentTimeMillis()).toJobParameters());
        JobExecution run = jobLauncher.run(batchJob, jobParameters);
        run.getId();
    }

}
这次,我们将读取到的数据写入数据库,简单修改下面的这处代码即可
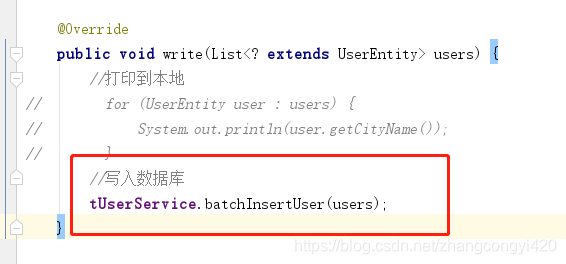
启动项目,浏览器输入:http://localhost:8083/runJob?job1param=hello-springbatch
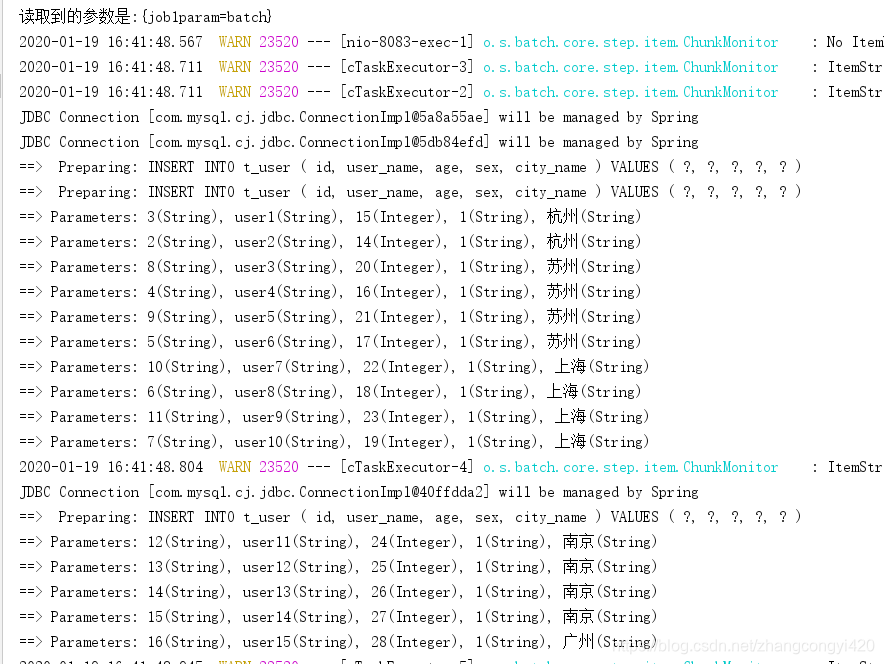
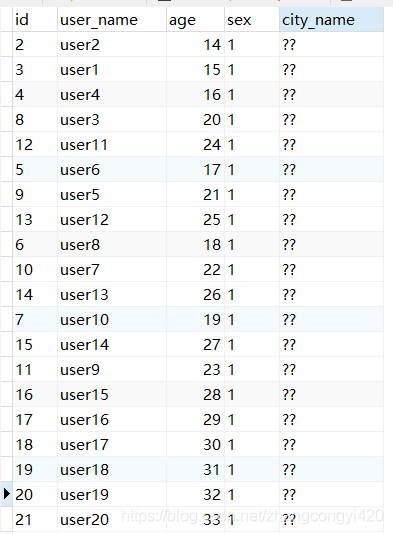
再来看数据库,发现数据已成功插入(这里有个数据库的字段乱码,留待稍后处理)
本篇简单讲解了springbatch启动任务的两种方式,并通过案例做了验证,有兴趣的同学可以继续深入研究,本篇到此结束,最后,感谢观看!
需要源码的同学可前往下载:https://download.csdn.net/download/zhangcongyi420/12113959
