前言
受2020年初的新型肺炎病毒影响,多日宅在家中无聊至极,昨天找了台旧笔记本(8G运行内存,256G磁盘空间)搭建CDH6.1,找到以前保存的三台虚拟机文件以及一块1T的移动硬盘后,博主将虚拟机文件均放置在移动硬盘上,便开始搭建了。
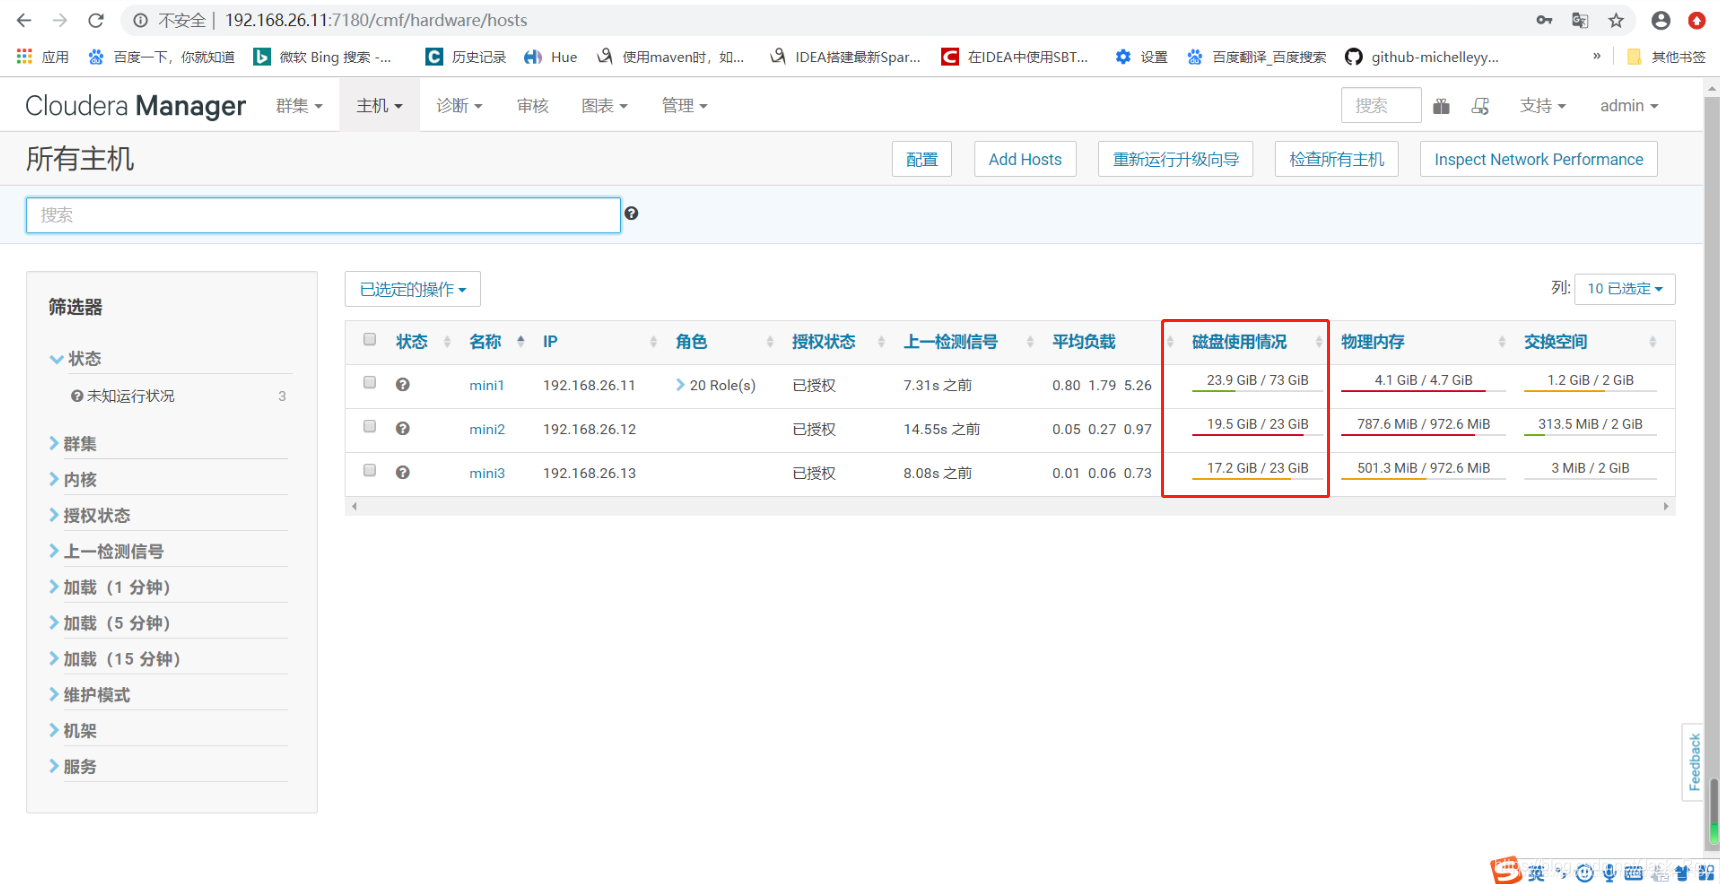
性能不好的机器搭这种环境很是棘手,提前对主节点磁盘进行扩容,又花费将近八个小时搭建完成后(大部分时间都用来等待安装和写自动化安装脚本了),发现两个从节点磁盘也不够用了:
所以要对两台从节点进行扩容,这里记录一下扩容过程,希望能够帮助有扩容需求的朋友。
扩容过程
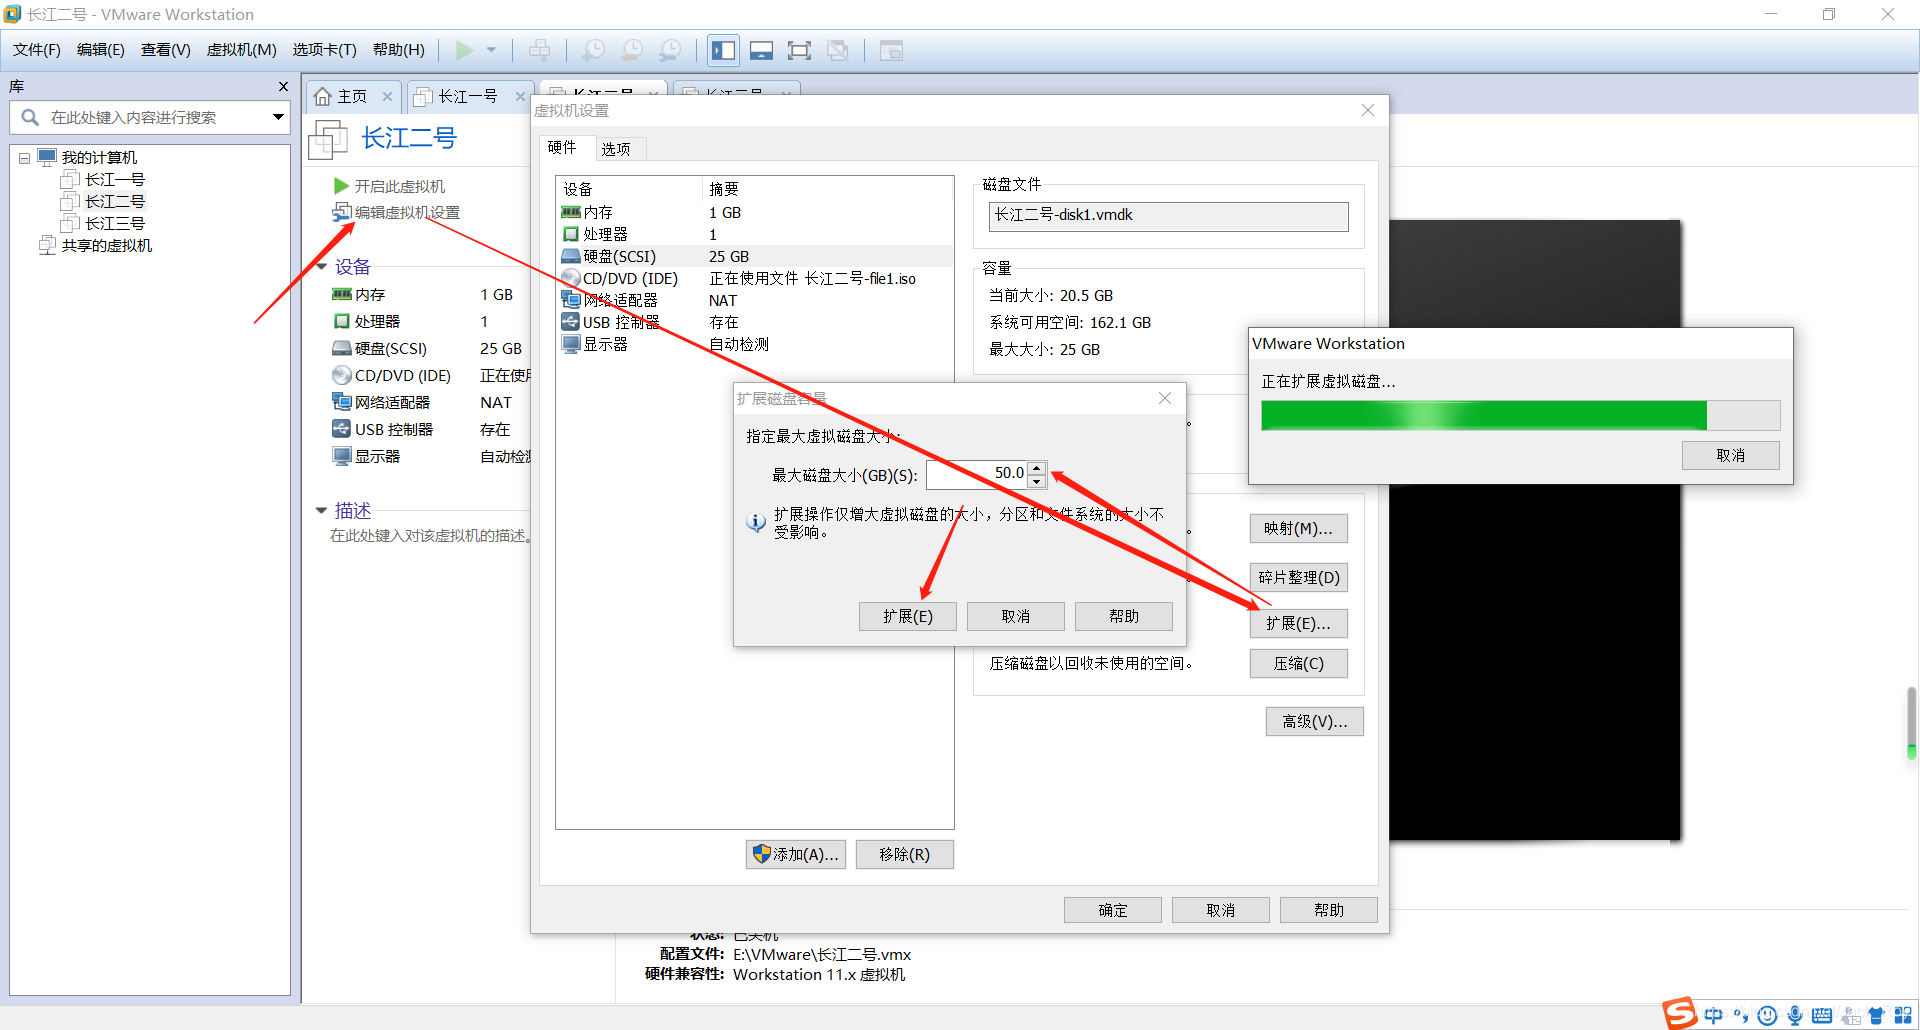
在虚拟机主界面点击“编辑虚拟机设置”,由硬盘一选项点击“扩展”,输入扩展后的磁盘空间后,点击“扩展”,接着等待扩展完成,第一步工作便完成了。
启动虚拟机,输入df -h 命令,发现增加的磁盘空间并没有显现:
[root@mini2 ~]# df -h
文件系统                 容量  已用  可用 已用% 挂载点
/dev/mapper/centos-root   22G   20G  2.7G   88% /
devtmpfs                 727M     0  727M    0% /dev
tmpfs                    739M     0  739M    0% /dev/shm
tmpfs                    739M  9.5M  729M    2% /run
tmpfs                    739M     0  739M    0% /sys/fs/cgroup
/dev/sr0                 4.3G  4.3G     0  100% /mnt/cdrom
/dev/sda1               1014M  156M  859M   16% /boot
tmpfs                    148M     0  148M    0% /run/user/0
root用户下输入lsblk命令,查看我们的信息:
[root@mini2 ~]# lsblk
NAME            MAJ:MIN RM  SIZE RO TYPE MOUNTPOINT
sda               8:0    0   50G  0 disk
├─sda1            8:1    0    1G  0 part /boot
└─sda2            8:2    0   24G  0 part
  ├─centos-root 253:0    0   22G  0 lvm  /
  └─centos-swap 253:1    0    2G  0 lvm  [SWAP]
sr0              11:0    1  4.2G  0 rom  /mnt/cdrom
很明显sda没有完全生效,我们只需要简单设置并刷新内核信息便可使其生效,root用户下执行命令:
fdisk /dev/sda
依次输入n->p->3->回车->回车->w:
[root@mini2 ~]# fdisk /dev/sda
欢迎使用 fdisk (util-linux 2.23.2)。

更改将停留在内存中,直到您决定将更改写入磁盘。
使用写入命令前请三思。


命令(输入 m 获取帮助):n
Partition type:
   p   primary (2 primary, 0 extended, 2 free)
   e   extended
Select (default p): p
分区号 (3,4,默认 3):3
起始 扇区 (52428800-104857599,默认为 52428800):
将使用默认值 52428800
Last 扇区, +扇区 or +size{K,M,G} (52428800-104857599,默认为 104857599):
将使用默认值 104857599
分区 3 已设置为 Linux 类型,大小设为 25 GiB

命令(输入 m 获取帮助):w
The partition table has been altered!

Calling ioctl() to re-read partition table.

WARNING: Re-reading the partition table failed with error 16: 设备或资源忙.
The kernel still uses the old table. The new table will be used at
the next reboot or after you run partprobe(8) or kpartx(8)
正在同步磁盘。
root用户下再次执行命令:
fdisk /dev/sda
依次输入t->3->L->8e->w :
[root@mini2 ~]# fdisk /dev/sda
欢迎使用 fdisk (util-linux 2.23.2)。

更改将停留在内存中,直到您决定将更改写入磁盘。
使用写入命令前请三思。


命令(输入 m 获取帮助):t
分区号 (1-3,默认 3):3
Hex 代码(输入 L 列出所有代码):L

 0  空              24  NEC DOS         81  Minix / 旧 Linu bf  Solaris
 1  FAT12           27  隐藏的 NTFS Win 82  Linux 交换 / So c1  DRDOS/sec (FAT-
 2  XENIX root      39  Plan 9          83  Linux           c4  DRDOS/sec (FAT-
 3  XENIX usr       3c  PartitionMagic  84  OS/2 隐藏的 C:  c6  DRDOS/sec (FAT-
 4  FAT16 <32M      40  Venix 80286     85  Linux 扩展      c7  Syrinx
 5  扩展            41  PPC PReP Boot   86  NTFS 卷集       da  非文件系统数据
 6  FAT16           42  SFS             87  NTFS 卷集       db  CP/M / CTOS / .
 7  HPFS/NTFS/exFAT 4d  QNX4.x          88  Linux 纯文本    de  Dell 工具
 8  AIX             4e  QNX4.x 第2部分  8e  Linux LVM       df  BootIt
 9  AIX 可启动      4f  QNX4.x 第3部分  93  Amoeba          e1  DOS 访问
 a  OS/2 启动管理器 50  OnTrack DM      94  Amoeba BBT      e3  DOS R/O
 b  W95 FAT32       51  OnTrack DM6 Aux 9f  BSD/OS          e4  SpeedStor
 c  W95 FAT32 (LBA) 52  CP/M            a0  IBM Thinkpad 休 eb  BeOS fs
 e  W95 FAT16 (LBA) 53  OnTrack DM6 Aux a5  FreeBSD         ee  GPT
 f  W95 扩展 (LBA)  54  OnTrackDM6      a6  OpenBSD         ef  EFI (FAT-12/16/
10  OPUS            55  EZ-Drive        a7  NeXTSTEP        f0  Linux/PA-RISC
11  隐藏的 FAT12    56  Golden Bow      a8  Darwin UFS      f1  SpeedStor
12  Compaq 诊断     5c  Priam Edisk     a9  NetBSD          f4  SpeedStor
14  隐藏的 FAT16 <3 61  SpeedStor       ab  Darwin 启动     f2  DOS 次要
16  隐藏的 FAT16    63  GNU HURD or Sys af  HFS / HFS+      fb  VMware VMFS
17  隐藏的 HPFS/NTF 64  Novell Netware  b7  BSDI fs         fc  VMware VMKCORE
18  AST 智能睡眠    65  Novell Netware  b8  BSDI swap       fd  Linux raid 自动
1b  隐藏的 W95 FAT3 70  DiskSecure 多启 bb  Boot Wizard 隐  fe  LANstep
1c  隐藏的 W95 FAT3 75  PC/IX           be  Solaris 启动    ff  BBT
1e  隐藏的 W95 FAT1 80  旧 Minix
Hex 代码(输入 L 列出所有代码):8e
已将分区“Linux”的类型更改为“Linux LVM”

命令(输入 m 获取帮助):w
The partition table has been altered!

Calling ioctl() to re-read partition table.

WARNING: Re-reading the partition table failed with error 16: 设备或资源忙.
The kernel still uses the old table. The new table will be used at
the next reboot or after you run partprobe(8) or kpartx(8)
正在同步磁盘。
执行如下命令,让内核同步分区信息:
partprobe
执行命令mkfs.ext4 /dev/sda3:
[root@mini2 ~]# partprobe
Warning: 无法以读写方式打开 /dev/sr0 (只读文件系统)。/dev/sr0 已按照只读方式打开。
[root@mini2 ~]# mkfs.ext4 /dev/sda3
mke2fs 1.42.9 (28-Dec-2013)
文件系统标签=
OS type: Linux
块大小=4096 (log=2)
分块大小=4096 (log=2)
Stride=0 blocks, Stripe width=0 blocks
1638400 inodes, 6553600 blocks
327680 blocks (5.00%) reserved for the super user
第一个数据块=0
Maximum filesystem blocks=2155872256
200 block groups
32768 blocks per group, 32768 fragments per group
8192 inodes per group
Superblock backups stored on blocks:
	32768, 98304, 163840, 229376, 294912, 819200, 884736, 1605632, 2654208,
	4096000

Allocating group tables: 完成
正在写入inode表: 完成
Creating journal (32768 blocks): 完成
Writing superblocks and filesystem accounting information: 完成
执行命令pvcreate /dev/sda3:
[root@mini2 ~]# pvcreate /dev/sda3
WARNING: ext4 signature detected on /dev/sda3 at offset 1080. Wipe it? [y/n]: y
  Wiping ext4 signature on /dev/sda3.
  Physical volume "/dev/sda3" successfully created.
执行命令pvdisplay 查看挂载信息:
[root@mini2 ~]# pvdisplay
  --- Physical volume ---
  PV Name               /dev/sda2
  VG Name               centos
  PV Size               <24.00 GiB / not usable 3.00 MiB
  Allocatable           yes
  PE Size               4.00 MiB
  Total PE              6143
  Free PE               1
  Allocated PE          6142
  PV UUID               7UlTlU-enMD-4GZs-0aj8-OEg3-PLRf-cBmPpm

  "/dev/sda3" is a new physical volume of "25.00 GiB"
  --- NEW Physical volume ---
  PV Name               /dev/sda3
  VG Name
  PV Size               25.00 GiB
  Allocatable           NO
  PE Size               0
  Total PE              0
  Free PE               0
  Allocated PE          0
  PV UUID               Dp7fOO-2flL-GfAn-zdE7-GjgI-66Pq-9SGdU1
执行命令:
[root@mini2 ~]# vgextend centos /dev/sda3
  Volume group "centos" successfully extended
执行命令lvextend -L +25G /dev/mapper/centos-root(该数目为增加的磁盘空间,不包含已有的磁盘空间):
[root@mini2 ~]# lvextend -L +25G /dev/mapper/centos-root
 Size of logical volume centos/root changed from 21.99 GiB (5630 extents) to 46.99 GiB (12030 extents).
  Logical volume centos/root successfully resized.
执行命令lvs:
[root@mini2 ~]# lvs
  LV   VG     Attr       LSize  Pool Origin Data%  Meta%  Move Log Cpy%Sync Convert
  root centos -wi-ao---- 46.99g
  swap centos -wi-ao----  2.00g
执行命令xfs_growfs /dev/mapper/centos-root:
[root@mini2 ~]# xfs_growfs /dev/mapper/centos-root
meta-data=/dev/mapper/centos-root isize=512    agcount=4, agsize=1441280 blks
         =                       sectsz=512   attr=2, projid32bit=1
         =                       crc=1        finobt=0 spinodes=0
data     =                       bsize=4096   blocks=5765120, imaxpct=25
         =                       sunit=0      swidth=0 blks
naming   =version 2              bsize=4096   ascii-ci=0 ftype=1
log      =internal               bsize=4096   blocks=2815, version=2
         =                       sectsz=512   sunit=0 blks, lazy-count=1
realtime =none                   extsz=4096   blocks=0, rtextents=0
data blocks changed from 5765120 to 12318720
到这一步我们扩容完成,使用df -h命令验证一番:
[root@mini2 ~]# df -h
文件系统                 容量  已用  可用 已用% 挂载点
/dev/mapper/centos-root   47G   20G   28G   42% /
devtmpfs                 727M     0  727M    0% /dev
tmpfs                    739M     0  739M    0% /dev/shm
tmpfs                    739M  9.5M  729M    2% /run
tmpfs                    739M     0  739M    0% /sys/fs/cgroup
/dev/sr0                 4.3G  4.3G     0  100% /mnt/cdrom
/dev/sda1               1014M  156M  859M   16% /boot
tmpfs                    148M     0  148M    0% /run/user/0
cm_processes             739M     0  739M    0% /run/cloudera-scm-agent/process
去Cloudera manager管理页面看一下,ok了:

后记
大家在操作的时候有什么问题,可以下方留言交流。
