mybatis的多条件查询是后台开发中常见的一种需求,下面直接展示需要实现的效果图:
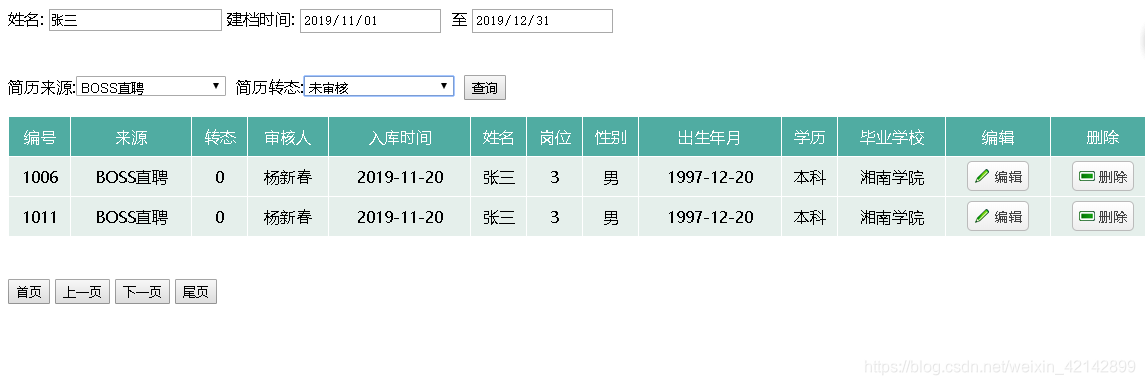
如上图,我们需要根据四个条件来查询简历信息,而且需求允许某些条件为空,还有一个就是时间段的查询,如果我们使用的常规的操作,就是使用sql语句一直and下去,但是显然这样是不符合要求的,而且维护起来也很麻烦,mybatis中就有一个功能专门用来完成多条件查询的,下面我们一起学习一下mybatis的多条件查询。由于本人学习过程中是在一个项目中添加学习的,所以代码不能全贴上来,所以这里只展示一些核心的代码块,然后做出解释。
1、首先这个项目是基于SSM+Maven的,所以搭建好环境,确保SSM框架可以跑通。
2、完成上面的jsp页面的编写,代码如下:
<%--
Created by IntelliJ IDEA.
User: Administrator
Date: 2019/11/21
Time: 9:34
To change this template use File | Settings | File Templates.
--%>
<%@ page contentType="text/html;charset=UTF-8" language="java" isELIgnored="false" %>
<%@ taglib prefix="c" uri="http://java.sun.com/jsp/jstl/core" %>
<%--注意导入的一定是jsp中的jstl,不然会出现错误--%>
<html>
<head>
<title>简历信息</title>
<link rel="stylesheet" type="text/css" href="custom/uimaker/easyui.css">
<link rel="stylesheet" type="text/css" href="custom/uimaker/icon.css">
<script type="text/javascript" src="custom/jquery.min.js"></script>
<script type="text/javascript" src="custom/jquery.easyui.min.js"></script>
<script type="text/javascript" src="custom/easyui-lang-zh_CN.js"></script>
</head>
<body >
<div class="text-c">
<form action="${pageContext.request.contextPath}/findResumeByCand" class="form form-horizontal">
姓名: <input type="text" name="cand_name" value="${resume.cand_name}">
建档时间: <input type="date" name="startTime" value="${startTime}"> 至 <input type="date" name="endTime" value="${endTime}">
<br><br><br>
简历来源:<select name="resource" value="${resume.res_resource}" class="select-box inline" style="width:150px" size="1">
<option value="${resume.res_resource}" style="display: none">${resume.res_resource}</option>
<option value="全部">全部</option>
<option value="BOSS直聘">BOSS直聘</option>
<option value="外包">外包</option>
</select>
简历转态:<select name="res_status" class="select-box inline" style="width:150px" size="1">
<option value="-1">全部</option>
<option value="0">未审核</option>
<option value="1">通过笔试</option>
<option value="2">通过面试</option>
<option value="3">接收office</option>
</select>
<input type="submit" class="btn btn-success Hui-iconfont radius" value="查询">
</form>
</div>
<table width="100%" border="1" id="dataTable" style=" border-collapse:collapse; border-spacing:0; border:1px solid #FFFFFF;" >
<tr style="background:#50aca2;color: #fff;border-bottom-width: 0; text-align: center; height: 2.5rem;">
<td>编号</td>
<td>来源</td>
<td>转态</td>
<td>审核人</td>
<td>入库时间</td>
<td>姓名</td>
<td>岗位</td>
<td>性别</td>
<td>出生年月</td>
<td>学历</td>
<td>毕业学校</td>
<td>编辑</td>
<td>删除</td>
</tr>
<c:forEach items="${list}" var="resumeList" >
<tr style="background: #e5efeb; text-align: center;height: 2.5rem;">
<td><c:out value="${resumeList.res_id}"></c:out></td>
<td><c:out value="${resumeList.res_resource}"></c:out></td>
<td><c:out value="${resumeList.res_status}"></c:out></td>
<td><c:out value="${resumeList.res_cheak_person}"></c:out></td>
<td><c:out value="${resumeList.res_indate}"></c:out></td>
<td><c:out value="${resumeList.cand_name}"></c:out></td>
<td><c:out value="${resumeList.cand_post}"></c:out></td>
<td><c:out value="${resumeList.cand_sex}"></c:out></td>
<td><c:out value="${resumeList.cand_birthday}"></c:out></td>
<td><c:out value="${resumeList.cand_education}"></c:out></td>
<td><c:out value="${resumeList.cand_school}"></c:out></td>
<td><a href="#" class="easyui-linkbutton" data-options="iconCls:'icon-edit'">编辑</a></td>
<td><a href="#" class="easyui-linkbutton" data-options="iconCls:'icon-remove'">删除</a></td>
</tr>
</c:forEach>
</table>
<br><br>
<c:if test="${page.isFirstPage==true}">
<button class="btn btn-default btn-info disabled">首页</button>
<button class="btn btn-default btn-info disabled">上一页</button>
</c:if>
<c:if test="${page.isFirstPage!=true}">
<a href="findResume?pageNo=${page.firstPage}" class="btn btn-default btn-info">首页</a>
<a href="findResume?pageNo=${page.prePage}" class="btn btn-default btn-info">上一页</a>
</c:if>
<c:if test="${page.isLastPage==true}">
<button class="btn btn-default btn-info disabled">下一页</button>
<button class="btn btn-default btn-info disabled">尾页</button>
</c:if>
<c:if test="${page.isLastPage!=true}">
<a href="findResume?pageNo=${page.nextPage}" class="btn btn-default btn-info">下一页</a>
<a href="findResume?pageNo=${page.lastPage}" class="btn btn-default btn-info">尾页</a>
</c:if>
</body>
</html>
这页面中使用一个表单完成多条件的表单编写,下面的是数据的展示,接着是一个mybatis分页的使用,我在上一篇Mybatis分页插件的使用博客中有介绍过。接着就是控制层代码了
@RequestMapping("findResumeByCand")
    public String findResumeByMutiCond(@RequestParam(required=true,defaultValue="1") Integer pageNo,
                                       @RequestParam(required=false,defaultValue="15") Integer pageSize,
                                       HttpServletRequest request){
        //获取表单中的数据
        String res_resource=request.getParameter("resource");
        String status=request.getParameter("res_status");
        String cand_name=request.getParameter("cand_name");
        //获取输入的时间
        String startTime = request.getParameter("startTime");
        String endTime=request.getParameter("endTime");
        //时间输出字符串形式
        System.out.println(startTime);
        System.out.println(endTime);
        //分页操作
        PageHelper.startPage(pageNo, pageSize);
        int res_status = Integer.parseInt(status);
        //将数据封装成对象
        Resume resume=new Resume();
        resume.setCand_name(cand_name);
        resume.setRes_resource(res_resource);
        resume.setRes_status(res_status);
        List<Resume> resumeByCand = resumeService.findResumeByCand(resume,startTime,endTime);
        PageInfo<Resume> page=new PageInfo<Resume>(resumeByCand);
        request.getSession().setAttribute("list",resumeByCand);
        request.getSession().setAttribute("page",page);
        request.getSession().setAttribute("resume",resume);
        request.getSession().setAttribute("startTime",startTime);
        request.getSession().setAttribute("endTime",endTime);
        System.out.println(resumeByCand);
        return "getResume";
    }
表单提交以后会访问到这个控制类中的这个方法,然后我们需要获取表单的数据,下拉列表获取到的值、时间、姓名、简历状态、简历来源等信息都可以获取到,在表单中使用name属性,在类中通过request对象就可以获取到,当然获取的方法很多,这是最原始的一种方法,接着将获取到的封装成一个简历对象,当然有关于简历的信息可以封装起来,但是建档的startTime和endTime不属于简历实体类中,所以用参数的方式传递过去,接着就是业务层和持久层的编写,这里应该挺简单的,最后最为关键的就是sql语句的编写了
<!--多条件查询
注意事件:
1、if里面的字段是传过来的参数,而不是数据库中的字段,在这里踩了两次坑
2、每一个参数都要在接口中绑定起来,不然会找不到参数
3、对于封装好的对象类型也要进行绑定,而且在这个文件中引入对象中的属性必须使用对象.属性的方式
4、对于时间类型的判断处理
5、对于大于等于小于等于这样的特殊字符如果报错,看是不是因为转义的问题。
-->
<select id="findResumeByCand" resultType="com.tf.entity.Resume" >
select * from resume
<where>
1 = 1
<if test="resume1.cand_name != null and resume1.cand_name!=''">
and cand_name = #{resume1.cand_name}
</if>
<if test="resume1.res_status != -1">
and res_status = #{resume1.res_status}
</if>
<if test = "resume1.res_resource != '全部'">
and res_resource = #{resume1.res_resource}
</if>
<if test="startTime!='' and startTime!=null">
and res_indate >= to_date(#{startTime},'yyyy-mm-dd')
</if>
<if test="endTime!='' and endTime!=null">
and res_indate <= to_date(#{endTime},'yyyy-mm-dd')
</if>
</where>
</select>
注意这里的判断条件是要根据表单中的内容来判断的,比如简历来源中的全部,不一定都是说为空或者为null什么的,所以这里要加以注意。
 /**多条件查询*/
    public List<Resume> findResumeByCand(@Param(value = "resume1") Resume resume1,
                                         @Param(value = "startTime") String startTime,
                                         @Param(value = "endTime") String endTime);
这是接口的编写。
这样一个多条件查询功能就完成了,当然还有很多的细节的东西,但是这些东西都是需要自己去尝试,去摸索的,我在做的时候就出现了很多的问题,也是bug不断,我也只是提供一个简单的思路,很多东西都没有说到位,自己在学习的时候也是查看博客,然后自己一步步的做,有些博客写的确实挺好,代码都有,直接复制下来,这样可以直接运行起来看看效果,然后再去看源代码,这样东西才会变成自己的。
