先写一个类,继承自SQLiteOpenHelper
public class MyDatabaseHelper extends SQLiteOpenHelper {
//声明一个Context
private Context context;
//原本的重写方法很多用不到的参数 这里直接删除了,第二个参数为数据库的名字(需要用db结尾)
// 调用父类的时候传入1个空值就可以了
//这里的两个参数分别是传入的Content(调用的Activity) version(版本)
public MyDatabaseHelper(@Nullable Context context, int version) {
super(context, "data.db", null, version);
//赋值
this.context=context;
}
//创建数据库的方法
@Override
public void onCreate(SQLiteDatabase db) {
String s = "create table Book(" +
"id integer," +
"name text)";
//执行SQL语句
db.execSQL(s);
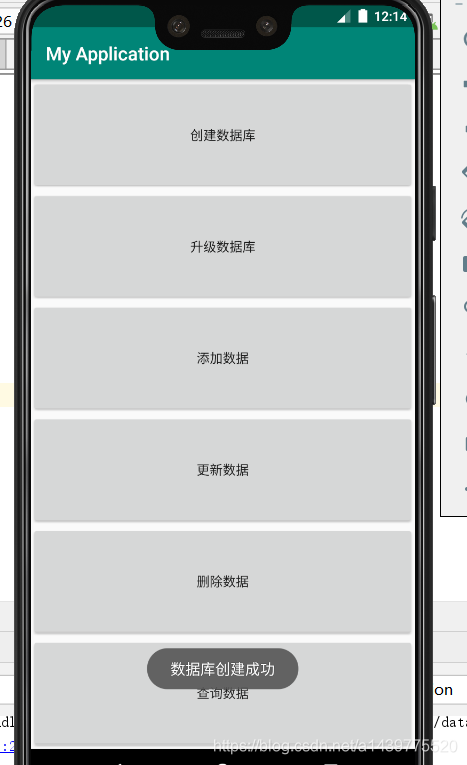
Toast.makeText(context, "数据库创建成功", Toast.LENGTH_SHORT).show();
}
//升级数据库的 这里多了两个参数
//这两个参数是版本号,只有新版本号大于旧版本号的时候才能运行这个方法
//升级的时候记得换一个表明,表明不能相同
@Override
public void onUpgrade(SQLiteDatabase db, int oldVersion, int newVersion) {
String s = "create table User(" +
"id integer," +
"name text)";
//执行SQL语句
db.execSQL(s);
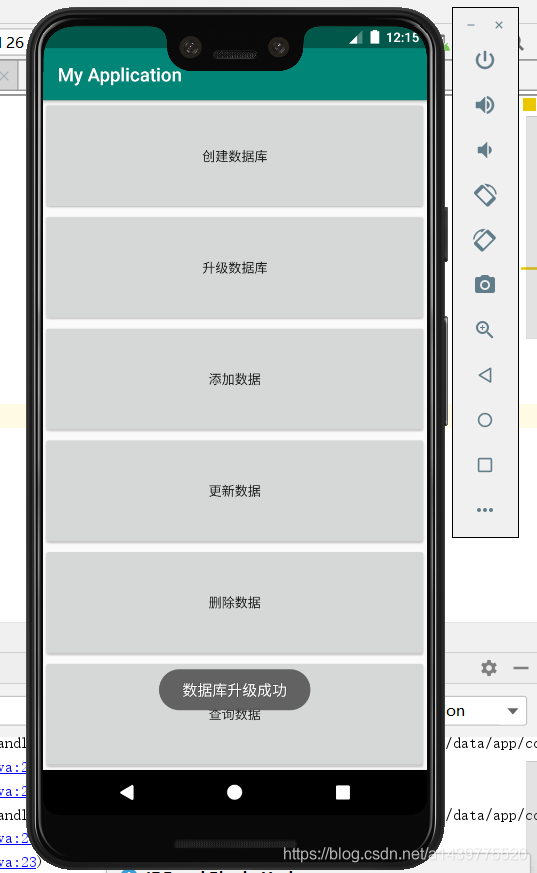
Toast.makeText(context, "数据库升级成功", Toast.LENGTH_SHORT).show();
}
}
主方法的代码
package com.example.myapplication;
import androidx.appcompat.app.AppCompatActivity;
import android.content.ContentValues;
import android.database.Cursor;
import android.database.sqlite.SQLiteDatabase;
import android.os.Bundle;
import android.util.Log;
import android.view.View;
import android.widget.Button;
import android.widget.Toast;
public class DataBase extends AppCompatActivity {
//声明按钮
Button btn1, btn2, btn3, btn4, btn5, btn6;
private MyDatabaseHelper dbHelper;
private SQLiteDatabase db;
@Override
protected void onCreate(Bundle savedInstanceState) {
super.onCreate(savedInstanceState);
setContentView(R.layout.activity_data_base);
//找到控件
btn1 = findViewById(R.id.btn1);
btn2 = findViewById(R.id.btn2);
btn3 = findViewById(R.id.btn3);
btn4 = findViewById(R.id.btn4);
btn5 = findViewById(R.id.btn5);
btn6 = findViewById(R.id.btn6);
//创建数据库
btn1.setOnClickListener(new View.OnClickListener() {
@Override
public void onClick(View v) {
dbHelper = new MyDatabaseHelper(DataBase.this, 5);
dbHelper.getWritableDatabase();
}
});
//升级数据库
btn2.setOnClickListener(new View.OnClickListener() {
@Override
public void onClick(View v) {
//修改一下版本
dbHelper = new MyDatabaseHelper(DataBase.this, 6);
dbHelper.getWritableDatabase();
}
});
//添加数据
btn3.setOnClickListener(new View.OnClickListener() {
@Override
public void onClick(View v) {
db = dbHelper.getWritableDatabase();
//添加数据需要用到类似于Map的ContentValues
ContentValues values = new ContentValues();
//添加 前面的数据是列名,要与数据库表中的数据保持一致
values.put("id", 1);
values.put("name", "张三");
//插入数据,第一个参数为表名,中间的参数输入一个空值就行,最后一个参数就是刚才存的values
//输入数据会返回一个影响行数
long rows = db.insert("User", null, values);
if (rows > 0) {
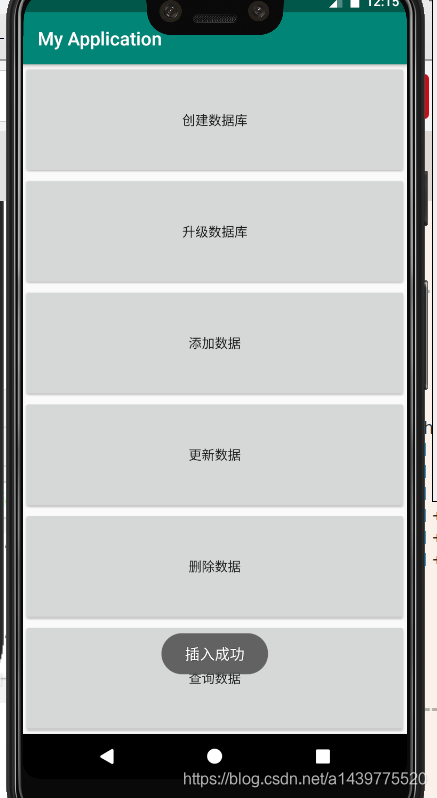
Toast.makeText(DataBase.this, "插入成功", Toast.LENGTH_SHORT).show();
} else {
Toast.makeText(DataBase.this, "插入失败", Toast.LENGTH_SHORT).show();
}
}
});
//更新数据
btn4.setOnClickListener(new View.OnClickListener() {
@Override
public void onClick(View v) {
db = dbHelper.getWritableDatabase();
//更新数据需要用到类似于Map的ContentValues
ContentValues values = new ContentValues();
//添加 前面的数据是列名,要与数据库表中的数据保持一致
values.put("name", "张三1");
int rows = db.update("User", values, "id=?", new String[]{"1"});
if (rows > 0) {
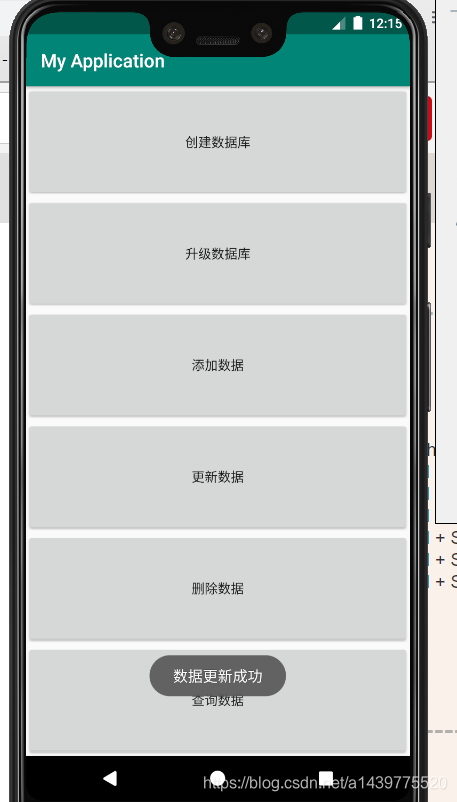
Toast.makeText(DataBase.this, "数据更新成功", Toast.LENGTH_SHORT).show();
} else {
Toast.makeText(DataBase.this, "数据更新失败", Toast.LENGTH_SHORT).show();
}
}
});
//删除数据
btn5.setOnClickListener(new View.OnClickListener() {
@Override
public void onClick(View v) {
db = dbHelper.getWritableDatabase();
int rows = db.delete("User", "id=?", new String[]{"1"});
if (rows > 0) {
Toast.makeText(DataBase.this, "数据删除成功", Toast.LENGTH_SHORT).show();
} else {
Toast.makeText(DataBase.this, "数据删除失败", Toast.LENGTH_SHORT).show();
}
}
});
//查询数据
btn6.setOnClickListener(new View.OnClickListener() {
@Override
public void onClick(View v) {
//这次是read,以前都是write
db = dbHelper.getReadableDatabase();
//查询表中所有数据,query()方法返回一个Cursor对象
// 第一个参数为表名,第二个参数为列名,如果不写的话则返回全部列,第三个参数为筛选条件,如果第三个筛选条件有?则第四个就是和更新删除的意义一样,凭借这个进行筛选
// 第五个参数是靠什么分组,第六个是分完组靠什么筛选,最后一个是依靠什么排序
Cursor cursor = db.query("User", null, null, null, null, null, null);
//如果索引在第一条就开始执行
if (cursor.moveToFirst()) {
do {
//通过列名找到数据
String id = cursor.getString(cursor.getColumnIndex("id"));
String name = cursor.getString(cursor.getColumnIndex("name"));
Log.i("data", "id为" + id + "名字为" + name);
} while (cursor.moveToNext());
}
//使用完需要关闭
cursor.close();
}
});
}
}
最后是XML布局的代码
<?xml version="1.0" encoding="utf-8"?>
<LinearLayout xmlns:android="http://schemas.android.com/apk/res/android"
    xmlns:app="http://schemas.android.com/apk/res-auto"
    xmlns:tools="http://schemas.android.com/tools"
    android:layout_width="match_parent"
    android:orientation="vertical"
    android:layout_height="match_parent"
    tools:context=".DataBase">


    <Button
        android:id="@+id/btn1"
        android:layout_width="match_parent"
        android:layout_height="wrap_content"
        android:layout_weight="1"
        android:text="创建数据库" />

    <Button
        android:id="@+id/btn2"
        android:layout_width="match_parent"
        android:layout_height="wrap_content"
        android:layout_weight="1"
        android:text="升级数据库" />

    <Button
        android:id="@+id/btn3"
        android:layout_width="match_parent"
        android:layout_height="wrap_content"
        android:layout_weight="1"
        android:text="添加数据" />

    <Button
        android:id="@+id/btn4"
        android:layout_width="match_parent"
        android:layout_height="wrap_content"
        android:layout_weight="1"
        android:text="更新数据" />

    <Button
        android:id="@+id/btn5"
        android:layout_width="match_parent"
        android:layout_height="wrap_content"
        android:layout_weight="1"
        android:text="删除数据" />

    <Button
        android:id="@+id/btn6"
        android:layout_width="match_parent"
        android:layout_height="wrap_content"
        android:layout_weight="1"
        android:text="查询数据" />
</LinearLayout>
最后附上效果图
创建数据库
升级数据库
插入数据
更新数据
删除数据
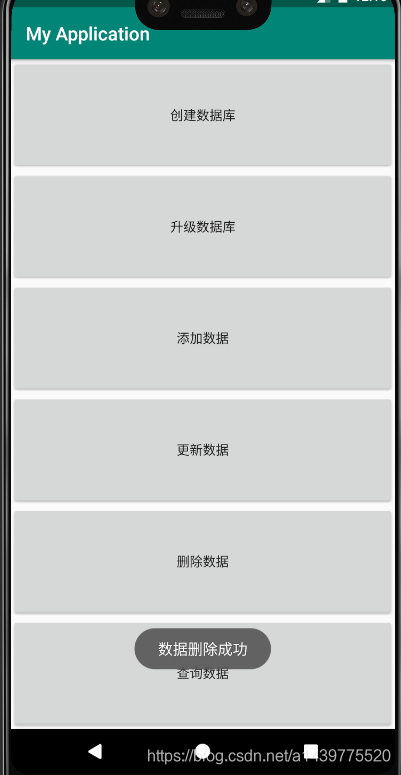
查询数据
这里画圈的地方是为了做个筛选,更直观的看出查询出的log数据

最后附上一个查看数据库的位置
在右下角的按钮 打开后 在data/data/包名/database/…
包名不知道的话,可以打开你这个项目内任意一个类,最上面就是包名

