一、创建一个动态的web项目

二、导入必须的jar包

三、配置前端控制器(在web.xml文件中),给出的代码在图片下面,直接复制粘贴即可

 <!-- 配置一个前端控制器 -->
  <servlet>
  	<servlet-name>dispatcherServlet</servlet-name>
  	<servlet-class>org.springframework.web.servlet.DispatcherServlet</servlet-class>
  	<!-- 配置初始化参数 -->
  	<init-param>
  		<param-name>contextConfigLocation</param-name>
  		<param-value>classpath:springMVC.xml</param-value>
  	</init-param>
  	<!-- 设置启动时机 -->
  	<load-on-startup>1</load-on-startup>
  </servlet>
  <servlet-mapping>
  	<servlet-name>dispatcherServlet</servlet-name>
  	<url-pattern>/</url-pattern>
  </servlet-mapping>
四、在src目录下新建一个springMVC.xml的文件


在文件中键入以下内容:
<beans xmlns="http://www.springframework.org/schema/beans"
	xmlns:xsi="http://www.w3.org/2001/XMLSchema-instance"
	xmlns:context="http://www.springframework.org/schema/context"
	xmlns:aop="http://www.springframework.org/schema/aop"
	xmlns:tx="http://www.springframework.org/schema/tx"
	xmlns:mvc="http://www.springframework.org/schema/mvc"
	xsi:schemaLocation="http://www.springframework.org/schema/beans
	http://www.springframework.org/schema/beans/spring-beans.xsd
	http://www.springframework.org/schema/context
	http://www.springframework.org/schema/context/spring-context.xsd
	http://www.springframework.org/schema/aop
	http://www.springframework.org/schema/aop/spring-aop.xsd
	http://www.springframework.org/schema/mvc
	http://www.springframework.org/schema/mvc/spring-mvc.xsd
	http://www.springframework.org/schema/tx
	http://www.springframework.org/schema/tx/spring-tx.xsd">

    <context:component-scan base-package="com.yidongxueyuan"/>
</beans>
五、新建一个class,编写如下内容

六、准备前端页面
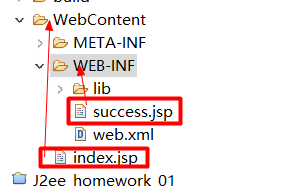
注意:index.jsp在WebContent下,success.jsp在WEB-INF下。
在index.jsp中编写如下内容:

在success.jsp中编写如下内容:

七、在服务器上运行index.jsp
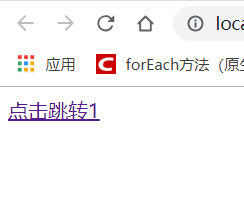
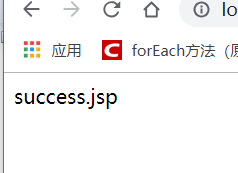
点击,页面跳转情况如下
控制台显示如下

至此,一个springMVC入门案例搭建成功。
