配置环境
| 主机名 | 网络地址 | 默认网关 | 域名服务器 |
|---|---|---|---|
| Server2.worldskills.cn | 192.168.10.100/24 | 192.168.10.254 | 192.168.10.254 |
| Server1.worldskills.cn | 192.168.10.254/24 192.168.10.254/24 | 无 | 127.0.0.1 |
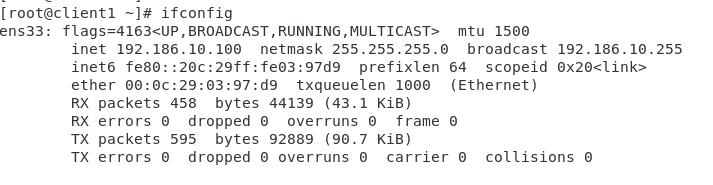
| Client1.worldskills.cn | 192.186.10.100/24 | 无 | 192.186.10.254 |
➢ 服务器Server1.worldskills.cn工作任务
1. 请根据附件说明配置服务器的主机名,域和 IP 地址
由图表可知,server1需要配置两张网卡
首先修改主机名
hostnamectl set-hostname 主机名
#命令如下
hostnamectl set-hostname Server1.worldskills.cn
添加网卡

然后配置ip地址
这里我使用图形化界面,易操作
nm-connection-editor

点击save保存
systemctl restart network

2. 开启路由转发,为当前实验环境提供路由功能
1.临时开启,(写入内存,在内存中开启)
echo "1" > /proc/sys/net/ipv4/ip_forward

2.永久开启,(写入内核)
在 vim /etc/sysctl.conf 下
加入此行   net.ipv4.ip_forward = 1
sysctl -p      ----加载一下
3. Chrony
a. 提供时间同步功能
b. 每一台设备添加一个系统计划任务,每天凌晨 3 点进行一次时间同
步(除了服务器自己)
首先配置一个yum源
参考文档:https://blog.csdn.net/gd_9988/article/details/104037243
mount /dev/cdrom /mnt
echo '[rhel]
name=rhel
baseurl=file:///mnt
gpgcheck=0
enabled=1' > /etc/yum.repos.d/rhel.repo
最后使用yum repolist查看已安装的源
server1上的配置
yum install -y chrony
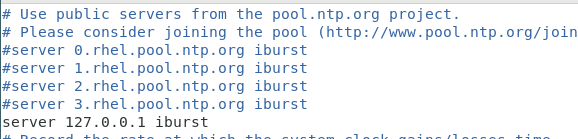
vim /etc/chrony.conf
systemctl restart chronyd
systemctl enable chronyd
然后使用chronyc sources -v进行验证
firewall-cmd --permanent --add-service=ntp
firewall-cmd --reload
iptables -I INPUT -p udp --dport=123 -j ACCEPT
server2上的配置

systemctl restart chronyd
systemctl enable chronyd
使用chronyc进行验证
使用计划任务
crontab -e
* 3  * * *  /usr/sbin/ntpdate 192.168.10.254
client1配置同server2,不再赘述
4. Dns(Bind9)
a. 创建 worldskills.cn 域名数据库,添加必要解析的域名解析;
yum install -y bind*
vim /etc/named.conf

vim /etc/named.rfc1912.zones

留下第二个和第四个
修改为:

cd /var/named
cp -a named.localhost worldskills.cn.local
cp -a named.loopback worldskills.cn.zone
编辑正向解析文件
vim worldskills.cn.local

编辑反向解析文件
vim worldskills.cn.zone

systemctl restart named
systemctl enable named
使用nslookup命令进行测试

最后在防火墙上允许此服务需要的端口
firewall-cmd --permanent --add-service=dns
firewall-cmd --reload
iptables -I INPUT -p tcp --dport=53 -j ACCEPT
iptables -I INPUT -p udp --dport=53 -j ACCEPT
server2上进行测试

参考文档:https://blog.csdn.net/gd_9988/article/details/104063221
5. Iptables
a. 默认阻挡所有流量
iptables -P INPUT REJECT
b. 添加必要的 NAT 规则和流量放行规则,使要求中的服务正常提供工作
iptables -I INPUT -p udp --dport=123 -j ACCEPT //NTP服务
iptables -I INPUT -p tcp --dport=53 -j ACCEPT  //DNS服务
iptables -I INPUT -p udp --dport=53 -j ACCEPT
参考文档:https://www.linuxprobe.com/chapter-08.html
➢ 服务器Server2.worldskills.cn工作任务
1.请根据附件说明配置服务器的主机名,域和IP地址
主机名设置
hostnamectl set-hostname Server2.worldskills.cn
网卡设置
nm-connection-editor

save保存
systemctl restart network \\重启网卡

2.Disk
a.磁盘管理
i.添加必要的虚拟磁盘

添加SATA格式的无需重启
ii.配置为raid-1磁盘d
mdadm命令的常用参数和作用
| 参数 | 作用 |
|---|---|
| -a | 检测设备名称 |
| -n | 指定设备数量 |
| -l | 指定RAID级别 |
| -C | 创建 |
| -v | 显示过程 |
| -f | 模拟设备损坏 |
| -r | 移除设备 |
| -Q | 查看摘要信息 |
| -D | 查看详细信息 |
| -S | 停止RAID磁盘阵列 |
mdadm -C /dev/md0 -n 2 -l 1 /dev/sdb /dev/sdc

b.逻辑卷
i.使用现有的物理raid-1磁盘创建5120个Physical Extent
ii.每个Physical Extent大小为2MB
iii.路径/dev/vgdisk/lvdisk
iv.将该磁盘挂载到/data目录,开机自动挂载。
pvcreate /dev/md0
vgcreate -s 2M  vdisk /dev/md0
lvcreate -l 5120 -n lvdisk /dev/vgdisk
mkfs.xfs /dev/vgdisk/lvdisk
mkdir /data
echo "/dev/vgdisk/lvdisk /data xfs defaults 0 0" >> /etc/fstab
mount -a
3.Vsftpd
a./data/webdownload/upload目录作为匿名用户的上传目录
i.上传的文件所有者均设置为ftpusr
ii.禁止上传后缀名为.html.htm.php的文件
1)安装vsftd并设置防火墙
2)配置vsftpd
yum install -y vsftpd
vim /etc/vsftpd/vsftpd.conf
mkdir -p /data/webdownload/upload
写入

anon_upload_enable=YES
anon_mkdir_write_enable=YES
anon_other_write_enable=YES
anon_root=/data/webdownload/upload
systemctl restart vsftpd
systemctl enable vsftpd
setsebool -P ftpd_full_access=on
firewall-cmd --permanent --add-service=ftp
firewall-cmd --reload
useradd ftpusr
chown ftpusr:ftpusr /data/webdownload/upload
chmod g+s /data/webdownload/upload
参考文档: https://www.linuxprobe.com/chapter-11.html
4.Samba
a.创建/data/samba/share共享目录,共享名为office-share
mkdir -p /data/samba/share
yum install -y samba
vim /etc/samba/smb.conf
#写入
[office-share]
comment = share
path = /data/samba/share
public = Yes
writable = Yes
systemctl restart smb
systemctl enable smb
useradd ldsgp
chown -Rf ldsgp:ldsgp /data/samba/share
semange fcontext  -a -t samba_share_t /data/samba/share
restorecon -Rv /data/samba/share
setsebool -P samba_enable_home_dirs on
5.Apache2
a.工作进程运行设置为www系统用户
b.创建网站www.worldskills.cn
i.网站根目录/data/webroot
yum install -y httpd
vim /etc/httpd/conf/httpd.conf
mkdir -p /data/webroot
useradd www
工作进程设置为www系统用户

网站根目录
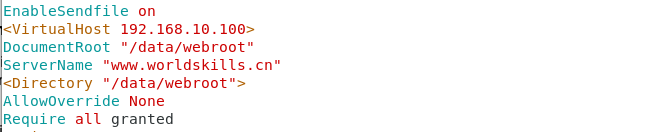
写入
<VirtualHost 192.168.10.100>
DocumentRoot "/data/webroot"
ServerName "www.worldskills.cn"
<Directory "/data/webroot">
AllowOverride None
Require all granted
</Directory>
</VirtualHost>
systemctl restart httpd
systemctl enable httpd
echo "192.168.10.100  www.worldskills.cn" >> /etc/hosts
echo "www.worldskills.cn" >> /data/webroot/index.html
firewall-cmd --permanent --add-service =http
firewall-cmd --reload
#更改selinux上下文
semanage fcontext -a -t httpd_sys_content_t  /data/webroot/*
restorecon -Rv /data/webroot

➢ 服务器Client1.worldskills.cn工作任务
1.请根据附件说明配置服务器的主机名,域和IP地址
#主机名设置
hostnamectl set-hostname Client1.worldskills.cn
#网卡设置
nm-connection-editor

systemctl restart network
2.安装nslookup、dig、curl、smbclient、lftp、ftp、ntpdate
查找软件包
rpm -qf | `which 命令`
yum whatprovides 命令
安装nslookup
rpm -qf | `which nslookup`
rpm -ivh /media/cdrom/Packages/bind-utils-9.9.4-72.el7.x86_64.rpm


安装dig

同上
安装curl

安装smbclient
yum install -y samba-client
安装lftp
yum whatprovides lftp
yum install -y lftp.x86_64

安装ftp(同上)

安装ntpdate

