3.SpringBoot整合Servlet
3.1.方式一
步骤:
- 写一个类MyFirstServlet继承HttpServlet,并重写doGet方法。
- 在类的上面用@WebServlet标识Servlet并指明name和urlPatterns。
- 在标识有@SpringBootApplication的主类上加上@ServletComponentScan。
FirstServlet.java
package com.example.servlet.myservlet;

import javax.servlet.http.HttpServlet;
import java.io.IOException;
import javax.servlet.ServletException;
import javax.servlet.annotation.WebServlet;
import javax.servlet.http.HttpServletRequest;
import javax.servlet.http.HttpServletResponse;

/**
 *SpringBoot整合Servlet方式一
 *@WebServlet(name="MyFirstServlet",urlPatterns="/myFirst")相当于如下:
 *
 *<servlet>
 * <servlet-name>MyFirstServlet</servlet-name>
 * <servlet-class>ah.szxy.servlet.FirstServlet</servlet-class>
 *</servlet>
 *<servlet-mapping>
 * <servlet-name>MyFirstServlet</servlet-name>
 * <url-pattern>/first</url-pattern>
 *</servlet-mapping>
 *
 */

@WebServlet(name="MyFirstServlet",urlPatterns="/myFirst")
public class FirstServlet extends HttpServlet {

    @Override
    protected void doGet(HttpServletRequest req, HttpServletResponse resp) throws ServletException, IOException {
        System.out.println("MyFirstServlet init............");
    }
}
ServletApplication.java
package com.example.servlet;

import org.springframework.boot.SpringApplication;
import org.springframework.boot.autoconfigure.SpringBootApplication;
import org.springframework.boot.web.servlet.ServletComponentScan;

@SpringBootApplication
@ServletComponentScan //在springBoot启动时会扫描@WebServlet,并将该类实例化
public class ServletApplication {

   public static void main(String[] args) {
      SpringApplication.run(ServletApplication.class, args);
   }

}
然后启动项目
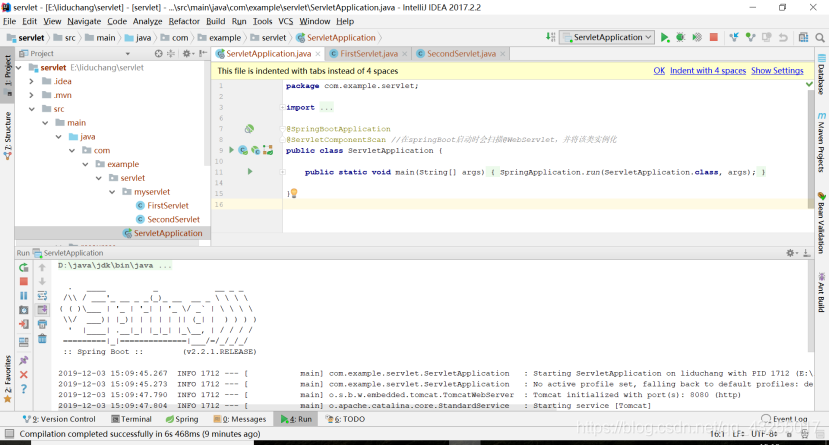
最后在浏览器输入localhost:8080/myFirstServlet,页面显示空白,在控制台打印MyFirstServlet init…
3.2.方式二
步骤:
- 创建一个类SecondServlet继承HttpServlet,并重写doGet方法。
- 在@SpringBootApplication标识的主类中加@Bean的一个方法。
SecondServlet.java
package com.example.servlet.myservlet;

import javax.servlet.ServletException;
import javax.servlet.http.HttpServlet;
import javax.servlet.http.HttpServletRequest;
import javax.servlet.http.HttpServletResponse;
import java.io.IOException;

/**
 * 整合Servlet的第二种方式
 */
public class SecondServlet extends HttpServlet {

    @Override
    protected void doGet(HttpServletRequest req, HttpServletResponse resp) throws ServletException, IOException {
        System.out.println("MySecondServlet init..........");
    }
}
ServletApplication.java
package com.example.servlet;
import com.example.servlet.myservlet.SecondServlet;
import org.springframework.boot.SpringApplication;
import org.springframework.boot.autoconfigure.SpringBootApplication;
import org.springframework.boot.web.servlet.ServletComponentScan;
import org.springframework.boot.web.servlet.ServletRegistrationBean;
import org.springframework.context.annotation.Bean;
@SpringBootApplication
//@ServletComponentScan //在springBoot启动时会扫描@WebServlet,并将该类实例化
public class ServletApplication {
public static void main(String[] args) {
SpringApplication.run(ServletApplication.class, args);
}
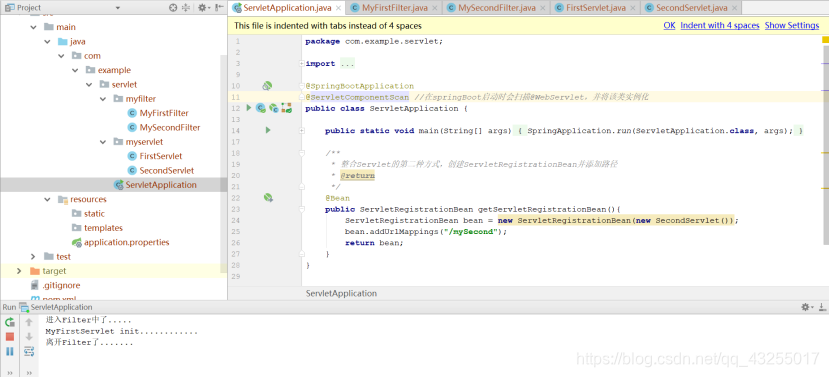
/**
* 整合Servlet的第二种方式,创建ServletRegistrationBean并添加路径
* @return
*/
@Bean
public ServletRegistrationBean getServletRegistrationBean(){
ServletRegistrationBean bean = new ServletRegistrationBean(new SecondServlet());
bean.addUrlMappings("/mySecond");
return bean;
}
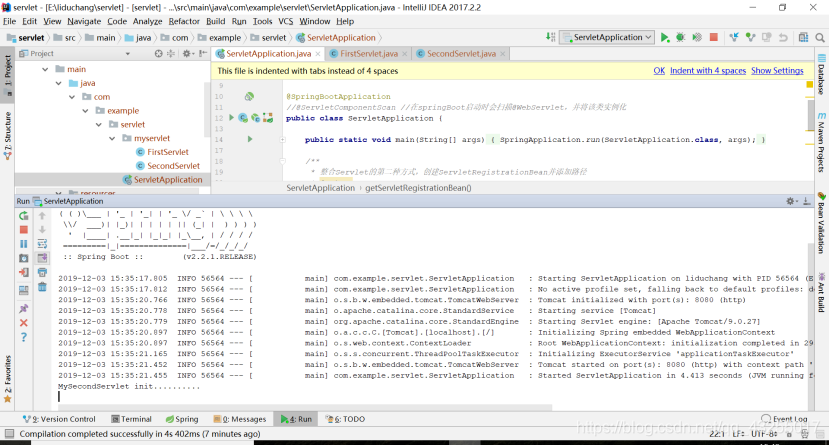
然后启动项目,在浏览器中访问localhost:8080/mySecondServlet,页面也是空白,在控制台就会打印MySecondServlet init…
项目,结构如图所示
结论:
- 上面的两种方式推荐使用第一种基于注解的整合。
- 虽然现在几乎用不到servlet了,但是学习SpringBoot整合servlet有助于学习的深入了解,更好的理解框架。
4.SpringBoot整合Filter
4.1.方式一
步骤:
- 创建一个MyFirstFilter类实现Filter接口,并在类上面标注@WebFilter。
- 在@SpringBootApplication的主类上加上@ServletComponentScan注解。
MyFirstFilter.java
package com.example.servlet.myfilter;

import javax.servlet.*;
import javax.servlet.annotation.WebFilter;
import java.io.IOException;

/**
 * 基于@WebFilter注解整合Filter方式一
 */
@WebFilter(filterName = "MyFirstFilter",urlPatterns = "/myFirst")
public class MyFirstFilter implements Filter {
    @Override
    public void init(FilterConfig filterConfig) throws ServletException {

    }

    @Override
    public void doFilter(ServletRequest arg0, ServletResponse arg1, FilterChain arg2) throws IOException, ServletException {
        System.out.println("进入Filter中了.....");
        arg2.doFilter(arg0,arg1);
        System.out.println("离开Filter了.......");
    }

    @Override
    public void destroy() {

    }
}
ServletApplication.java
package com.example.servlet;

import com.example.servlet.myservlet.SecondServlet;
import org.springframework.boot.SpringApplication;
import org.springframework.boot.autoconfigure.SpringBootApplication;
import org.springframework.boot.web.servlet.ServletComponentScan;
import org.springframework.boot.web.servlet.ServletRegistrationBean;
import org.springframework.context.annotation.Bean;

@SpringBootApplication
@ServletComponentScan //在springBoot启动时会扫描@WebServlet,并将该类实例化
public class ServletApplication {

   public static void main(String[] args) {
      SpringApplication.run(ServletApplication.class, args);
   }

   /**
    * 整合Servlet的第二种方式,创建ServletRegistrationBean并添加路径
    * @return
    */
   @Bean
   public ServletRegistrationBean getServletRegistrationBean(){
      ServletRegistrationBean bean = new ServletRegistrationBean(new SecondServlet());
      bean.addUrlMappings("/mySecond");
      return bean;
   }
}
4.2.方式二
步骤:
- 创建一个类MySecondFilter实现Filter接口,重写方法。
- 在@SpringBootApplication标识的主类中加@Bean的一个方法,将MySecondFilter对象注入容器中。
MySecondFilter.java
package com.example.servlet.myfilter;

import javax.servlet.*;
import java.io.IOException;

/**
 * 整合Filter的第二种方式
 */
public class MySecondFilter implements Filter {
    @Override
    public void init(FilterConfig filterConfig) throws ServletException {

    }

    @Override
    public void doFilter(ServletRequest arg0, ServletResponse arg1, FilterChain arg2) throws IOException, ServletException {
        System.out.println("进入MySecondFilter了......");
        arg2.doFilter(arg0, arg1);
        System.out.println("离开MySecondFilter了......");
    }

    @Override
    public void destroy() {

    }
}
ServletApplication.java
package com.example.servlet;
import com.example.servlet.myfilter.MySecondFilter;
import com.example.servlet.myservlet.SecondServlet;
import org.springframework.boot.SpringApplication;
import org.springframework.boot.autoconfigure.SpringBootApplication;
import org.springframework.boot.web.servlet.FilterRegistrationBean;
import org.springframework.boot.web.servlet.ServletComponentScan;
import org.springframework.boot.web.servlet.ServletRegistrationBean;
import org.springframework.context.annotation.Bean;
@SpringBootApplication
//@ServletComponentScan //在springBoot启动时会扫描@WebServlet,并将该类实例化
public class ServletApplication {
public static void main(String[] args) {
SpringApplication.run(ServletApplication.class, args);
}
/**
* 整合Filter的第二种方式
* 注册Filter
*/
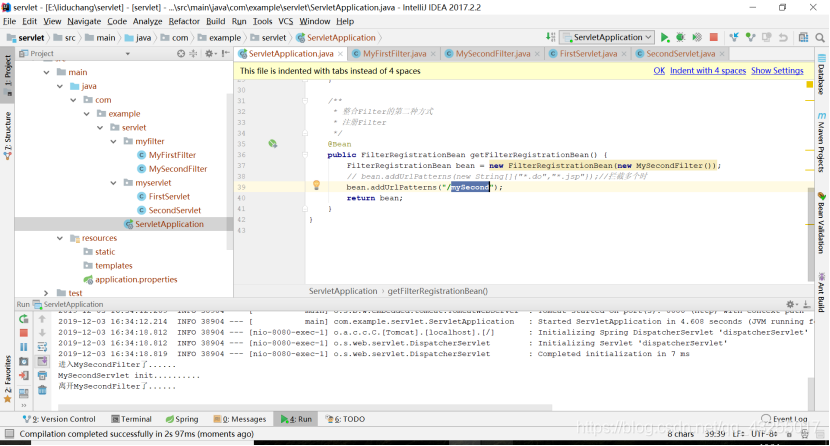
@Bean
public FilterRegistrationBean getFilterRegistrationBean() {
FilterRegistrationBean bean = new FilterRegistrationBean(new MySecondFilter());
// bean.addUrlPatterns(new String[]{"*.do","*.jsp"});//拦截多个时
bean.addUrlPatterns("/mySecond");
return bean;
}
}
然后在浏览器访问localhost:8080/mySecond,就可以看到控制台打印如下
5.SpringBoot整合Listener
5.1.方式一
步骤:
- 创建一个类MyFirstListener实现ServletContextListener接口,重写方法
- 在该类上加上@WebListener注解
package com.example.servlet.mylistener;
import javax.servlet.ServletContextEvent;
import javax.servlet.ServletContextListener;
import javax.servlet.annotation.WebListener;
/**
* springBoot 整合Listener第一种方式
* 创建一个Servlet上下文的监听器
* @WebListener 自动注册,相当于在web.xml中添加如下代码
*
*<listener>
* <listener-class>ah.szxy.listener.FirstListener</listener-class>
*</listener>
*/
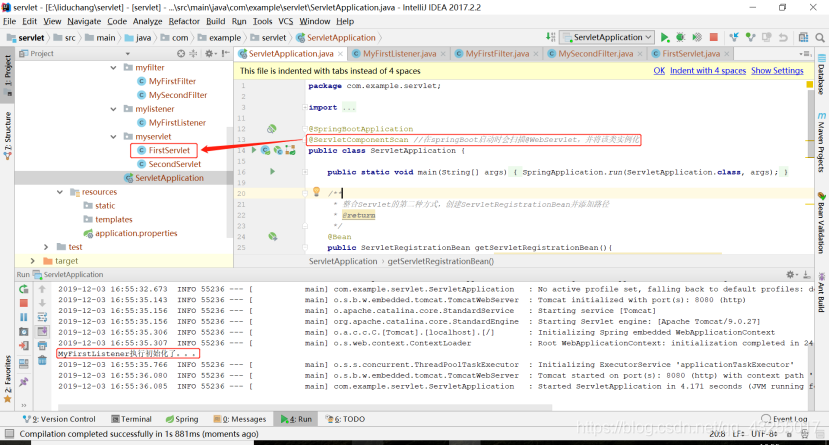
@WebListener
public class MyFirstListener implements ServletContextListener {
@Override
public void contextDestroyed(ServletContextEvent arg0) {
// TODO Auto-generated method stub
System.out.println("MyFirstListener执行销毁了。。。");
}
@Override
public void contextInitialized(ServletContextEvent arg0) {
// TODO Auto-generated method stub
System.out.println("MyFirstListener执行初始化了。。。");
}
}
执行项目会打印如下,因为用了@ServletComponentScan注解,在项目启动的时候就会扫描包中是否含有servlet,若有就初始化。由于FirstServlet是基于注解初始化的,所以在项目启动的时候,就会执行初始化servlet,被Listener监听到
5.1.方式二
步骤:
- 创建一个类MySecondListener实现ServletContextListener接口,重写方法。
- 在@SpringBootApplication标识的主类中加@Bean的一个方法,将MySecondListener对象注入容器中。
package com.example.servlet.mylistener;

import javax.servlet.ServletContextEvent;
import javax.servlet.ServletContextListener;

/**
 * 整合Listener的第二种方式
 */
public class MySecondListener implements ServletContextListener {

    @Override
    public void contextDestroyed(ServletContextEvent arg0) {
        // TODO Auto-generated method stub
        System.out.println("MySecondListener执行销毁了。。。");
    }

    @Override
    public void contextInitialized(ServletContextEvent arg0) {
        // TODO Auto-generated method stub
        System.out.println("MySecondListener执行初始化了。。。");
    }

}
package com.example.servlet;
import com.example.servlet.myfilter.MySecondFilter;
import com.example.servlet.mylistener.MySecondListener;
import com.example.servlet.myservlet.SecondServlet;
import org.springframework.boot.SpringApplication;
import org.springframework.boot.autoconfigure.SpringBootApplication;
import org.springframework.boot.web.servlet.FilterRegistrationBean;
import org.springframework.boot.web.servlet.ServletComponentScan;
import org.springframework.boot.web.servlet.ServletListenerRegistrationBean;
import org.springframework.boot.web.servlet.ServletRegistrationBean;
import org.springframework.context.annotation.Bean;
@SpringBootApplication
@ServletComponentScan //在springBoot启动时会扫描@WebServlet,并将该类实例化
public class ServletApplication {
public static void main(String[] args) {
SpringApplication.run(ServletApplication.class, args);
}
/**
* 注册listener
*/
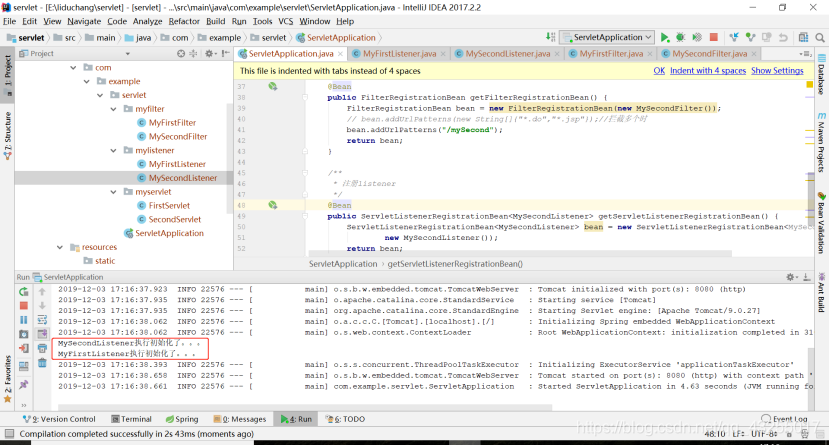
@Bean
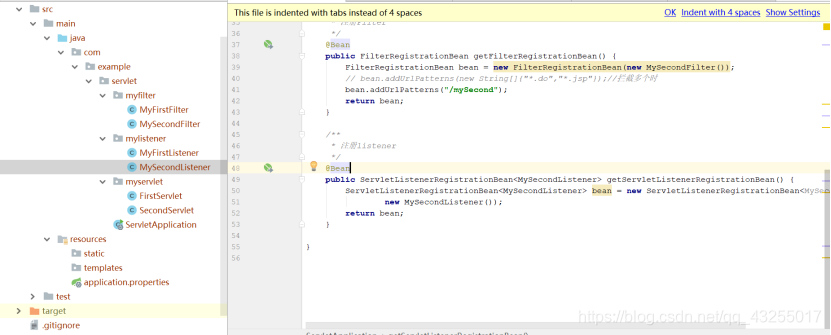
public ServletListenerRegistrationBean<MySecondListener> getServletListenerRegistrationBean() {
ServletListenerRegistrationBean<MySecondListener> bean = new ServletListenerRegistrationBean<MySecondListener>(
new MySecondListener());
return bean;
}
}
执行项目,在控制台可以看到输出如下,两个Servlet监听器都执行了
总的项目目录包结构如下: