SpringSecurity实现OAuth2
OAuth(开放授权)是一个开放标准,允许用户让第三方应用访问该用户在某一网站上存储的私密的资源(如照片,视频,联系人列表),而无需将用户名和密码提供给第三方应用。OAuth2.0是OAuth协议的延续版本,但不向前兼容OAuth 。2.0(即完全废止了OAuth1.0)。 OAuth 2.0关注客户端开发者的简易性。要么通过组织在资源拥有者和HTTP服务商之间的被批准的交互动作代表用户,要么允许第三方应用代表用户获得访问的权限。同时为Web应用,桌面应用和手机,和起居室设备提供专门的认证流程。
OAuth2.0 官方手册摘要
OAuth2官方文档:The OAuth 2.0 Authorization Framework
四种角色
OAuth2 定义了四种角色
resource owner
An entity capable of granting access to a protected resource.
When the resource owner is a person, it is referred to as an
end-user.
resource server
The server hosting the protected resources, capable of accepting
and responding to protected resource requests using access tokens.
client
An application making protected resource requests on behalf of the
resource owner and with its authorization. The term “client” does
not imply any particular implementation characteristics (e.g.,
whether the application executes on a server, a desktop, or other
devices).
authorization server
The server issuing access tokens to the client after successfully
authenticating the resource owner and obtaining authorization.
协议的工作流程
     +--------+                               +---------------+
     |        |--(A)- Authorization Request ->|   Resource    |
     |        |                               |     Owner     |
     |        |<-(B)-- Authorization Grant ---|               |
     |        |                               +---------------+
     |        |
     |        |                               +---------------+
     |        |--(C)-- Authorization Grant -->| Authorization |
     | Client |                               |     Server    |
     |        |<-(D)----- Access Token -------|               |
     |        |                               +---------------+
     |        |
     |        |                               +---------------+
     |        |--(E)----- Access Token ------>|    Resource   |
     |        |                               |     Server    |
     |        |<-(F)--- Protected Resource ---|               |
     +--------+                               +---------------+
Figure 1: Abstract Protocol Flow
The abstract OAuth 2.0 flow illustrated in Figure 1 describes the
interaction between the four roles and includes the following steps:
(A ) The client requests authorization from the resource owner. The
authorization request can be made directly to the resource owner
(as shown), or preferably indirectly via the authorization
server as an intermediary.
(B ) The client receives an authorization grant, which is a
credential representing the resource owner’s authorization,
expressed using one of four grant types defined in this
specification or using an extension grant type. The
authorization grant type depends on the method used by the
client to request authorization and the types supported by the
authorization server.
(C ) The client requests an access token by authenticating with the
authorization server and presenting the authorization grant.
(D ) The authorization server authenticates the client and validates
the authorization grant, and if valid, issues an access token.
(E ) The client requests the protected resource from the resource
server and authenticates by presenting the access token.
(F ) The resource server validates the access token, and if valid,
serves the request.
常用授权类型
OAuth 2.0框架为不同的用例指定了几种授权类型,以及用于创建新授权类型的框架。
下面列出了最常见的OAuth 2.0授权类型。
Authorization Code 授权码
Implicit 隐式的
Password 密码
Client Credentials 客户端凭证
Device Code 设备代码
Refresh Token 刷新令牌
OAuth2.0实现:SpringSecurity
Spring Security OAuth使用标准Spring和Spring安全编程模型以及配置为OAuth (1a)和OAuth2安全框架提供了支持。SpringSecurity涵盖OAuth的提供者和OAuth使用者,将安全性应用于应用程序不适合胆小的人,OAuth也不例外。在开始之前,您需要确保了解OAuth以及它要解决的问题。OAuth站点有很好的文档。您还需要确保了解Spring和Spring Security是如何工作的。希望您非常熟悉OAuth(和/或OAuth2)和Spring安全性,以最大化开发人员指南的有效性。Spring安全的OAuth与这两种技术紧密相关,因此您对它们越熟悉,就越有可能识别出使用的术语和模式。
我会提供一个最小化可用于生产的Demo,帮助大家理解。
Demo同时会用到RBAC权限模型。
SpringSecurity实现的OAuth2.0授权项目仓库
环境准备
JDK 1.8
Idea 2018.3.5
Gradle 4.8
SpringBoot 2.1.2
Mysql
Postman
Datagrip
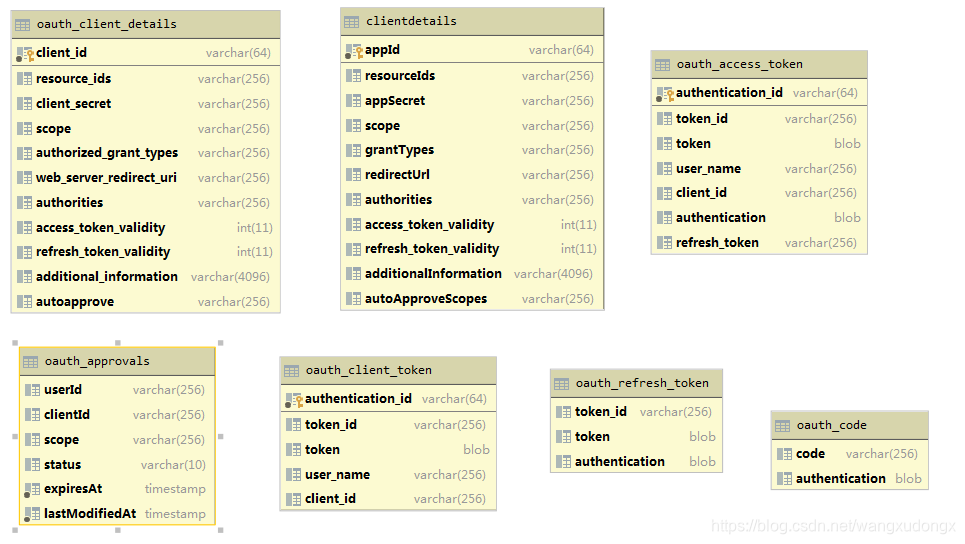
表结构
SpringSecurity官方定义OAuth2.0表结构
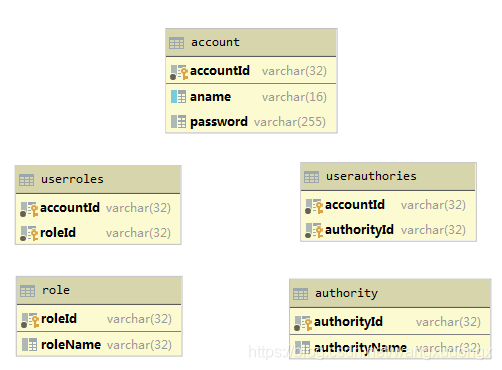
自定义RBAC表结构
测试数据准备
插入两条待授权的client
secret : 123
超时:3600秒
INSERT INTO demodb.oauth_client_details (client_id, resource_ids, client_secret, scope, authorized_grant_types, web_server_redirect_uri, authorities, access_token_validity, refresh_token_validity, additional_information, autoapprove) VALUES ('client', null, '$2a$10$lT7DSH3abPuTfCGwrPW3dOURXrkR4Z6.gkUtCRRMsSYhnyrSnnasu', 'app', 'authorization_code', 'http://localhost:8080/OAuthServer/actuator/health', null, 3600, 3600, null, null);
INSERT INTO demodb.oauth_client_details (client_id, resource_ids, client_secret, scope, authorized_grant_types, web_server_redirect_uri, authorities, access_token_validity, refresh_token_validity, additional_information, autoapprove) VALUES ('client02', null, '$2a$10$lT7DSH3abPuTfCGwrPW3dOURXrkR4Z6.gkUtCRRMsSYhnyrSnnasu', 'app', 'authorization_code', 'http://localhost:8080/OAuthServer/actuator/health', null, 3600, 3600, null, null);
两个用户
name: aa
password:123
role:ADMIN
authority:ACCESS01、ACCESS02
name: bb
password:123
role:USER
authority:ACCESS02
这里的sql都在代码仓库里、我就不贴了。
项目结构
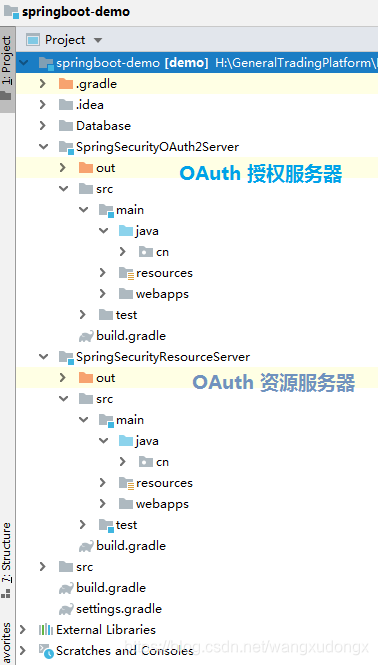
OAuth2.0 授权服务
引入依赖
配置文件
码代码
/**
 * OAuth2 授权服务器配置类
 */
@Configuration
@EnableAuthorizationServer
public class AuthorizationServerConfiguration extends AuthorizationServerConfigurerAdapter {
    @Autowired
    private BCryptPasswordEncoder passwordEncoder;
/*
    @Override
    public void configure(ClientDetailsServiceConfigurer clients) throws Exception {
//        super.configure(clients);
        clients
                .inMemory()
                .withClient("client")
                .secret(passwordEncoder.encode("secret"))
                .authorizedGrantTypes("authorization_code")
                .scopes("app")
                .redirectUris("https://www.baidu.com");
    }
*/


    @Bean
    @Primary
    @ConfigurationProperties(prefix = "spring.datasource")
    public DataSource dataSource() {
        // 配置数据源,以上注解是指定数据源,否则会有冲突
        return DataSourceBuilder.create().build();
    }

    @Bean
    public TokenStore tokenStore() {
        // 基于 JDBC 实现,令牌保存到数据
        return new JdbcTokenStore(dataSource());
    }

    @Bean
    public ClientDetailsService jdbcClientDetails() {
        // 基于 JDBC 实现,需要事先在数据库配置客户端信息
        return new JdbcClientDetailsService(dataSource());
    }

    @Override
    public void configure(AuthorizationServerEndpointsConfigurer endpoints) throws Exception {
        // 设置令牌
        endpoints.tokenStore(tokenStore());
    }

    @Override
    public void configure(ClientDetailsServiceConfigurer clients) throws Exception {
        // 读取客户端配置
        clients.withClientDetails(jdbcClientDetails());
    }
}
@Configuration
@EnableWebSecurity
@EnableGlobalMethodSecurity(prePostEnabled = true)
public class SecurityConfiguration extends WebSecurityConfigurerAdapter {

    @Bean
    public BCryptPasswordEncoder passwordEncoder() {
        return new BCryptPasswordEncoder();
    }
    @Override
    protected void configure(AuthenticationManagerBuilder auth) throws Exception {
//        super.configure(auth);
/*
        auth
                .inMemoryAuthentication()
                .withUser("aa").password( passwordEncoder().encode("123") ).roles("ADMIN")
                .and()
                .withUser("bb").password(passwordEncoder().encode("123")).roles("USER");
*/

        auth
                .userDetailsService(userDetailsServiceBean());
    }


    /**
     *
     * @param web
     * @throws Exception
     */
    @Override
    public void configure(WebSecurity web) throws Exception {
//        super.configure(web);
//        放开 /oauth/check_token action
        web
                .ignoring().antMatchers("/oauth/check_token");
    }

    @Override
    @Bean
    public UserDetailsService userDetailsServiceBean() throws Exception {
        return new UserDetailsServiceImpl();
    }

    @Bean
    @Override
    protected UserDetailsService userDetailsService() {
//        return super.userDetailsService();
        return new UserDetailsServiceImpl();
    }
}
/**
 * 用户授权业务类
 */
@Service
public class UserDetailsServiceImpl implements UserDetailsService {
    @Autowired
    private AccountRepository accountRepository;
    @Autowired
    private AuthorityRepository authorityRepository;

    /**
     * 根据用户名查用户的角色、权限等信息
     * @param username
     * @return
     * @throws UsernameNotFoundException
     */
    @Override
    public UserDetails loadUserByUsername(String username) throws UsernameNotFoundException {
//        return null;
        Account temp = new Account();
        temp.setAname(username);

//        Example<Account> accountExample = Example.of(temp);

        Optional<Account> account = accountRepository.findOne(Example.of(temp));

        List<GrantedAuthority> grantedAuthorityList = new LinkedList<>();

        authorityRepository.findAllByUserId(account.get().getAccountId()).forEach(i->{
            GrantedAuthority grantedAuthority = new SimpleGrantedAuthority(i.getAuthorityName());
            grantedAuthorityList.add(grantedAuthority);
        });

//        返回用户名、密码、角色或者权限列表
        return new User(username, account.get().getPassword(), grantedAuthorityList);

    }
}
资源服务器
应用上下文配置
spring:
  jpa:
    database: mysql
    show-sql: true
    hibernate:
      ddl-auto: update
      naming:
        physical-strategy: org.hibernate.boot.model.naming.PhysicalNamingStrategyStandardImpl
  datasource:
    url: jdbc:mysql://192.168.84.135:3306/demodb
#    jdbcUrl: jdbc:mysql://192.168.84.135:3306/demodb
    password: mysql12345
    username: root
    driver-class-name: com.mysql.jdbc.Driver

server:
  port: 8081
  servlet:
    context-path: /ResourceServer

# OAuth2 权限服务器各接口路径配置
security:
  oauth2:
    client:
      client-id: client
      client-secret: 123
      access-token-uri: http://localhost:8080/OAuthServer/oauth/token
      user-authorization-uri: http://localhost:8080/OAuthServer/oauth/aurhorize
#      id: client
    resource:
      token-info-uri: http://localhost:8080/OAuthServer/oauth/check_token
资源服务角色配置类
/**
 * OAuth2 资源服务器配置类
 */
@Configuration
@EnableResourceServer
@EnableGlobalMethodSecurity(prePostEnabled = true , securedEnabled = true , jsr250Enabled = true)
public class SecurityConfiguration extends ResourceServerConfigurerAdapter {
    @Override
    public void configure(HttpSecurity http) throws Exception {
//        super.configure(http);
        http
                .authorizeRequests()
                .antMatchers("/").hasAuthority("ACCESS01")
                .antMatchers("/access2").hasAuthority("ACCESS02");
    }
}
测试
SpringSecurityOAuth的默认端点

获取code
localhost:8080/OAuthServer/oauth/authorize?client_id=client&response_type=code
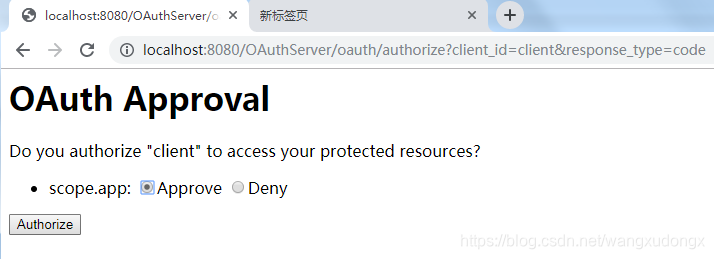

拿到code了。
换取access_token
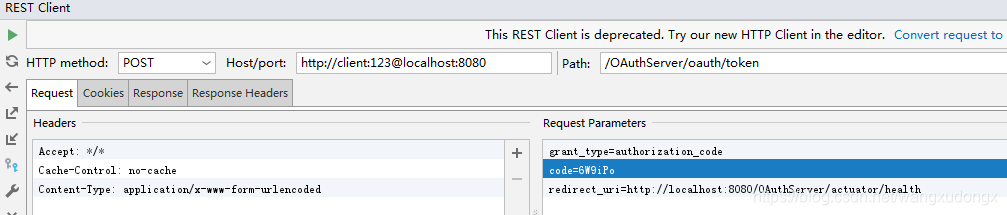
POST http://client:123@localhost:8080/OAuthServer/oauth/token?grant_type=authorization_code&code=6W9iPo&redirect_uri=http://localhost:8080/OAuthServer/actuator/health
Accept: */*
Cache-Control: no-cache
Content-Type: application/x-www-form-urlencoded
结果
{
  "access_token": "4c91cc88-fc82-44d8-aae3-f33073f34d6c",
  "token_type": "bearer",
  "expires_in": 3599,
  "scope": "app"
}
检测access_token状态

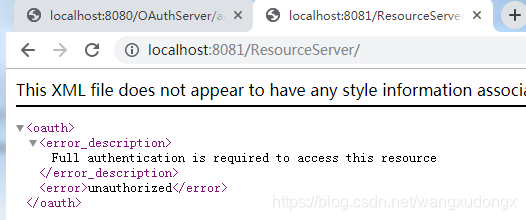
接口访问
普通访问
带access_token访问
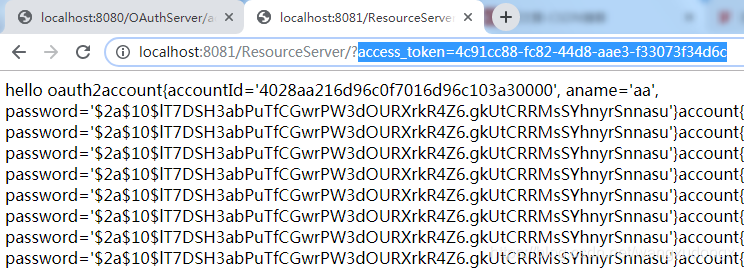
加入access_token成功访问。
加入IP白名单验证
有两种的方案来做这个事:
1、加入AOP切面
2、使用SpringSecurity的AuthenticationProvider
比较一下这两种方案的差异,AOP可以在任何地方加白名单,而AuthenticationProvider只能在授权服务端加入,在使用了方案2之后,AuthenticationProvider基本接管了UserDetailsService,UserDetailsService只在AuthenticationProvider的authenticate方法没有返回的情况下才去执行,比如authenticate抛出异常。
如果你需要对来访问的IP进行全面且细致的控制那我推荐你用AOP。
如果你是要对来取授权的IP进行管控,那么AuthenticationProvider明显更简单直接。而且一般来说如果你没有取得授权(code、access_token)那你肯定也没法进行之后的动作了。
AOP怎么实现我没必要再次赘述了,给大家看一下AuthenticationProvider。
白名单验证规则类
/**
 * 白名单验证规则类
 */
/**
 * 白名单验证规则类
 */
@Component
public class CustomIpAuthenticationProvider implements AuthenticationProvider {

    Set<String> whitelist = new HashSet<String>();

    public CustomIpAuthenticationProvider() {
        super();
        whitelist.add("11.11.11.11");
        whitelist.add("0:0:0:0:0:0:0:1");
    }

    @Override
    public Authentication authenticate(Authentication auth) throws AuthenticationException {
        System.out.println("authenticate");
        WebAuthenticationDetails details = (WebAuthenticationDetails) auth.getDetails();
        String userIp = details.getRemoteAddress();
        System.out.println("*********"+userIp);

        if(! whitelist.contains(userIp)){
//            IP未存在白名单中,直接返回
            return new UsernamePasswordAuthenticationToken(null, null, null);
        }else{
//            IP在白名单中,中断authenticate,转到loadUserByUsername
            throw new BadCredentialsException("此IP在白名单中,转到loadUserByUsername");
        }

    }

    @Override
    public boolean supports(Class<?> authentication) {
        return authentication.equals(UsernamePasswordAuthenticationToken.class);
    }
}
安全配置类WebSecurity
//  白名单验证对象
    @Autowired
    private CustomIpAuthenticationProvider ipAuthenticationProvider;
    @Override
    protected void configure(AuthenticationManagerBuilder auth) throws Exception {
//        super.configure(auth);
/*
        auth
                .inMemoryAuthentication()
                .withUser("aa").password( passwordEncoder().encode("123") ).roles("ADMIN")
                .and()
                .withUser("bb").password(passwordEncoder().encode("123")).roles("USER");
*/

        auth
                .userDetailsService(userDetailsServiceBean());
//        设置IP白名单
        auth
                .authenticationProvider(ipAuthenticationProvider);
    }
这样的验证流程是在获取code登录的时候验证IP,如果在白名单中就转到loadUserByUsername,没有在白名单中直接返回。
使用授权码访问资源服务的客户端示例
应用上下文配置
application.yml
security:
  oauth2:
    client:
      client-id: client03
      client-secret: 123
      access-token-uri: http://localhost:8080/OAuthServer/oauth/token
      user-authorization-uri: http://localhost:8080/OAuthServer/oauth/authorize
      scope: app
    resource:
      user-info-uri:  http://localhost:8081/ResourceServer/user/me
    authorization:
      check-token-access: http://localhost:8080/OAuthServer/oauth/check_token


server:
  port: 8082
  servlet:
    context-path: /ClientApp
    session:
      cookie:
        name: CLIENTAPPSESSION
Sso客户端配置类
/**
 * 使用授权码访问OAuth保护资源的客户端配置类
 */
@Configuration
@EnableOAuth2Sso
public class SecurityConfiguration extends WebSecurityConfigurerAdapter {
    @Override
    protected void configure(HttpSecurity http) throws Exception {
//        super.configure(http);
        http
                .antMatcher("/login")
                .authorizeRequests()
                .anyRequest()
                .permitAll();
    }
}
测试用Controller
@Controller
public class HomeController {
    @Autowired
    private OAuth2RestTemplate restTemplateOAuth2;

    /**
     * 这个是携带OAuth2.0数据的RestTemplate
     * @param oAuth2ClientContext
     * @param details
     * @return
     */
    @Bean
    public OAuth2RestTemplate oauth2RestTemplate(
            @Qualifier("oauth2ClientContext") OAuth2ClientContext oAuth2ClientContext, OAuth2ProtectedResourceDetails details) {
        return new OAuth2RestTemplate(details, oAuth2ClientContext);
    }

    @ResponseBody
    @RequestMapping("/")
    public String indexProc(){
        return "index";
    }

    /**
     * 访问资源服务器上的接口
     * @return
     */
    @ResponseBody
    @RequestMapping("/access2")
    public String access2Proc(){
        String result = restTemplateOAuth2.getForObject("http://localhost:8081/ResourceServer/access2", String.class);
        return "this is access 2222 "+ result;
    }

}
测试
数据的准备
# web_service_redirect_uri :http://localhost:8082/ClientApp/login,http://localhost:8082/ClientApp/access2

# autoapprove :设置为true 的话自动授权
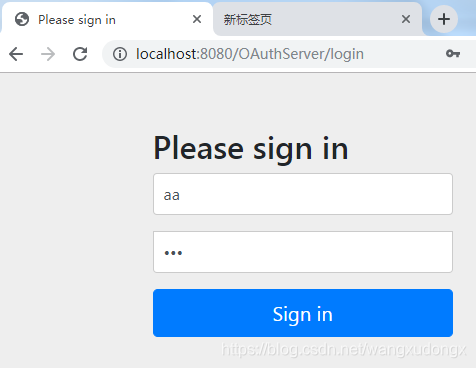
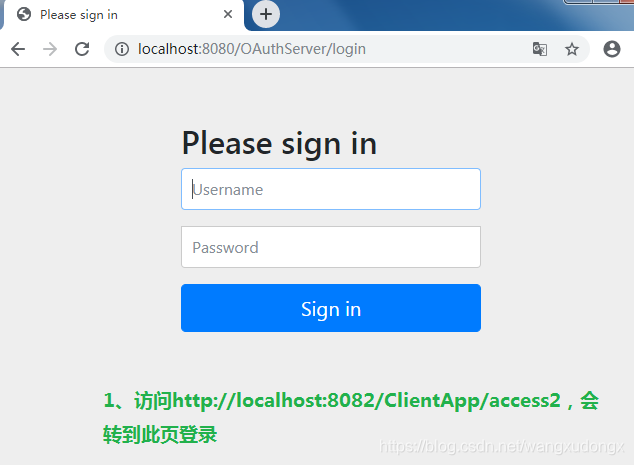
1、访问受保护资源会转到授权服务器登录
http://localhost:8082/ClientApp/access2
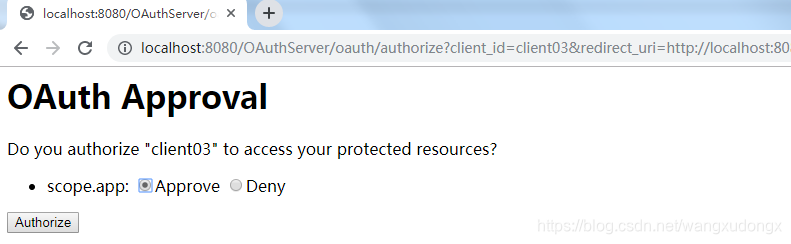
2、转到登录页、输入正确的username、password之后转到授权页。
3、点击 Authorize 之后会转到 回调页
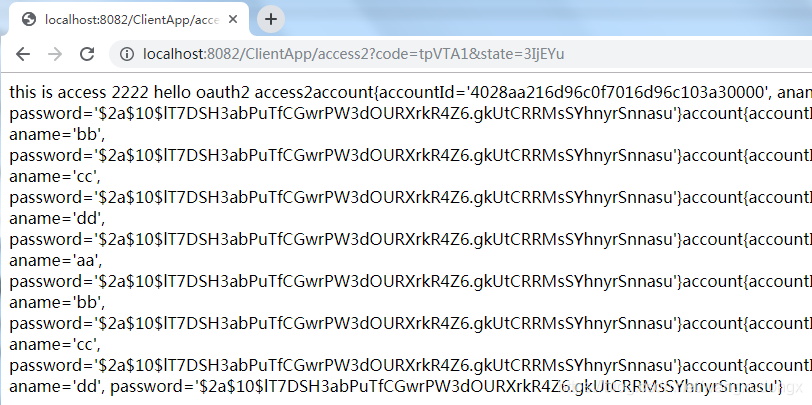
okay,结束。
