文章目录
- 1.1 进程和多线程的概念及线程的优点
- 1.2 使用多线程
- 1.3 currentThread() 方法
- 1.4 isAlive() 方法
- 1.5 sleep() 方法
- 1.6 getId() 方法
- 1.7 停止线程
- 1.7.1 停止不了的线程
- 1.7.2 判断线程是否是停止状态
- 1.7.3 能停止的线程——异常法
- 1.7.4 在沉睡中停止
- 1.7.5 能停止的线程——暴力停止
- 1.7.6 方法 stop() 与 java.lang.ThreadDeath 异常
- 1.7.7 释放锁的不良后果
- 1.7.8 使用 return 停止线程
- 1.8 暂停线程
- 1.9 yield 方法
- 1.10 线程的优先级
- 1.11 守护线程
本章主要介绍 Thread 类中的核心方法,Thread 类的核心方法较多,读者应该着重掌握如下关键技术点:
- 线程的启动
- 如何使线程暂停
- 如何使线程停止
- 线程的优先级
- 线程安全相关的问题
1.1 进程和多线程的概念及线程的优点
-
进程是受操作系统管理的基本运行单元
-
线程是在进程中独立运行的子任务
比如:QQ.exe 这个进程运行时就有很多子任务(好友视频,下载文件,发送表情)在同时运行,其中每一项任务都可以理解成是线程在工作
-
多线程的优点:可以最大限度的利用 CPU 的空闲时间来处理其它的任务,提高 CPU 的利用率
比如:一边让操作系统处理正在由打印机打印的数据,一边使用 Word 编辑文档,而 CPU 在这些任务间不停地切换,由于切换速度非常快,给使用者的感受就是这些任务似乎在同时运行。
以下是单任务运行环境的模型图:
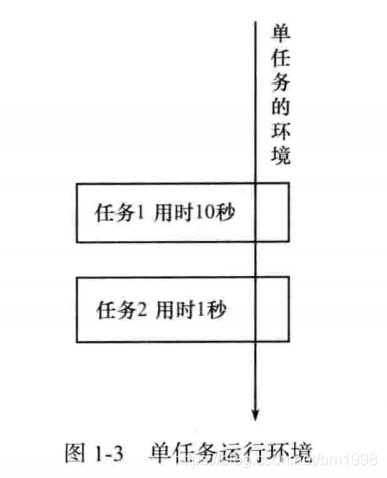
- 在单任务运行环境中,任务 1 和任务 2 是两个完全独立,互不相关的任务,任务 1 是在等待远程服务器返回数据,这时 CPU 一直处于等待状态,而任务 2 必须在任务 1 运行结束后才可以运行,虽然任务 2 执行时间仅有 1 秒,但却有 10 秒的等待时间,系统运行效率大幅降低
- 单任务运行环境的特点就是排队执行,也就是同步
- 单任务运行环境的缺点,即 CPU 利用率大幅降低
以下是多任务运行环境的模型图:
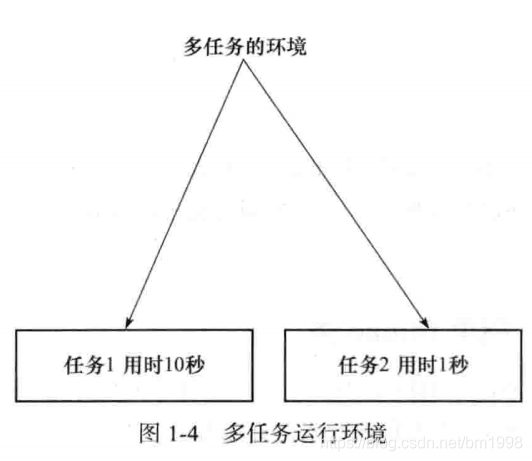
- 在多任务运行环境中,CPU 完全可以在任务 1 和 任务 2 之间来回切换,使任务 2 不必等到 10 秒再运行,系统的运行效率大大得到提升
- 使用多线程就是在使用异步
1.2 使用多线程
一个进程正在运行时,至少会有一个线程正在运行,比如调用 main 方法的线程就是这样的:
public class Test {
    public static void main(String[] args) {
        System.out.println(Thread.currentThread().getName());
    }
}
运行结果
main
分析:这说明一个叫 main 的线程正在执行 main() 方法中的代码
1.2.1 继承 Thread 类
实现多线程编程的方式主要有两种,一种是继承 Thread 类,一种是实现 Runnable 接口
接下来我们看一下继承 Thread 类实现多线程编程:
-
创建一个自定义的线程类
public class MyThread extends Thread { @Override public void run() { super.run(); System.out.println("MyThread"); } } -
测试类
public class MyThreadTest {
    public static void main(String[] args) {
        MyThread myThread = new MyThread();
        myThread.start();
        System.out.println("运行结束");
    }
}
运行结果
运行结束
MyThread
分析:MyThread 类的 run 方法执行的时间比较晚,这也说明使用多线程技术时,代码的运行结果与代码的执行顺序或调用顺序是无关的。线程是一个子任务,CPU 以随机的方式来调用线程中的 run 方法。
下面演示线程调用的随机性:
-
创建一个自定义的线程类
public class MyThread2 extends Thread { @Override public void run() { super.run(); for (int i = 0; i < 10; i++) { int time = (int) (Math.random() * 1000); try { Thread.sleep(time); System.out.println("run="+Thread.currentThread().getName()); } catch (InterruptedException e) { e.printStackTrace(); } } } } -
测试类
public class MyThread2Test {
    public static void main(String[] args) {
        MyThread2 myThread2 = new MyThread2();
        myThread2.setName("myThread2");
        myThread2.start();
        for (int i = 0; i < 10; i++) {
            int time = (int) (Math.random() * 1000);
            try {
                Thread.sleep(time);
                System.out.println("main=" + Thread.currentThread().getName());
            } catch (InterruptedException e) {
                e.printStackTrace();
            }
        }
    }
}
运行结果
run=myThread2
main=main
run=myThread2
run=myThread2
main=main
run=myThread2
run=myThread2
main=main
run=myThread2
main=main
run=myThread2
run=myThread2
main=main
run=myThread2
run=myThread2
main=main
main=main
main=main
main=main
main=main
分析:为了展示出线程的调用具有随机特性,所以使用随机数的形式来使线程挂起,从而表现出 CPU 执行哪个线程具有不确定性
注意:Thread 类中的 start() 方法的作用是通知 ”线程规划器“ 此线程已经准备就绪,等待调用线程对象的 run() 方法,具有异步效果。如果调用 thread.run() 就是同步了,那么此线程对象并不交给 ”线程规划器“ 来进行处理,而是由 main 主线程来调用 run() 方法,也就是说要等到 run() 方法执行完才可以执行后面的代码
下面演示 start() 方法的执行顺序不代表线程的启动顺序:
-
创建一个自定义的线程类
public class MyThread3 extends Thread { private int i; public MyThread3(int i) { this.i = i; } @Override public void run() { System.out.println(i); super.run(); } } -
测试类
public class MyThread3Test {
    public static void main(String[] args) {
        List<MyThread3> myThread3List = new ArrayList<>();
        for (int i = 0; i < 10; i++) {
            myThread3List.add(new MyThread3(i));
        }
        for (int i = 0; i < 10; i++) {
            myThread3List.get(i).start();
        }
    }
}
运行结果
0
2
3
1
4
6
9
5
7
8
1.2.2 实现 Runnable 接口
如果想要创建的线程类已经有一个父类了,这是就不能再继承自 Thread 类了,因为 Java 不支持多继承,所以就需要实现 Runnable 接口来应对这样的情况了
Thread 类有两个构造函数 Thread(Runnable target) 和 Thread(Runnable target, String name),说明构造函数支持传入一个 Runnable 接口的对象。
下面看一下实现 Runnable 接口来实现多线程编程:
-
创建一个自定义的线程类
public class MyThread4 implements Runnable{ @Override public void run() { System.out.println("MyThread4"); } } -
测试类
public class MyThread4Test {
    public static void main(String[] args) {
        MyThread4 myThread4 = new MyThread4();
        Thread thread = new Thread(myThread4);
        thread.start();
        System.out.println("运行结束");
    }
}
运行结果
运行结束
MyThread4
另外要说明的是,Thread 类也实现了 Runnable 接口
public class Thread implements Runnable {
这也就意味着 Thread(Runnable target) 不光可以传入 Runnable 对象,还可以传入一个 Thread 类的对象,这样做完全可以将一个 Thread 对象中的 run() 方法交给其它的线程进行调用
1.2.3 实例变量与线程安全
自定义线程类中的实例变量针对其他线程可以有共享和不共享之分
-
不共享的情况
下面通过一个示例来看一下数据不共享的情况:
-
创建一个自定义的线程类
public class MyThread5 extends Thread { private int count = 5; public MyThread5(String name) { super(); this.setName(name); } @Override public void run() { super.run(); while (count > 0) { count--; System.out.println("由" + this.currentThread().getName() + "计算,count = " + count); } } } -
测试类
public class MyThread5Test {
    public static void main(String[] args) {
        MyThread5 a = new MyThread5("A");
        MyThread5 b = new MyThread5("B");
        MyThread5 c = new MyThread5("C");
        a.start();
        b.start();
        c.start();

    }
}
运行结果
由B计算,count = 4
由A计算,count = 4
由A计算,count = 3
由B计算,count = 3
由B计算,count = 2
由A计算,count = 2
由B计算,count = 1
由C计算,count = 4
由B计算,count = 0
由A计算,count = 1
由A计算,count = 0
由C计算,count = 3
由C计算,count = 2
由C计算,count = 1
由C计算,count = 0
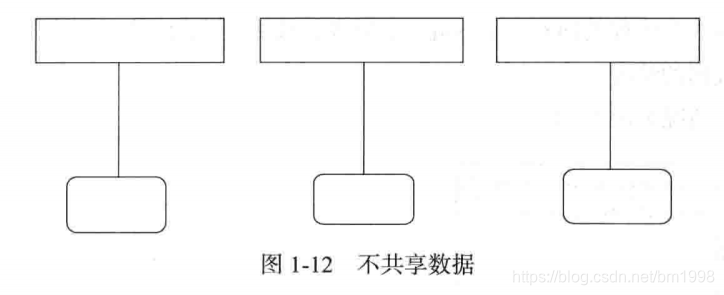
分析:一共创建了 3 个线程,每个线程都有各自的 count 变量,自己减少自己的 count 变量的值,这样情况就是变量不共享
-
-
共享数据的情况
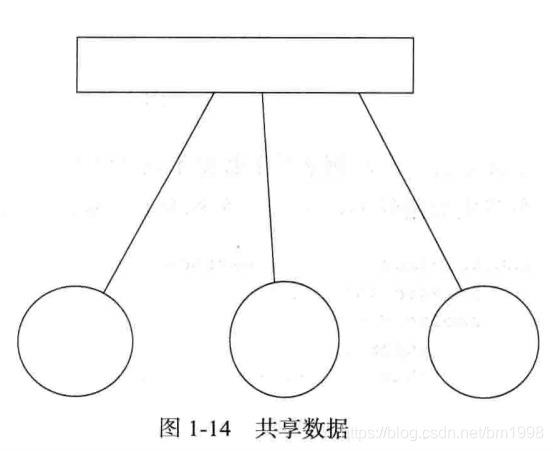
共享数据的情况就是多个线程可以访问同一个变量,比如在实现投票功能的软件时,多个线程可以同时处理同一个人的票数
下面通过一个示例来看一下数据共享的情况:
-
创建一个自定义的线程类
public class MyThread6 extends Thread { private int count = 5; @Override public void run() { super.run(); count--; System.out.println("由" + this.currentThread().getName() + "计算,count = " + count); } } -
测试类
public class MyThread6Test {
    public static void main(String[] args) {
        MyThread6 myThread6 = new MyThread6();

        Thread a = new Thread(myThread6, "A");
        Thread b = new Thread(myThread6, "B");
        Thread c = new Thread(myThread6, "C");
        Thread d = new Thread(myThread6, "D");
        Thread e = new Thread(myThread6, "E");

        a.start();
        b.start();
        c.start();
        d.start();
        e.start();
    }
}
运行结果
由B计算,count = 3
由A计算,count = 3
由C计算,count = 2
由D计算,count = 1
由E计算,count = 0
分析:线程 A 和线程 B 打印出的 count 值都是 3,说明 A 和 B 同时对 count 进行了处理,这就产生了 ”非线程安全“ 问题。“非线程安全” 主要是指多个线程对同一个对象中的同一个实例变量进行操作时,会出现值被更改、值不同步的情况,进而影响到程序的执行流程。
但我们想要得到的打印结果是依次递减的,该怎么解决非线程安全问题呢? 这时就需要使多个线程之间进行同步,也就是用按顺序排队的方式进行减 1 操作。更改后的代码如下:
-
创建一个自定义的线程类
public class MyThread7 extends Thread { private int count = 5; @Override synchronized public void run() { super.run(); count--; System.out.println("由" + this.currentThread().getName() + "计算,count = " + count); } } -
测试类
public class MyThread7Test {
    public static void main(String[] args) {
        MyThread7 myThread7 = new MyThread7();

        Thread a = new Thread(myThread7, "A");
        Thread b = new Thread(myThread7, "B");
        Thread c = new Thread(myThread7, "C");
        Thread d = new Thread(myThread7, "D");
        Thread e = new Thread(myThread7, "E");

        a.start();
        b.start();
        c.start();
        d.start();
        e.start();
    }
}
运行结果
由A计算,count = 4
由B计算,count = 3
由C计算,count = 2
由D计算,count = 1
由E计算,count = 0
分析:在 run() 方法前加入 synchronized 关键字,使多个线程在执行 run() 方法时,以排队的方式进行处理。 当一个线程调用 run() 方法前,先判断 run() 方法有没有被上锁,如果上锁,说明有其他线程正在调用 run() 方法,必须等其他线程对 run() 方法调用结束后才可以执行 run() 方法。这样也就实现了排队调用 run() 方法的目的了。
synchronized 可以在任意对象及方法上加锁,而加锁的这段代码称为 ”互斥区“ 或 ”临界区“。
-
1.2.4 留意 i-- 与 System.out.println() 的异常
System.out.println() 方法内部是同步的
public void println(String x) {
    synchronized (this) {
        print(x);
        newLine();
    }
}
System.out.println() 与 i-- 联合使用时还是会产生 ”非线程安全问题“,下面通过一个示例来看一下:
-
创建一个自定义的线程类
public class MyThread8 extends Thread { private int i = 5; @Override public void run() { super.run(); System.out.println("i = " + (i--) + " threadName = " + this.currentThread().getName()); } } -
测试类
public class MyThread8Test {
    public static void main(String[] args) {
        MyThread8 myThread8 = new MyThread8();
        Thread t1 = new Thread(myThread8);
        Thread t2 = new Thread(myThread8);
        Thread t3 = new Thread(myThread8);
        Thread t4 = new Thread(myThread8);
        Thread t5 = new Thread(myThread8);
        t1.start();
        t2.start();
        t3.start();
        t4.start();
        t5.start();
    }
}
运行结果
i = 5   threadName = Thread-2
i = 3   threadName = Thread-4
i = 2   threadName = Thread-5
i = 4   threadName = Thread-3
i = 5   threadName = Thread-1
分析:虽然 System.out.println() 方法内部是同步的,但 i-- 操作却是在进入 println() 之前发生的,所以还是会产生 ”非线程安全问题“。为了防止 ”非线程安全问题“ 的发生,还是应该继续使用同步方法
1.3 currentThread() 方法
currentThread() 方法可返回代码块正在被哪个线程调用的信息
下面通过一个示例进行说明:
-
创建一个自定义的线程类
public class MyThread9 extends Thread { public MyThread9() { System.out.println("构造方法的打印:" + Thread.currentThread().getName()); } @Override public void run() { super.run(); System.out.println("run 方法的打印:" + Thread.currentThread().getName()); } } -
测试类
public class MyThread9Test {
    public static void main(String[] args) {
        MyThread9 myThread9 = new MyThread9();
        myThread9.start();
    }
}
运行结果
构造方法的打印:main
run 方法的打印:Thread-0
分析:MyThread 类的构造函数是被 main 线程调用的,而 run 方法是被名称为 Thread-0 的线程调用的
下面再看一个比较复杂的实例:
-
创建一个自定义的线程类
public class MyThread10 extends Thread { public MyThread10() { System.out.println("MyThread10---begin"); // Thread.currentThread().getName() 指的是调用 MyThread10 这个线程类的线程的名称 System.out.println("Thread.currentThread().getName():" + Thread.currentThread().getName()); // this.getName() 指的是 MyThread10 这个线程类的名称 System.out.println("this.getName():" + this.getName()); System.out.println("MyThread10---end"); } @Override public void run() { super.run(); System.out.println("run---begin"); System.out.println("Thread.currentThread().getName():" + Thread.currentThread().getName()); System.out.println("this.getName():" + this.getName()); System.out.println("run---end"); } } -
测试类
public class MyThread10Test {
    public static void main(String[] args) {
        MyThread10 myThread10 = new MyThread10();
        System.out.println("---------");
        Thread thread = new Thread(myThread10,"A");
        thread.start();
    }
}
运行结果
MyThread10---begin
Thread.currentThread().getName():main
this.getName():Thread-0
MyThread10---end
---------
run---begin
Thread.currentThread().getName():A
this.getName():Thread-0
run---end
1.4 isAlive() 方法
isAlive() 方法的功能是判断当前的线程是否处于活动状态,活动状态就是线程已经启动且尚未终止
下面通过一个示例进行说明:
-
创建一个自定义的线程类
public class MyThread11 extends Thread { @Override public void run() { super.run(); System.out.println("run = " + this.isAlive()); } } -
测试类
public class MyThread11Test {
    public static void main(String[] args) throws InterruptedException {
        MyThread11 myThread11 = new MyThread11();
        System.out.println("begin = " + myThread11.isAlive());
        myThread11.start();
        Thread.sleep(1000);
        System.out.println("end = " + myThread11.isAlive());
    }
}
运行结果
begin = false
run = true
end = false
分析:begin = false 是因为 myThread11 线程还未启动,end = false 是因为 myThread11 线程已经终止
在使用 isAlive() 方法时,如果将线程对象以构造参数的方式传递给 Thread 对象进行 start() 启动,运行的结果和前面的示例是有差异的。造成差异的主要原因还是来自于 Thread.currentThread() 和 this 的差异,下面通过一个示例进行说明:
-
创建一个自定义的线程类
public class MyThread12 extends Thread { public MyThread12() { System.out.println("MyThread12---begin"); // Thread.currentThread().getName() 指的是调用 MyThread10 这个线程类的线程的名称 System.out.println("Thread.currentThread().getName():" + Thread.currentThread().getName()); // Thread.currentThread().isAlive() 指的是调用 MyThread10 这个线程类的线程是否处于活动状态 System.out.println("Thread.currentThread().isAlive():" + Thread.currentThread().isAlive()); // this.getName() 指的是 MyThread10 这个线程类的名称 System.out.println("this.getName():" + this.getName()); // this.isAlive() 指的是 MyThread10 这个线程类是否处于活动状态 System.out.println("this.isAlive():" + this.isAlive()); System.out.println("MyThread12---end"); } @Override public void run() { super.run(); System.out.println("run---begin"); System.out.println("Thread.currentThread().getName():" + Thread.currentThread().getName()); System.out.println("Thread.currentThread().isAlive():" + Thread.currentThread().isAlive()); System.out.println("this.getName():" + this.getName()); System.out.println("this.isAlive():" + this.isAlive()); System.out.println("run---end"); } } -
测试类
public class MyThread12Test {
    public static void main(String[] args) {
        MyThread12 myThread12 = new MyThread12();
        System.out.println("---------");
        Thread thread = new Thread(myThread12, "A");
        thread.start();
    }
}
运行结果
MyThread12---begin
Thread.currentThread().getName():main
Thread.currentThread().isAlive():true
this.getName():Thread-0
this.isAlive():false
MyThread12---end
---------
run---begin
Thread.currentThread().getName():A
Thread.currentThread().isAlive():true
this.getName():Thread-0
this.isAlive():false
run---end
1.5 sleep() 方法
sleep() 方法的作用是在指定的毫秒数内让当前 ”正在执行的线程” 休眠(暂停执行)。这个 ”正在执行的线程” 是指 this.currentThread() 返回的线程。
下面通过一个示例来说明:
-
创建一个自定义的线程类
public class MyThread13 extends Thread { @Override public void run() { super.run(); try { System.out.println("run threadName = " + this.currentThread().getName() + " begin time = " + System.currentTimeMillis()); Thread.sleep(2000); System.out.println("run threadName = " + this.currentThread().getName() + " end time = " + System.currentTimeMillis()); } catch (InterruptedException e) { e.printStackTrace(); } } } -
测试类
public class MyThread13Test {
    public static void main(String[] args) {
        System.out.println("begin time = " + System.currentTimeMillis());
        MyThread13 myThread13 = new MyThread13();
        myThread13.run();
        System.out.println("end time = " + System.currentTimeMillis());
    }
}
运行结果
begin time = 1573470507836
run threadName = main begin time = 1573470507837
run threadName = main end time = 1573470509838
end time = 1573470509838
分析:上面测试类中是直接调用 myThread13.run() 方法,也就是由 main 线程来调用 run() 方法,从运行结果可以看到在 run() 方法中 main 线程暂停了 2000 毫秒
接下来看看使用 start() 方法启动 myThread13 线程:
-
测试类
public class MyThread13_2 {
    public static void main(String[] args) {
        System.out.println("begin time = " + System.currentTimeMillis());
        MyThread13 myThread13 = new MyThread13();
        myThread13.start();
        System.out.println("end time = " + System.currentTimeMillis());
    }
}
运行结果
begin time = 1573470976618
end time = 1573470976620
run threadName = Thread-0 begin time = 1573470976621
run threadName = Thread-0 end time = 1573470978621
分析:由于 main 线程和 myThread13 线程是异步执行的,所以首先执行的是 main 线程打印的 begin time 和 end time,而 myThread13 线程是随后运行的,从运行结果可以看到在 run() 方法中 myThread13 线程暂停了 2000 毫秒
1.6 getId() 方法
getId() 方法的作用是取得线程的唯一标识。
下面通过一个示例来说明:
-
创建一个测试类
 public class Test2 {
     public static void main(String[] args) {
         System.out.println(Thread.currentThread().getName());
         System.out.println(Thread.currentThread().getId());
     }
 }
运行结果
main
1
分析:从运行结果来看,说明正在执行 main() 方法中代码的线程名称为 main,线程 id 值为 1
1.7 停止线程
停止一个线程意味着在线程处理完任务之前停掉正在做的操作,也就是放弃当前操作。
在 Java 中有以下三种方法可以终止正在运行的线程:
- 使用退出标志,使线程正常退出,也就是当 run() 方法完成后线程终止
- 使用 stop() 方法强行终止线程,已废弃,不推荐使用
- 使用 interrupt() 方法中断线程,经常使用
1.7.1 停止不了的线程
接下来会使用 interrupt() 方法,但这个方法不会真的停止线程,只是在当前线程中打了一个停止的标记
下面通过一个示例来说明:
-
创建一个自定义的线程类
public class MyThread14 extends Thread { @Override public void run() { super.run(); for (int i = 0; i < 500000; i++) { System.out.println(i); } } } -
测试类
public class MyThread14Test {
    public static void main(String[] args) {
        try {
            MyThread14 myThread14 = new MyThread14();
            myThread14.start();
            Thread.sleep(1000);
            myThread14.interrupt();
        } catch (InterruptedException e) {
            e.printStackTrace();
        }
    }
}
运行结果
...
499990
499991
499992
499993
499994
499995
499996
499997
499998
499999
分析:从运行结果来看,调用 interrupt() 方法并没有停止线程,那该如何停止线程呢?
1.7.2 判断线程是否是停止状态
在介绍如何如何停止线程前,先来看一下如何判断线程的状态是否是停止的。
Thread 类中提供了两种方法:
- this.interrupted():测试当前线程是否已经是中断状态,当前线程是指运行 this.interrupted() 方法的线程,执行后具有将状态标志清除为 false 的功能
- this.isInterrupted():测试线程 Thread 对象是否已经是中断状态,但不清除状态标志
下面通过一个示例来演示 interrupted() 方法的使用:
-
创建一个自定义的线程类
public class MyThread15 extends Thread { @Override public void run() { super.run(); for (int i = 0; i < 50000; i++) { System.out.println(i); } } } -
测试类
public class MyThread15Test {
    public static void main(String[] args) {
        try {
            MyThread15 myThread15 = new MyThread15();
            myThread15.start();
            // 让 main 线程休眠 0.5 秒,这样线程规划器会先执行 myThread15 线程
            Thread.sleep(500);
            myThread15.interrupt();
            System.out.println("是否停止1 = " + myThread15.interrupted());
            System.out.println("是否停止2 = " + myThread15.interrupted());
        } catch (InterruptedException e) {
            e.printStackTrace();
        }

    }
}
运行结果
...
40292
40293
40294
40295
是否停止1 = false
40296
40297
...
40803
40804
40805
是否停止2 = false
40806
40807
40808
40809
...
分析:
我们在测试类中调用了以下代码,来停止 myThread15 线程:
myThread15.interrupt();
但在后面又使用了以下代码,来判断当前线程是否停止:
System.out.println("是否停止1 = " + myThread15.interrupted());
System.out.println("是否停止2 = " + myThread15.interrupted());
但打印结果说明当前线程并未停止,再看看 interrupted() 方法的解释:测试当前线程是否已经是中断状态,当前线程是指运行 this.interrupted() 方法的线程
这个当前线程是 main 线程,它从未中断过,所以打印结果是两个 false
接下来让 main 线程产生中断,再看看:
-
创建测试类
public class Test3 {
    public static void main(String[] args) {
        Thread.currentThread().interrupt();
        System.out.println("是否停止1 = " + Thread.interrupted());
        System.out.println("是否停止2 = " + Thread.interrupted());
    }
}
运行结果
是否停止1 = true
是否停止2 = false
分析:第一次调用 interrupted() 判断当前线程已经是中断状态了,然后清除了状态标志,所以第二次调用 interrupted() 方法的返回值是 false
介绍完 interrupted() 方法,下面通过一个示例来演示 isInterrupted() 方法的使用:
-
创建测试类
public class MyThread15Test_2 {
    public static void main(String[] args) {
        try {
            MyThread15 myThread15 = new MyThread15();
            myThread15.start();
            // 让 main 线程休眠 0.5 秒,这样线程规划器会先执行 myThread15 线程
            Thread.sleep(500);
            myThread15.interrupt();
            System.out.println("是否停止1 = " + myThread15.isInterrupted());
            System.out.println("是否停止2 = " + myThread15.isInterrupted());
        } catch (InterruptedException e) {
         e.printStackTrace();
        }
 }
}
运行结果
...
48254
48255
48256
48257
是否停止1 = true
是否停止2 = true
48258
48259
48260
...
分析:从打印结果上来看,测试 myThread15 线程已经是中断状态了,而且 isInterrupted() 方法并不清除状态标志,所以打印了两个 true
1.7.3 能停止的线程——异常法
有了前面学习的知识,就可以在 for 语句中判断一下线程是否是中断状态了,如果是中断状态,则后面的代码不再运行即可。
下面通过一个示例来演示异常法停止线程:
-
创建一个自定义的线程类
public class MyThread16 extends Thread { @Override public void run() { super.run(); try { for (int i = 0; i < 50000; i++) { // 如果是中断状态就不再执行后面的代码了 if (this.interrupted()) { System.out.println("我要退出了..."); throw new InterruptedException(); } System.out.println(i); } } catch (InterruptedException e) { e.printStackTrace(); } } } -
测试类
public class MyThread16Test {
    public static void main(String[] args) {
        try {
            MyThread16 myThread16 = new MyThread16();
            myThread16.start();
            Thread.sleep(500);
            myThread16.interrupt();
        } catch (InterruptedException e) {
            e.printStackTrace();
        }
    }
}
运行结果
...
41332
41333
41334
41335
41336
41337
41338
我要退出了...
java.lang.InterruptedException
	at MyThread16.run(MyThread16.java:9)
1.7.4 在沉睡中停止
如果线程在 sleep() 状态下停止线程,会是什么效果呢?
下面通过一个示例来演示:
-
创建一个自定义的线程类
public class MyThread17 extends Thread { @Override public void run() { super.run(); try { System.out.println("begin"); Thread.sleep(100000); System.out.println("end"); } catch (InterruptedException e) { System.out.println("线程沉睡中被中断,进入 catch !" + " this.interrupted() = "+this.interrupted()); e.printStackTrace(); } } } -
测试类
public class MyThread17Test {
    public static void main(String[] args) {
        try {
            MyThread17 myThread17 = new MyThread17();
            myThread17.start();
            Thread.sleep(500);
            myThread17.interrupt();
        } catch (InterruptedException e) {
            e.printStackTrace();
        }
    }
}
运行结果
begin
线程沉睡中被中断,进入 catch ! this.interrupted() = false
java.lang.InterruptedException: sleep interrupted
	at java.lang.Thread.sleep(Native Method)
	at MyThread17.run(MyThread17.java:7)
分析:从打印结果上来看,如果在 sleep 状态下停止某一线程,会进入 catch 语句,并清除停止状态值,使之变成 false
前面一个实验是先 sleep 然后再停止线程,接下来我们看看先停止线程再 sleep 会怎样,下面通过一个示例来演示:
-
创建一个自定义的线程类
public class MyThread18 extends Thread { @Override public void run() { super.run(); try { for (int i = 0; i < 50000; i++) { System.out.println(i); } System.out.println("begin"); Thread.sleep(100000); System.out.println("end"); } catch (InterruptedException e) { System.out.println("线程先被中断,再遇到 sleep ,进入 catch !" + " this.interrupted() = " + this.interrupted()); e.printStackTrace(); } } } -
测试类
public class MyThread18Test {
    public static void main(String[] args) {
        MyThread18 myThread18 = new MyThread18();
        myThread18.start();
        myThread18.interrupt();
    }
}
运行结果
49997
49998
49999
begin
线程先被中断,再遇到 sleep ,进入 catch ! this.interrupted() = false
java.lang.InterruptedException: sleep interrupted
	at java.lang.Thread.sleep(Native Method)
	at MyThread18.run(MyThread18.java:10)
1.7.5 能停止的线程——暴力停止
使用 stop() 方法停止线程是非常暴力的,下面通过一个示例来演示:
-
创建一个自定义的线程类
public class MyThread19 extends Thread { private int i = 0; @Override public void run() { super.run(); try { while (true) { i++; System.out.println(i); sleep(1000); } } catch (InterruptedException e) { System.out.println("进入了 catch() 中"); e.printStackTrace(); } } } -
测试类
public class MyThread19Test {
    public static void main(String[] args) {
        try {
            MyThread19 myThread19 = new MyThread19();
            myThread19.start();
            Thread.sleep(8000);
            myThread19.stop();
        } catch (InterruptedException e) {
            e.printStackTrace();
        }
    }
}
运行结果
1
2
3
4
5
6
7
8
1.7.6 方法 stop() 与 java.lang.ThreadDeath 异常
调用 stop() 方法时会抛出 java.lang.ThreadDeath 异常,但在通常的情况下,此异常不需要显示地捕获。
下面通过一个示例来演示:
-
创建一个自定义的线程类
public class MyThread20 extends Thread { @Override public void run() { super.run(); try { this.stop(); } catch (ThreadDeath e) { System.out.println("进入了 catch() 中"); e.printStackTrace(); } } } -
测试类
public class MyThread20Test {
    public static void main(String[] args) {
        MyThread20 myThread20 = new MyThread20();
        myThread20.start();
    }
}
运行结果
进入了 catch() 中
java.lang.ThreadDeath
	at java.lang.Thread.stop(Thread.java:850)
	at MyThread20.run(MyThread20.java:6)
1.7.7 释放锁的不良后果
stop() 方法已经被作废,原因如下:
- 如果强制让线程停止,则有可能使一些清洁性的工作得不到完成
- 对锁定的对象进行了 ”解锁“,导致数据得不到同步的处理,出现数据不一致的问题
下面通过一个示例来演示 stop() 方法造成数据不一致的示例:
-
创建一个对象,其中 setUsernameAndPassword 方法上锁
public class SynchronizedObject { private String username = "a"; private String password = "aa"; public String getUsername() { return username; } public void setUsername(String username) { this.username = username; } public String getPassword() { return password; } public void setPassword(String password) { this.password = password; } synchronized public void setUsernameAndPassword(String username, String password) { try { this.username = username; Thread.sleep(10000); this.password = password; } catch (InterruptedException e) { e.printStackTrace(); } } } -
创建一个自定义的线程类
public class MyThread21 extends Thread { private SynchronizedObject synchronizedObject; public MyThread21(SynchronizedObject synchronizedObject) { this.synchronizedObject = synchronizedObject; } @Override public void run() { super.run(); synchronizedObject.setUsernameAndPassword("b","bb"); } } -
测试类
public class MyThread21Test {
    public static void main(String[] args) {
        try {
            SynchronizedObject synchronizedObject = new SynchronizedObject();
            MyThread21 myThread21 = new MyThread21(synchronizedObject);
            myThread21.start();
            Thread.sleep(500);
            myThread21.stop();
            System.out.println(synchronizedObject.getUsername() + " " +synchronizedObject.getPassword());
        } catch (InterruptedException e) {
            e.printStackTrace();
        }
    }
}
运行结果
b aa
1.7.8 使用 return 停止线程
将方法 interrupt() 和 return 结合使用也能实现停止线程的效果,不过还是建议使用 ”抛异常“ 法来实现线程的停止,因为 catch 块可以对异常的信息进行相关的处理,而且使用异常流能更方便地控制程序的运行流程,不至于代码中出现很多个 return 造成污染
下面通过一个示例来演示使用 return 停止线程:
-
创建一个自定义的线程类
public class MyThread22 extends Thread { private int i = 0; @Override public void run() { super.run(); while (true) { if(this.isInterrupted()){ System.out.println("退出了"); return; } System.out.println(i); i++; } } } -
测试类
public class MyThread22Test {
    public static void main(String[] args) {
        try {
            MyThread22 myThread22 = new MyThread22();
            myThread22.start();
            Thread.sleep(500);
            myThread22.interrupt();
        } catch (InterruptedException e) {
            e.printStackTrace();
        }
    }
}
运行结果
...
16916
16917
16918
16919
退出了
1.8 暂停线程
暂停线程意味着此线程还可以恢复运行。在 Java 多线程中,可以使用 suspend() 方法暂停线程,使用 resume() 方法恢复线程的执行。这两个方法已经是过期作废的方法了
1.8.1 suspend 与 resume 方法的使用
下面通过一个示例来演示 suspend 与 resume 方法的使用:
-
创建一个自定义的线程类
public class MyThread23 extends Thread { private int i = 0; public int getI() { return i; } public void setI(int i) { this.i = i; } @Override public void run() { super.run(); while (true) { i++; } } } -
测试类
public class MyThread23Test {
    public static void main(String[] args) {
        try {
            // 创建线程
            MyThread23 myThread23 = new MyThread23();
            // 启动线程
            myThread23.start();
            Thread.sleep(500);
            // 暂停线程
            myThread23.suspend();

            // A 段
            System.out.println("A = " + System.currentTimeMillis() + " i = " + myThread23.getI());
            Thread.sleep(500);
            System.out.println("A = " + System.currentTimeMillis() + " i = " + myThread23.getI());

            // 恢复线程
            myThread23.resume();
            Thread.sleep(500);
            // 暂停线程
            myThread23.suspend();

            // B 段
            System.out.println("B = " + System.currentTimeMillis() + " i = " + myThread23.getI());
            Thread.sleep(500);
            System.out.println("B = " + System.currentTimeMillis() + " i = " + myThread23.getI());
        } catch (InterruptedException e) {
            e.printStackTrace();
        }
    }
}
运行结果
A = 1573647074155 i = 220277857
A = 1573647074655 i = 220277857
B = 1573647075156 i = 469660276
B = 1573647075656 i = 469660276
分析:从打印结果上来看,线程的确被暂停了,而且还可以恢复成运行的状态
1.8.2 suspend 和 resume 方法的缺点——独占
在使用 suspend 和 resume 方法时,如果使用不当,极易造成公共的同步对象的独占,使得其他线程无法访问公共的同步对象。
下面通过一个示例来演示独占锁的情况:
-
创建一个自定义的线程类
public class MyThread24 extends Thread { private int count = 5; @Override synchronized public void run() { super.run(); count--; System.out.println("由" + this.currentThread().getName() + "计算,count = " + count); if (this.currentThread().getName() == "A") { // A 线程永远 suspend 了 Thread.currentThread().suspend(); } } } -
测试类
public class MyThread24Test {
    public static void main(String[] args) {
        try {
            MyThread24 myThread24 = new MyThread24();
            Thread a = new Thread(myThread24, "A");
            a.start();
            Thread.sleep(500);
            Thread b = new Thread(myThread24, "B");
            b.start();
        } catch (InterruptedException e) {
            e.printStackTrace();
        }

    }
}
运行结果
由A计算,count = 4
分析:A 线程先在 run() 方法中被永远暂停了,然后 B 线程就不能进入 run() 方法了,因为 run() 方法被 A 线程独占了
下面通过一个示例来演示另一种独占锁的情况:
-
创建一个自定义的线程类
public class MyThread25 extends Thread { private int i = 0; @Override public void run() { super.run(); while (true) { i++; // System.out.println(i); } } } -
测试类
public class MyThread25Test {
    public static void main(String[] args) {
        try {
            MyThread25 myThread25 = new MyThread25();
            myThread25.start();
            Thread.sleep(500);
            myThread25.suspend();
            System.out.println("main end");
        } catch (InterruptedException e) {
            e.printStackTrace();
        }
    }
}
运行结果
main end -
接下来把 MyThread25 中的注释去掉,再次运行,运行结果如下
...
41172
41173
41174
41175
41176
分析:第二次运行控制台没有打印 main end,出现这样的情况的原因是,当程序运行到 println() 方法内部时,同步锁未被释放。
之前讲过,System.out.println() 方法内部是同步的,源代码如下:
public void println(String x) {
    synchronized (this) {
        print(x);
        newLine();
    }
}
这导致 PrintStream 对象的 println() 方法一直呈暂停状态,并且锁未释放,所以 main() 方法中的代码 System.out.println(“main end”); 迟迟不能打印。
1.8.3 suspend 和 resume 方法的缺点——不同步
在使用 suspend 和 resume 方法时也容易出现因为线程的暂停而导致数据不同步的情况。
下面通过一个示例来演示数据不同步的情况:
-
创建一个自定义的实体类
public class MyObject { private String username = "a"; private String password = "aa"; public void setUsernameAndPassword(String username, String password) { this.username = username; if (Thread.currentThread().getName() == "A"){ // 线程暂停了 Thread.currentThread().suspend(); } this.password = password; } public void printUsernameAndPassword() { System.out.println(this.username + " " + this.password); } } -
测试类
public class MyObjectTest {
    public static void main(String[] args) {
        try {
            MyObject myObject = new MyObject();
            Thread thread1 = new Thread() {
                @Override
                public void run() {
                    super.run();
                    myObject.setUsernameAndPassword("b","bb");
                }
            };
            thread1.setName("A");
            thread1.start();
            Thread.sleep(500);
            Thread thread2 = new Thread(){
                @Override
                public void run() {
                    super.run();
                    myObject.printUsernameAndPassword();
                }
            };
            thread2.start();
        } catch (InterruptedException e) {
            e.printStackTrace();
        }
    }
}
运行结果
b aa
1.9 yield 方法
yield() 方法的作用是放弃当前的 CPU 资源,将它让给其它的任务去占用 CPU 执行时间。但放弃的时间不确定,有可能刚刚放弃,马上又获得 CPU 时间片。
下面通过一个示例来演示 yield 方法的使用:
-
创建一个自定义的线程类
public class MyThread26 extends Thread { @Override public void run() { super.run(); long beginTime = System.currentTimeMillis(); int count = 0; for (int i = 0; i < 5000000; i++) { // Thread.yield(); count += i; } System.out.println(count); long endTime = System.currentTimeMillis(); System.out.println("用时:" + (endTime - beginTime) + "毫秒"); } } -
测试类
public class MyThread26Test {
    public static void main(String[] args) {
        MyThread26 myThread26 = new MyThread26();
        myThread26.start();
    }
}
运行结果
1642668640 用时:5毫秒 -
接下来把 MyThread26 中的注释取消,再次运行,运行结果如下:
1642668640
用时:4726毫秒
分析:显然,第二次运行,将 CPU 让给其他资源导致速度变慢了
1.10 线程的优先级
在操作系统中,线程可以划分优先级,优先级高的线程得到的 CPU 资源较多,也就是 CPU 优先执行优先级较高的线程对象中的任务。
设置线程优先级有助于帮 “线程规划器” 确定在下一次选择哪个线程来优先执行。
设置线程的优先级使用 setPriority() 方法,此方法源码如下:
public final void setPriority(int newPriority) {
    ThreadGroup g;
    checkAccess();
    if (newPriority > MAX_PRIORITY || newPriority < MIN_PRIORITY) {
        throw new IllegalArgumentException();
    }
    if((g = getThreadGroup()) != null) {
        if (newPriority > g.getMaxPriority()) {
            newPriority = g.getMaxPriority();
        }
        setPriority0(priority = newPriority);
    }
}
在 Java 中,线程的优先级分为 1-10 这 10 个等级,如果小于 1 或大于 10,则 JDK 抛出异常 throw new IllegalArgumentException()
1.10.1 线程优先级的继承性
在 Java 中,线程的优先级具有继承性,比如 A 线程启动 B 线程,则 B 线程的优先级与 A 是一样的。
下面通过一个示例来演示:
-
创建两个自定义的线程类
public class MyThread27 extends Thread {
    @Override
    public void run() {
        super.run();
        System.out.println("MyThread27 priority: " + this.getPriority());
        MyThread27_2 myThread27_2 = new MyThread27_2();
        myThread27_2.start();
    }
}
public class MyThread27_2 extends Thread { @Override public void run() { super.run(); System.out.println("MyThread27_2 priority: " + this.getPriority()); } } -
测试类
public class MyThread27Test {
    public static void main(String[] args) {
        System.out.println("main begin priority: "+Thread.currentThread().getPriority());
//        Thread.currentThread().setPriority(6);
        System.out.println("main end priority: "+Thread.currentThread().getPriority());
        MyThread27 myThread27 = new MyThread27();
        myThread27.start();
    }
}
运行结果
main begin priority: 5 main end priority: 5 MyThread27 priority: 5 MyThread27_2 priority: 5 -
接下来把 MyThread27Test 中的注释取消,再次运行,运行结果如下:
main begin priority: 5
main end priority: 6
MyThread27 priority: 6
MyThread27_2 priority: 6
分析:显然,第二次运行优先级被更改后,依然被继承了
1.10.2 优先级具有规则性
线程的优先级具有一定的规则性,也就是 CPU 尽量将执行资源让给优先级比较高的线程。
下面通过一个示例来演示:
-
创建两个自定义的线程类
public class MyThread28 extends Thread {
    @Override
    public void run() {
        super.run();
        long beginTime = System.currentTimeMillis();
        int count = 0;
        for (int i = 0; i < 100000000; i++) {
            count += i;
        }
        long endTime = System.currentTimeMillis();
        System.out.println("MyThread28 用时:" + (endTime - beginTime) + "毫秒");
    }
}
public class MyThread28_2 extends Thread { @Override public void run() { super.run(); long beginTime = System.currentTimeMillis(); int count = 0; for (int i = 0; i < 50000000; i++) { count += i; } long endTime = System.currentTimeMillis(); System.out.println("MyThread28_2 用时:" + (endTime - beginTime) + "毫秒"); } } -
测试类
public class MyThread28Test {
    public static void main(String[] args) {
        for (int i = 0; i < 5; i++) {
            MyThread28 myThread28 = new MyThread28();
            myThread28.setPriority(10);
            myThread28.start();
            MyThread28_2 myThread28_2 = new MyThread28_2();
            myThread28_2.setPriority(1);
            myThread28_2.start();
        }
    }
}
运行结果
MyThread28 用时:44毫秒
MyThread28 用时:45毫秒
MyThread28 用时:47毫秒
MyThread28 用时:39毫秒
MyThread28_2 用时:26毫秒
MyThread28_2 用时:31毫秒
MyThread28 用时:39毫秒
MyThread28_2 用时:58毫秒
MyThread28_2 用时:22毫秒
MyThread28_2 用时:22毫秒
分析:从打印结果上来看,高优先级的线程总是大部分先执行完,但不代表高优先级的线程全部先执行完
当线程优先级的等级差距很大时,谁先执行完和代码的调用顺序无关,为了验证这一结论,继续实验:
-
测试类
public class MyThread28Test_2 { public static void main(String[] args) { for (int i = 0; i < 5; i++) { MyThread28 myThread28 = new MyThread28(); myThread28.setPriority(1); myThread28.start(); MyThread28_2 myThread28_2 = new MyThread28_2(); myThread28_2.setPriority(10); myThread28_2.start(); } } } -
运行结果
MyThread28_2 用时:27毫秒
MyThread28_2 用时:26毫秒
MyThread28_2 用时:28毫秒
MyThread28_2 用时:20毫秒
MyThread28_2 用时:6毫秒
MyThread28 用时:63毫秒
MyThread28 用时:96毫秒
MyThread28 用时:106毫秒
MyThread28 用时:116毫秒
MyThread28 用时:116毫秒
分析:可以发现 MyThread28_2 先执行完,也就验证了线程的优先级与代码的执行顺序无关,出现这样的结果完全是因为 MyThread28_2 的优先级是最高的
1.10.3 优先级具有随机性
线程的优先级具有 “随机性”,也就是优先级较高的线程不一定每一次都先执行完。
下面通过一个示例来演示:
-
创建两个自定义的线程类
public class MyThread29 extends Thread {
    @Override
    public void run() {
        super.run();
        long beginTime = System.currentTimeMillis();
        int count = 0;
        for (int i = 0; i < 100000000; i++) {
            count += i;
        }
        long endTime = System.currentTimeMillis();
        System.out.println("MyThread29 用时:" + (endTime - beginTime) + "毫秒");
    }
}
public class MyThread29_2 extends Thread{ @Override public void run() { super.run(); long beginTime = System.currentTimeMillis(); int count = 0; for (int i = 0; i < 100000000; i++) { count += i; } long endTime = System.currentTimeMillis(); System.out.println("MyThread29_2 用时:" + (endTime - beginTime) + "毫秒"); } } -
测试类
public class MyThread29Test {
    public static void main(String[] args) {
        for (int i = 0; i < 5; i++) {
            MyThread29 myThread29 = new MyThread29();
            myThread29.setPriority(5);
            myThread29.start();
            MyThread29_2 myThread29_2 = new MyThread29_2();
            myThread29_2.setPriority(6);
            myThread29_2.start();
        }

    }
}
运行结果
MyThread29_2 用时:63毫秒
MyThread29 用时:80毫秒
MyThread29_2 用时:81毫秒
MyThread29 用时:90毫秒
MyThread29 用时:67毫秒
MyThread29_2 用时:70毫秒
MyThread29_2 用时:78毫秒
MyThread29 用时:68毫秒
MyThread29 用时:74毫秒
MyThread29_2 用时:64毫秒
分析:为了让结果体现 “随机性”,所以两个线程的优先级一个设置为 5,另一个设置为 6,让优先级接近一些。从打印结果上来看,MyThread29_2 线程的优先级更高,但 MyThread29_2 线程不一定每一次都先执行完。
1.10.4 看谁运行的快
优先级高的线程和优先级低的谁的运行速度更快,下面通过一个示例来演示:
-
创建两个自定义的线程类
public class MyThread30 extends Thread {
    private long count = 0;

    public long getCount() {
        return count;
    }

    public void setCount(long count) {
        this.count = count;
    }

    @Override
    public void run() {
        super.run();
        while (true) {
            count++;
        }
    }
}
public class MyThread30_2 extends Thread { private long count = 0; public long getCount() { return count; } public void setCount(long count) { this.count = count; } @Override public void run() { super.run(); while (true) { count++; } } } -
测试类
public class MyThread30Test {
    public static void main(String[] args) {
        try {
            MyThread30 myThread30 = new MyThread30();
            myThread30.setPriority(Thread.NORM_PRIORITY - 3);
            myThread30.start();

            MyThread30_2 myThread30_2 = new MyThread30_2();
            myThread30_2.setPriority(Thread.NORM_PRIORITY + 3);
            myThread30_2.start();

            Thread.sleep(20000);
            myThread30.stop();
            myThread30_2.stop();

            System.out.println("myThread30:" + myThread30.getCount());
            System.out.println("myThread30_2:" + myThread30_2.getCount());
        } catch (InterruptedException e) {
            e.printStackTrace();
        }


    }
}
运行结果
myThread30:5682347365
myThread30_2:7136576679
分析:从打印结果上来看,优先级高的线程运行速度更快
1.11 守护线程
在 Java 线程中有两种线程,一种是用户线程,另一种就是守护(Daemon)线程。
什么是守护线程呢? 守护线程是一种特殊的线程,它的特性有陪伴的含义,当进程中不存在非守护进程了,则守护线程自动销毁。典型的守护进程就是垃圾回收线程,当进程中没有非守护进程了,则垃圾回收线程也没有存在的必要了,自动销毁。
下面通过一个示例来演示守护线程:
-
创建一个自定义的线程类
public class MyThread31 extends Thread { private int i = 0; @Override public void run() { super.run(); try { while(true){ i++; System.out.println(i); Thread.sleep(1000); } } catch (InterruptedException e) { e.printStackTrace(); } } } -
测试类
public class MyThread31Test {
    public static void main(String[] args) {
        try {
            MyThread31 myThread31 = new MyThread31();
            // 将一个用户线程设置为守护线程
            myThread31.setDaemon(true);
            myThread31.start();
            Thread.sleep(5000);
            System.out.println("守护线程退出了");
        } catch (InterruptedException e) {
            e.printStackTrace();
        }
    }
}
运行结果
1
2
3
4
5
守护线程退出了
