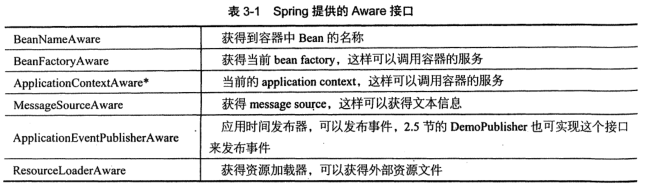
Spring Aware
一、介绍
Aware:意识到,目的是让Bean获得到Spring容器的服务,可以直接继承ApplicationContextAware获得Spring容器的所有服务,但原则上是使用到什么接口,就实现什么接口。
二、需求
将txt文件里面的内容,读取到控制台。
三、示例
1.新建test.txt文件,内容随意
1234567890qwertyuiop!@#$%^&*()去沃尔特与IOP平
2.Spring Aware演示Bean
package com.eleven.aware1;

import java.io.IOException;

import org.apache.commons.io.IOUtils;
import org.springframework.beans.factory.BeanNameAware;
import org.springframework.context.ResourceLoaderAware;
import org.springframework.core.io.Resource;
import org.springframework.core.io.ResourceLoader;
import org.springframework.stereotype.Service;

@Service // 表示将当前类注入到Spring容器中,成为Spring管理的一个Bean
// BeanNameAware:获得到容器中Bean的名称
// ResourceLoaderAware:获取外部资源文件
public class AwareService implements BeanNameAware, ResourceLoaderAware {

	private String beanName;
	private ResourceLoader loader;

	@Override
	public void setResourceLoader(ResourceLoader resourceLoader) {
		// TODO Auto-generated method stub
		this.loader = resourceLoader;
	}

	@Override
	public void setBeanName(String name) {
		// TODO Auto-generated method stub
		this.beanName = name;
	}

	public void outputResult() {
		// 获取到文件的名称
		System.out.println("Bean的名称:" + beanName);
		// 加载外部资源文件
		Resource resource = loader.getResource("classpath:com/eleven/aware1/test.txt");
		// 输出资源文件的内容
		try {
			System.out.println("输出资源文件的内容:" + IOUtils.toString(resource.getInputStream()));
		} catch (IOException e) {
			e.printStackTrace();
		}
	}

}
3.配置类
package com.eleven.aware1;

import org.springframework.context.annotation.ComponentScan;
import org.springframework.context.annotation.Configuration;

@Configuration	// 声明当前类是一个配置类
@ComponentScan("com.eleven.aware1")	// 自动扫描包下面的所以配置
public class AwareConfig {

}
4.运行
package com.eleven.aware1;

import org.springframework.context.annotation.AnnotationConfigApplicationContext;

public class Main {
	public static void main(String[] args) {
		// 将AnnotationConfigApplicationContext注入到Spring容器里面,成为Spring管理的一个Bean
		AnnotationConfigApplicationContext context = new AnnotationConfigApplicationContext(AwareConfig.class);
		// 获得AwareService声明的Bean
		AwareService awareService = context.getBean(AwareService.class);

		awareService.outputResult();
		context.close();
	}

}
5.输出
Bean的名称:awareService
输出资源文件的内容:1234567890qwertyuiop!@#$%^&*()去沃尔特与IOP平
多线程
一、介绍
Spring是通过任务执行器(TaskExecutor)来实现多线程和并发编程。使用ThreadPoolTaskExecutor可以实现一个基于线程的TaskExecutor。
二、需求
实现一个多线程。
三、示例
1.配置类
package com.eleven.thread1;

import java.util.concurrent.Executor;

import org.springframework.aop.interceptor.AsyncUncaughtExceptionHandler;
import org.springframework.context.annotation.ComponentScan;
import org.springframework.context.annotation.Configuration;
import org.springframework.scheduling.annotation.AsyncConfigurer;
import org.springframework.scheduling.annotation.EnableAsync;
import org.springframework.scheduling.concurrent.ThreadPoolTaskExecutor;

@Configuration // 声明当前类是一个配置类
@ComponentScan("com.eleven.thread1") // 自动扫描包下面的所有配置
@EnableAsync // 开启异步任务支持
public class TaskExecutorConfig implements AsyncConfigurer {

	@Override
	public Executor getAsyncExecutor() {
		// TODO Auto-generated method stub
		ThreadPoolTaskExecutor taskExecutor = new ThreadPoolTaskExecutor(); // 线程池
		taskExecutor.setCorePoolSize(5);	// 核心池大小
		taskExecutor.setMaxPoolSize(10);	// 最大池大小
		taskExecutor.setQueueCapacity(25);	// 排队容量
		taskExecutor.initialize();			// 初始化
		return taskExecutor;
	}

	@Override
	public AsyncUncaughtExceptionHandler getAsyncUncaughtExceptionHandler() {
		// TODO Auto-generated method stub
		return null;
	}

}
2.任务执行类
package com.eleven.thread1;

import org.springframework.scheduling.annotation.Async;
import org.springframework.stereotype.Service;

@Service // 声明当前类是Spring管理的一个Bean
public class AsynTaskService {

	@Async	// 表示该方法是异步方法
	public void executeAsyncTask(Integer i) {
		System.out.println("执行异步任务" + i);
	}

	@Async
	public void executeAsyncTaskPlus(Integer i) {
		System.out.println("执行异步任务+1++++++++++" + (i + 1));
	}

}
3.运行
package com.eleven.thread1;

import org.springframework.context.annotation.AnnotationConfigApplicationContext;

public class Main {
	public static void main(String[] args) {
		AnnotationConfigApplicationContext context = new AnnotationConfigApplicationContext(TaskExecutorConfig.class);
		AsynTaskService asynTaskService = context.getBean(AsynTaskService.class);

		for (int i = 0; i < 10; i++) {
			asynTaskService.executeAsyncTask(i);
			asynTaskService.executeAsyncTaskPlus(i);
		}

		context.close();
	}

}
4.输出
执行异步任务+1++++++++++1
执行异步任务+1++++++++++3
执行异步任务2
执行异步任务+1++++++++++4
执行异步任务4
执行异步任务+1++++++++++5
执行异步任务5
执行异步任务+1++++++++++6
执行异步任务+1++++++++++2
执行异步任务6
执行异步任务0
执行异步任务1
执行异步任务3
执行异步任务8
执行异步任务+1++++++++++8
执行异步任务+1++++++++++10
执行异步任务7
执行异步任务+1++++++++++7
执行异步任务9
执行异步任务+1++++++++++9
计划任务
一、介绍
在配置类上加入@EnableScheduling注解,开启对计划任务的支持,然后在要执行计划任务的方法上加入@Scheduled注解,声明是一个计划任务。
二、需求
利用Spring的计划任务,每隔5秒执行一次。
三、示例
1.计划任务执行类
package com.eleven.planttask1;

import java.text.SimpleDateFormat;
import java.util.Date;

import org.springframework.scheduling.annotation.Scheduled;
import org.springframework.stereotype.Service;

@Service // 声明当前类是一个配置类
public class ScheduledTaskService {

	// 获取当前时间
	private static final SimpleDateFormat dataFormat = new SimpleDateFormat("HH:mm:ss");

	@Scheduled(fixedRate = 5000) // 开启计划任务,默认单位是毫秒
	public void reportCurrentTime() {
		System.out.println("每隔5秒执行一次:" + dataFormat.format(new Date()));
	}

	@Scheduled(cron = "0 28 11 ? * *") // 设置的是每天的11点28分开始执行
	public void fixTimeExecution() {
		System.out.println("在指定的时间:" + dataFormat.format(new Date() + "执行"));
	}

}
2.配置类
package com.eleven.planttask1;

import org.springframework.context.annotation.ComponentScan;
import org.springframework.context.annotation.Configuration;
import org.springframework.scheduling.annotation.EnableScheduling;

@Configuration // 声明当前类是一个配置类
@ComponentScan("com.eleven.planttask1")
@EnableScheduling // 开启对计划任务的支持
public class TaskSchedulerConfig {

}
3.运行
package com.eleven.planttask1;

import org.springframework.context.annotation.AnnotationConfigApplicationContext;

public class Main {
	public static void main(String[] args) {
		AnnotationConfigApplicationContext context = new AnnotationConfigApplicationContext(TaskSchedulerConfig.class);
	}

}
4.输出
每隔5秒执行一次:19:54:06
每隔5秒执行一次:19:54:11
每隔5秒执行一次:19:54:16
每隔5秒执行一次:19:54:21
每隔5秒执行一次:19:54:26
条件注解
一、介绍
根据特定条件创建特定的Bean。
根据特定条件来控制Bean的创建行为。
二、需求
模拟程序在不同的操作系统中,若在Windows系统下运行程序,则输出命令dir;若在Linux系统下运行,则输出列表命令ls。
三、示例
1.判断Windows的条件
package com.eleven.conditional1;

import org.springframework.context.annotation.Condition;
import org.springframework.context.annotation.ConditionContext;
import org.springframework.core.type.AnnotatedTypeMetadata;

public class WindowsConditional implements Condition {

	/**
	 * ConditionContext:条件
	 * getEnvironment:获取环境
	 * getProperty:获取属性
	 * contains:包含
	 */
	@Override
	public boolean matches(ConditionContext context, AnnotatedTypeMetadata metadata) {
		return context.getEnvironment().getProperty("os.name").contains("Windows");
	}

}
2.判定Linux的条件
package com.eleven.conditional1;

import org.springframework.context.annotation.Condition;
import org.springframework.context.annotation.ConditionContext;
import org.springframework.core.type.AnnotatedTypeMetadata;

public class LinuxConditional implements Condition {

	@Override
	public boolean matches(ConditionContext context, AnnotatedTypeMetadata metadata) {
		return context.getEnvironment().getProperty("os.name").contains("Linux");
	}

}
3.接口
package com.eleven.conditional1;

public interface ListService {
	public String showListCmd();

}
4.windows下所要创建的Bean的类
package com.eleven.conditional1;

import org.springframework.stereotype.Service;

@Service
public class WindowsListService implements ListService{

	@Override
	public String showListCmd() {
		return "dir";
	}

}
5.Linux下所要创建的Bean的类
package com.eleven.conditional1;

import org.springframework.stereotype.Service;

@Service
public class LinuxListService implements ListService{

	@Override
	public String showListCmd() {
		return "ls";
	}

}
6.配置类
package com.eleven.conditional1;

import org.springframework.context.annotation.Bean;
import org.springframework.context.annotation.Conditional;
import org.springframework.context.annotation.Configuration;

@Configuration // 声明当前类是一个配置类
public class ConditionConfig {

	@Bean
	@Conditional(WindowsConditional.class)
	public ListService windowsListService() {
		return new WindowsListService();
	}

	@Bean
	@Conditional(LinuxConditional.class)
	public ListService linuxListService() {
		return new LinuxListService();
	}

}
7.运行
package com.eleven.conditional1;

import org.springframework.context.annotation.AnnotationConfigApplicationContext;

public class Main {
	public static void main(String[] args) {
		AnnotationConfigApplicationContext context = new AnnotationConfigApplicationContext(ConditionConfig.class);
		WindowsListService windowsListService = context.getBean(WindowsListService.class);

		System.out.println(
				context.getEnvironment().getProperty("os.name") + "系统下的命令列表为:" + windowsListService.showListCmd());

		/*
		 * LinuxListService linuxListService = context.getBean(LinuxListService.class);
		 * System.out.println( context.getEnvironment().getProperty("os.name") +
		 * "系统下的命令列表为:" + linuxListService.showListCmd());
		 */
	}

}
8.输出
Windows 10系统下的命令列表为:dir
组合注解和元注解
一、介绍
元注解:可以注入到别的注解上的注解。
组合注解:被注解的注解叫做组合注解。
二、需求
模拟一个元注解和组合注解
三、示例
1.组合注解
package com.eleven.annotation1;

import java.lang.annotation.Documented;
import java.lang.annotation.ElementType;
import java.lang.annotation.Retention;
import java.lang.annotation.RetentionPolicy;
import java.lang.annotation.Target;

import org.springframework.context.annotation.ComponentScan;
import org.springframework.context.annotation.Configuration;

@Target(ElementType.TYPE)	// 用于接口、类、枚举、注解
@Retention(RetentionPolicy.RUNTIME)
@Documented
@Configuration
@ComponentScan
public @interface WiselyConfiguration {

	String[] value() default{};

}
2.演示服务Bean
package com.eleven.annotation1;

import org.springframework.stereotype.Service;

@Service
public class DemoService {
	public void outputResult() {
		System.out.println("从组合配置一样可以获得Bean");
	}

}
3.配置类
package com.eleven.annotation1;

@WiselyConfiguration("com.eleven.annotation1")
public class DemoConfig {

}
4.运行
package com.eleven.annotation1;

import org.springframework.context.annotation.AnnotationConfigApplicationContext;

public class Main {
	public static void main(String[] args) {
		AnnotationConfigApplicationContext context = new AnnotationConfigApplicationContext(DemoConfig.class);

		DemoService demoService = context.getBean(DemoService.class);
		demoService.outputResult();
		context.close();
	}

}
5.输出
从组合配置一样可以获得Bean
测试
一、介绍
单元测试:只针对当前的类和方法进行测试。
集成测试:将系统的各个部分组合在一起进行测试。
二、需求
将系统的各个部分组合在一起进行集成测试。
三、示例
1.添加依赖包
<!-- Spring Test 支持 -->
		<!-- https://mvnrepository.com/artifact/org.springframework/spring-test -->
		<dependency>
			<groupId>org.springframework</groupId>
			<artifactId>spring-test</artifactId>
			<version>4.1.6.RELEASE</version>
		</dependency>
		<!-- https://mvnrepository.com/artifact/junit/junit -->
		<dependency>
			<groupId>junit</groupId>
			<artifactId>junit</artifactId>
			<version>4.11</version>
			<scope>test</scope>
		</dependency>
2.编写测试代码(在src/main/java)
package com.eleven.test1;

public class TestBean {

	private String content;

	public TestBean(String content) {
		super();
		this.content = content;
	}

	public String getContent() {
		return content;
	}

	public void setContent(String content) {
		this.content = content;
	}


}
3.配置类
package com.eleven.test1;

import org.springframework.context.annotation.Bean;
import org.springframework.context.annotation.Configuration;
import org.springframework.context.annotation.Profile;

@Configuration // 声明当前是一个配置类
public class TestConfig {

	@Bean
	@Profile("dev")
	public TestBean devTestBean() {
		return new TestBean("开发环境");
	}

	@Bean
	@Profile("prod")
	public TestBean prodTestBean() {
		return new TestBean("生产环境");
	}

}
4.测试(在src/test/java下面操作)
package com.eleven.test1;

import org.junit.Assert;
import org.junit.Test;
import org.junit.runner.RunWith;
import org.springframework.beans.factory.annotation.Autowired;
import org.springframework.test.context.ActiveProfiles;
import org.springframework.test.context.ContextConfiguration;
import org.springframework.test.context.junit4.SpringJUnit4ClassRunner;

@RunWith(SpringJUnit4ClassRunner.class) // 在JUint环境下面
@ContextConfiguration(classes = { TestConfig.class }) // 加载配置文件TestConfig
@ActiveProfiles("prod") // 声明当前的环境
public class DemoTest {
	@Autowired
	private TestBean testBean;

	@Test
	public void prodTest() {
		String expected = "生产环境";
		String actual = testBean.getContent();
		Assert.assertEquals(expected, actual);
	}

}
5.输出
运行测试,为绿色表示通过,红色表示未通过。
