要求
用13台虚拟机搭建一个高可用负载均衡集群架构出来,并运行三个站点,具体需求如下。
-
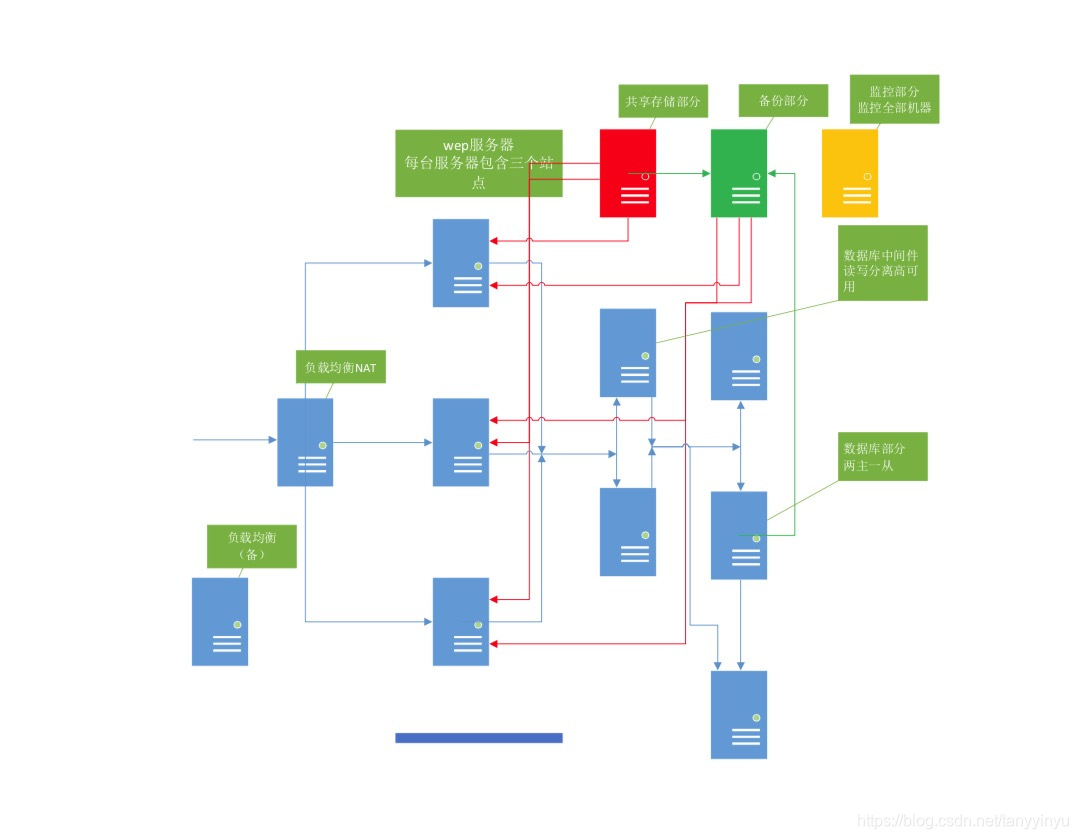
设计你认为合理的架构,用visio把架构图画出来
-
搭建lnmp、tomcat+jdk环境
-
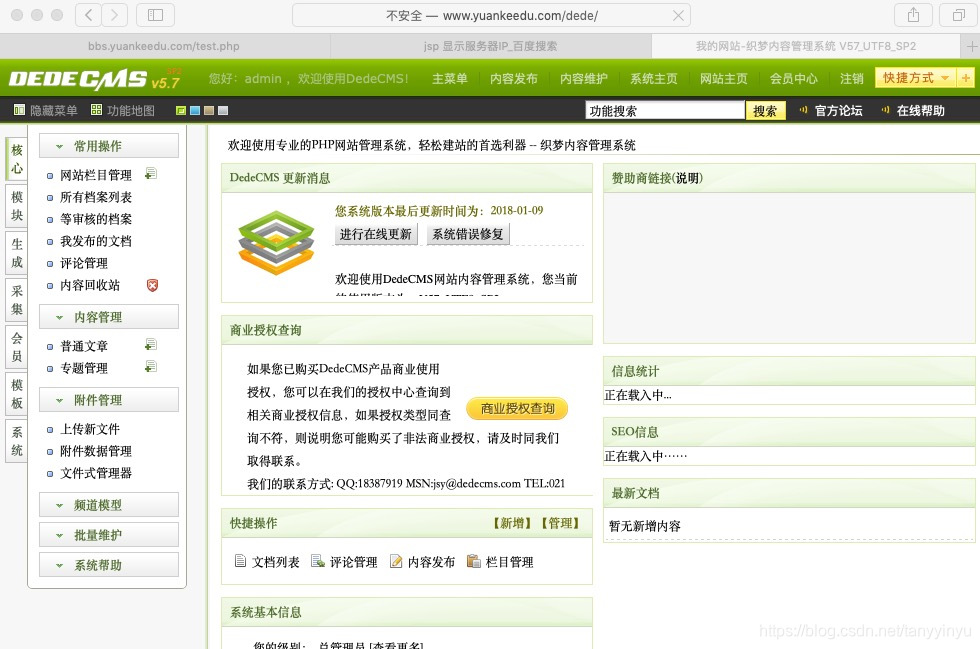
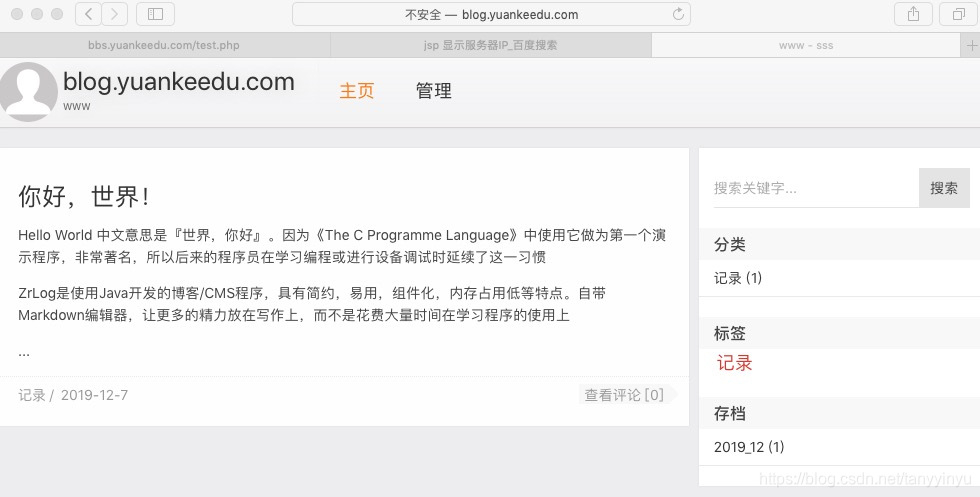
三个站点分别为:discuz论坛、dedecms企业网站以及zrlog博客
-
由于机器有限,尽可能地把三个站点放到同一台服务器上,然后做负载均衡集群,要求所有站点域名解析到一个ip上,也就是说只有一个出口ip
-
需要共享静态文件,比如discuz需要共享的目录是 data/attachment,dedecms需要共享upload(具体目录,你可以先上传一个图片,查看图片所在目录)
-
设计合理的目录、文件权限,比如discuz的data目录需要给php-fpm进程用户可写权限,其他目录不用写的就不要给写权限(目录755,文件644,属主属组root)
-
所有服务器要求只能普通用户登录,而且只能密钥登录,root只能普通用户sudo
-
给所有服务器做一个简单的命令审计功能
-
php-fpm服务要求设置慢执行日志,超时时间为2s,并做日志切割,日志保留一月
-
所有站点都需要配置访问日志,并做日志切割,要求静态文件日志不做记录,日志保留一月
-
制定合理的mysql数据备份方案,并写备份脚本,要求把备份数据传输到备份服务器
-
制定代码、静态文件的备份方案,并写备份脚本,要求把备份数据传输到备份服务器
-
编写数据恢复文档,能保证当数据丢失在2小时内恢复所有数据
-
搭建zabbix监控告警系统,要求监控各个基础指标(cpu、内存、硬盘),网卡流量需要成图,还需要监控web站点的可用性,
-
定制自定义监控脚本,监控web服务器的并发连接数,接入zabbix,成图,设置触发器,超过100告警
-
定制自定义监控脚本,监控mysql的队列,接入zabbix,成图,设置触发器,队列超过300告警
-
定制自定义监控脚本,监控mysql的慢查询日志,接入zabbix,成图,设置触发器,每分钟超过60条日志需要告警,需要仔细分析慢查询日志的规律,确定日志条数
-
利用jmx,在zabbix上监控tomcat
-
给三个站点的后台访问做二次认证,增加安全性
-
用shell脚本实现文件、代码同步上线(参考分发系统)
IP实际分配

架构图
- 架构调整后没有使用数据库中间件,因为网站程序不能实现读写分离;
- 实验过程分别使用mycat和atlas实现了读写分离;
- 网站只对接一台主数据库服务器,但是这个服务还是跟另外一台服务器主主同步,另有一台从机与二主数据库同步;
- 由于阿里云不能使用VIP,所以都没有实现高可用;
设置记录
- 负载均衡
upstream yuankeedu_com
    {
#        ip_hash;
        server 172.31.215.150:80; #服务器IP与端口;
	server 172.31.215.148:80;
	server 172.31.215.149:80;
    }
upstream zrlog_com
    {
#        ip_hash;
        server 172.31.215.150:8080; #服务器IP与端口;
        server 172.31.215.148:8080; #服务器IP与端口;
        server 172.31.215.149:8080; #服务器IP与端口;

   }

server {
        server_name  bbs.yuankeedu.com;
  listen       80 ;
 listen       [::]:80;
 location /
        {
            proxy_pass http://yuankeedu_com;   #upstream
            proxy_set_header Host $host;
            proxy_set_header X-Real-IP $remote_addr;
            proxy_set_header X-Forwarded-For $proxy_add_x_forwarded_for;
        }
    }
server {

  server_name blog.yuankeedu.com;
 listen       80 ;
        listen       [::]:80;
location /
        {
            proxy_pass http://zrlog_com;                    #upstream
            proxy_set_header Host $host;
            proxy_set_header X-Real-IP $remote_addr;
            proxy_set_header X-Forwarded-For $proxy_add_x_forwarded_for;
        }
    }

server {
        server_name  www.yuankeedu.com;
  listen       80 ;
        listen       [::]:80;
    location /
        {
            proxy_pass http://yuankeedu_com;                    #upstream
            proxy_set_header Host $host;
            proxy_set_header X-Real-IP $remote_addr;
            proxy_set_header X-Forwarded-For $proxy_add_x_forwarded_for;
        }
 }
- 其中一台web的nginx配置,三台都一样
discuz论坛
server {
        server_name  bbs.yuankeedu.com;
 listen       80 ;
        listen       [::]:80;
        root         /data/wwwroot/bbs.yuankeedu.com;
 index  index.html index.htm index.php;
        # Load configuration files for the default server block.
       include /etc/nginx/default.d/*.conf;

        location ~ /admin.php\?$ {
	auth_basic "User Authentication";
       	auth_basic_user_file /data/wwwroot/bbs.yuankedu.com/data/attachment/user_pw;
	fastcgi_pass   127.0.0.1:9000;
        fastcgi_index  index.php;
        fastcgi_param  SCRIPT_FILENAME  /data/wwwroot/bbs.yuankeedu.com$fastcgi_script_name;
        include        fastcgi_params;
	}

	location ~ \.php$ {
 root           /data/wwwroot/bbs.yuankeedu.com;
        fastcgi_pass   127.0.0.1:9000;
        fastcgi_index  index.php;
        fastcgi_param  SCRIPT_FILENAME  /data/wwwroot/bbs.yuankeedu.com$fastcgi_script_name;
        include        fastcgi_params;
        }

	location ~* \.(png|jpeg|gif|js|css|bmp|flv)$ {
	access_log off;
}

access_log  /data/logs/bbs.access.log  main;
	location /nginx_status
{
        stub_status on;		#主要语句;
        access_log   off;
        allow 127.0.0.1;
        deny all;
    }
}

dedecms网站
server {
        server_name  www.yuankeedu.com;
 listen       80 ;
        listen       [::]:80;
        root         /data/wwwroot/www.yuankeedu.com;
        index           index.html index.htm index.php;
        # Load configuration files for the default server block.

	location ~ /dede/$ {
        auth_basic "User Authentication";
        auth_basic_user_file /data/wwwroot/www.yuankeedu.com/uploads/user_pw;
        fastcgi_pass   127.0.0.1:9000;
        fastcgi_index  index.php;
        fastcgi_param  SCRIPT_FILENAME  /data/wwwroot/www.yuankeedu.com$fastcgi_script_name;
        include        fastcgi_params;
        }

        location ~ \.php$ {
        root           /data/wwwroot/www.yuankeedu.com;
        fastcgi_pass   127.0.0.1:9000;
        fastcgi_index  index.php;
        fastcgi_param  SCRIPT_FILENAME  /data/wwwroot/www.yuankeedu.com$fastcgi_script_name;
        include        fastcgi_params;
        }

	location ~* \.(png|jpeg|gif|js|css|bmp|flv)$ {
        access_log off;
}

	access_log  /data/logs/www.access.log  main;

	location /nginx_status
{
        stub_status on;		#主要语句;
        access_log   off;
        allow 127.0.0.1;
        deny all;
    }
}
- 其中一台服务器论坛设置的数据库信息:
只对接到主数据库上,三个库为discuz3, dedecms3, zrlog3
$_config['db']['1']['dbhost'] = '172.31.215.153';
$_config['db']['1']['dbuser'] = 'discuz3';
$_config['db']['1']['dbpw'] = 'discuz3';
$_config['db']['1']['dbcharset'] = 'utf8';
$_config['db']['1']['pconnect'] = '0';
$_config['db']['1']['dbname'] = 'discuz3';
$_config['db']['1']['tablepre'] = 'pre_';
$_config['db']['slave'] = '';
$_config['db']['common']['slave_except_table'] = '';
- 目录权限
discuz需要写权限的目录和修改命令
chown -R php-fpm config data uc_server/data uc_client/data
dedecms需要写权限的目录和修改命令
chown -R php-fpm plus dede data a install special uploads
- 数据库授权命令
grant all on discuz3.* to 'discuz3'@'172.31.215.148' identified by 'discuz3';
grant all on discuz3.* to 'discuz3'@'172.31.215.149' identified by 'discuz3';
grant all on discuz3.* to 'discuz3'@'172.31.215.150' identified by 'discuz3';
grant all on dedecms3.* to 'dedecms3'@'172.31.215.148' identified by 'dedecms3';
grant all on dedecms3.* to 'dedecms3'@'172.31.215.149' identified by 'dedecms3';
grant all on dedecms3.* to 'dedecms3'@'172.31.215.150' identified by 'dedecms3';
grant all on zrlog3.* to 'zrlog3'@'172.31.215.148' identified by 'zrlog3';
grant all on zrlog3.* to 'zrlog3'@'172.31.215.149' identified by 'zrlog3';
grant all on zrlog3.* to 'zrlog3'@'172.31.215.150' identified by 'zrlog3';
环境测试
- 以两个php网站为例,zrlog使用java还不懂相关测试方法;
- 是否实现了三个web服务器的负载均衡
创建了一个test页面用于显示当前的web服务器IP,负载均衡使用轮询方式
bbs站点discuz
TanydeMacBook-Air:~ tanytan$ curl -x47.105.218.25:80 bbs.yuankeedu.com/test.php
Host: bbs.yuankeedu.com
Remote Address: 172.31.215.159
X-Forwarded-For: 219.137.190.111
X-Forwarded-Proto:
Server Address: 172.31.215.150
Server Port: 80

TanydeMacBook-Air:~ tanytan$ curl -x47.105.218.25:80 bbs.yuankeedu.com/test.php
Host: bbs.yuankeedu.com
Remote Address: 172.31.215.159
X-Forwarded-For: 219.137.190.111
X-Forwarded-Proto:
Server Address: 172.31.215.148
Server Port: 80

TanydeMacBook-Air:~ tanytan$ curl -x47.105.218.25:80 bbs.yuankeedu.com/test.php
Host: bbs.yuankeedu.com
Remote Address: 172.31.215.159
X-Forwarded-For: 219.137.190.111
X-Forwarded-Proto:
Server Address: 172.31.215.149
Server Port: 80

www站点dedecms
TanydeMacBook-Air:~ tanytan$ curl -x47.105.218.25:80 www.yuankeedu.com/test.php
Host: www.yuankeedu.com
Remote Address: 172.31.215.159
X-Forwarded-For: 219.137.190.111
X-Forwarded-Proto:
Server Address: 172.31.215.150
Server Port: 80

TanydeMacBook-Air:~ tanytan$ curl -x47.105.218.25:80 www.yuankeedu.com/test.php
Host: www.yuankeedu.com
Remote Address: 172.31.215.159
X-Forwarded-For: 219.137.190.111
X-Forwarded-Proto:
Server Address: 172.31.215.148
Server Port: 80

TanydeMacBook-Air:~ tanytan$ curl -x47.105.218.25:80 www.yuankeedu.com/test.php
Host: www.yuankeedu.com
Remote Address: 172.31.215.159
X-Forwarded-For: 219.137.190.111
X-Forwarded-Proto:
Server Address: 172.31.215.149
Server Port: 80
页面显示正常

数据库
主数据库
mysql> show master status;
+---------------+----------+-------------------------+------------------+-------------------+
| File          | Position | Binlog_Do_DB            | Binlog_Ignore_DB | Executed_Gtid_Set |
+---------------+----------+-------------------------+------------------+-------------------+
| master.000009 |    79485 | discuz3,dedecms3,zrlog3 |                  |                   |
+---------------+----------+-------------------------+------------------+-------------------+
1 row in set (0.00 sec)
主数据库是二主的从机
mysql> show slave status \G
*************************** 1. row ***************************
               Slave_IO_State: Waiting for master to send event
                  Master_Host: 172.31.215.154
                  Master_User: repli
                  Master_Port: 3306
                Connect_Retry: 60
              Master_Log_File: second.000012
          Read_Master_Log_Pos: 75038
               Relay_Log_File: ape-test3005-relay-bin.000010
                Relay_Log_Pos: 361
        Relay_Master_Log_File: second.000012
             Slave_IO_Running: Yes
            Slave_SQL_Running: Yes
              Replicate_Do_DB:
          Replicate_Ignore_DB:
           Replicate_Do_Table:
       Replicate_Ignore_Table:
      Replicate_Wild_Do_Table:
  Replicate_Wild_Ignore_Table:
                   Last_Errno: 0
                   Last_Error:
                 Skip_Counter: 0
          Exec_Master_Log_Pos: 75038
              Relay_Log_Space: 738
              Until_Condition: None
               Until_Log_File:
                Until_Log_Pos: 0
           Master_SSL_Allowed: No
           Master_SSL_CA_File:
           Master_SSL_CA_Path:
              Master_SSL_Cert:
            Master_SSL_Cipher:
               Master_SSL_Key:
        Seconds_Behind_Master: 0
Master_SSL_Verify_Server_Cert: No
                Last_IO_Errno: 0
                Last_IO_Error:
               Last_SQL_Errno: 0
               Last_SQL_Error:
  Replicate_Ignore_Server_Ids:
             Master_Server_Id: 101
                  Master_UUID: e825cd46-1675-11ea-9a82-00163e0a0167
             Master_Info_File: /data/mysql/master.info
                    SQL_Delay: 0
          SQL_Remaining_Delay: NULL
      Slave_SQL_Running_State: Slave has read all relay log; waiting for more updates
           Master_Retry_Count: 86400
                  Master_Bind:
      Last_IO_Error_Timestamp:
     Last_SQL_Error_Timestamp:
               Master_SSL_Crl:
           Master_SSL_Crlpath:
           Retrieved_Gtid_Set:
            Executed_Gtid_Set:
                Auto_Position: 0
         Replicate_Rewrite_DB:
                 Channel_Name:
           Master_TLS_Version:
1 row in set (0.00 sec)
二主是一主的主机
mysql> show master status;
+---------------+----------+-------------------------+------------------+-------------------+
| File          | Position | Binlog_Do_DB            | Binlog_Ignore_DB | Executed_Gtid_Set |
+---------------+----------+-------------------------+------------------+-------------------+
| second.000012 |    75038 | discuz3,dedecms3,zrlog3 |                  |                   |
+---------------+----------+-------------------------+------------------+-------------------+
1 row in set (0.00 sec)

二主是一主的从机

mysql> show slave status \G
*************************** 1. row ***************************
               Slave_IO_State: Waiting for master to send event
                  Master_Host: 172.31.215.153
                  Master_User: repli
                  Master_Port: 3306
                Connect_Retry: 60
              Master_Log_File: master.000009
          Read_Master_Log_Pos: 79485
               Relay_Log_File: ape-test3010-relay-bin.000012
                Relay_Log_Pos: 79692
        Relay_Master_Log_File: master.000009
             Slave_IO_Running: Yes
            Slave_SQL_Running: Yes
              Replicate_Do_DB:
          Replicate_Ignore_DB:
           Replicate_Do_Table:
       Replicate_Ignore_Table:
      Replicate_Wild_Do_Table:
  Replicate_Wild_Ignore_Table:
                   Last_Errno: 0
                   Last_Error:
                 Skip_Counter: 0
          Exec_Master_Log_Pos: 79485
              Relay_Log_Space: 80069
              Until_Condition: None
               Until_Log_File:
                Until_Log_Pos: 0
           Master_SSL_Allowed: No
           Master_SSL_CA_File:
           Master_SSL_CA_Path:
              Master_SSL_Cert:
            Master_SSL_Cipher:
               Master_SSL_Key:
        Seconds_Behind_Master: 0
Master_SSL_Verify_Server_Cert: No
                Last_IO_Errno: 0
                Last_IO_Error:
               Last_SQL_Errno: 0
               Last_SQL_Error:
  Replicate_Ignore_Server_Ids:
             Master_Server_Id: 100
                  Master_UUID: 19142ad4-1510-11ea-b1b6-00163e042516
             Master_Info_File: /data/mysql/master.info
                    SQL_Delay: 0
          SQL_Remaining_Delay: NULL
      Slave_SQL_Running_State: Slave has read all relay log; waiting for more updates
           Master_Retry_Count: 86400
                  Master_Bind:
      Last_IO_Error_Timestamp:
     Last_SQL_Error_Timestamp:
               Master_SSL_Crl:
           Master_SSL_Crlpath:
           Retrieved_Gtid_Set:
            Executed_Gtid_Set:
                Auto_Position: 0
         Replicate_Rewrite_DB:
                 Channel_Name:
           Master_TLS_Version:
1 row in set (0.00 sec)

二主是从机的主机
mysql> show slave status \G
*************************** 1. row ***************************
               Slave_IO_State: Waiting for master to send event
                  Master_Host: 172.31.215.154
                  Master_User: repli
                  Master_Port: 3306
                Connect_Retry: 60
              Master_Log_File: second.000012
          Read_Master_Log_Pos: 75038
               Relay_Log_File: slaver.000007
                Relay_Log_Pos: 75245
        Relay_Master_Log_File: second.000012
             Slave_IO_Running: Yes
            Slave_SQL_Running: Yes
              Replicate_Do_DB:
          Replicate_Ignore_DB:
           Replicate_Do_Table:
       Replicate_Ignore_Table:
      Replicate_Wild_Do_Table:
  Replicate_Wild_Ignore_Table:
                   Last_Errno: 0
                   Last_Error:
                 Skip_Counter: 0
          Exec_Master_Log_Pos: 75038
              Relay_Log_Space: 75606
              Until_Condition: None
               Until_Log_File:
                Until_Log_Pos: 0
           Master_SSL_Allowed: No
           Master_SSL_CA_File:
           Master_SSL_CA_Path:
              Master_SSL_Cert:
            Master_SSL_Cipher:
               Master_SSL_Key:
        Seconds_Behind_Master: 0
Master_SSL_Verify_Server_Cert: No
                Last_IO_Errno: 0
                Last_IO_Error:
               Last_SQL_Errno: 0
               Last_SQL_Error:
  Replicate_Ignore_Server_Ids:
             Master_Server_Id: 101
                  Master_UUID: e825cd46-1675-11ea-9a82-00163e0a0167
             Master_Info_File: /data/mysql/master.info
                    SQL_Delay: 0
          SQL_Remaining_Delay: NULL
      Slave_SQL_Running_State: Slave has read all relay log; waiting for more updates
           Master_Retry_Count: 86400
                  Master_Bind:
      Last_IO_Error_Timestamp:
     Last_SQL_Error_Timestamp:
               Master_SSL_Crl:
           Master_SSL_Crlpath:
           Retrieved_Gtid_Set:
            Executed_Gtid_Set:
                Auto_Position: 0
         Replicate_Rewrite_DB:
                 Channel_Name:
           Master_TLS_Version:
1 row in set (0.00 sec)
数据库同步测试
在主机上创建库;
mysql> use discuz3;
mysql> create table zz(id int,name varchar(20));

mysql> show tables;
三个库都显示如下库,证明写入可以同步到三台数据库上;
zz

使用单独mycat机器测试读写分离
discuz3逻辑库对应于三台数据库的discuz3库;

从机数据库删除刚刚创建的库;
mysql> drop table zz;
登陆mycat;
mysql -uroot -ppassword -h127.0.0.1 -P8066
mysql> show tables;
结果依家出现有zz表,没有zz表两种结果,因为二主跟从机只支持读,而从机已经删掉了zz表;

从机再新建zz表;必须要新建库,之后的删除命令不成功的话,会造成同步失败;
mysql> create table zz(id int,name varchar(20));

在mycat里删除zz表;
mysql> drop table zz;
三台数据库单独再查看tables,table zz都没有了,证明写同步了;
mysql> show tables;


使用atlas测试读写分离,方法一样,以下是启动命令
 /usr/local/mysql-proxy/bin/mysql-proxyd test start
 mysql -uatlas -patlas -h127.0.0.1 -P3306
 默认的工作端口1234改成了3306
 atlas帐号可以连接到三台数据库的库中;
- mycat管理界面看后台情况


- Atlas配置文件记录
[mysql-proxy]
admin-username = user
admin-password = pwd
proxy-backend-addresses = 172.31.215.153:3306
proxy-read-only-backend-addresses = 172.31.215.154:3306@1, 172.31.215.155:3306@1
pwds = atlas:KsWNCR6qyNk=, test:A1YaJzZgEjM=
daemon = true
keepalive = true
event-threads = 8
log-level = message
log-path = /usr/local/mysql-proxy/log
proxy-address = 0.0.0.0:3306
admin-address = 0.0.0.0:2345
- mycat 配置文件记录
vim /usr/local/mycat/conf/server.xml
...上面略
 <user name="root">
                <property name="password">password</property>
                <property name="schemas">discuz3,dedecms3,zrlog3</property>
        </user>
        <user name="discuz3">
                <property name="password">discuz3</property>
                <property name="schemas">discuz3</property>
        </user>
        <user name="dedecms3">
                <property name="password">dedecms3</property>
                <property name="schemas">dedecms3</property>
        </user>
        <user name="zrlog3">
                <property name="password">zrlog3</property>
                <property name="schemas">zrlog3</property>
        </user>
        <user name="user">
                <property name="password">user</property>
                <property name="schemas">discuz3,dedecms3,zrlog3</property>
                <property name="readOnly">true</property>
        </user>

</mycat:server>

cat /usr/local/mycat/conf/schema.xml

<?xml version="1.0"?>
<!DOCTYPE mycat:schema SYSTEM "schema.dtd">
<mycat:schema xmlns:mycat="http://io.mycat/">
        <schema name="discuz3" checkSQLschema="false" sqlMaxLimit="1000" dataNode="dn1" />
        <schema name="dedecms3" checkSQLschema="false" sqlMaxLimit="1000" dataNode="dn2" />
        <schema name="zrlog3" checkSQLschema="false" sqlMaxLimit="1000" dataNode="dn3" />

        <dataNode name="dn1" dataHost="localhost1" database="discuz3" />
        <dataNode name="dn2" dataHost="localhost1" database="dedecms3" />
        <dataNode name="dn3" dataHost="localhost1" database="zrlog3" />
        <dataHost name="localhost1" maxCon="2000" minCon="1" balance="3"
                          writeType="1" dbType="mysql" dbDriver="native" switchType="-1"  slaveThreshold="100">
            <heartbeat>select user()</heartbeat>

            <writeHost host="hostM1" url="172.31.215.153:3306" user="root" password="password">
                  <!-- can have multi read hosts -->
                  <readHost host="hostS1" url="172.31.215.154:3306" user="root" password="password" />
                  <readHost host="hostS2" url="172.31.215.155:3306" user="root" password="password" />
            </writeHost>
        </dataHost>
</mycat:schema>
静态文件共享
- 安装nfs-util
- 创建目录,修改权限
- 修改配置文件
- 创建nfs用户
- 直接查看配置文件
[root@ape-test3007 ~]# cat /etc/exports
/data/discuz 172.31.215.0/24(rw,sync,root_squash,anonuid=1000,anongid=1000)
/data/dedecms 172.31.215.0/24(rw,sync,root_squash,anonuid=1000,anongid=1000)
/data/zrlog 172.31.215.0/24(rw,sync,root_squash,anonuid=1000,anongid=1000)

[root@ape-test3007 ~]# ls -ld /data/*
drwxrwxrwx  8 root root 4096 12月  8 10:58 /data/dedecms
drwxrwxrwx 11 root root 4096 12月  8 10:56 /data/discuz
drwxrwxrwx  2 root root 4096 12月  7 23:26 /data/zrlog

[root@ape-test3007 ~]# ll /data/discuz/
总用量 40
drwxr-xr-x 2 nfs  nfs  4096 12月  7 20:22 album
drwxr-xr-x 2 nfs  nfs  4096 12月  7 20:21 category
drwxr-xr-x 2 nfs  nfs  4096 12月  7 20:21 common
drwxr-xr-x 2 nfs  nfs  4096 12月  7 20:22 forum
drwxr-xr-x 2 nfs  nfs  4096 12月  7 20:22 group
drwxr-xr-x 2 nfs  nfs  4096 12月  7 20:21 portal
drwxr-xr-x 2 nfs  nfs  4096 12月  7 20:21 profile
drwxr-xr-x 2 nfs  nfs  4096 12月  7 20:21 swfupload
drwxr-xr-x 2 nfs  nfs  4096 12月  7 20:21 temp
-rw-r--r-- 1 root root   88 12月  8 10:56 user_pw
- 三台web服务器需要安装nfs-util,使用静态文件的目录挂载nfs的共享目录,以让静态文件都通过nfs同步到三台服务器
- 其中一个台web服务器的自动挂载配置
zrlog的目录要新建,没有上传文件之前并不存在;
discuz要备份目录结构再挂载,挂载后把备份内容放回到nfs服务器里;
[root@ape-test3001 ~]# cat !$
cat /etc/fstab

#
# /etc/fstab
# Created by anaconda on Tue Oct  8 09:13:42 2019
#
# Accessible filesystems, by reference, are maintained under '/dev/disk'
# See man pages fstab(5), findfs(8), mount(8) and/or blkid(8) for more info
#
UUID=87ba1103-a0d7-49ef-a8ae-6ce1d3fd2453 /                       ext4    defaults        1 1
172.31.215.156:/data/discuz /data/wwwroot/bbs.yuankeedu.com/data/attachment nfs  defaults 0  0
172.31.215.156:/data/dedecms /data/wwwroot/www.yuankeedu.com/uploads   nfs  defaults 0 0
172.31.215.156:/data/zrlog /usr/local/tomcat/webapps/ROOT/attached   nfs   defaults 0   0

手动umount一个挂载后
mount -a会把配置文件里的设置都挂载上
只使用普通用户ssh登陆,再授权su -
- 以一台机器为例 用户名tanytan
在公网机和内网机上分别创建用户tanytan
这是带公网的机器,所有登陆必须通过这台机器,公网机器跟内网机器都需要新增普通用户;

[root@ape-test3000 ~]# useradd tanytan
[root@ape-test3000 ~]# passwd tanytan
更改用户 tanytan 的密码 。
新的 密码:
无效的密码: 密码未通过字典检查 - 它基于字典单词
重新输入新的 密码:
passwd:所有的身份验证令牌已经成功更新。

[root@ape-test3008 ~]# useradd tanytan
[root@ape-test3008 ~]# passwd tanytan
更改用户 tanytan 的密码 。
新的 密码:
无效的密码: 密码未通过字典检查 - 它基于字典单词
重新输入新的 密码:
passwd:所有的身份验证令牌已经成功更新。

把使用机器的密钥先上传到公网机器上

TanydeMacBook-Air:~ tanytan$ ssh-copy-id 47.105.218.25
/usr/bin/ssh-copy-id: INFO: Source of key(s) to be installed: "/Users/tanytan/.ssh/id_rsa.pub"
/usr/bin/ssh-copy-id: INFO: attempting to log in with the new key(s), to filter out any that are already installed
/usr/bin/ssh-copy-id: INFO: 1 key(s) remain to be installed -- if you are prompted now it is to install the new keys
tanytan@47.105.218.25's password:
Permission denied, please try again.
[email protected]'s password:

Number of key(s) added:        1

Now try logging into the machine, with:   "ssh '47.105.218.25'"
and check to make sure that only the key(s) you wanted were added.

即可免密登陆公网机器

TanydeMacBook-Air:~ tanytan$ ssh 47.105.218.25
Last failed login: Sun Dec  8 12:31:53 CST 2019 from 219.137.190.111 on ssh:notty
There was 1 failed login attempt since the last successful login.

Welcome to Alibaba Cloud Elastic Compute Service !

[tanytan@ape-test3000 ~]$

在公网机上为当前用户新增密钥

[tanytan@ape-test3000 ~]$ ssh-keygen
Generating public/private rsa key pair.
Enter file in which to save the key (/home/tanytan/.ssh/id_rsa):
Enter passphrase (empty for no passphrase):
Enter same passphrase again:
Your identification has been saved in /home/tanytan/.ssh/id_rsa.
Your public key has been saved in /home/tanytan/.ssh/id_rsa.pub.
The key fingerprint is:
SHA256:qZRnvYPe0ki14KTekZjv2CpGIKQkmhOkfCWsYEs3kW4 tanytan@ape-test3000
The key's randomart image is:
+---[RSA 2048]----+
|...oo.           |
|*= =o            |
|@+=..            |
|*ooE   .oo.      |
| o..  o*S+..     |
|    ..++=...     |
|   . ..+.+o      |
|    o .+=...     |
|   . .oo+..      |
+----[SHA256]-----+

把密钥文件上传到要访问的内网机器上(已建立对应普通用户名)
[tanytan@ape-test3000 ~]$ ssh-copy-id 172.31.215.147
/usr/bin/ssh-copy-id: INFO: Source of key(s) to be installed: "/home/tanytan/.ssh/id_rsa.pub"
The authenticity of host '172.31.215.147 (172.31.215.147)' can't be established.
ECDSA key fingerprint is SHA256:DsbelDqGedZIZ5DsKFpynnbUF3GiDiysNz/FBtbAQ68.
ECDSA key fingerprint is MD5:e2:55:a9:8a:cb:e2:59:79:26:6a:75:27:d5:23:11:78.
Are you sure you want to continue connecting (yes/no)? yes
/usr/bin/ssh-copy-id: INFO: attempting to log in with the new key(s), to filter out any that are already installed
/usr/bin/ssh-copy-id: INFO: 1 key(s) remain to be installed -- if you are prompted now it is to install the new keys
tanytan@172.31.215.147's password:

Number of key(s) added: 1

Now try logging into the machine, with:   "ssh '172.31.215.147'"
and check to make sure that only the key(s) you wanted were added.

即可免密登陆到内网机器上
[tanytan@ape-test3000 ~]$ ssh 172.31.215.147

Welcome to Alibaba Cloud Elastic Compute Service !
[tanytan@ape-test3008 ~]$

设置此普通用户的sudo权限

[root@ape-test3008 ~]# visudo
增加一句;
root    ALL=(ALL)       ALL
tanytan ALL=(ALL)       NOPASSWD: /usr/bin/su
[root@ape-test3008 ~]# su tanytan
[tanytan@ape-test3008 root]$ sudo su
可以无密码转到root帐号下;
[root@ape-test3008 ~]#

设置只能密钥登陆和root用户不能ssh登陆

vi /etc/ssh/sshd_config
设置以下两个选项
PasswordAuthentication no
PermitRootLogin no   #root不能使用密钥和密码登陆;

[root@ape-test3000 ~]# ssh 172.31.215.147
使用root密钥不能登陆
Permission denied (publickey,gssapi-keyex,gssapi-with-mic).

[tanytan@ape-test3000 .ssh]$ mv id_rsa id_rsa.bak
没有私钥后,不能登陆机器;
[tanytan@ape-test3000 .ssh]$ ssh 172.31.215.147
Permission denied (publickey,gssapi-keyex,gssapi-with-mic).

修改PasswordAuthentication yes后,可以使用密码登陆;
命令记录
vi /etc/profile #在最后加入以下内容;
- 由于加入到/etc/profile等于以root权限运行下面句子,普通用户加载这个句子是不能成功运行的,所以只是记录了以root权限使用机器的命令;
if [ ! -d  /usr/local/domob/records/${LOGNAME} ]

then

mkdir -p /usr/local/domob/records/${LOGNAME}

chmod 300 /usr/local/domob/records/${LOGNAME}

fi

export HISTORY_FILE="/usr/local/domob/records/${LOGNAME}/bash_history"

export PROMPT_COMMAND='{ date "+%Y-%m-%d %T ##### $(who am i |awk "{print \$1\" \"\$2\" \"\$5}") #### $(history 1 | { read x cmd; echo "$cmd"; })"; } >>$HISTORY_FILE'


source /etc/profile
web nginx日志切割
/var/log/nginx/*.log /data/logs/bbs.access.log /data/logs/www.access.log  {
        daily
        dateext
        missingok
        rotate 30
        compress
        delaycompress
        notifempty
        create 640 nginx adm
        sharedscripts
        postrotate
                if [ -f /var/run/nginx.pid ]; then
                        kill -USR1 `cat /var/run/nginx.pid`
                fi
        endscript
}

/usr/local/tomcat/logs/catalina.out {
 copytruncate  #创建复制文件,然后清空原文件;
 daily
 dateext
 nocompress
 missingok
}
php慢查询日志
[root@ape-test3001 ~]# vim /usr/local/php-fpm/etc/php-fpm.d/www.conf
修改相应句子;
slowlog = /tmp/php.slow
request_slowlog_timeout = 2

[root@ape-test3001 ~]# vim /tmp/php.slow
使用sleep()语句测试时,记录的结果;

[04-Dec-2019 14:50:05]  [pool www] pid 21852
script_filename = /data/wwwroot/bbs.yuankeedu.com/test.php
[0x00007f343641f220] sleep() /data/wwwroot/bbs.yuankeedu.com/test.php:9

[04-Dec-2019 14:50:17]  [pool www] pid 21853
script_filename = /data/wwwroot/bbs.yuankeedu.com/test.php
[0x00007f343641f220] sleep() /data/wwwroot/bbs.yuankeedu.com/test.php:9


logrotate配置:
/tmp/php.slow {
daily
dateext
missingok
rotate 30
create 640 php-fpm php-fpm
sharedscripts
postrotate
  if [ -f /usr/local/php-fpm/var/run/php-fpm.pid ]; then
  kill -USR1 `cat /usr/local/php-fpm/var/run/php-fpm.pid`   #发送重新加载的信号;
  fi
endscript
}
nginx站点访问日志
- 日志设置在前面有具体样板
- 日志记录情况如下:
172.31.215.159 - user1 [08/Dec/2019:11:49:51 +0800] "GET /uc_server/avatar.php?uid=1&size=small&ts=1 HTTP/1.0" 302 0 "http://bbs.yuankeedu.com/" "Mozilla/5.0 (Macintosh; Intel Mac OS X 10_14_6) AppleWebKit/605.1.15 (KHTML, like Gecko) Version/12.1.2 Safari/605.1.15" "219.137.190.111"
172.31.215.159 - user1 [08/Dec/2019:11:49:51 +0800] "GET /home.php?mod=spacecp&ac=pm&op=checknewpm&rand=1575776990 HTTP/1.0" 200 0 "http://bbs.yuankeedu.com/" "Mozilla/5.0 (Macintosh; Intel Mac OS X 10_14_6) AppleWebKit/605.1.15 (KHTML, like Gecko) Version/12.1.2 Safari/605.1.15" "219.137.190.111"
三个站点后台的二次认证
- 站点登陆后台成功后的地址为
http://bbs.yuankeedu.com/admin.php?
http://www.yuankeedu.com/dede/index.php
-
以这个链接做二次认证,具体如上面所示
-
二次认证可能记住了访问地址,成功登陆过以后就不再显示认证窗口
-
认证密码文件也共享在nfs服务器上
-
zrlog密码认证暂时忽略
-
测试例子
TanydeMacBook-Air:~ tanytan$ curl -x47.105.218.25:80 www.yuankeedu.com/dede/ -I
HTTP/1.1 401 Unauthorized
Server: nginx/1.16.1
Date: Sun, 08 Dec 2019 13:16:08 GMT
Content-Type: text/html
Content-Length: 179
Connection: keep-alive
WWW-Authenticate: Basic realm="User Authentication"

TanydeMacBook-Air:~ tanytan$ curl -x47.105.218.25:80 www.yuankeedu.com/dede/ -uuser1:password -I
HTTP/1.1 302 Found
Server: nginx/1.16.1
Date: Sun, 08 Dec 2019 13:16:29 GMT
Content-Type: text/html; charset=utf-8
Connection: keep-alive
X-Powered-By: PHP/7.3.0
Set-Cookie: PHPSESSID=ebego126eg6a3vkcmspumh72ij; path=/
Expires: Thu, 19 Nov 1981 08:52:00 GMT
Pragma: no-cache
Cache-Control: private
Set-Cookie: _csrf_name_bda4f76f=ca5858325e89e4e48fbe19dd7f5318bd; expires=Sun, 08-Dec-2019 15:16:29 GMT; Max-Age=7200; path=/
Set-Cookie: _csrf_name_bda4f76f__ckMd5=dd1a785e4e07e248; expires=Sun, 08-Dec-2019 15:16:29 GMT; Max-Age=7200; path=/
location: login.php?gotopage=%2Fdede%2F
数据库备份方案
- 每天备份二主数据库,在任务计划里执行脚本,本地保存7天的备份
- 把备份文件同步一份到备份服务器,服务器保留一个月
- 每天把前天的文件压缩
- 每天把七天前的文件删除
二主数据库和备份服务器都要有一个普通的备份帐号
此帐号在二主数据库上需要实现无密码登陆备份服务器

生成本地备份目录
mkdir -p /data/backup
chown -R tanytan /data/backup

备份服务器目录
mkdir -p /data/backup
chown -R tanytan /data/backup

二主数据库,授权备份用户
grant all on discuz3.* to 'dumper'@'localhost' identified by 'password';
grant all on dedecms3.* to 'dumper'@'localhost' identified by 'password';
grant all on zrlog3.* to 'dumper'@'localhost' identified by 'password';

#! /bin/bash
#daily backup part
dump=/usr/local/mysql/bin/mysqldump
user=dumper
pw=password
tip=172.31.215.157
la=`date +%Y-%m-%d`
sdate=`date +%d`
dir=/data/backup

#local backup
for db in discuz3 dedecms3 zrlog3;      #使用了for 语句,确实简单很多;
   do
        $dump -u$user -p$pw $db > $dir/"$db"_$la.sql
        sleep 2
        rsync -av $dir/"$db"_$la.sql $tip:$dir/"$db"_$sdate.sql   #rsync同步同时修改名字可以让远端保留30天的文件;
   done

#compress
zdate=`date -d "-2day" +%Y-%m-%d`    #使用时间区分要压缩的文件;
gzip /data/backup/*$zdate.sql     #gzip可以将每个文件单独压缩;
#del
ddate=`date -d "-7day" +%Y-%m-%d`    #使用时间区分要删除的文件;
if [ ! -d "/data/backup/del" ]
        then
	   mkdir /data/backup/del
fi
mv $dir/*$ddate* $dir/del/      #先移动到目录,后删除,更安全;
rm -rf $dir/del/*

任务计划
使用tanytan帐号建立如下计划任务(命令最好不要加用户名)
crontab -e
# *  *  *  *  * user-name  command to be executed
01 03 * * *  /usr/bin/bash /home/tanytan/sqlbackup.sh

脚本权限
[tanytan@ape-test3010 ~]$ ll /home/tanytan/
total 8
-rwxr-xr-x 1 tanytan root    907 Dec  8 15:27 sqlbackup.sh
静态文件备份
- 架构里静态文件保存在nfs服务器上,需要多一份备份放置在备份服务器里
- 也是用到rsync命令同步
- 需要普通用户备份,另外使用密钥认证
- 这个部分可参考上一个部分,并无新的内容
- 备份周期与数据库同步
数据恢复文档
-
nfs服务器下线,不能上线,即可使用备份服务器变成nfs服务器
备份服务器要做好nfs的配置
修改三台web服务器的挂载点
如果nfs与备份服务器使用keepalived实现高可用,即可马上恢复
nfs恢复后,需手动同步最新数据,然后可将nfs上线; -
如果主数据库下线,不能上线,由于是双主结构,数据基本是同步的,可以手动切换到二主数据库上,或使用keepalived自动切换;
如想数据更同步,应考虑使用半同步模式,主机收到的命令返回成功前,会写上relay log,所以主与二主不同步将极少发生;
主数据库可上线后,待与二主数据同步后,可将主数据库重新上线;
zabbix监控
- zabbix内网机器安装要顺利需要把所有依赖包都下载下来,再一次过安装;
 Package                 架构       版本                    源                                            大小
===============================================================================================================
正在安装:
 zabbix-agent            x86_64     4.0.15-1.el7            /zabbix-agent-4.0.15-1.el7.x86_64            1.6 M
 zabbix-get              x86_64     4.0.15-1.el7            /zabbix-get-4.0.15-1.el7.x86_64              1.2 M
 zabbix-server-mysql     x86_64     4.0.15-1.el7            /zabbix-server-mysql-4.0.15-1.el7.x86_64     5.0 M
 zabbix-web              noarch     4.0.15-1.el7            /zabbix-web-4.0.15-1.el7.noarch               16 M
 zabbix-web-mysql        noarch     4.0.15-1.el7            /zabbix-web-mysql-4.0.15-1.el7.noarch        0.0
为依赖而安装:
 OpenIPMI                x86_64     2.0.27-1.el7            base                                         243 k
 OpenIPMI-libs           x86_64     2.0.27-1.el7            base                                         523 k
 OpenIPMI-modalias       x86_64     2.0.27-1.el7            base                                          16 k
 OpenIPMI-perl           x86_64     2.0.27-1.el7            base                                         167 k
 apr                     x86_64     1.4.8-5.el7             base                                         103 k
 apr-util                x86_64     1.5.2-6.el7             base                                          92 k
 fping                   x86_64     3.10-4.el7              epel                                          46 k
 gnutls                  x86_64     3.3.29-9.el7_6          base                                         680 k
 httpd                   x86_64     2.4.6-90.el7.centos     base                                         2.7 M
 httpd-tools             x86_64     2.4.6-90.el7.centos     base                                          91 k
 iksemel                 x86_64     1.4-2.el7.centos        zabbix-non-supported                          49 k
 libevent                x86_64     2.0.21-4.el7            base                                         214 k
 libtool-ltdl            x86_64     2.4.2-22.el7_3          base                                          49 k
 libzip                  x86_64     0.10.1-8.el7            base                                          48 k
 mailcap                 noarch     2.1.41-2.el7            base                                          31 k
 net-snmp-libs           x86_64     1:5.7.2-43.el7          base                                         750 k
 nettle                  x86_64     2.7.1-8.el7             base                                         327 k
 php                     x86_64     5.4.16-46.1.el7_7       updates                                      1.4 M
 php-bcmath              x86_64     5.4.16-46.1.el7_7       updates                                       58 k
 php-cli                 x86_64     5.4.16-46.1.el7_7       updates                                      2.7 M
 php-common              x86_64     5.4.16-46.1.el7_7       updates                                      565 k
 php-gd                  x86_64     5.4.16-46.1.el7_7       updates                                      128 k
 php-ldap                x86_64     5.4.16-46.1.el7_7       updates                                       53 k
 php-mbstring            x86_64     5.4.16-46.1.el7_7       updates                                      505 k
 php-mysql               x86_64     5.4.16-46.1.el7_7       updates                                      101 k
 php-pdo                 x86_64     5.4.16-46.1.el7_7       updates                                       99 k
 php-xml                 x86_64     5.4.16-46.1.el7_7       updates                                      126 k
 t1lib                   x86_64     5.1.2-14.el7            base                                         166 k
 trousers                x86_64     0.3.14-2.el7            base                                         289 k
 unixODBC                x86_64     2.3.1-14.el7            base                                         413 k

事务概要
===============================================================================================================
安装  5 软件包 (+30 依赖软件包)
yum localinstall OpenIPMI-2.0.27-1.el7.x86_64.rpm OpenIPMI-libs-2.0.27-1.el7.x86_64.rpm OpenIPMI-modalias-2.0.27-1.el7.x86_64.rpm OpenIPMI-perl-2.0.27-1.el7.x86_64.rpm apr-1.4.8-5.el7.x86_64.rpm apr-util-1.5.2-6.el7.x86_64.rpm fping-3.10-4.el7.x86_64.rpm gnutls-3.3.29-9.el7_6.x86_64.rpm httpd-2.4.6-90.el7.centos.x86_64.rpm httpd-tools-2.4.6-90.el7.centos.x86_64.rpm iksemel-1.4-2.el7.centos.x86_64.rpm libevent-2.0.21-4.el7.x86_64.rpm libtool-ltdl-2.4.2-22.el7_3.x86_64.rpm libzip-0.10.1-8.el7.x86_64.rpm mailcap-2.1.41-2.el7.noarch.rpm net-snmp-libs-5.7.2-43.el7.x86_64.rpm nettle-2.7.1-8.el7.x86_64.rpm php-7.3.0.tar.bz2 php-bcmath-5.4.16-46.1.el7_7.x86_64.rpm php-cli-5.4.16-46.1.el7_7.x86_64.rpm php-common-5.4.16-46.1.el7_7.x86_64.rpm php-gd-5.4.16-46.1.el7_7.x86_64.rpm php-ldap-5.4.16-46.1.el7_7.x86_64.rpm php-mbstring-5.4.16-46.1.el7_7.x86_64.rpm php-mysql-5.4.16-46.1.el7_7.x86_64.rpm php-pdo-5.4.16-46.1.el7_7.x86_64.rpm php-xml-5.4.16-46.1.el7_7.x86_64.rpm t1lib-5.1.2-14.el7.x86_64.rpm trousers-0.3.14-2.el7.x86_64.rpm unixODBC-2.3.1-14.el7.x86_64.rpm zabbix-agent-4.0.15-1.el7.x86_64.rpm zabbix-server-mysql-4.0.15-1.el7.x86_64.rpm zabbix-web-4.0.15-1.el7.noarch.rpm zabbix-web-mysql-4.0.15-1.el7.noarch.rpm zabbix-get-4.0.15-1.el7.x86_64.rpm
监控tomcat, 安装zabbix-java-gateway,同理把所有包一次过安装;
zabbix-agent可直接yum;
 Package                              架构            版本                              源                大小
===============================================================================================================
正在安装:
 zabbix-java-gateway                  x86_64          4.0.15-1.el7                      zabbix           764 k
为依赖而安装:
 copy-jdk-configs                     noarch          3.3-10.el7_5                      base              21 k
 java-1.8.0-openjdk-headless          x86_64          1:1.8.0.232.b09-0.el7_7           updates           32 M
 javapackages-tools                   noarch          3.4.1-11.el7                      base              73 k
 lksctp-tools                         x86_64          1.0.17-2.el7                      base              88 k
 pcsc-lite-libs                       x86_64          1.8.8-8.el7                       base              34 k
 python-javapackages                  noarch          3.4.1-11.el7                      base              31 k
 python-lxml                          x86_64          3.2.1-4.el7                       base             758 k
 tzdata-java                          noarch          2019c-1.el7                       updates          187 k

事务概要
===============================================================================================================
安装  1 软件包 (+8 依赖软件包)
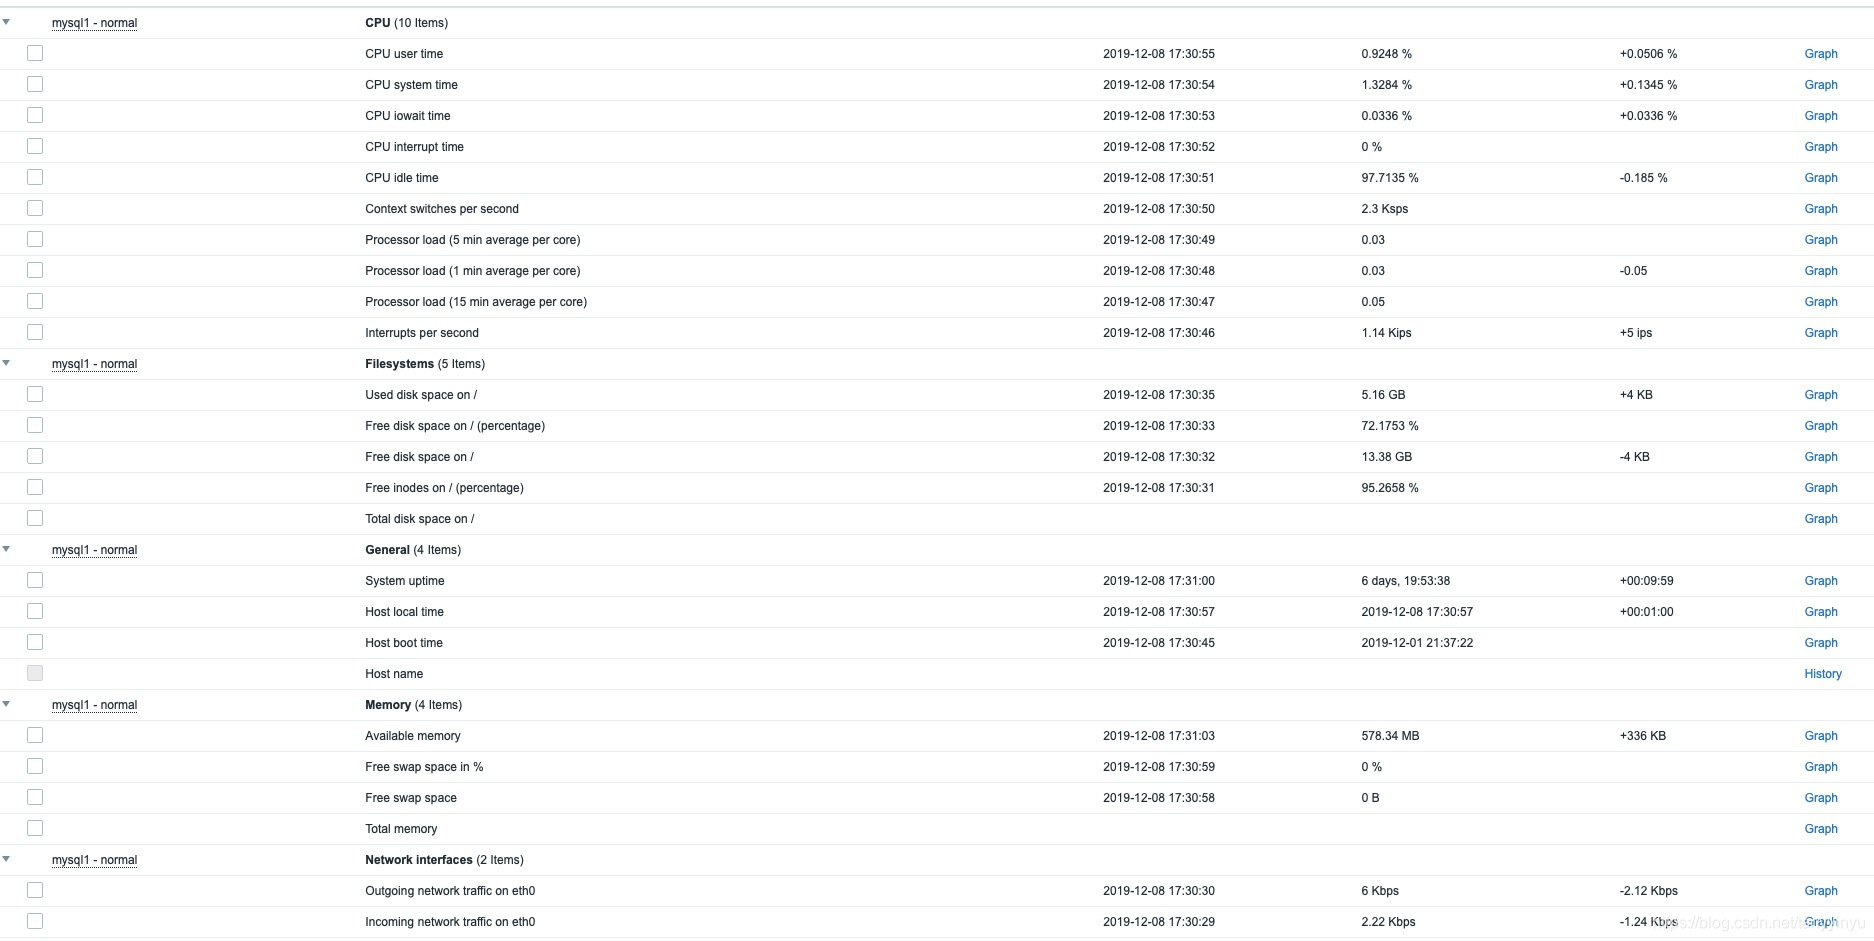
实际监控实现
- 添加了基础监控,自定义linux监控模板;

流量监控
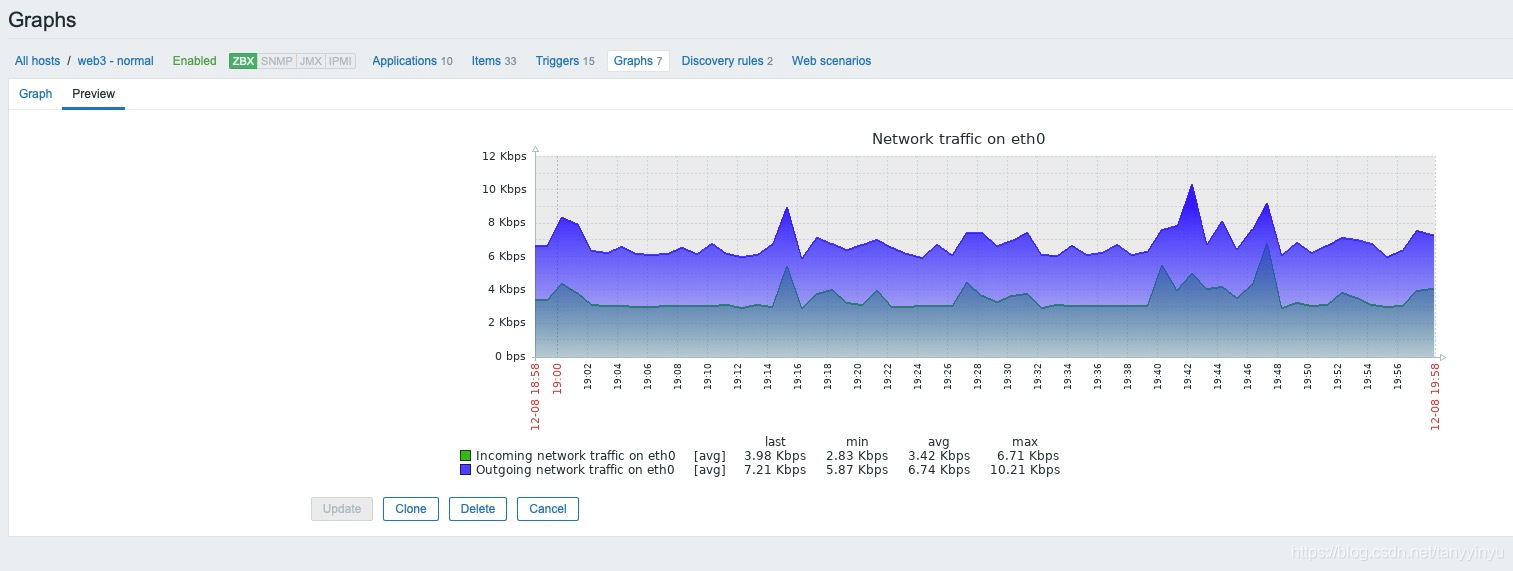
- web服务器两个nginx虚拟主机分别实现监控
虚拟主机配置文件请参考上面;
监控脚本如下:
[root@ape-test3001 ~]# cat /usr/local/sbin/ngx_bbs_status.sh /usr/local/sbin/ngx_www_status.sh
#!/bin/bash
url="bbs.yuankeedu.com/nginx_status" 	#定义两个变量,放便使用;
curl="/usr/bin/curl -x127.0.0.1:80"

# 检测nginx进程是否存在
function bbsping {
    /sbin/pidof nginx | wc -l
}
# 检测nginx性能
function bbsactive {
    $curl $url 2>/dev/null| grep 'Active' | awk '{print $NF}'
}
function bbsreading {
    $curl $url 2>/dev/null| grep 'Reading' | awk '{print $2}'
}
function bbswriting {
    $curl $url 2>/dev/null| grep 'Writing' | awk '{print $4}'
}
function bbswaiting {
    $curl $url 2>/dev/null| grep 'Waiting' | awk '{print $6}'
}
function bbsaccepts {
    $curl $url 2>/dev/null| awk NR==3 | awk '{print $1}'
}
function bbshandled {
    $curl $url 2>/dev/null| awk NR==3 | awk '{print $2}'
}
function bbsrequests {
    $curl $url 2>/dev/null| awk NR==3 | awk '{print $3}'
}
$1

#!/bin/bash
url="bbs.yuankeedu.com/nginx_status" 	#定义两个变量,放便使用;
curl="/usr/bin/curl -x127.0.0.1:80"

# 检测nginx进程是否存在
function wwwping {
    /sbin/pidof nginx | wc -l
}
# 检测nginx性能
function wwwactive {
    $curl $url 2>/dev/null| grep 'Active' | awk '{print $NF}'
}
function wwwreading {
    $curl $url 2>/dev/null| grep 'Reading' | awk '{print $2}'
}
function wwwwriting {
    $curl $url 2>/dev/null| grep 'Writing' | awk '{print $4}'
}
function wwwwaiting {
    $curl $url 2>/dev/null| grep 'Waiting' | awk '{print $6}'
}
function wwwaccepts {
    $curl $url 2>/dev/null| awk NR==3 | awk '{print $1}'
}
function wwwhandled {
    $curl $url 2>/dev/null| awk NR==3 | awk '{print $2}'
}
function wwwrequests {
    $curl $url 2>/dev/null| awk NR==3 | awk '{print $3}'
}
$1

zabbix-agent配置文件增加语句,引用此配置文件
UserParameter=bbs.status[*],/usr/local/sbin/ngx_bbs_status.sh $1
UserParameter=www.status[*],/usr/local/sbin/ngx_www_status.sh $1
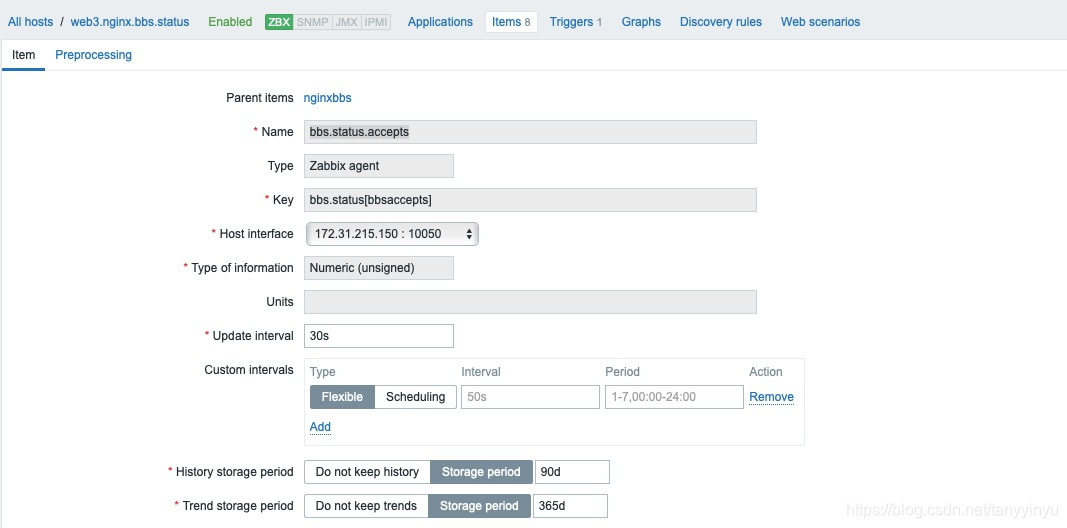
zabbix-web界面添加模板,模板新增item
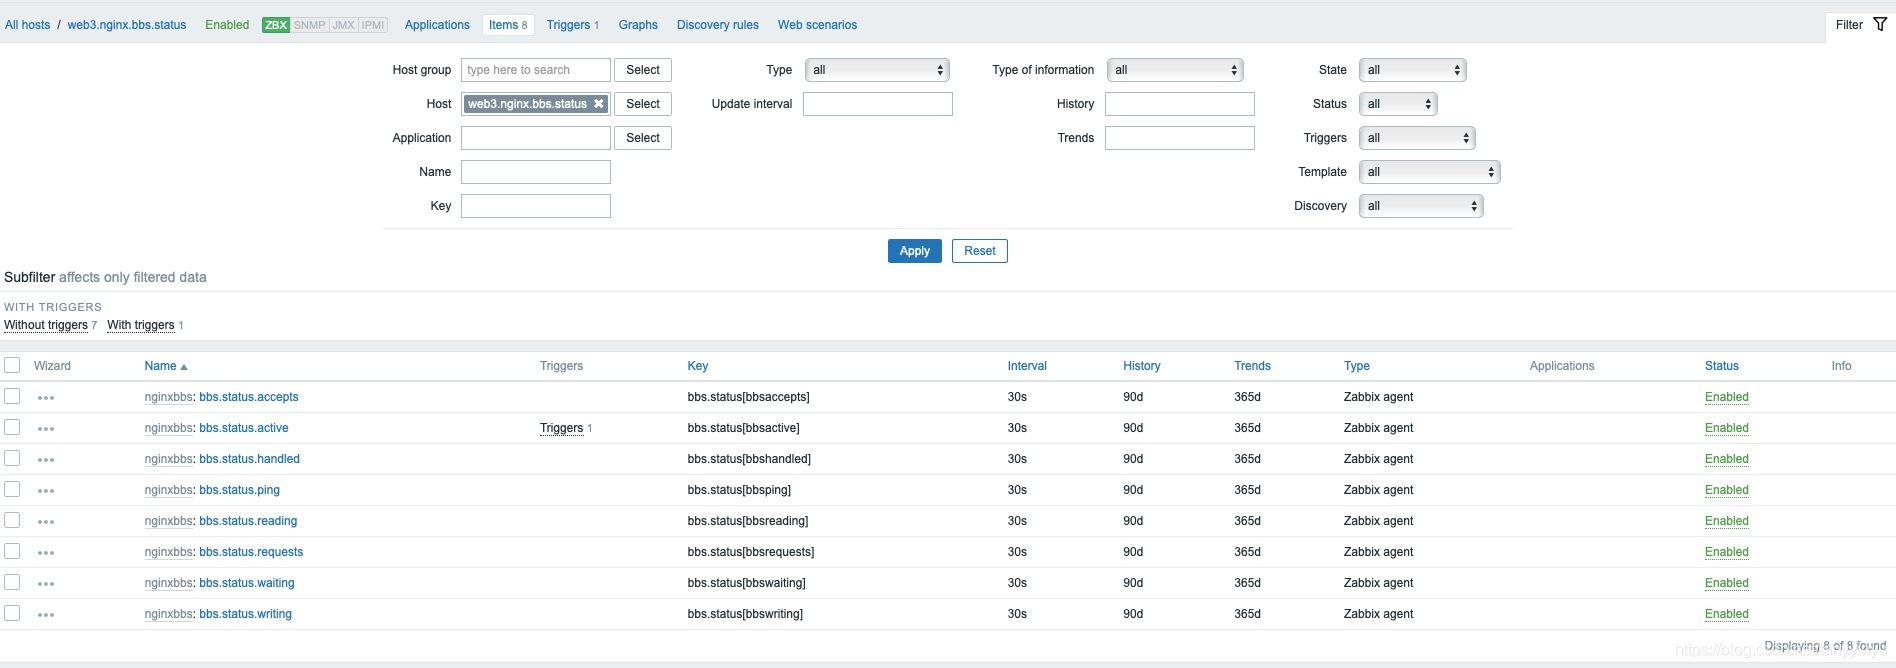
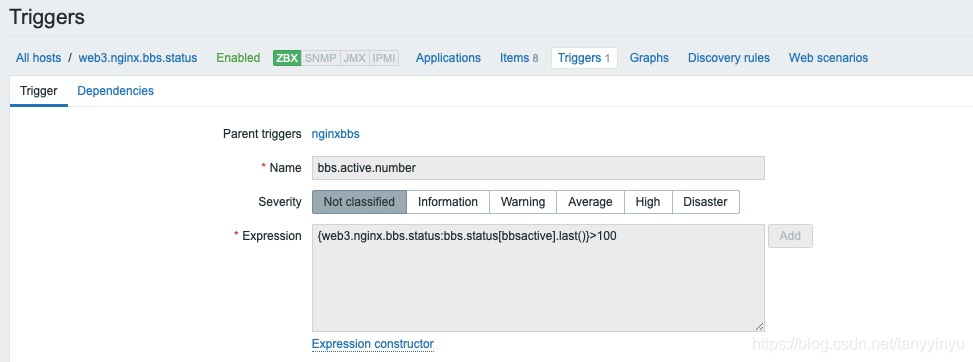
新增trigger - 活动连接数大于100报警
-
mysql常规监控
zabbix-agent自带监控的脚本,需要调整环境变量或做软链接,让需要到的程序能够使用
定义监控数据库的帐户,将认证信息写在文档里;
即可在web界面添加agent和相应模板监控数据库;
-
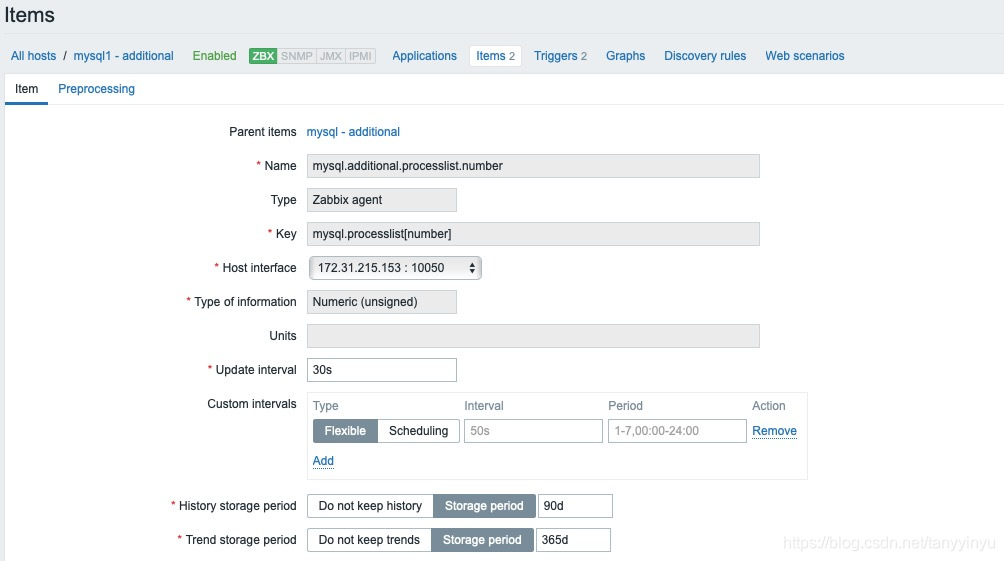
自定义数据库慢查询数量脚本和队列脚本
[root@ape-test3005 ~]# cat /usr/local/sbin/processlist.sh /usr/local/sbin/slowsql.sh
#! /bin/bash
mysql=/usr/local/mysql/bin/mysql
log="-umo -ppassword -h172.31.215.153"
number () {
        $mysql $log -e "show processlist;" 2> /dev/null | wc -l
}
$1

#! /bin/bash
f=`/usr/bin/date +%Y-%m-%d`T`date +%H`
min=`/usr/bin/date -d "1 minutes ago"  +%M`
slow () {
number=`cat /data/mysql/slow.log |grep $f:$min: |wc -l`  #通过日期,字母,小时与分钟,统计前一分钟日志的行数;
echo $number
}
$1

慢查询日志格式
# Time: 2019-12-08T09:42:23.966295Z
# User@Host: root[root] @ localhost []  Id:   867
# Query_time: 3.000198  Lock_time: 0.000000 Rows_sent: 1  Rows_examined: 0
use discuz;
SET timestamp=1575798143;
select sleep (3);
# Time: 2019-12-08T09:42:57.953561Z
# User@Host: root[root] @ localhost []  Id:   873
# Query_time: 3.000204  Lock_time: 0.000000 Rows_sent: 1  Rows_examined: 0
SET timestamp=1575798177;
select sleep (3);

zabbix-agent中引用脚本
UserParameter=mysql.processlist[*],/usr/local/sbin/processlist.sh $1
UserParameter=mysql.1minslow[*],/usr/local/sbin/slowsql.sh $1
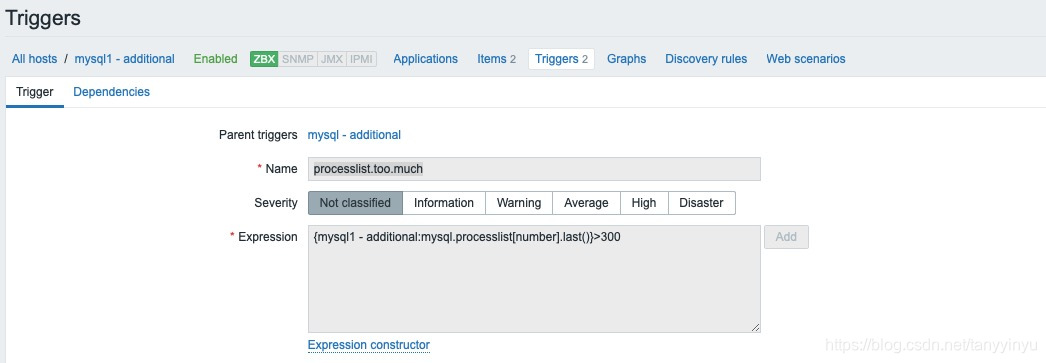
zabbix-web界面调用脚本,监控与报警

慢查询大于60报警

队列大于300报警
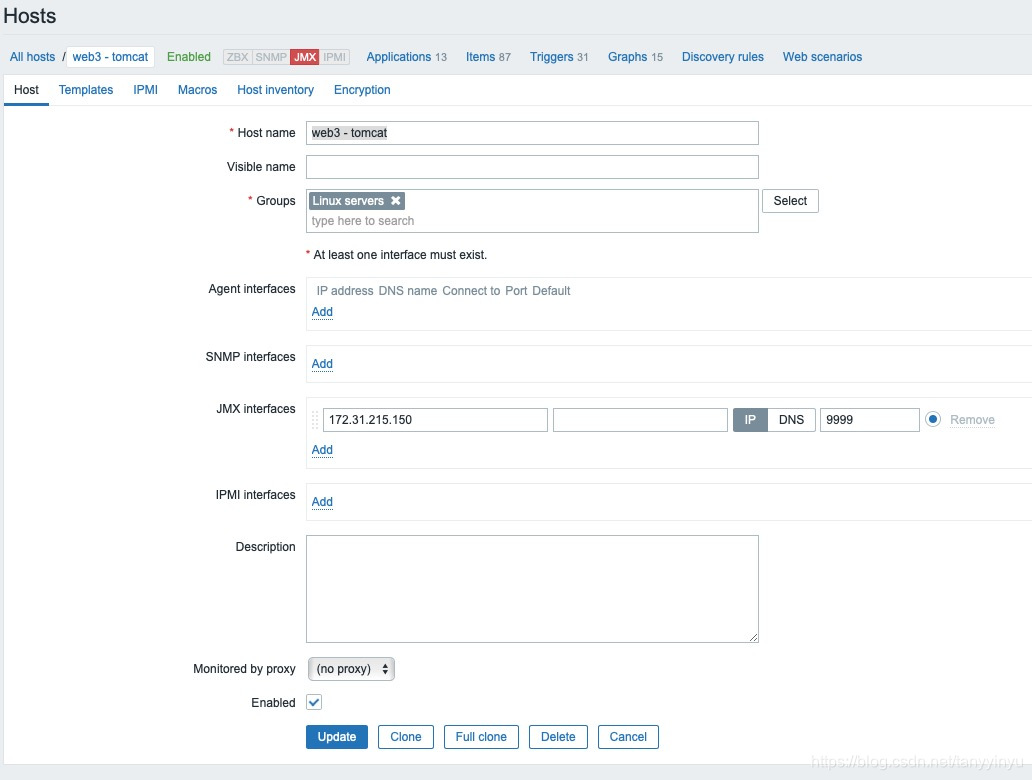
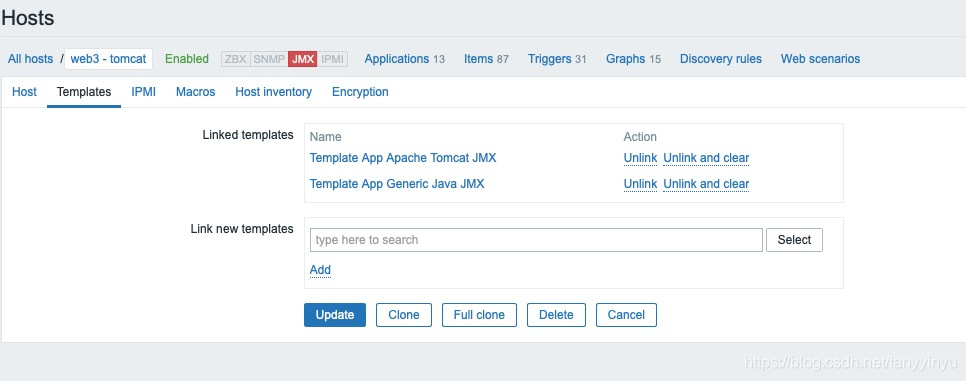
- JMX监控tomcat
tomcat新增JMX模块用于监控tomcat,会启动自定义端口,下图的9999端口;
zabbix-server端新增zabbix-java-gateway用于从JMX接口接收数据,会启动java-gateway服务,10052端口;
zabbix-java-gateway设置参数
zabbix-server设置gateway的相关参数
即可在zabbix-web上增加tomcat主机
代码上线脚本:
#! /bin/bash
# code syn to different server
#reminder
read -p "你是否已经更新了文件列表/root/synfile.list?确认请输入y或者Y,否则按其他任意键退出脚本。" c
if [ -z "$c" ]      #没有输入退出;
	then
   	   exit 1
fi
if [ $c == "y" -o $c == "Y" ]     #输入Y or y继续执行,否则退出;
	then
	   echo "脚本将在2秒后,继续执行。"
	   for i in 1 2       #延时功能;
		do
		   echo -n "."
		   sleep 1
		done
	   echo
	else
	   exit 1
fi
#clean the /root/rsync.exp file      #主同步expect函数,只执行一次,完成后删除,以免错误执行;
[ -f /root/rsync.exp ] && rm -f /root/rsync.exp    #检查有没有同名称文件残留,删除;

#create the rsync.exp
cat > /root/rsync.exp <<EOF				#新建一个脚本文件,EOF结束;

#expect interact function      #开始输入;
# /usr/bin/expect
set passwd "password"
set host [lindex \$argv 0]     #参数1赋给expect函数;
set file [lindex \$argv 1]        #参数2赋给expect函数;
spawn rsync -av --files-from=\$file / root@\$host:/     #使用获取到的文件列表,和IP同步到指定服务器;
expect {
"yes/no" {send "yes\r"}
"password:" {send \$passwd\r}
}
expect eof
EOF

chmod a+x /root/rsync.exp      #./rsync.exp这样运行时要做这个操作;

#function to check whether a file exist
if_file_exist()
{
if [ ! -f $1 ]
   then
	echo "文件$1不存在,请检查。"
	exit 1
fi
}

if_file_exist /root/ip.list
if_file_exist /root/synfile.list

for ip in `cat /root/ip.list`     #读取ip.list把ip逐个实施;
   do
	expect /root/rsync.exp $ip /root/synfile.list
   done

rm -f /root/rsync.exp      #删除expect函数;
- 同步列表里可以是文件,也可以是目录,如下
[root@second ~]# ls -ld  /root/synt /tmp/syna /usr/local/synn /data/syny
drwxr-xr-x 2 root root 6 11月 22 12:36 /data/syny
-rw-r--r-- 1 root root 0 11月 22 12:34 /root/synt
drwxr-xr-x 2 root root 6 11月 22 12:35 /tmp/syna
-rw-r--r-- 1 root root 0 11月 22 12:36 /usr/local/synn
[root@second ~]# vi ./syn.txt   #文件内容如下;
/root/synt
/tmp/syna
/usr/local/synn
/data/syny
