GCD
GCD (Grand Central Dispatch)
GCD两个核心概念:
任务和队列
任务
任务就是执行操作的意思,也就是block那段代码。执行操作有两种:同步执行和异步执行。
同步执行(sync):阻塞主线程并执行任务,不会开启新线程任务
异步执行(async):不会阻塞主线程,会开启新线程执行任务,在后台执行
队列
这里的队列就是任务队列,即用来存放任务的队列。队列是一种特殊的线性表,采用先进先出(FIFO)的原则,
每次新任务都会被插入到队列尾部,而执行队列中的任务时,会从队列头部开始读取并执行。
GCD中有两种队列:串行队列和并行队列
1.
并行队列(DISPATCH_QUEUE_CONCURRENT):可以多个任务同时进行,也就会开启多个线程执行任务。交替执行。
2.串行队列(DISPATCH_QUEUE_SERIAL):任务一个接着一个执行,也就是一个任务执行完后,下一个任务就开始。一个接着一个执行。
队列的创建
// 串行队列
dispatch_queue_t queue= dispatch_queue_create("my_queue_serial", DISPATCH_QUEUE_SERIAL);

// 并行队列
dispatch_queue_t queue= dispatch_queue_create("my_queue_concurrent", DISPATCH_QUEUE_CONCURRENT);
GCD默认提供了全局队列和主队列
1.
全局队列dispatch_get_global_queue,全局队列就是并行队列,供整个应用使用;需要两个参数,第一个是队列优先级(DISPATCH_QUEUE_PRIORITY_DEFAULT),第二个0即可(官方文档说:For future use)
2.主队列dispatch_get_main_queue,主队列就是串行队列,在应用启动时,就创建好了,所以我们要用的时候就直接拿来用而不需要创建
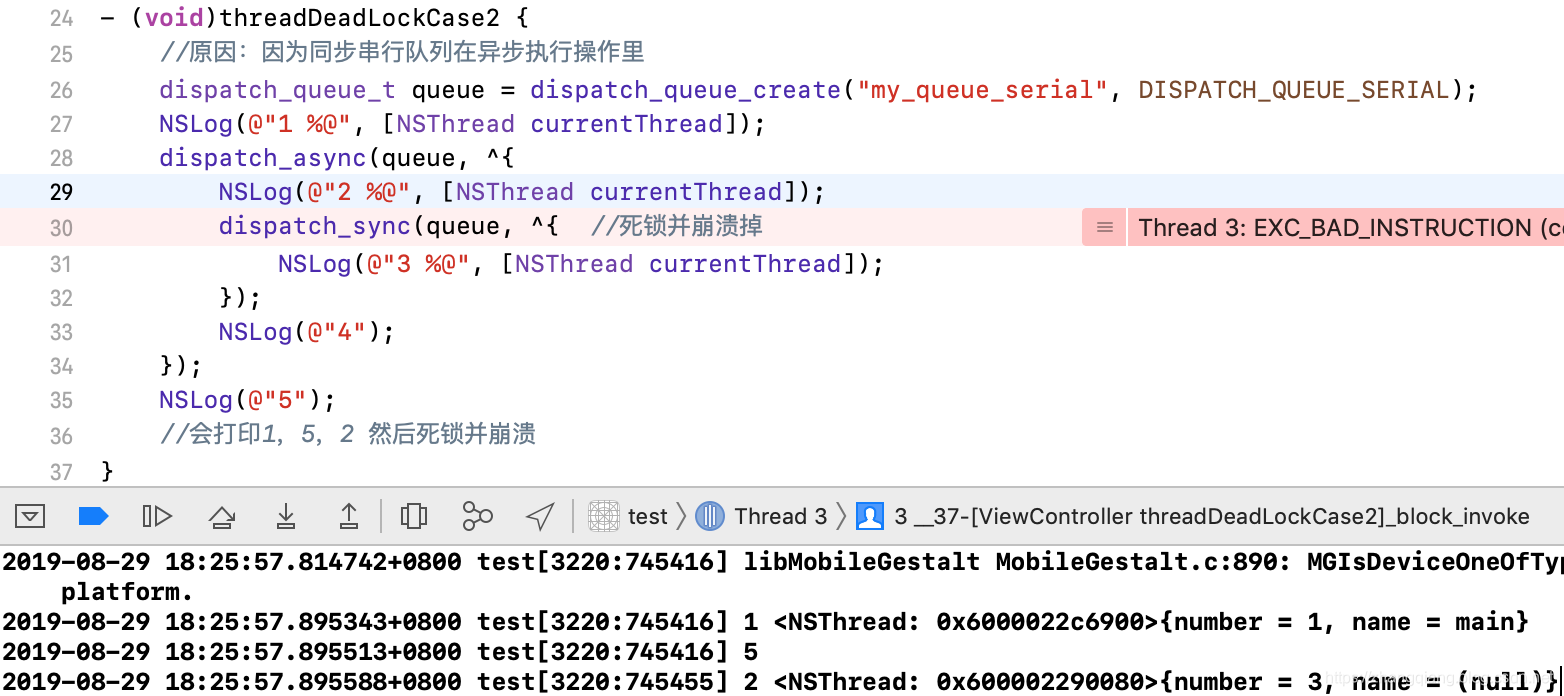
任务和队列的组合
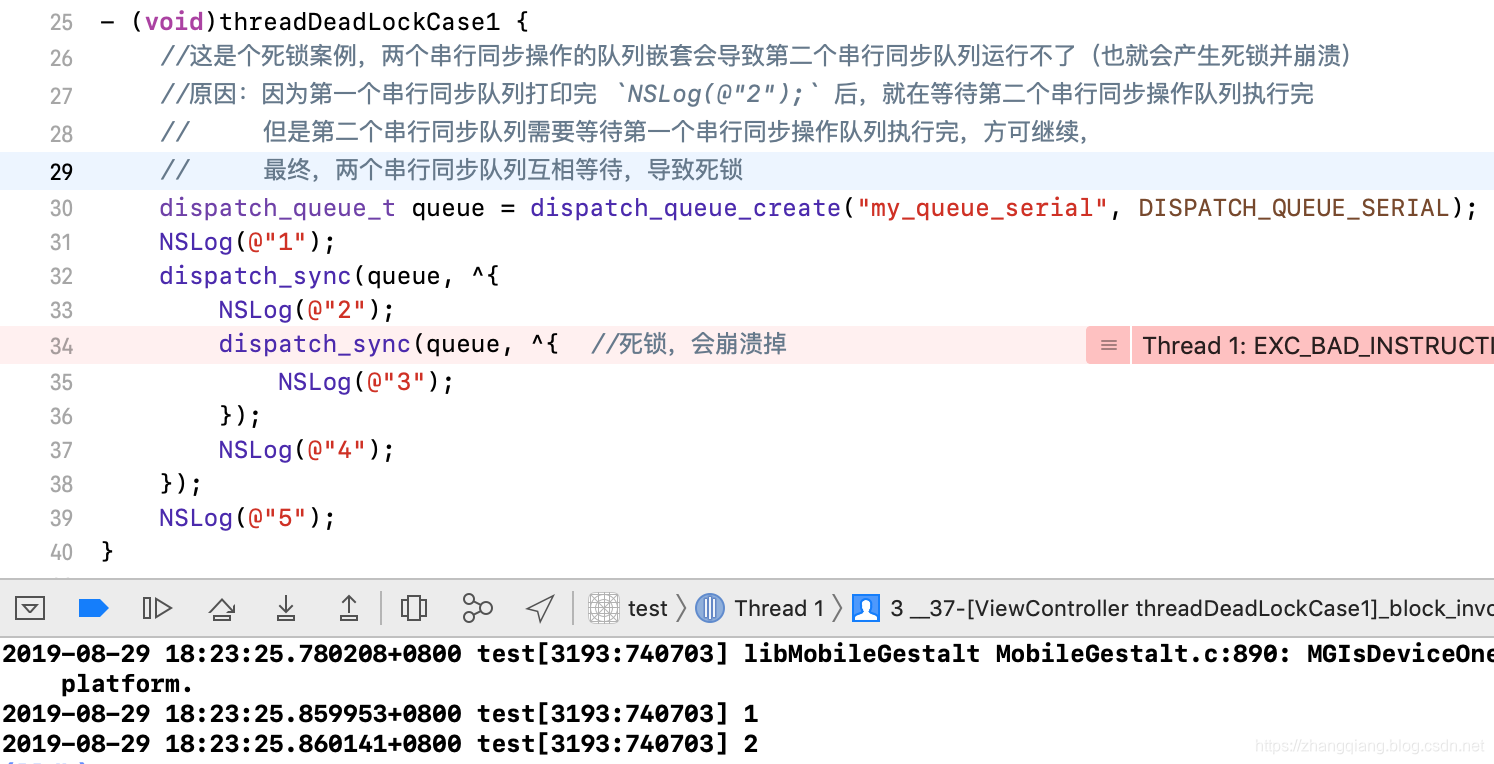
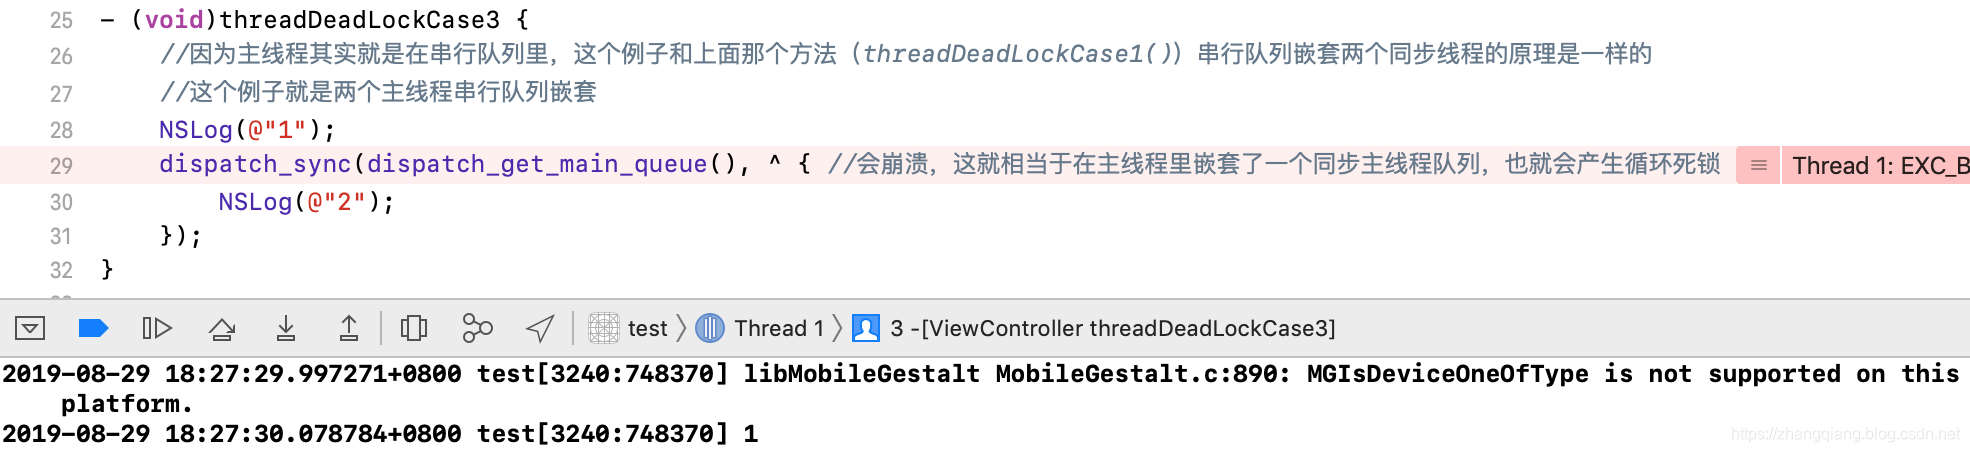
1.并行队列 + 同步执行
2.并行队列 + 异步执行
3.串行队列 + 同步执行
4.串行队列 + 异步执行
还有两个特殊组合
1.主队列 + 同步执行(会死锁并崩溃)
2.主队列 + 异步执行

看下三种死锁的原因
GCD线程之间的通讯
在iOS开发过程中,我们一般在主线程里边进行UI刷新,例如:点击、滚动、拖拽等事件。我们通常把一些耗时的操作放在其他线程,
比如:图片下载、文件上传等耗时操作。而当我们有时候在其他线程完成了耗时操作时,需要回到主线程,那么就用到了线程之间的通讯。
dispatch_async(dispatch_get_global_queue(DISPATCH_QUEUE_PRIORITY_DEFAULT, 0), ^{
    //做某些下载操作

    // 回到主线程
    dispatch_async(dispatch_get_main_queue(), ^{
        NSLog(@"更新UI"]);
    });
});
GCD的其他方法
GCD的屏障方法 dispatch_barrier_async
我们有时候需要异步执行两组操作,而且第一组操作执行完之后,才能开始执行第二组操作。这样我们就需要一个相当于栅栏一样的一个方法将两组异步执行的
操作分割开来,当然这里的操作组里可以包含一个或多个任务。这就需要用到dispatch_barrier_async方法在两个操作组间形成栅栏。
- (void)barrierAsync {
    dispatch_queue_t myconcurrent = dispatch_queue_create("my_queue_concurrent", DISPATCH_QUEUE_CONCURRENT);

    //第一组 并行队列异步操作
    dispatch_async(myconcurrent, ^{
        NSLog(@"1 %@", [NSThread currentThread]);
    });
    dispatch_async(myconcurrent, ^{
        NSLog(@"2 %@", [NSThread currentThread]);
    });

    //只有第一组执行完后,第二组才会开始执行
    dispatch_barrier_sync(myconcurrent, ^{
        NSLog(@"barrier_sync");
    });

    //第二组 并行队列异步操作
    dispatch_async(myconcurrent, ^{
        NSLog(@"3 %@", [NSThread currentThread]);
    });
    dispatch_async(myconcurrent, ^{
        NSLog(@"4 %@", [NSThread currentThread]);
    });
}
输出为:
[7017:431987] 2 <NSThread: 0x6000002756c0>{number = 4, name = (null)}
[7017:431986] 1 <NSThread: 0x604000461700>{number = 3, name = (null)}
[7017:431702] barrier_sync
[7017:431987] 4 <NSThread: 0x6000002756c0>{number = 4, name = (null)}
[7017:431988] 3 <NSThread: 0x604000461440>{number = 5, name = (null)}
GCD的延时执行方法 dispatch_after
当我们需要延迟执行一段代码时,就需要用到GCD的 dispatch_after 方法
dispatch_after(dispatch_time(DISPATCH_TIME_NOW, (int64_t)(3.0 * NSEC_PER_SEC)), dispatch_get_main_queue(), ^{
    NSLog(@"三秒后,异步执行这里的代码");
});
GCD的只执行一次方法 dispatch_once
常用于创建单例时使用,也就是在整个应用程序运行过程中dispatch_once的block任务只会被执行一次
static dispatch_once_t onceToken;
dispatch_once(&onceToken, ^{
    NSLog(@"这个block任务只会被执行一次");
});
GCD的快速迭代方法 dispatch_apply
通常我们会使用 for 循环遍历,但是GCD给我们提供了一个快速迭代的方法 dispatch_apply 使我们可以同时遍历。
比如:说遍历0~5 这6个数字,for循环就是每次取出一个元素进行遍历,但是 dispatch_apply却是同时遍历的
dispatch_queue_t global_queue = dispatch_get_global_queue(0, 0);
dispatch_apply(6, global_queue, ^(size_t index) {
    NSLog(@"%zd %@", index, [NSThread currentThread]);
});
看输出结果的时间,我们可以得知,6个数字是同时迭代完的
2017-10-15 16:22:31.807072+0800 test[7302:444592] 0 <NSThread: 0x6000000712c0>{number = 1, name = main}
2017-10-15 16:22:31.807073+0800 test[7302:444696] 1 <NSThread: 0x60400026f780>{number = 3, name = (null)}
2017-10-15 16:22:31.807072+0800 test[7302:444698] 3 <NSThread: 0x60000027e580>{number = 5, name = (null)}
2017-10-15 16:22:31.807109+0800 test[7302:444697] 2 <NSThread: 0x60400026f600>{number = 4, name = (null)}
2017-10-15 16:22:31.807266+0800 test[7302:444592] 4 <NSThread: 0x6000000712c0>{number = 1, name = main}
2017-10-15 16:22:31.807274+0800 test[7302:444696] 5 <NSThread: 0x60400026f780>{number = 3, name = (null)}
GCD的队列组 dispatch_group_t
有时候我们会有这样的需求:分别异步执行几个耗时的操作,然后当这几个耗时的操作都执行完毕后,再回到主线程执行操作,这时我们就需要用到队列组了。比如:同时下载多张图片,或者文件,下载完就需要通知
//全局队列
dispatch_queue_t global_queue = dispatch_get_global_queue(0, 0);

//创建一个队列组
dispatch_group_t group = dispatch_group_create();

//将block操作加入到任务组
dispatch_group_enter(group);
dispatch_group_async(group, global_queue, ^{
    NSLog(@"执行第一个耗时的任务操作 %@", [NSThread currentThread]);

    //该任务执行完操作后,就马上从任务组中移除
    dispatch_group_leave(group);
});

dispatch_group_enter(group);
dispatch_group_async(group, global_queue, ^{
    NSLog(@"执行第二个耗时的任务操作 %@", [NSThread currentThread]);
    dispatch_group_leave(group);
});

dispatch_group_enter(group);
dispatch_group_async(group, global_queue, ^{
    NSLog(@"执行第三个耗时的任务操作 %@", [NSThread currentThread]);
    dispatch_group_leave(group);
});

//上面的任务都执行完后,会有以下两种方式来处理结果
//第一种 会阻塞主线程,等待上面的任务执行完,再继续向下执行
//dispatch_group_wait(group, DISPATCH_TIME_FOREVER);

//第二种 不会阻塞主线程,等待上面的任务执行完,该block就会执行 (推荐)
dispatch_group_notify(group, dispatch_get_main_queue(), ^{
    NSLog(@"回到主线程 %@", [NSThread currentThread]);
});
输出的结尾如下,无论如何当所有的任务执行完后,dispatch_group_notify里的block就是最后执行的,因为是并行队列,所以它们的顺序不会一致的
2017-10-15 17:00:51.710362+0800 test[7983:475352] 执行第二个耗时的任务操作 <NSThread: 0x60000027fb40>{number = 3, name = (null)}
2017-10-15 17:00:51.710362+0800 test[7983:475358] 执行第三个耗时的任务操作 <NSThread: 0x60000027fbc0>{number = 4, name = (null)}
2017-10-15 17:00:51.710418+0800 test[7983:475354] 执行第一个耗时的任务操作 <NSThread: 0x60000027fd00>{number = 5, name = (null)}
2017-10-15 17:00:51.719487+0800 test[7983:475038] 回到主线程 <NSThread: 0x60400007c680>{number = 1, name = main}
NSThread
NSThread多线程编程,超级简单,NSthread是基于pthread_t封装的,所以基本上在使用方面pthread_t和NSThread差不多
线程的生命周期,五种状态
1.
新建(new Thread),就是实例化了一个线程对象
在iOS中,self.alwasyThread = [[NSThread alloc] initWithTarget:self selector:@selector(alwaysRun) object:nil];
2.
就绪(runnable),就是线程在就绪队列中等待CPU分配时间片,一般是start方法
在iOS中,[self.alwasyThread start];
3.
运行(running),就是线程已经获得CPU资源并且马上执行任务,一般是run方法
在iOS中,start方法就表示进入就绪状态,并且获得CPU资源后进入运行状态
4.
死亡(dead),就是线程执行完任务,或者被其他线程杀死,这时就不能再进入就绪状态,重新运行。调用stop方法终止线程
在iOS中,[NSThread exit];
5.
阻塞(blocked),就是某种原因导致正在运行的线程暂停自己,让出CPU,那么自己就进入了阻塞状态(suspend),阻塞状态可以调用resume恢复
在iOS中,sleep(3);,[NSThread sleepForTimeInterval:3.0f];,[NSThread sleepUntilDate:[NSDate dateWithTimeIntervalSinceNow:3.0]];
我们分三步说下吧
1.创建子线程
第一种方式
- (void)nsthread_test {
    NSThread *thread = [[NSThread alloc] initWithTarget:self selector:@selector(run) object:nil];
    [thread start];
}

- (void)run {
    NSLog(@"NSThread子线程 %@", [NSThread currentThread]);
}
输出为:
2017-10-16 test[25785:1117888] NSThread子线程 <NSThread: 0x604000270200>{number = 3, name = (null)}
第二种方式,仅限iOS 10及以上版本可用
NSThread *thread = [[NSThread alloc] initWithBlock:^{
    NSLog(@"NSThread子线程 %@", [NSThread currentThread]);
}];
[thread start];
2.分离线程
- (void)nsthread_test {
    [NSThread detachNewThreadSelector:@selector(run:) toTarget:self withObject:@[ @"这是", @"参数"]];
}

- (void)run:(id)parameters {
    NSLog(@"NSThread子线程 parameter=%@ %@", parameters, [NSThread currentThread]);
}
输出为:
2017-10-16 test[25940:1121175] NSThread子线程 parameter=("这是", "参数") <NSThread: 0x604000460240>{number = 3, name = (null)}
3.后台线程
开启新线程在后台执行
- (void)nsthread_test {
    [self performSelectorInBackground:@selector(run:) withObject:@[ @"这是", @"参数"]];
}

- (void)run:(id)parameters {
    NSLog(@"NSThread后台线程 parameter=%@ %@", parameters, [NSThread currentThread]);
}
输出为:
2017-10-16 test[25940:1127130] NSThread后台线程 parameter=("这是", "参数") <NSThread: 0x6000002718c0>{number = 3, name = (null)}
还有几个方法都是通过self调用的
//在主线程上执行,一般可以用来更新UI
- (void)performSelectorOnMainThread:(SEL)aSelector withObject:(nullable id)arg waitUntilDone:(BOOL)wait;

//在指定线程上执行
- (void)performSelector:(SEL)aSelector onThread:(NSThread *)thr withObject:(nullable id)arg waitUntilDone:(BOOL)wait;

// 延迟执行,就像dispatch_after()方法类似
- (void)performSelector:(SEL)aSelector withObject:(nullable id)anArgument afterDelay:(NSTimeInterval)delay;
NSOperation
1)、NSOperation是Apple提供给开发者的一套多线程解决方案,实际上是基于GCD的一套更高级封装,完全Objective-C代码。简单、易用、代码可读性高。
NSOperation需要配合NSOperationQueue来实现多线程,因为默认情况下
NSOperation单独使用时是系统同步执行操作,并没有开启新线程的能力,只有配合NSOperationQueue才能实现异步执行
因为NSOperation是基于GCD的,那么使用起来也和GCD差不多,其中,NSOperation相当于GCD中的任务,而NSOperationQueue则相当于GCD中的队列。
NSOperation实现多线程的使用步骤分为三步:
1.创建任务:先将需要执行的操作封装到一个NSOperation对象中
2.创建队列:创建NSOperationQueue对象
3.将任务加入到队列中,然后将NSOperation对象加入到NSOperationQueue中,之后,系统就会从Queue中读取出来,在新线程中执行操作。
以下我们来看下NSOperation和NSOperationQueue的基本使用
2)、NSOperation和NSOperationQueue的基本使用
NSOperation是一个抽象类,不能封装任务,我们只有使用它的子类来封装任务。有三种方式来封装任务,如下:
1.使用子类
NSInvocationOperation
2.使用子类NSBlockOperation
3.自定义一个类派生自NSOperation,定义一些相应的方法
创建任务
比如:我们先不使用NSOperationQueue,而是单独使用NSInvocationOperation和NSBlockOperation,分别如下:
NSInvocationOperation
- (void)invocationOp {
    NSInvocationOperation *op = [[NSInvocationOperation alloc] initWithTarget:self selector:@selector(run) object:nil];
    [op start];
}

- (void)run {
    NSLog(@"%@", [NSThread currentThread]);
}
输出结果如下,证明了单独使用NSInvocationOperation时其实是在主线程中执行,并没有开启新线程。
test[8700:498048] <NSThread: 0x600000074a40>{number = 1, name = main}
NSBlockOperation
NSBlockOperation *op = [NSBlockOperation blockOperationWithBlock:^{
    NSLog(@"%@", [NSThread currentThread]);
}];
[op start];
输出结果如下,同样地,NSBlockOperation实际也是在主线程执行的,没有开启新线程。
test[8760:499896] <NSThread: 0x604000060340>{number = 1, name = main}
NSBlockOperation还提供一个方法 addExecutionBlock,通过该方法添加的block代码块就是在子线程中运行的
NSBlockOperation *op = [NSBlockOperation blockOperationWithBlock:^{
    // 在主线程
    NSLog(@"1------%@", [NSThread currentThread]);
}];

//添加额外的任务(在子线程执行)
[op addExecutionBlock:^{
    NSLog(@"2------%@", [NSThread currentThread]);
}];
[op addExecutionBlock:^{
    NSLog(@"3------%@", [NSThread currentThread]);
}];
[op addExecutionBlock:^{
    NSLog(@"4------%@", [NSThread currentThread]);
}];
[op addExecutionBlock:^{
    NSLog(@"5------%@", [NSThread currentThread]);
}];
[op start];
输出结果如下,addExecutionBlock:会开启子线程来执行任务,而blockOperationWithBlock:依旧是在主线程中执行任务的, 只是执行顺序会不一致
test[8801:501346] 2------<NSThread: 0x600000068440>{number = 3, name = (null)}
test[8801:501045] 1------<NSThread: 0x604000069040>{number = 1, name = main}
 test[8801:501347] 3------<NSThread: 0x6000002621c0>{number = 4, name = (null)}
test[8801:501348] 4------<NSThread: 0x60400027e100>{number = 5, name = (null)}
test[8801:501346] 5------<NSThread: 0x600000068440>{number = 3, name = (null)}
自定义一个类,派生自NSOperation
@interface ZQRunOperation : NSOperation
@end

@implementation ZQRunOperation
- (void)main {
    NSLog(@"ZQRunOperation类 --- %@", [NSThread currentThread]);
}
@end
调用
ZQRunOperation *myOp = [[ZQRunOperation alloc] init];
[myOp start];
输出
test[9660:515849] ZQRunOperation类 --- <NSThread: 0x6040002619c0>{number = 1, name = main}
自定义的类,根据你的需要,可以派生自NSInvocationOperation或者NSBlockOperation
创建队列
使用NSOperationQueue和GCD的并发队列和串行队列有一点不同,是:
NSOperationQueue一共有两种队列,分别是:主队列和其他队列;其中其它队列就包含了串行和并发。
串行和并发执行的关键点,主要根据maxConcurrentOperationCount参数来区分,这个参数的意思是最大并发数
1.默认情况下
maxConcurrentOperationCount为-1,表示不进行限制,也就是并发执行
2.当maxConcurrentOperationCount设置为1时,就表示串行执行
3.当maxConcurrentOperationCount设置为大于1,就表示并发执行,假如程序员设置的值大于系统并发的最大值,那么系统也会根据情况自动调整的
声明主队列
NSOperationQueue *queue = [NSOperationQueue mainQueue];
把任务添加到变量queue中,就表示所有的任务都是在主队列中执行
其它队列
NSOperationQueue *queue = [[NSOperationQueue alloc] init];
把任务添加到此变量queue中,就表示所有的任务会在子线程中执行,是串行执行还是并发执行取决于上面提到的参数maxConcurrentOperationCount
将任务添加到队列中
接下来,我们就需要把任务添加到队列中了,使用方法 addOperation:,如下代码所示:
- (void)queue {
    NSOperationQueue *queue = [[NSOperationQueue alloc] init];

    NSInvocationOperation *invocationOp = [[NSInvocationOperation alloc] initWithTarget:self selector:@selector(run) object:nil];

    NSBlockOperation *blockOp = [NSBlockOperation blockOperationWithBlock:^{
        for (int i = 0; i < 2; i++) {
            NSLog(@"NSBlockOperation %@", [NSThread currentThread]);
        }
    }];
    [queue addOperation:invocationOp];
    [queue addOperation:blockOp];
}

- (void)run {
    for (int i = 0; i < 2; i++) {
        NSLog(@"NSInvocationOperation %@", [NSThread currentThread]);
    }
}
输出结果如下,得知两点:一是,任务在子线程中执行的,二是,任务是并行执行的
test[10378:538549] NSBlockOperation <NSThread: 0x600000465000>{number = 3, name = (null)}
test[10378:538551] NSInvocationOperation <NSThread: 0x600000464ec0>{number = 4, name = (null)}
test[10378:538549] NSBlockOperation <NSThread: 0x600000465000>{number = 3, name = (null)}
test[10378:538551] NSInvocationOperation <NSThread: 0x600000464ec0>{number = 4, name = (null)}
还有一种方式是,直接给NSOperationQueue添加block任务 使用方法 addOperationWithBlock:
- (void)queue {
    NSOperationQueue *queue = [[NSOperationQueue alloc] init];
    [queue addOperationWithBlock:^{
        for (int i = 0; i < 2; i++) {
            NSLog(@"NSOperationQueue直接添加block任务 %@", [NSThread currentThread]);
        }
    }];

    NSInvocationOperation *invocationOp = [[NSInvocationOperation alloc] initWithTarget:self selector:@selector(run) object:nil];

    NSBlockOperation *blockOp = [NSBlockOperation blockOperationWithBlock:^{
        for (int i = 0; i < 2; i++) {
            NSLog(@"NSBlockOperation %@", [NSThread currentThread]);
        }
    }];
    [queue addOperation:invocationOp];
    [queue addOperation:blockOp];
}

- (void)run {
    for (int i = 0; i < 2; i++) {
        NSLog(@"NSInvocationOperation %@", [NSThread currentThread]);
    }
}
输出如下,得知,这也是在子线程中执行的,也是并发的
[10629:542729] NSOperationQueue直接添加block任务 <NSThread: 0x60000026f880>
[10629:542728] NSBlockOperation <NSThread: 0x6040004630c0>{number = 4, name =
[10629:542730] NSInvocationOperation <NSThread: 0x6000000719c0>{number = 5,
[10629:542728] NSBlockOperation <NSThread: 0x6040004630c0>{number = 4, name =
[10629:542729] NSOperationQueue直接添加block任务 <NSThread: 0x60000026f880>
[10629:542730] NSInvocationOperation <NSThread: 0x6000000719c0>{number = 5, name = (null)}
上面说的几种方式都是NSOperationQueue的并行队列执行的,下面来一个串行队列的例子
- (void)queue {
    NSOperationQueue *queue = [[NSOperationQueue alloc] init];
    queue.maxConcurrentOperationCount = 1;//设置为1,就表示串行队列

    [queue addOperationWithBlock:^{
        for (int i = 0; i < 2; i++) {
            NSLog(@"NSOperationQueue直接添加block任务 %@", [NSThread currentThread]);
        }
    }];

    NSInvocationOperation *invocationOp = [[NSInvocationOperation alloc] initWithTarget:self selector:@selector(run) object:nil];

    NSBlockOperation *blockOp = [NSBlockOperation blockOperationWithBlock:^{
        for (int i = 0; i < 2; i++) {
            NSLog(@"NSBlockOperation %@", [NSThread currentThread]);
        }
    }];
    [queue addOperation:invocationOp];
    [queue addOperation:blockOp];
}

- (void)run {
    for (int i = 0; i < 2; i++) {
        NSLog(@"NSInvocationOperation %@", [NSThread currentThread]);
    }
}
输出结果如下,从结果可以看出,所有的任务都是依次执行的,即串行队列执行任务
test[10749:544638] NSOperationQueue直接添加block任务 <NSThread: 0x6000002713c0>{number = 3, name = (null)}
test[10749:544638] NSOperationQueue直接添加block任务 <NSThread: 0x6000002713c0>{number = 3, name = (null)}
test[10749:544638] NSInvocationOperation <NSThread: 0x6000002713c0>{number = 3, name = (null)}
test[10749:544638] NSInvocationOperation <NSThread: 0x6000002713c0>{number = 3, name = (null)}
test[10749:544638] NSBlockOperation <NSThread: 0x6000002713c0>{number = 3, name = (null)}
test[10749:544638] NSBlockOperation <NSThread: 0x6000002713c0>{number = 3, name = (null)}
操作依赖
NSOperation和NSOperationQueue最吸引人的地方是它能添加操作之间的依赖关系。
比如:A, B, C三个任务操作,根据依赖关系,任务的执行顺序就不同,如下代码所示:
- (void)addDependenciesOperations {
    //创建队列
    NSOperationQueue *queue = [[NSOperationQueue alloc] init];

    //创建任务
    NSBlockOperation *opA = [NSBlockOperation blockOperationWithBlock:^{
        NSLog(@"NSBlockOperation A  %@", [NSThread currentThread]);
    }];
    NSBlockOperation *opB = [NSBlockOperation blockOperationWithBlock:^{
        NSLog(@"NSBlockOperation B  %@", [NSThread currentThread]);
    }];
    NSInvocationOperation *opC = [[NSInvocationOperation alloc] initWithTarget:self selector:@selector(run) object:nil];

    //添加依赖
    [opB addDependency:opC]; //opB依赖于opC
    [opA addDependency:opC]; //opA依赖于opC
    [opA addDependency:opB]; //opA依赖于opB
    //所以执行顺序应该是 opC -> opB -> opA

    //添加任务
    [queue addOperation:opA];
    [queue addOperation:opB];
    [queue addOperation:opC];
}

- (void)run {
    for (int i = 0; i < 2; i++) {
        NSLog(@"NSInvocationOperation C %@", [NSThread currentThread]);
    }
}
输出如下,得知,设置了依赖,就可以说是串行队列执行任务了
test[10979:551447] NSInvocationOperation C <NSThread: 0x600000267080>{number = 3, name = (null)}
test[10979:551447] NSInvocationOperation C <NSThread: 0x600000267080>{number = 3, name = (null)}
test[10979:551448] NSBlockOperation B  <NSThread: 0x600000267200>{number = 4, name = (null)}
test[10979:551447] NSBlockOperation A  <NSThread: 0x600000267080>{number = 3, name = (null)}
当然了,添加的依赖不一定要三个,一个也可以,如下
//添加依赖
[opB addDependency:opC]; //opB依赖于opC
//所以任务执行顺序应该是 opA -> opC -> opB
一些其他方法
- (void)cancel; NSOperation提供的取消方法,可以取消单个操作
-(void)cancelAllOperations; NSOperationQueue提供的取消队列里所有的任务的方法
- (void)setSuspended:(BOOL)b; 可以设置任务的暂停与恢复,YES表示暂停队列任务,NO表示恢复队列执行
- (BOOL)isSuspended; 判断暂停状态
注意
暂停和取消的区别在于:暂停操作后,还可以恢复操作,继续向下执行;而取消操作之后,所有的操作,再也恢复不了了,而且剩下的任务也都将取消掉了
Lock 锁
在多线程编程中,并发会使一段代码在同一段时间内线程之间互相争抢资源(资源共享)而产生数据的不一致性,为了解决这个问题,就引入了锁。锁的类型有多种,在iOS中,有如下:
1.
OSSpinLock自旋锁
2.dispatch_semaphoreGCD信号量实现加锁
3.pthread_mutex互斥锁
4.NSLock互斥锁
5.NSCondition信号锁
6.pthread_mutex(recursive)递归互斥锁
7.NSRecursiveLock递归锁
8.NSConditionLock条件锁
9.@synchronized互斥锁
在看本篇文章前,请先了解GCD和NSOperation, 如果你已熟知,请继续往下看。
我们先来看下iOS中全部的锁,以及它们的效率
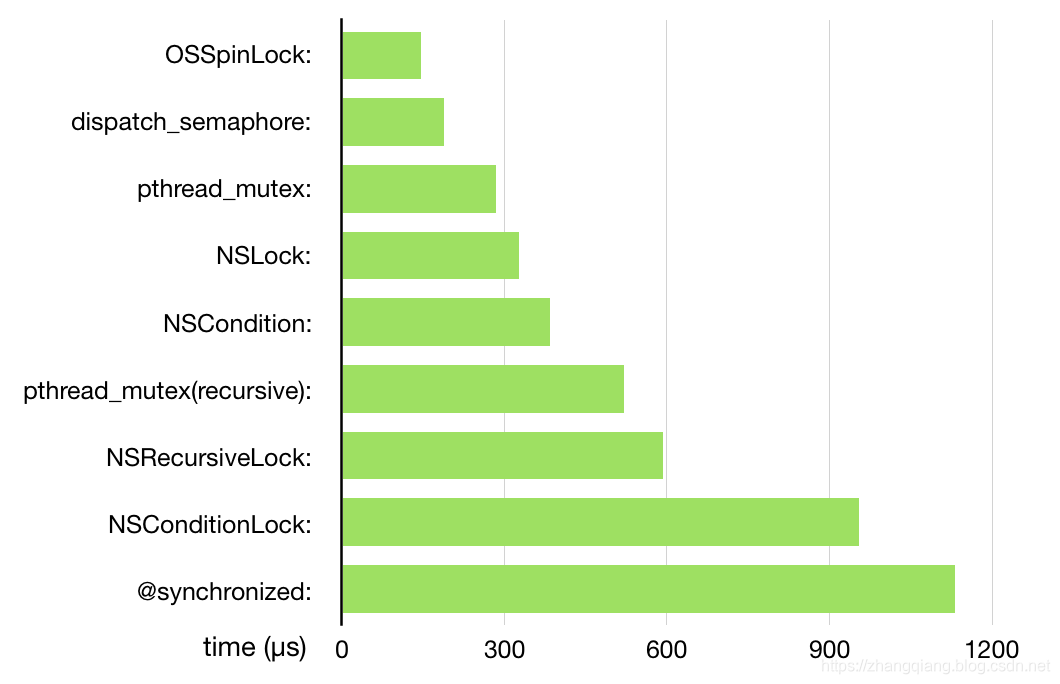
这个简单的性能测试是在iPhone 6, iOS 9上跑的,测试者在这篇文章
该结果显示的,横向柱状条最短的为性能最佳和最高;可知,OSSpinLock最佳,但是OSSpinLock被发现bug,Apple工程师透露了这个自旋锁有问题,暂时停用了,查看这里
虽然OSSpinLock(自旋锁)有问题,但是我们还是看到了pthread_mutex和dispatch_semaphore性能排行仍是很高,而且苹果在新系统中也已经优化了
这两个锁的性能,所以我们在开发时也可以使用它们啦。
下面来一一介绍它们的使用
1.dispatch_semaphore GCD信号量实现加锁
GCD中提供了一种信号机制,也是为了解决资源抢占问题的,支持信号通知和信号等待。
1.每当发送一个信号时,则信号量加1
2.每当发送一个等待信号时,则信号量减1
3.如果信号量为0,则信号会处于等待状态,直到信号量大于0时就开始执行
- (void)example {

    //假设一共电影票3张票
    self.movieTickets = 3;

    //创建信号量
    dispatch_semaphore_t semaphore = dispatch_semaphore_create(1);

    //添加任务1
    dispatch_async(dispatch_get_global_queue(0, 0), ^{
        [self buyTicketWithCounts:2 taskName:@"任务1" semaphore:semaphore];
    });

    //添加任务2
    dispatch_async(dispatch_get_global_queue(0, 0), ^{
        [self buyTicketWithCounts:2 taskName:@"任务2" semaphore:semaphore];
    });
}

- (void)buyTicketWithCounts:(int)counts taskName:(NSString *)taskName semaphore:(dispatch_semaphore_t)semaphore {
    dispatch_semaphore_wait(semaphore, DISPATCH_TIME_FOREVER);
    for (int i = 0; i < counts; i++) {
        if (self.movieTickets == 0) {
            NSLog(@"%@ 票已卖完! %@", taskName, [NSThread currentThread]);
            break;
        }

        NSLog(@"%@ 抢到%d票 剩余%d张票 %@", taskName, i + 1, --self.movieTickets, [NSThread currentThread]);
    }
    dispatch_semaphore_signal(semaphore);
}
输出结果如下
 test[23790:1042584] 任务1 抢到1票 剩余2张票 <NSThread: 0x604000465180>{number = 3, name = (null)}
test[23790:1042584] 任务1 抢到2票 剩余1张票 <NSThread: 0x604000465180>{number = 3, name = (null)}
test[23790:1042582] 任务2 抢到1票 剩余0张票 <NSThread: 0x604000464e00>{number = 4, name = (null)}
test[23790:1042582] 任务2 票已卖完! <NSThread: 0x604000464e00>{number = 4, name = (null)}
2.pthread_mutex 互斥锁
在POSIX(可移植操作系统)中,pthread_mutex是一套用于多线程同步的mutex锁,如同名一样,使用起来非常简单,性能比较高
//初始化互斥锁
__block pthread_mutex_t _mutex;
pthread_mutex_init(&_mutex, NULL);

//创建队列组
dispatch_group_t group = dispatch_group_create();

//创建并行队列
dispatch_queue_t concurrentQueue = dispatch_queue_create("my.concurrent.queue", DISPATCH_QUEUE_CONCURRENT);

//添加任务A到队列组
dispatch_group_async(group, concurrentQueue, ^{
    pthread_mutex_lock(&_mutex);
    NSLog(@"NSBlockOperation A %@", [NSThread currentThread]);
    pthread_mutex_unlock(&_mutex);
});

//添加任务B到队列组
dispatch_group_async(group, concurrentQueue, ^{
    pthread_mutex_lock(&_mutex);
    NSLog(@"NSBlockOperation B %@", [NSThread currentThread]);
    pthread_mutex_unlock(&_mutex);
});

//任务执行完,接收到通知
dispatch_group_notify(group, concurrentQueue, ^{
    pthread_mutex_destroy(&_mutex);
    NSLog(@"pthread_mutex_t has been destroyed!");
});
输出结果:
2017-10-16 test[22982:1011384] NSBlockOperation B <NSThread: 0x60000026a380>{number = 3, name = (null)}
2017-10-16 test[22982:1011382] NSBlockOperation A <NSThread: 0x604000465ac0>{number = 4, name = (null)}
2017-10-16 test[22982:1011382] pthread_mutex_t has been destroyed!
3.pthread_mutex(recursive) 递归互斥锁
其实就是一个参数来断定pthread_mutex_t是否是递归锁,
我们先来看下死锁的例子
- (void)pthread_recursive_lock {
    __block pthread_mutex_t _mutext;
    pthread_mutex_init(&_mutext, NULL);

    dispatch_async(dispatch_get_global_queue(0, 0), ^{
        static void (^MyBlock)(int);
        MyBlock = ^(int value){
            pthread_mutex_lock(&_mutext); //第二次运行到这里会阻塞住,产生死锁,因为之前被锁住的资源还未解锁,所以就造成它们俩互相等待
            if (value > 0) {
                NSLog(@"value = %d %@", value, [NSThread currentThread]);
                MyBlock(value - 1);
            }
        };
        MyBlock(5);
        pthread_mutex_unlock(&_mutext);
    });
}
解决这个死锁的重点就是给pthread_mutex_t设置属性为递归锁,代码如下
	- (void)pthread_recursive_lock {

    //创建互斥锁的属性对象,并设置递归锁
    pthread_mutexattr_t _mutexattr;
    pthread_mutexattr_init(&_mutexattr);
    pthread_mutexattr_settype(&_mutexattr, PTHREAD_MUTEX_RECURSIVE);

    //创建互斥锁对象
    __block pthread_mutex_t _mutext;
    pthread_mutex_init(&_mutext, &_mutexattr);

    dispatch_async(dispatch_get_global_queue(0, 0), ^{
        static void (^MyBlock)(int);
        MyBlock = ^(int value){
            pthread_mutex_lock(&_mutext); //第二次运行到这里会产生死锁,因为之前被锁住的资源还未解锁,所以就造成它们俩互相等待
            if (value > 0) {
                NSLog(@"value = %d %@", value, [NSThread currentThread]);
                MyBlock(value - 1);
            }
        };
        MyBlock(5);
        pthread_mutex_unlock(&_mutext);
        pthread_mutex_destroy(&_mutext);
    });
}
输出结果如下:
2017-10-16 test[25369:1103912] value = 5 <NSThread: 0x600000464a00>{number = 3, name = (null)}
2017-10-16 test[25369:1103912] value = 4 <NSThread: 0x600000464a00>{number = 3, name = (null)}
2017-10-16 test[25369:1103912] value = 3 <NSThread: 0x600000464a00>{number = 3, name = (null)}
2017-10-16 test[25369:1103912] value = 2 <NSThread: 0x600000464a00>{number = 3, name = (null)}
2017-10-16 test[25369:1103912] value = 1 <NSThread: 0x600000464a00>{number = 3, name = (null)}
4.NSLock 互斥锁
在Cocoa中NSLock是一种简单的互斥锁,继承自NSLocking协议,定义了lock和unlock方法,
而NSLock类还增加了tryLock和lockBeforeDate:方法。
1.tryLock方式试图获取一个锁,但是如果锁不可用的时候,它不会阻塞线程,相反它只会返回NO
2.lockBeforeDate:方法试图获取一个锁,但是如果锁没有在规定的时间内被获得,它会从阻塞状态变为非阻塞状态,返回NO
3.使用时,注意lock和unlock是成对出现的,也就说lock方法连续不能调用多次
我们这里来个简单的题:
假设一共有5张电影票,
现在有三个人去买票,每人要购买2张,
也就是三个人一共要买6张票,可是总电影票数只有5张,
所以最终他们有一人只能买到一张票
- (void)example {
    //创建锁的对象
    self.lock = [[NSLock alloc] init];

    //假设总共有5张电影票
    self.movieTickets = 5;

    //创建一个并行队列
    dispatch_queue_t myconcurrent = dispatch_queue_create("com.concurrent.queue.hello", DISPATCH_QUEUE_CONCURRENT);

    //A线程异步并行 买2张票
    dispatch_async(myconcurrent, ^{
        [self buyTicketWithCounts:2 thread:@"线程A"];
    });

    //B线程异步并行 买2张票
    dispatch_async(myconcurrent, ^{
        [self buyTicketWithCounts:2 thread:@"线程B"];
    });

    //C线程异步并行 买2张票
    dispatch_async(myconcurrent, ^{
        [self buyTicketWithCounts:2 thread:@"线程C"];
    });
}

- (void)buyTicketWithCounts:(int)counts thread:(NSString *)threadName {
    [self.lock lock];
    for (int i = 1; i <= counts; i++) {
        if (self.movieTickets == 0) {
            NSLog(@"票卖完了 %@", threadName);
            return;
        }
        NSLog(@"剩余票数:%d  %@ %@", self.movieTickets, threadName, [NSThread currentThread]);
        self.movieTickets--;
    }
    [self.lock unlock];
}
输出结果如下:
2017-10-16 test[20232:919739] 剩余票数:5  线程A <NSThread: 0x600000468240>{number = 3, name = (null)}
2017-10-16 test[20232:919739] 剩余票数:4  线程A <NSThread: 0x600000468240>{number = 3, name = (null)}
2017-10-16 test[20232:919738] 剩余票数:3  线程B <NSThread: 0x60000007fa40>{number = 4, name = (null)}
2017-10-16 test[20232:919738] 剩余票数:2  线程B <NSThread: 0x60000007fa40>{number = 4, name = (null)}
2017-10-16 test[20232:919745] 剩余票数:1  线程C <NSThread: 0x6040004674c0>{number = 5, name = (null)}
2017-10-16 test[20232:919745] 票卖完了 线程C
保证了总票数5张没有变,最终有一个人只能买到一张票
5.NSRecursiveLock 递归锁
NSRecursiveLock是一个递归锁,它的lock方法可以被同一个线程多次请求,而且不会引起死锁;
主要用在循环或者递归操作中,多次lock,只需要一次unlock,因为递归锁内部会有一个跟踪被lock的数次的功能,
不管被lock多少次,最后unlock也会把所有的持有资源给解锁,来看一个经典的死锁案例,如下
NSLock *lock_i = [[NSLock alloc] init];

dispatch_async(dispatch_get_global_queue(0, 0), ^{
    static void (^MyBlock)(int);
    MyBlock = ^(int value) {
        [lock_i lock]; //加锁代码在递归执行第二次时阻塞了,也就是死锁了
        if (value > 0) {
            NSLog(@"value = %d %@", value, [NSThread currentThread]);
            sleep(2);
            MyBlock(value - 1);
        }
        [lock_i unlock];
    };
    MyBlock(5);
});
看看这个代码,由于在递归运行过程中,[lock_i lock];会被多次调用,而NSLock每次lock对象时,必须是unlock状态,
所以它就会一直等着上一个lock的对象资源被unlock掉,但是上一个并没有执行unlock,所以就造成了他们之间互相等待,而形成死锁。
为了解决这个问题,我们就需要使用递归锁NSRecursiveLock,因为递归锁可以多次lock,最后一次unlock就能解锁所有已经被lock的对象
NSRecursiveLock *lock = [[NSRecursiveLock alloc] init];

dispatch_async(dispatch_get_global_queue(0, 0), ^{
    static void (^MyBlock)(int);
    MyBlock = ^(int value) {
        [lock lock]; //这行代码加锁执行了多次
        if (value > 0) {
            NSLog(@"value = %d %@", value, [NSThread currentThread]);
            sleep(2);
            MyBlock(value - 1);
        }
        [lock unlock];//解锁只执行了一次
    };
    MyBlock(5);
});
输出结果为:
2017-10-16 test[21404:957416] value = 5 <NSThread: 0x604000073280>{number = 3, name = (null)}
2017-10-16 test[21404:957416] value = 4 <NSThread: 0x604000073280>{number = 3, name = (null)}
2017-10-16 test[21404:957416] value = 3 <NSThread: 0x604000073280>{number = 3, name = (null)}
2017-10-16 test[21404:957416] value = 2 <NSThread: 0x604000073280>{number = 3, name = (null)}
2017-10-16 test[21404:957416] value = 1 <NSThread: 0x604000073280>{number = 3, name = (null)}
6.NSCondition 信号锁
NSCondition也是派生自NSLocking, 所以它就有lock和unlock方法,但是NSCondition本身还有wait和signal方法,非常好用。
我们拿生产者消费者模式来举例吧
1.消费者获取锁,取产品,如果没有取到,则wait,这时会释放锁,知道有线程唤醒它去消费产品
2.生产者制造产品,首先也要取得锁,然后生产,再发signal,这样就可以唤醒正在wait的线程的消费者
- (void)ProducerConsumerPattern {
    self.products = [[NSMutableArray alloc] init];

    //创建信号量锁
    NSCondition *condition = [[NSCondition alloc] init];

    //创建一个并行队列
    NSOperationQueue *myQueue = [[NSOperationQueue alloc] init];

    //消费者
    NSBlockOperation *consumer = [NSBlockOperation blockOperationWithBlock:^{
        [condition lock];
        while (self.products.count == 0) {
            [condition wait]; //阻塞住,让线程等待,直到被通知到
        }

        NSLog(@"Consumed a product which named %@ %@", self.products.firstObject, [NSThread currentThread]);
        [condition unlock];
    }];

    //生产者
    NSBlockOperation *producer = [NSBlockOperation blockOperationWithBlock:^{
        [condition lock];

        NSString *productName = [NSString stringWithFormat:@"产品-%ld", random()];
        NSLog(@"Produced a product %@ %@ ", productName, [NSThread currentThread]);
        [self.products addObject:productName];

        [condition signal];
        [condition unlock];
    }];

    [myQueue addOperation:producer];
    [myQueue addOperation:consumer];
}
输出如下:
2017-10-16 test[24877:1088668] Produced a product 产品-1804289383 <NSThread: 0x600000269a00>{number = 3, name = (null)}
2017-10-16 test[24877:1088667] Consumed a product which named 产品-1804289383 <NSThread: 0x604000278700>{number = 4, name = (null)}
7.NSConditionLock 条件锁
NSConditionLock定义了一组可以指定int类型条件的互斥锁
NSConditionLock *conditionLock = [[NSConditionLock alloc] initWithCondition:0];

dispatch_async(dispatch_get_global_queue(DISPATCH_QUEUE_PRIORITY_DEFAULT, 0), ^{
    for (int i = 0; i <= 3; i++) {
        [conditionLock lock];
        NSLog(@"A %d %@", i, [NSThread currentThread]);
        sleep(1);
        [conditionLock unlockWithCondition:i];
    }
});

dispatch_async(dispatch_get_global_queue(DISPATCH_QUEUE_PRIORITY_LOW, 0), ^{
    [conditionLock lock];
    NSLog(@"B %@",[NSThread currentThread]);
    [conditionLock unlock];
});
8.@synchronized 互斥锁
我们这里来个简单的题:
假设一共有5张电影票,
现在有三个人去买票,每人要购买2张,
也就是三个人一共要买6张票,可是总电影票数只有5张,
所以最终他们有一人只能买到一张票
@synchronized关键字加锁,是一种互斥锁,性能较差不推荐使用;看代码示例:
- (void)example {
    //假设总共有5张电影票
    self.movieTickets = 5;

    //创建一个并行队列
    dispatch_queue_t myconcurrent = dispatch_queue_create("com.concurrent.queue.hello", DISPATCH_QUEUE_CONCURRENT);

    //A线程异步并行 买2张票
    dispatch_async(myconcurrent, ^{
        [self buyTicketWithCounts:2 thread:@"线程A"];
    });

    //B线程异步并行 买2张票
    dispatch_async(myconcurrent, ^{
        [self buyTicketWithCounts:2 thread:@"线程B"];
    });

    //C线程异步并行 买2张票
    dispatch_async(myconcurrent, ^{
        [self buyTicketWithCounts:2 thread:@"线程C"];
    });
}

- (void)buyTicketWithCounts:(int)counts thread:(NSString *)threadName {
    @synchronized(self) {
        for (int i = 1; i <= counts; i++) {
            if (self.movieTickets == 0) {
                NSLog(@"票卖完了 %@", threadName);
                return;
            }
            NSLog(@"剩余票数:%d  %@ %@", self.movieTickets, threadName, [NSThread currentThread]);
            self.movieTickets--;
        }
    }
}
猜猜输出结果会是什么?
2017-10-16 test[19868:910931] 剩余票数:5  线程A <NSThread: 0x600000270400>{number = 3, name = (null)}
2017-10-16 test[19868:910931] 剩余票数:4  线程A <NSThread: 0x600000270400>{number = 3, name = (null)}
2017-10-16 test[19868:910928] 剩余票数:3  线程B <NSThread: 0x600000270640>{number = 4, name = (null)}
2017-10-16 test[19868:910928] 剩余票数:2  线程B <NSThread: 0x600000270640>{number = 4, name = (null)}
2017-10-16 test[19868:910930] 剩余票数:1  线程C <NSThread: 0x6000002705c0>{number = 5, name = (null)}
2017-10-16 test[19868:910930] 票卖完了 线程C
这里例子说明,总票数5张没有变,因为使用了@synchronized互斥锁;假设此时,我们不用@synchronized,会输出什么结果了?
2017-10-16 test[19984:914005] 剩余票数:5  线程A <NSThread: 0x604000067c40>{number = 4, name = (null)}
2017-10-16 test[19984:914004] 剩余票数:5  线程C <NSThread: 0x600000276180>{number = 3, name = (null)}
2017-10-16 test[19984:914007] 剩余票数:5  线程B <NSThread: 0x60400026c880>{number = 5, name = (null)}
2017-10-16 test[19984:914005] 剩余票数:4  线程A <NSThread: 0x604000067c40>{number = 4, name = (null)}
2017-10-16 test[19984:914004] 剩余票数:3  线程C <NSThread: 0x600000276180>{number = 3, name = (null)}
2017-10-16 test[19984:914007] 剩余票数:2  线程B <NSThread: 0x60400026c880>{number = 5, name = (null)}
看到没,卖出了6张票
Runloop
RunLoop是iOS和OS X开发中非常基础的知识,通过RunLoop可以实现自动释放池,延迟回调,触摸事件,屏幕刷新等功能。
一般来讲,一个线程一次只能执行一个任务,执行完成后线程就会退出。如果我们需要一个机制,让线程能随时处理事件但并不退出,通常的代码如下:
function loop() {
    initialize();
    do {
        var message = get_next_message();
        process_message(message);
    } while (message != quit);
}
这种模型通常被称作 Event Loop。 Event Loop 在很多系统和框架都有实现,比如Node.js的事件处理,比如Windows程序消息循环,再比如iOS/OS X里的RunLoop.
实现这种模型的关键点在于:如何管理事件/消息,如何让线程在没有处理消息时休眠以避免资源占用、在有消息来到时立刻被唤醒。
所以 RunLoop 实际上就是一个对象,这个对象管理了其需要处理的事件和消息,并提供了一个入口函数来执行上面的 Event Loop 的逻辑。线程执行了这个函数后,就会一直处于这个函数内部 “接收消息 -> 等待 -> 处理” 的循环中,知道这个循环结束(比如传入quit的消息),函数返回。
在iOS/OS X系统中,提供了两个这样的对象:NSRunLoop和CFRunLoopRef。
CFRunLoopRef是在CoreFoundation框内的,提供了纯C函数的API,代码是开源的,所有这些API都是线程安全的。
NSRunLoop是基于CFRunLoopRef的封装,提供了面向对象的API,但是这些API不是线程安全的。
Swift开源后,苹果又维护了一个跨平台的CoreFoundation版本:https://github.com/apple/swift-corelibs-foundation/ 这个版本的源码可能和现有的iOS系统中的实现略有不同,但是更容易编译,因为它已经适配了 Linux/Windows
RunLoop对外的接口
在CoreFoundation里面关于RunLoop有5个类
CFRunLoopRef
CFRunLoopModeRef
CFRunLoopSourceRef
CFRunLoopTimerRef
CFRunLoopObserverRef
其中 CFRunLoopModeRef 类并没有对外暴露,只是通过 CFRunLoopRef 的接口进行了封装。他们的关系如下:
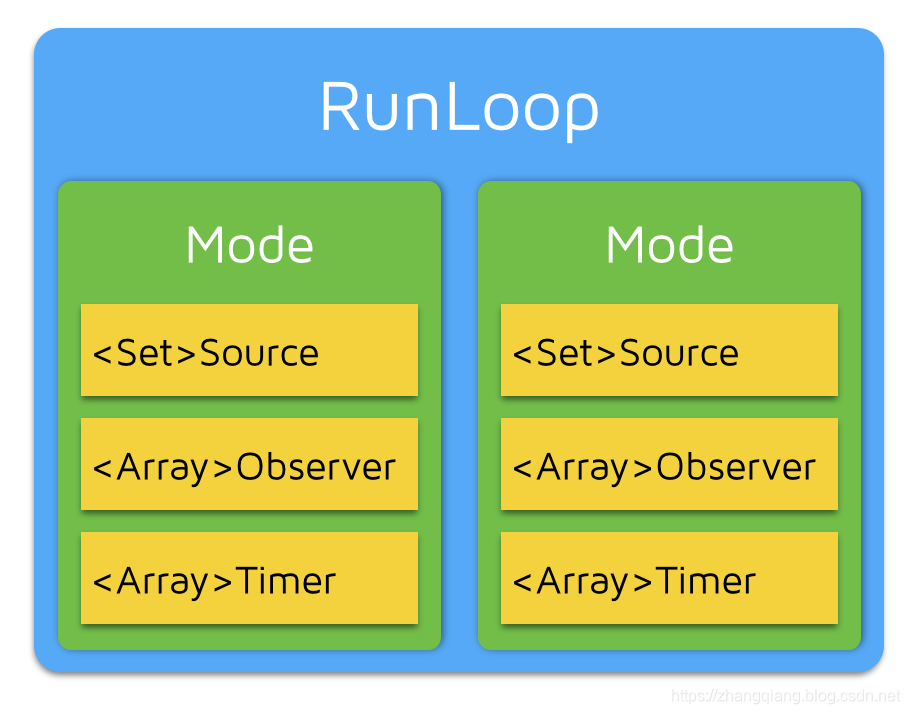
- 一个RunLoop包含若干个Mode
- 每个Mode包含若干个Source/Timer/Observer
- 每次调用RunLoop的主函数时,只能指定其中一个Mode,这个Mode被称作CurrentMode
- 如果需要切换Mode,只能先退出Loop,再重新指定一个Mode进入
- 这样做的目的是为了分割开不同组的Source/Timer/Observer
CFRunLoopSourceRef 是事件产生的地方。Source有两个版本:Source0和Source1。
-
Source0 包含了一个回调(函数指针),不会主动出发事件。使用时,需要先调用CFRunLoopSourceSignal(source) 将这个Source标记为待处理,然后手动调用CFRunLoopWakeUp(runloop)来唤醒RunLoop,让其处理这个事件。Source0就是手势识别
UIGestureRecognizer -
Source1 包含了一个mach_port和一个回调(函数指针),被用于通过内核和其他线程互相发送消息。这种Source能主动唤醒RunLoop的线程。Source1是事件响应,通常事件比如 UIButton 点击、touchesBegin/Move/End/Cancel 事件都是在调用 _UIApplicationHandleEventQueue() 进行应用内部的分发。
CFRunLoopTimerRef 是基于时间的触发器,它和NSTimer是toll-free bridged(也就是互相可替换)的,可以混用;它包含了一个时间长度和一个回调;当其被加入到RunLoop时,RunLoop会注册对应的时间点,当达到时间点时,RunLoop会被环形以执行那个回调
CFRunLoopObserverRef 是观察者,每一个Observer都有一个回调(函数指针),当RunLoop状态发生变化时,观察者就能通过回调接受到这个变化,观测的时间点有:
typedef CF_OPTIONS(CFOptionFlags, CFRunLoopActivity) {
    kCFRunLoopEntry         = (1UL << 0), // 即将进入Loop
    kCFRunLoopBeforeTimers  = (1UL << 1), // 即将处理 Timer
    kCFRunLoopBeforeSources = (1UL << 2), // 即将处理 Source
    kCFRunLoopBeforeWaiting = (1UL << 5), // 即将进入休眠
    kCFRunLoopAfterWaiting  = (1UL << 6), // 刚从休眠中唤醒
    kCFRunLoopExit          = (1UL << 7), // 即将退出Loop
};
RunLoop的Mode
CFRunLoopMode结构如下
struct __CFRunLoopMode {
    CFStringRef _name;            // Mode Name, 例如 @"kCFRunLoopDefaultMode"
    CFMutableSetRef _sources0;    // Set
    CFMutableSetRef _sources1;    // Set
    CFMutableArrayRef _observers; // Array
    CFMutableArrayRef _timers;    // Array
    ...
};
CFRunLoop结构如下
struct __CFRunLoop {
    CFMutableSetRef _commonModes;     // Set
    CFMutableSetRef _commonModeItems; // Set<Source/Observer/Timer>
    CFRunLoopModeRef _currentMode;    // Current Runloop Mode
    CFMutableSetRef _modes;           // Set
    ...
};
苹果公开的Mode有两个,这两个Mode都是被标记为common属性,如下:
- kCFRunLoopDefaultMode(UIDefaultRunLoopMode)
- UITrackingRunLoopmode
应用场景举例:
主线程的RunLoop的UIDefaultRunLoopMode是App平时所处的状态,UITrackingRunLoopmode是追踪ScrollView滑动时的状态。当你创建一个Timer并加入到DefaultMode时,Timer会得到重复回调,但是此时滑动一个TableView时,RunLoop会将Mode切换为TrackingRunLoopMode,这时Timer就不会被回调,并且也不会影响滑动操作。
可是有时你需要一个Timer,在两个mode中都能得到回调,办法有两种;
- 1.将这个Timer分别加入到两个Mode中去
- 2.将Timer加入到顶层的RunLoop的commonMode
RunLoop的内部逻辑
根据苹果文档里的说明,RunLoop内部的大概逻辑如下:
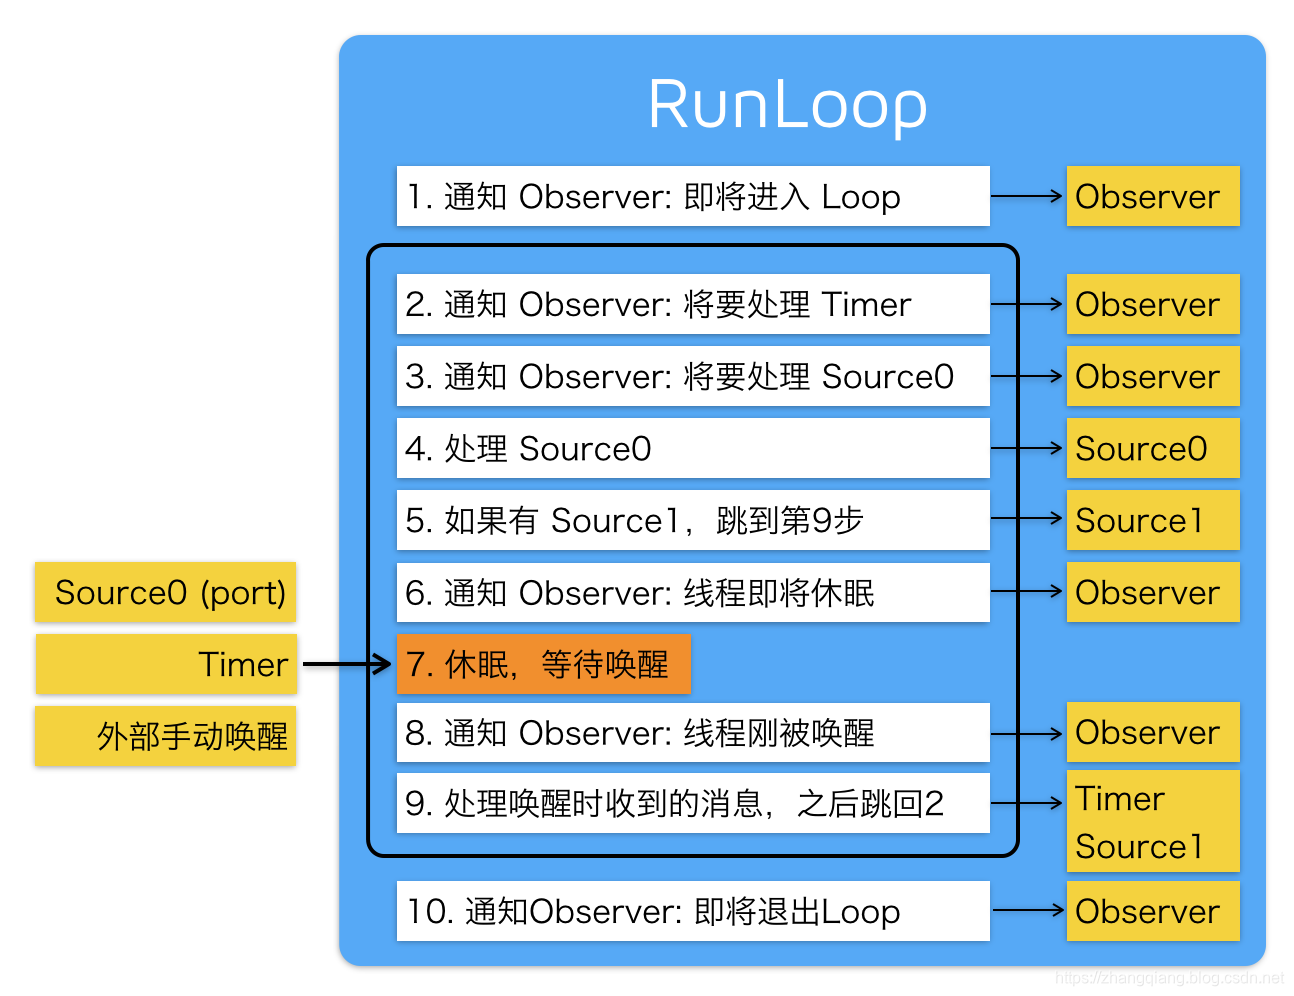
具体看这里
苹果用RunLoop实现的功能
首先我们来了解下App启动后的RunLoop的状态,分别向系统注册了5个mode:
- 1.
kCFRunLoopDefaultMode,App的默认mode,通常主线程在这个mode下运行的 - 2.
UITrackingRunLoopMode,界面跟踪mode,用于UIScrollView追踪触摸滑动时保证界面不受其他mode影响 - 3.
UIInitializationRunLoopMode,在App刚启动时第一个进入的Mode,启动完后便不再使用 - 4.
GSEventReceiveRunLoopMode,接受系统事件的内部mode,通常用不到 - 5.
kCFRunLoopCommonModes,这是一个占位mode,没有实际作用
定时器
NSTimer其实就是CFRunLoopTimerRef,他们之间是toll-free bridged(互相替换)。一个NSTimer注册到RunLoop后,Runloop会为其重新的时间点注册好事件。
例如:10:00, 10:10, 10:20 这个几个时间点。RunLoop为了节省资源,并不会在非常准确的时间点回调这个Timer。Timer有个属性叫做Tolerance(宽容度),表示当时间点到达后,容许有多少的误差。如果某一个时间点错过了,例如执行了一个很长时间的任务,则那个时间点的回调会被跳过去,不会延后执行
CADisplayLink是一个和屏幕刷新率一致的定时器(但实际实现原理更为复杂,和NSTimer并不一样)。如果在两次屏幕刷新之间执行了一个任务,那其中就会有一帧会被跳过去(和NSTimer一样),这就造成了界面卡顿的感觉。尤其是在快速滑动tableView时,即时有一帧的卡顿也会让用户有所察觉。Facebook开源了AsyncDisplayLink(现在改名了叫做Texture)就是为了解决界面卡顿的问题,其内部也用到了RunLoop。
PerformSelector
当调用NSObject的performSelector:afterDelay:后,实际上是在其内部创建了一个Timer并且加入到当前的线程的RunLoop中,所以如果当前线程中没有RunLoop,则这个方法会失效
当调用performSelector:onThread:时,实际上也会创建一个Timer加到对应的线程中去,同样的,如果对应的线程中没有RunLoop,则该方法也会失效
以上的内容摘自:https://blog.ibireme.com/2015/05/18/runloop/
看例子
第一个例子,让一个线程常驻
- (void)viewDidLoad {
    [super viewDidLoad];

    NSLog(@"1.创建线程");
    self.alwasyThread = [[NSThread alloc] initWithTarget:self selector:@selector(alwaysRun) object:nil];
    NSLog(@"2.启动线程,包括:1).线程进入就绪状态;2).线程获得CPU资源后运行状态");
    [self.alwasyThread start];
}

- (void)alwaysRun {
    NSLog(@"该线程一直在活跃 %@", [NSThread currentThread]);

    self.runloop = [NSRunLoop currentRunLoop];
    [self.runloop addPort:[NSPort port] forMode:NSDefaultRunLoopMode];
    [self.runloop run];

    NSLog(@"不会执行到这里");
}

- (void)touchesBegan:(NSSet<UITouch *> *)touches withEvent:(UIEvent *)event
{
    [self performSelector:@selector(subthreadRun) onThread:self.alwasyThread withObject:nil waitUntilDone:NO];
}

- (void)subthreadRun {
    NSLog(@"你点击了屏幕 %@", [NSThread currentThread]);

    NSTimer *timer = [NSTimer timerWithTimeInterval:1.0 target:self selector:@selector(timerRun) userInfo:nil repeats:YES];
    [self.runloop addTimer:timer forMode:NSDefaultRunLoopMode];
}

- (void)timerRun {
    static int i = 0;
    NSLog(@"%d", i++);

    if (i == 5) {
        NSLog(@"3.线程进入阻塞状态,阻塞3秒钟");
        //    [NSThread sleepForTimeInterval:3.0f];
        [NSThread sleepUntilDate:[NSDate dateWithTimeIntervalSinceNow:3.0]];
        sleep(3);

        NSLog(@"4.退出线程,退出线程后,该方法下面的代码不在执行");
        [NSThread exit];

        NSLog(@"该线程挂了");
    }
}
输出了
2017-10-17 13:29:32.900140+0800 test[30877:1429252] 1.创建线程
2017-10-17 13:29:32.900374+0800 test[30877:1429252] 2.启动线程,包括:1).线程进入就绪状态;2).线程获得CPU资源后运行状态
2017-10-17 13:29:32.901087+0800 test[30877:1429358] 该线程一直在活跃 <NSThread: 0x604000461580>{number = 3, name = (null)}
2017-10-17 13:29:35.233913+0800 test[30877:1429358] 你点击了屏幕 <NSThread: 0x604000461580>{number = 3, name = (null)}
2017-10-17 13:29:36.236729+0800 test[30877:1429358] 0
2017-10-17 13:29:37.235340+0800 test[30877:1429358] 1
2017-10-17 13:29:38.237163+0800 test[30877:1429358] 2
2017-10-17 13:29:39.235978+0800 test[30877:1429358] 3
2017-10-17 13:29:40.240552+0800 test[30877:1429358] 4
2017-10-17 13:29:40.240877+0800 test[30877:1429358] 3.线程进入阻塞状态,阻塞3秒钟
2017-10-17 13:29:43.243757+0800 test[30877:1429358] 4.退出线程,退出线程后,该方法下面的代码不在执行
我们可以看到,一个线程的生命周期,从开始到结束,如果我们不点击屏幕的话,那么这个线程就是一直常驻的,当点击完屏幕后,阻塞三秒钟,就退出线程了,线程退出runloop也就挂了
下面在来一个例子,监听runloop的状态
- (void)viewDidLoad {
    [super viewDidLoad];

    NSLog(@"%@ 1.创建线程", [NSThread currentThread]);
    self.alwasyThread = [[NSThread alloc] initWithTarget:self selector:@selector(alwaysRun) object:nil];
    NSLog(@"%@ 2.启动线程,包括:1).线程进入就绪状态;2).线程获得CPU资源后运行状态", [NSThread currentThread]);
    [self.alwasyThread start];
}

- (void)alwaysRun {
    NSLog(@"%@ 该线程一直在活跃", [NSThread currentThread]);

    CFRunLoopObserverRef runLoopObserver = CFRunLoopObserverCreateWithHandler(CFAllocatorGetDefault(), kCFRunLoopAllActivities, true, 0, ^(CFRunLoopObserverRef observer, CFRunLoopActivity activity) {
        switch (activity) {
            case kCFRunLoopEntry:
                NSLog(@"%@ 即将进入 runloop", [NSThread currentThread]);
                break;
            case kCFRunLoopBeforeTimers:
                NSLog(@"%@ 即将处理 Timer", [NSThread currentThread]);
                break;
            case kCFRunLoopBeforeSources:
                NSLog(@"%@ 即将处理 Source", [NSThread currentThread]);
                break;
            case kCFRunLoopBeforeWaiting:
                NSLog(@"%@ 即将进入休眠", [NSThread currentThread]);
                break;
            case kCFRunLoopAfterWaiting:
                NSLog(@"%@ 从休眠中唤醒 runloop", [NSThread currentThread]);
                break;
            case kCFRunLoopExit:
                NSLog(@"%@ 即将退出 runloop ", [NSThread currentThread]);
                break;
            default:
                break;
        }
    });

    CFRunLoopAddObserver(CFRunLoopGetCurrent(), runLoopObserver, kCFRunLoopDefaultMode);

    NSRunLoop *runloop = [NSRunLoop currentRunLoop];
    [runloop addPort:[NSPort port] forMode:NSDefaultRunLoopMode];
    [runloop run];

    NSLog(@"%@ 不会执行到这里", [NSThread currentThread]);
}

- (void)touchesBegan:(NSSet<UITouch *> *)touches withEvent:(UIEvent *)event
{
    [self performSelector:@selector(subthreadRun) onThread:self.alwasyThread withObject:nil waitUntilDone:NO];
}

- (void)subthreadRun {
    static int i = 0;
    i++;
    NSLog(@"%@ 你点击了%d次屏幕 ", [NSThread currentThread], i);

    if (i == 2) {
        NSLog(@"3.线程进入阻塞状态,阻塞3秒钟");
        //[NSThread sleepForTimeInterval:3.0f];
        //[NSThread sleepUntilDate:[NSDate dateWithTimeIntervalSinceNow:3.0]];
        sleep(3);

        NSLog(@"4.退出线程,退出线程后,该方法下面的代码不在执行");
        [NSThread exit];

        NSLog(@"该线程挂了");
    }
}
输出结果为:
2017-10-17 test[35026:1575126] <NSThread: 0x600000260c40>{number = 1, name = main} 1.创建线程
2017-10-17 test[35026:1575126] <NSThread: 0x600000260c40>{number = 1, name = main} 2.启动线程,包括:1).线程进入就绪状态;2).线程获得CPU资源后运行状态
2017-10-17 test[35026:1575230] <NSThread: 0x604000461200>{number = 3, name = (null)} 该线程一直在活跃
2017-10-17 test[35026:1575230] <NSThread: 0x604000461200>{number = 3, name = (null)} 即将进入 runloop
2017-10-17 test[35026:1575230] <NSThread: 0x604000461200>{number = 3, name = (null)} 即将处理 Timer
2017-10-17 test[35026:1575230] <NSThread: 0x604000461200>{number = 3, name = (null)} 即将处理 Source
2017-10-17 test[35026:1575230] <NSThread: 0x604000461200>{number = 3, name = (null)} 即将进入休眠
2017-10-17 test[35026:1575230] <NSThread: 0x604000461200>{number = 3, name = (null)} 从休眠中唤醒 runloop
2017-10-17 test[35026:1575230] <NSThread: 0x604000461200>{number = 3, name = (null)} 即将处理 Timer
2017-10-17 test[35026:1575230] <NSThread: 0x604000461200>{number = 3, name = (null)} 即将处理 Source
2017-10-17 test[35026:1575230] <NSThread: 0x604000461200>{number = 3, name = (null)} 你点击了1次屏幕
2017-10-17 test[35026:1575230] <NSThread: 0x604000461200>{number = 3, name = (null)} 即将退出 runloop
2017-10-17 test[35026:1575230] <NSThread: 0x604000461200>{number = 3, name = (null)} 即将进入 runloop
2017-10-17 test[35026:1575230] <NSThread: 0x604000461200>{number = 3, name = (null)} 即将处理 Timer
2017-10-17 test[35026:1575230] <NSThread: 0x604000461200>{number = 3, name = (null)} 即将处理 Source
2017-10-17 test[35026:1575230] <NSThread: 0x604000461200>{number = 3, name = (null)} 即将进入休眠
2017-10-17 test[35026:1575230] <NSThread: 0x604000461200>{number = 3, name = (null)} 从休眠中唤醒 runloop
2017-10-17 test[35026:1575230] <NSThread: 0x604000461200>{number = 3, name = (null)} 即将处理 Timer
2017-10-17 test[35026:1575230] <NSThread: 0x604000461200>{number = 3, name = (null)} 即将处理 Source
2017-10-17 test[35026:1575230] <NSThread: 0x604000461200>{number = 3, name = (null)} 你点击了2次屏幕
2017-10-17 test[35026:1575230] 3.线程进入阻塞状态,阻塞3秒钟
2017-10-17 test[35026:1575230] 4.退出线程,退出线程后,该方法下面的代码不在执行
通过输出结果得知,runloop在没有任务或事件处理时,就会进入休眠状态,当我从屏幕上点击一下,runloop就马上唤醒了,然后runloop的状态依次如下:
进入即将处理timer -> 即将处理 Source -> 处理用户事件 -> 退出runloop,在进入runloop -> 即将处理Timer -> 即将处理Source -> 即将进入休眠
退出RunLoop的三种方式
-
1.当线程退出了,runloop就结束了
-
2.在运行runloop时,设置一个截止时间,如:
[self.runloop runUntilDate:[NSDate dateWithTimeIntervalSinceNow:10]];10秒后runloop结束了 -
3.主动调用
CFRunLoopStop(CFRunLoopRef rl)
NSPort 是一个抽象类,表示通信通道,它的子类有: -
NSMachPort 是本地机器的端口通信,
-
NSSocketPort 可以是本地机器,也可以远程机器的端口消息通道
-
NSMessagePort 是一个在通信过程使用的消息类,供NSMachPort和- NSSocketPort使用
iOS中的锁
NSOperation的认知
iOS的Runloop认知
Autolayout代码编写基本使用
明天看
https://yq.aliyun.com/articles/713299
https://blog.51cto.com/14121524/2412956?source=dra
https://www.jianshu.com/p/c89565111337
