以下内容为学习下图这本书做的笔记,非原创。做笔记主要是为了实践一下看看结果加深记忆。
目录:
1. 填充文字 2. 轮廓文字 3. 文本样式 4. 测量宽度
用法: context.fillText( 在画布上输出的文本,开始绘制文本的x坐标位置, 开始绘制文本的y坐标位置, 允许的最大文本宽度(以像素计)(可选) )
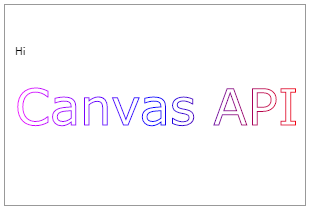
① 用 fillText() 方法在画布上绘制文本 “Hi” 和 "Canvas API"
语句:
 1 <canvas id="canvas" width="300" height="200" style="border:solid 1px #999;"></canvas>
 2 <script>
 3     draw();
 4     function draw(){
 5         //使用document.getElementById() 方法, 根据 canvas 元素的 id 获取对 canvas 的引用
 6         var ctx = document.getElementById('canvas').getContext('2d');
 7         var font = "40px Georgia";
 8         ctx.fillText("Hi", 10, 50); //绘制填色文字
 9         ctx.font = "50px Verdana";
10         //创建渐变
11         var gradient = ctx.createLinearGradient(0, 0, canvas.width, 0);
12         gradient.addColorStop("0","magenta");  //通过多个 addColorStop() 方法来定义渐变,与 createLinearGradient()方法配合使用
13         gradient.addColorStop("0.5","blue");
14         gradient.addColorStop("1.0","red");
15         //用渐变填色
16         ctx.fillStyle=gradient;
17         ctx.fillText("Canvas API",10, 120);
18     }
19 </script>
页面表现:
扫描二维码关注公众号,回复:
8784837 查看本文章


用法: context.strokeText( 在画布上输出的文本,开始绘制文本的x坐标位置, 开始绘制文本的y坐标位置, 允许的最大文本宽度(以像素计)(可选) )
① 用 strokeText() 方法绘制文本 “ Hi ” 和 " Canvas API "
语句:
 1 <canvas id="canvas" width="300" height="200" style="border:solid 1px #999;"></canvas>
 2 <script>
 3     draw();
 4     function draw(){
 5         //使用document.getElementById() 方法, 根据 canvas 元素的 id 获取对 canvas 的引用
 6         var ctx = document.getElementById('canvas').getContext('2d');
 7         var font = "40px Georgia";
 8         ctx.fillText("Hi", 10, 50); //绘制填色文字
 9         ctx.font = "50px Verdana";
10         //创建渐变
11         var gradient = ctx.createLinearGradient(0, 0, canvas.width, 0);
12         gradient.addColorStop("0","magenta");  //通过多个 addColorStop() 方法来定义渐变,与 createLinearGradient()方法配合使用
13         gradient.addColorStop("0.5","blue");
14         gradient.addColorStop("1.0","red");
15         //用渐变填色
16         ctx.strokeStyle=gradient;
17         ctx.strokeText("Canvas API",10, 120);
18     }
19 </script>
页面表现:
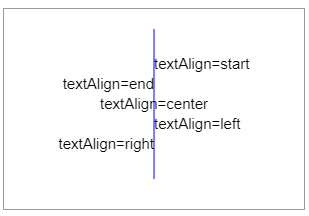
① 在x轴150px的位置创建一条竖线。位置150就被定义为所有文本的锚点。然后比较每种 textAlign 属性值对齐效果
语句:
 1 <canvas id="canvas" width="300" height="200" style="border:solid 1px #999;"></canvas>
 2 <script>
 3     draw();
 4     function draw(){
 5         //使用document.getElementById() 方法, 根据 canvas 元素的 id 获取对 canvas 的引用
 6         var ctx = document.getElementById('canvas').getContext('2d');
 7         //在位置 150 创建一条竖线
 8         ctx.strokeStyle ="blue";
 9         ctx.moveTo(150, 20);
10         ctx.lineTo(150, 170);
11         ctx.stroke();
12         ctx.font="15px Arial";
13         //显示不同的 textAlign 值,textAlign:设置正在绘制的文本水平对齐方式
14         ctx.textAlign="start";  //文本在指定的位置 开始
15         ctx.fillText("textAlign=start",150,60);
16         ctx.textAlign="end";    //文本在指定的位置 结束
17         ctx.fillText("textAlign=end",150,80);
18         ctx.textAlign="center"; //文本的中心被放置在指定的位置
19         ctx.fillText("textAlign=center",150,100);
20         ctx.textAlign="left";   //文本左对齐
21         ctx.fillText("textAlign=left",150,120);
22         ctx.textAlign="right";  //文本右对齐
23         ctx.fillText("textAlign=right",150,140);
24     }
25 </script>
页面表现:
② 在 y 轴 100px 的位置创建一条水平线。位置 100 就被定义为用蓝色填充的矩形。然后比较每种 textBaseline 属性值对齐效果。
语句:
 1 <canvas id="canvas" width="350" height="300" style="border:solid 1px #999;"></canvas>
 2 <script>
 3     draw();
 4     function draw(){
 5         //使用document.getElementById() 方法, 根据 canvas 元素的 id 获取对 canvas 的引用
 6         var ctx = document.getElementById('canvas').getContext('2d');
 7         //在位置 y = 100 绘制蓝色线条
 8         ctx.strokeStyle = "blue";
 9         ctx.moveTo(5, 100);
10         ctx.lineTo(395, 100);
11         ctx.stroke();
12         ctx.font="20px Arial";
13         //在 y=100 以不同的 textBaseline 值放置每个单词
14         //textBaseline :设置正在绘制的文本基线的对齐方式,即文本垂直对齐方式
15         ctx.textBaseline="top";     //文本基线是 em 方框的顶端
16         ctx.fillText("top",5,100);
17         ctx.textBaseline="bottom";  //文本基线是 em 方框的底端
18         ctx.fillText("bottom",50,100);
19         ctx.textBaseline="middle";  //文本基线是 em 方框的正中
20         ctx.fillText("middle",120,100);
21         ctx.textBaseline="alphabetic";  //文本基线是普通的字母基线
22         ctx.fillText("alphabetic",190,100);
23         ctx.textBaseline="hanging";     //文本基线是悬挂基线
24         ctx.fillText("hanging",250,100);
25     }
26 </script>
页面表现:

① 测量文字宽度
用法:context.measureText( 要绘制的文字 )
语句:
 1 <canvas id="canvas" width="350" height="300" style="border:solid 1px #999;"></canvas>
 2 <script>
 3     draw();
 4     function draw(){
 5         //使用document.getElementById() 方法, 根据 canvas 元素的 id 获取对 canvas 的引用
 6         var ctx = document.getElementById('canvas').getContext('2d');
 7         ctx.font = "bold 20px 楷体";
 8         ctx.fillStyle = "blue";
 9         var txt1 = "HTML5+CSS3";
10         ctx.fillText(txt1, 10, 40);
11         var txt2 = "以上字符串的宽度为:";
12         var mtx1 = ctx.measureText(txt1);
13         var mtx2 = ctx.measureText(txt2);
14         ctx.font = "bold 15px 宋体";
15         ctx.fillStyle = "red";
16         ctx.fillText(txt2, 10, 80);
17         ctx.fillText(mtx1.width,mtx2.width,80);
18     }
19 </script>
页面表现:
