我们的ftp服务器搭建好啦,但是我们不想让别人访问,这时候我们可以对系统用户、匿名用户、ftp用户进行认证
这时我们需要一个pam_mysql的rpm包,注:centos6中的epel源中有他的rpm包,我们可以直接下载使用,在centos7中因为epel源中没有pam_mysql的rpm包,所以我们要编译安装pam_mysql。
pam是一个可插入认证模块
centos6:
首先我们安装一个pam_mysql的rpm包
[root@localhost ~]# yum install pam_mysql -y
安装结束之后开始创建用户账户vsftpd数据库
[root@localhost ~]# mysql
Welcome to the MySQL monitor. Commands end with ; or \g.
Your MySQL connection id is 4
Server version: 5.1.73 Source distribution
Copyright (c) 2000, 2013, Oracle and/or its affiliates. All rights reserved.
Oracle is a registered trademark of Oracle Corporation and/or its
affiliates. Other names may be trademarks of their respective
owners.
Type 'help;' or '\h' for help. Type '\c' to clear the current input statement
mysql> drop database vsftpd;
-> Query OK, 1 row affected (0.18 sec)
mysql> select * from all;
ERROR 1064 (42000): You have an error in your SQL syntax; check the manual that corresponds to your MySQL server version for the right syntax to use near 'all' at line 1
mysql> \q
Bye
[root@localhost ~]# mysql
Welcome to the MySQL monitor. Commands end with ; or \g.
Your MySQL connection id is 5
Server version: 5.1.73 Source distribution
Copyright (c) 2000, 2013, Oracle and/or its affiliates. All rights reserved.
Oracle is a registered trademark of Oracle Corporation and/or its
affiliates. Other names may be trademarks of their respective
owners.
Type 'help;' or '\h' for help. Type '\c' to clear the current input statement.
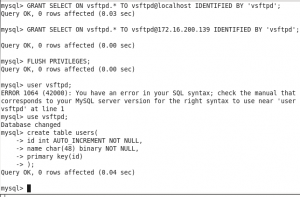
mysql> CREATE database vsftpd;
Query OK, 1 row affected (0.00 sec)
mysql> GRANT SELECT ON vsftpd.* TO vsftpd@localhost IDENTIFIED BY 'vsftpd';
Query OK, 0 rows affected (0.03 sec)
mysql> GRANT SELECT ON vsftpd.* TO [email protected] IDENTIFIED BY 'vsftpd';
Query OK, 0 rows affected (0.00 sec)
mysql> FLUSH PRIVILEGES;
Query OK, 0 rows affected (0.00 sec)
mysql> use vsftpd;
Database changed
mysql> create table users(
-> id int AUTO_INCREMENT NOT NULL,
-> name char(48) binary NOT NULL,
-> primary key(id)
-> );
Query OK, 0 rows affected (0.04 sec)
mysql>
添加的测试用户
mysql> create table users( id int AUTO_INCREMENT NOT NULL, name char(20) binary NOT NULL,password char(48) binary NOT NULL, primary key(id) );
Query OK, 0 rows affected (0.00 sec)

mysql> insert into users(name,password) values('tom',password('123'));
Query OK, 1 row affected (0.01 sec)

mysql> insert into users(name,password) values('jerry',password('123'));Query OK, 1 row affected (0.00 sec)
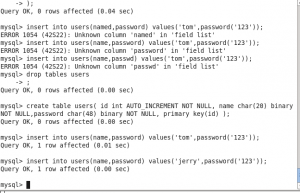
增加一个vsftpd数据库,在里面创建一张表users,主键是自动增长的id,name:tom、jerry密码均为123,数据库创建完成,
下面开始进行配置pam登录认证
建立pam认证认证所需的文件。
[root@localhost ~]# vim /etc/pam.d/vsftpd.mysql
auth required /lib64/security/pam_mysql.so user=vsftpd passwd=vsftpd host=172.16.200.140 db=vsftpd table=users usercolumn=name passwdcolumn=password crypt=2
account required /lib64/security/pam_mysql.so user=vsftpd passwd=vsftpd host=172.16.200.140 db=vsftpd table=users usercolumn=name passwdcolumn=password crypt=2
修改vsftpd的配置文件,使其适应mysql认证
[root@localhost ~]# useradd -s /sbin/nologin -d /var/ftproot vuser
useradd: warning: the home directory already exists.
Not copying any file from skel directory into it.
Creating mailbox file: File exists
[root@localhost ~]# chmod go+x /var/ftproot/
[root@localhost ~]# vim /etc/vsftpd/vsftpd.conf

在这里因为我之前创建过这个文件夹所以会报错,大家可以忽略,
对vsftpd的配置文件进行配置:在文件末尾添加以下内容
pam_service_name=vsftpd.mysql
userlist_enable=YES
tcp_wrappers=YES

anon_world_readable_only=NO
virtual_use_local_privs=YES

guest_enable=YES
guest_username=vuser

user_config_dir=/etc/vsftpd/vusers_config
配置结束重启服务
[root@localhost ~]# service mysqld restart
Stopping mysqld:                                           [  OK  ]
Starting mysqld:                                           [  OK  ]
[root@localhost ~]# service vsftpd restart
Shutting down vsftpd:                                      [  OK  ]
Starting vsftpd for vsftpd:                                [  OK  ]
[root@localhost ~]# ftp 172.16.200.140
Connected to 172.16.200.140 (172.16.200.140).
220 Welcome to blah FTP service.
Name (172.16.200.140:root): tom
331 Please specify the password.
Password:
230 Login successful.
Remote system type is UNIX.
Using binary mode to transfer files.
ftp> ls
227 Entering Passive Mode (172,16,200,140,210,7).
150 Here comes the directory listing.
226 Transfer done (but failed to open directory).
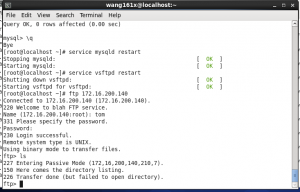
是不是很简单啊!!!
如果我们想要让tom使用ftp服务器,而不让jerry使用,我们可以使用
ftp> mkdir bcd
257 "/bcd" created
ftp> ls
200 PORT command successful. Consider using PASV.
150 Here comes the directory listing.
drwx------    2 501      501          4096 Jan 17 03:18 abc
drwx------    2 501      501          4096 Jan 17 03:20 bcd
226 Directory send OK.
ftp>
是不是很简单呢!不过在tom这个用户的家目录还没有文件,如果登录出现226 Transfer done (but failed to open directory).时,可以创建一个文件夹,然后ls即可
centos7编译安装pam_mysql
由于centos7的epel源中没有pam_mysql,所以我们需要编译安装,
因为base源中有vsftpd所以我们直接使用编译好的rpm包
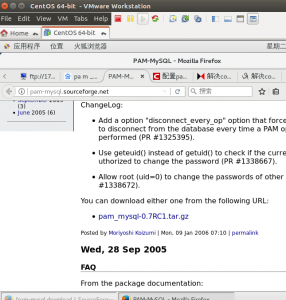
首先我们先到官网上下载pam_mysql的源码。
http://pam-mysql.sourceforge.net/
接下来开始编译pam模块
在这里看哦内定会有各种各样的错误,但是不要气馁,请继续看我的文章。
[root@bogon wang161x]# tar xf pam_mysql-0.7RC1.tar.gz
[root@bogon wang161x]# cd pam_mysql-0.7RC1/
[root@bogon pam_mysql-0.7RC1]# ./configure --with-mysql=/usr/local/mysql --with-openssl --with-pam-mods-dir=/lib/security/
..........
........
........
configure: error: Cannot find pam headers. Please check if your system is ready for pam module development
好吧!!出错了,不过这次错误还好。缺少了一个devel包,所以我们安装一个devel包
[root@bogon pam_mysql-0.7RC1]# yum install pam-devel -y
[root@bogon pam_mysql-0.7RC1]# ./configure --with-mysql=/usr/local/mysql --with-openssl --with-pam-mods-dir=/lib/security/

结束了,哈哈是不是有些简单呢!但是我当初可是装了两天才装好!!!全是坑
下面是我在安装过程中的错误总结:
如果遇到在编译安装pam_mysql模块中遇到configure: error: Your system doesn’t appear to be configured to use PAM. Perhaps you need to specify the correct location where the PAM modules reside. 情况,可以尝试添加一个选项 –with-pam-mods-dir=/lib/security/ 自己手动指明pam库的存放位置。
configure: error: Cannot find pam headers. Please check
if your system is ready for pam module development.
yum install pam-devel
