1.什么是Express?
Express是基于 Node.js 平台,快速、开放、极简的 Web 开发框架,最新版本为Express4.17.1。
2.Express的安装
npm install express --save
当然是在你安装好npm和node的前提后,运行上面安装命令
+ [email protected]
added 50 packages from 37 contributors in 5.387s
还需要安装一下
sudo npm -g install express-generator
/usr/local/bin/express -> /usr/local/lib/node_modules/express-generator/bin/express-cli.js
+ [email protected]
查看express -h
pxpress 的帮助文件
 express -h

  Usage: express [options] [dir]

  Options:

        --version        output the version number
    -e, --ejs            add ejs engine support
        --pug            add pug engine support
        --hbs            add handlebars engine support
    -H, --hogan          add hogan.js engine support
    -v, --view <engine>  add view <engine> support (dust|ejs|hbs|hjs|jade|pug|twig|vash) (defaults to jade)
        --no-view        use static html instead of view engine
    -c, --css <engine>   add stylesheet <engine> support (less|stylus|compass|sass) (defaults to plain css)
        --git            add .gitignore
    -f, --force          force on non-empty directory
    -h, --help           output usage information
3.可爱的Hello World
Hello world example 例子是每个语言或者是框架的入门必备
编写到app.js
#定义一个express
const express = require('express')
#声明变量app
const app = express()
#request 请求为/hello 返回 Hello keny88888
app.get('/hello’, (req, res) => res.send('Hello keny 风清扬!'))

app.listen(3000, () => console.log('Example app listening on port 3000!'))
运行node app.js
4.用命令express,使用ejs模块引擎建立Server的项目
  #运行命令
  express --ejs Server

  warning: option `--ejs' has been renamed to `--view=ejs'


   create : Server/
   create : Server/public/
   create : Server/public/javascripts/
   create : Server/public/images/
   create : Server/public/stylesheets/
   create : Server/public/stylesheets/style.css
   create : Server/routes/
   create : Server/routes/index.js
   create : Server/routes/users.js
   create : Server/views/
   create : Server/views/error.ejs
   create : Server/views/index.ejs
   create : Server/app.js
   create : Server/package.json
   create : Server/bin/
   create : Server/bin/www

   change directory:
     $ cd Server

   install dependencies:
     $ npm install

   run the app:
     $ DEBUG=server:* npm start

#本机运行效果
XXXXX@-Pro-3 express % cd Server
XXXXXX@Pro-3 Server % npm install
npm notice created a lockfile as package-lock.json. You should commit this file.
added 53 packages from 38 contributors in 6.858s
启动了服务,3000端口,执行效果图

4.1适当的修改一下生成的代码
修改一下route.js增加一个router,代码如下
#访问hello的时候,返回keny 风清扬!
router.get('/hello', function(req, res, next) {

res.render('index', { title: 'keny 风清扬!' });

});
重新运行DEBUG=server:* npm start,访问页面出现效果图为

注意:默认端口为3000端口,如果需要修改端口,可以增加PORT=9090 ;例如:DEBUG=server:* PORT=9090 npm start
4.2查看一下自动生成的目录结构
使用编辑器Visual Studio Code 打开项目,(提示:还可以用WebStore,idea,Atom等编辑工具打开,读者可以根据自己常用的工具进行node的编辑和开发工作)
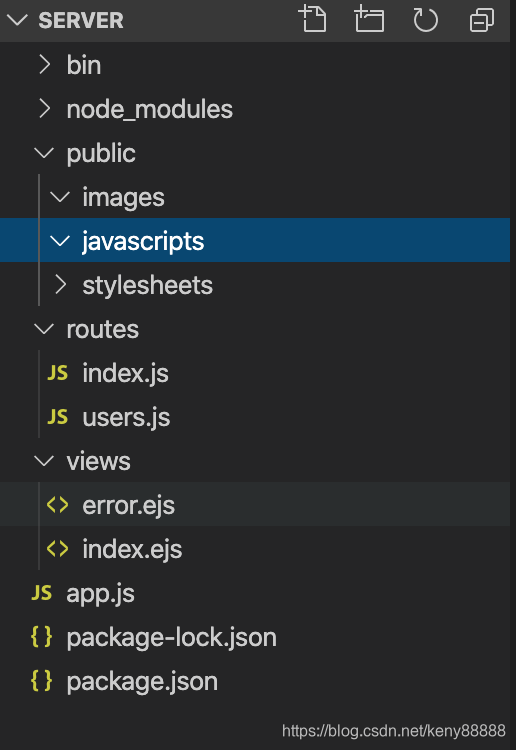
服务器生成目录有、bin、public、node_modules、views、routes目录,bin是命令目录,public为资源目录,node_modules node的模块,views为页面渲染,routes为路由目录,程序的入口是从app.js目录进去,package.json描述安装包的详情;

4.3查看页面的router
用F12打开浏览器,可以看到

请求的时候会有304 http状态
备注:
复习了一下http 304状态
客户端在请求一个文件的时候,发现自己缓存的文件有 Last Modified ,那么在请求中会包含 If Modified Since ,这个时间就是缓存文件的 Last Modified 。因此,如果请求中包含 If Modified Since,就说明已经有缓存在客户端。服务端只要判断这个时间和当前请求的文件的修改时间就可以确定是返回 304 还是 200 。
对于静态文件,例如:CSS、图片,服务器会自动完成 Last Modified 和 If Modified Since 的比较,完成缓存或者更新。但是对于动态页面,就是动态产生的页面,往往没有包含 Last Modified 信息,这样浏览器、网关等都不会做缓存,也就是在每次请求的时候都完成一个 200 的请求。
因此,对于动态页面做缓存加速,首先要在 Response 的 HTTP Header 中增加 Last Modified 定义,其次根据 Request 中的 If Modified Since 和被请求内容的更新时间来返回 200 或者 304 。虽然在返回 304 的时候已经做了一次数据库查询,但是可以避免接下来更多的数据库查询,并且没有返回页面内容而只是一个 HTTP Header,从而大大的降低带宽的消耗,对于用户的感觉也是提高。当这些缓存有效的时候,通过 Fiddler 或HttpWatch 查看一个请求会得到这样的结果:
第一次访问 200
按F5刷新(第二次访问) 304
按Ctrl+F5强制刷新 200
