文章目录
vuex是什么?
vuex 是一个专为 Vue.js 应用程序开发的状态管理模式。它采用集中式存储管理所有组件的状态,并以相应的规则保证状态。
为什么会出现?
为什么出现:vue一般是单项数据流,当我们的应用遇到多个组件共享状态时,单向数据流的简洁性很容易被破坏:
多个视图依赖于同一状态、来自不同视图的行为需要变更同一状态。
作用:多个组件共享数据或者是跨组件传递数据
怎么使用?
// store.js
1.引入Vuex插件;
Vue.use(Vuex);

2.将Vuex.Store这个类实例化,并传入一些配置
const store = new Vuex.Store({
    state:{
        count:0
    },
    mutations:{
        increment(state){
            state.count++;
        },
        del(state){
            state.count--;
        },
    },
    actions:{
        asyncAdd({commit}){
            setTimeout(() => {
                commit("increment");
            }, 2000);
        }
    }
})

3.将store的实例配置给Vue
// main.js
new Vue({
  store,
  render: h => h(App),
}).$mount('#app')


4.组件中使用时
// App.vue
add(){
    this.$store.commit('increment');
},
asyncAdd(){
    this.$store.dispatch('asyncAdd');
}

</script>
怎么实现?
1、vuex的核心api:
install函数:用来注册插件到vue里(说白了就是在vue中执行这个函数,并把vue当作参数传入此函数,使用vue的方法和绑定store到各个组件上)
store类:state、getters、mutations、actions、modules、plugins
辅助函数:mapState、mapActions、mapMutations
围绕这些问题实现
1、怎么让每个vue组件都能拿到$store?
2、怎么实现state数据响应式?
3、getters怎么实现?
4、commit怎么去触发mutation,dispatch怎么触发actions?
5、plugins是怎么实现?
6、mapState怎么实现?
1、给每个实例注入$store
let Vue
const install = (_Vue) => {
  Vue = _Vue
  // 使用vue的混入方法,在创建之前,给每个组件都增加$store属性
  Vue.mixin({
    // 创建之前会被执行
    beforeCreate () {
      // 根实例有store属性
      if (this.$options && this.$options.store) {
        this.$store = this.$options.store
      } else {
      // 根实例上没有的store属性,往父亲节点找
      // new Vue({store}) 这里已经在根组件挂载有store属性
        this.$store = this.$parent && this.$parent.$store
      }
    }
  })
}
export default {
  install // 给用户提供一个install方法,默认会被调用
}
在install方法里面,用vue.mixin混入,在beforeCreate的生命周期的钩子函数,使得当每个组件实例化的时候都会调用这个函数,给自己赋值一个store属性
2、设置state响应数据
class Store {
  constructor (options) {
    // this.vm  = options.state   只是单纯获取state数据,但是数据修改不会更新界面
    /** 借用Vue的双向绑定机制让Vuex中data变化实时更新界面 */
    this.vm = new _Vue({
      data: {
        state: options.state
      }
    })
  }
/* 类的属性访问器
    访问state对象时候,就直接返回响应式的数据
    Object.defineProperty get 同理
  */
  get state () {
    return this.vm.state
  }
}
利用vue的响应式原理,让state的修改都可以更新回视图,而不是单纯获取state数据
3、getters
getters从根本上就是computed,给你返回一些派生的状态(对数据进行过滤操作)
// 简化代码,封装遍历方法
const forEach = (obj, callback) => {
  Object.keys(obj).forEach((key) => {
    callback(key, obj[key])
  })
}
forEach(getters, (getterName, fn) => {
  Object.defineProperty(store.getters, getterName, {
    get () {
      // 让getter执行自己的状态 传入
      return fn(state)
    }
  })
})
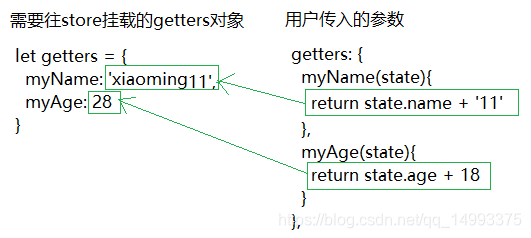
遍历用户传入的参数获取属性名,利用Object.defineProperty的get获取方法执行的结果,赋值到getters对象对应的属性名上,用户通过this.getters.myName就可以调用对应的值
4、mutations
特点:
1)不能直接改变 store 中的状态。改变 store 中的状态的唯一方法是提交 (commit) mutation。
2)每个 mutation 都有一个字符串的 事件类型 (type) 和 一个 回调函数 (handler)。调用 store.commit(type, payload) 方法来触发mutations中的相关方法。

forEach(mutations, (mutationName, fn) => {
      store.mutations[mutationName] || (store.mutations[mutationName] = [])
      store.mutations[mutationName].push((payload) => { // 先把用户传入的mutations参数的属性和方法保存到store实例上的this.mutations对象里面
        fn(state, payload)  // 参数是state数据
      })
    })

// 用户通过this.$store.commit('syncAdd', 10) 传入属性名和荷载,找到对应的函数,遍历执行
commit = (type, payload) => {
  this.mutations[type].forEach(fn => fn(payload))
}

5、actions
actions和mutations的区别:
①action提交的是mutation,而不是直接变更状态
②actions用于处理一些异步事件,而mutations一般用于处理同步事件
③通过store.dispatch触发action,参数是vuex.store实例(因为modules需要获取上下文)
通过store.commit触发mutation,参数是state,payload
actions也可以实现同步函数,但是vuex要求必须遵从原则
forEach(actions, (actionName, fn) => {
    store.actions[actionName] || (store.actions[actionName] = [])
    store.actions[actionName].push((payload) => {
      fn(store, payload)  // 参数是vuex.store实例
   	})
})

// 用户通过this.$store.dispatch('syncAdd', 10) 传入属性名和荷载,找到对应的函数,遍历执行
dispatch = (type, payload) => {
    this.actions[type].forEach(fn => fn(payload))
}
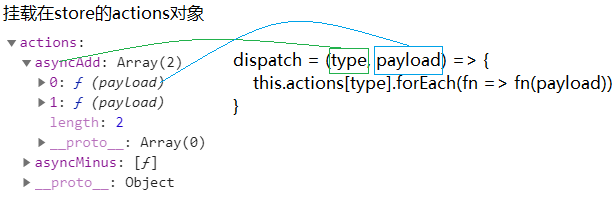
跟mutations差不多,只是传入的参数不一样,需要注意的点
6、modules
打印出来,我们可以看到store挂载一个module集合对象
import Vuex from 'vuex'
mounted () {
    console.log(this.$store._modules) // ModuleCollection {root: Module}
},
格式化成我们需要的:
let root = {
  _raw: options,
  _children: {
    a: {
      _raw: {},
      _children: {},
      state: { a: 1 }
    },
    b: {}
  },
  state: options.state
}

1)通过new ModuleCollection()实例,格式化传入的参数:主要通过遍历注册子模块
2)通过installModule(),递归安装每个模块,把每个模块的state、getters等数据都挂载到根state、getters上
class ModuleCollection {
  constructor (rootModule) {
    // 注册模块
    this.register([], rootModule)
  }
  register (path, rootModule) { // 将模块格式化
    let newModule = {
      _raw: rootModule,
      _children: rootModule.modules,
      state: rootModule.state
    }

    if (path.length === 0) { // 如果是根模块,将这个模块挂载到根实例上
      this.root = newModule
    } else {
      // 递归调用reduce方法 [a] 找出c的父级,再挂上去
      let parent = path.slice(0, -1).reduce((pre, cur) => { // pre 初始值  cur 当前元素
        return pre._children[cur] // 递归把children挂载在父级别的_children属性下
      }, this.root)
      parent._children[path[path.length - 1]] = newModule
    }
    // 遍历注册子模块
    // console.log(rootModule.modules) // {a: {…}, b: {…}}    {c: {…}}    {d: {…}}
    if (rootModule.modules) { // 如果有modules 开始重新再次注册
      forEach(rootModule.modules, (moduleName, value) => {
        this.register(path.concat(moduleName), value) // 循环两次,第一次[a],第二次[b] ,而不是[a,b]
      })
    }
  }
}

/** 安装模块 */
const installModule = (store, state, path, rootModule) => {
  console.log(state)
  if (path.length > 0) {
    let parent = path.slice(0, -1).reduce((pre, cur) => {
      return pre[cur]
    }, store.state)
    /** 利用Vue set方法实现数据绑定 */
    // vue不能在对象上增加不存在的属性,否则不会导致视图更新,要用set方法实现数据绑定
    _Vue.set(parent, path[path.length - 1], rootModule.state)
  }

  let getters = rootModule._raw.getters
  if (getters) {
    forEach(getters, (getterName, fn) => {
      Object.defineProperty(store.getters, getterName, {
        get () {
          // 让getter执行自己的状态 传入
          return fn(state)
        }
      })
    })
  }

  let mutations = rootModule._raw.mutations
  if (mutations) {
    forEach(mutations, (mutationName, fn) => {
      store.mutations[mutationName] || (store.mutations[mutationName] = [])
      store.mutations[mutationName].push((payload) => {
        fn(state, payload)
      })
    })
  }

  let actions = rootModule._raw.actions
  if (actions) {
    forEach(actions, (actionName, fn) => {
      store.actions[actionName] || (store.actions[actionName] = [])
      store.actions[actionName].push((payload) => {
        fn(store, payload)
      })
    })
  }

  // 挂载儿子
  if (rootModule._children) {
    forEach(rootModule._children, (moduleName, module) => {
      installModule(store, module.state, path.concat(moduleName), module)
    })
  }
}
class Store {
  constructor (options) {
   // 把数据格式化我们想要的树
    this.modules = new ModuleCollection(this._options)
    /**
      递归安装模块,把每个模块的的state、getters、mutations、actions,都挂载到根state、getters、mutations、actions对象上
      this 整个store
      this.state 当前的根状态
      [] 为了递归来创建的  等下要递归把每个state都放到根上
      this._modules.root 从根模块开始安装
     */
    installModule(this, this.state, [], this.modules.root)
  }
}
7、持久化插件plugins
作用是:把state都存储在localStorage里面,刷新不会丢失数据
原理:发布订阅模式
实例store的时候,遍历plugins里面的函数,并执行 this.subscribe() 订阅到sote._subscribe数组上
当监测到mutation有变化的时候,依次执行所有的订阅
使用:
// store.js
const persits = (store) => {
  store.subscribe((mutation, state) => {
    localStorage.setItem('vuex-state', JSON.stringify(state))
  })
}
export default new Vuex.Store({ // 导出一个store实例
  plugins: [
    persits // 发布,通知所有的订阅
  ]
})
/** 安装模块 */
const installModule = (store, state, path, rootModule) => {
  let mutations = rootModule._raw.mutations
  if (mutations) {
    forEach(mutations, (mutationName, fn) => {
      store.mutations[mutationName] || (store.mutations[mutationName] = [])
      store.mutations[mutationName].push((payload) => {
        fn(state, payload)
        console.log(state)
        // 发布 让所有订阅依次执行
        store._subscribes.forEach(fn => fn({ type: mutationName, payload }, store.state))
      })
    })
  }
}

class Store {
  constructor (options) {
    // 将用户的状态放到store中
    // this.state = options.state
    /** 借用Vue的双向绑定机制让Vuex中data变化实时更新界面 */
    this.vm = new _Vue({
      data: {
        state: options.state
      }
    })
    // 只循环一次,现在需要把子modules里面的getters、mutations、actions都放到对应的对象里
    /** 保存一份到本身实例 */
    this._options = options
	this._subscribes=[]
	// 实例store的时候,遍历plugins里面的函数,并执行 this.subscribe() 订阅
    options.plugins.forEach(plugin => plugin(this))
  }
  subscribe (fn) {
    this._subscribes.push(fn) // 订阅
  }
}
8、辅助函数mapState
用法
抽象形容:mapState是state的语法糖
import { mapState } from 'vuex';
 // computed只有mapState的情况下
  computed: mapState({
    counts: 'counts', // 第一种写法
    add: (state) => this.str + ':' + state.add, // 第二种写法
})

// 还有其他的情况下
computed: {
  /*
  ...mapState({
    counts: state => state.counts,
    add: state => state.add
  })
  */
  ...mapState([  // 第三种写法:通过数组来赋值
    'counts',
     'add'
  ])
},
…mapState相当于解构赋值给computed,浅拷贝
let mapState = {
  name: 'ccc',
  age: 1,
  child:{
    count:2
  }
}

let computed = {...mapState}
computed.age = 18
computed.child.count = 3
console.log(computed) // {name: "ccc", age: 18, child :{count:3}}
console.log(mapState) // {name: "ccc", age: 1, child :{count:3}}
命名空间用法
namespaced:vuex中的store分模块管理,需要在store的index.js中引入各个模块,为了解决不同模块命名冲突的问题,将不同模块的namespaced:true,之后在不同页面中引入getter、actions、mutations时,需要加上所属的模块名
当使用 mapState, mapGetters, mapActions 和 mapMutations 这些函数来绑定带命名空间的模块时,写起来可能比较繁琐:
// store.js
const moduleE = {
  namespaced: true,
  state: {
    name: 'xiaoming',
    age: 1
  }
}
export default new Vuex.Store({
  modules: {
	// 将模块挂载到根store
    moduleE, // 等同于moduleE : 等同于moduleE, 上面模块的命名空间是moduleE
    // eee: moduleE, // 下面模块的命名空间是 eee
 }
});
// 带命名空间的绑定函数
computed: {
  // ...mapState('命名空间名', ["name"])   在辅助函数mapState的第一参数上,填写上模块的命名空间名
 // ...mapState('moduleE', {
 //   name: 'name'
// })
  ...mapState('moduleE', ['name'])
}
实现原理
 computed: {
    // ...mapState('moduleE', { // 命名空间名用法1
    //   name: 'name'
    // })
   // ...mapState('moduleE', ['name']) // 命名空间名用法2
    // ...mapState({ // 用法1
    //   age: state => state.age
    // })
     ...mapState([ // 用法2
       'age'
     ])
  },
1)…mapState([ ‘age’]) 会执行一个函数,返回一个对象,通过…解构到computed上
2)执行函数时会判断传入的是字符串,还是对象或数组?
① 如果是对象或数组,都去根实例的state上找(所有module.state都挂载在store.state上)
对象{ age: state => state.age }:执行函数并传入根state作为参数,让它返回对应value
数组[ ‘age’ ]:通过key找到根state上的对应的value
② 如果是字符串,说明是用命名空间来获取值,则通过第一个参数(命名空间名)去根实例store._modulesNamespaceMap上找到对应的module模块,再通过第二个参数(key)找到state上对应的value返回
总结:都是通过key值在state上找到value值,组装成对象返回,然后再解构赋值到computed上
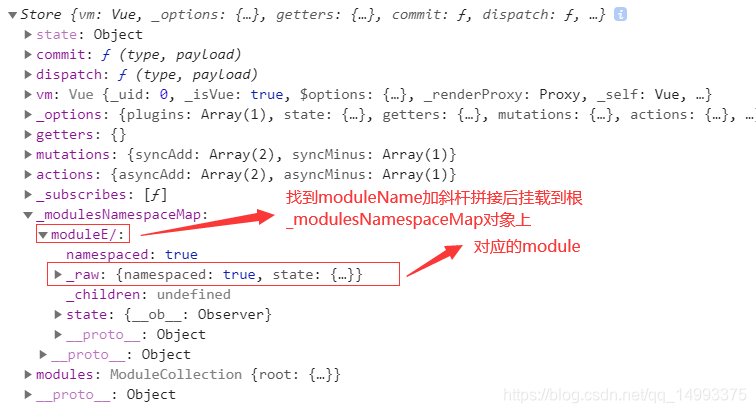
命名空间原理
命名空间原理:
1)安装每一个模块的时候,判断有没有namespaced,为否时,则给他设置false,
为true则找到moduleName和对应module,挂载到根_modulesNamespaceMap={}对象上
2)当通过mapState取值的时候就可以通过命名空间名到根_modulesNamespaceMap上找到对应的值
代码参考:githunb
