基于maven的spring boot 打包分离依赖及配置文件
使用springCloud或springboot的过程中,发布到生产环境的网速受限,如果每次将60,70M甚至更大的jar包上传,速度太慢了,采取jar包和配置文件分离的方式可以极大的压缩jar包大小,至于依赖的jar包则只需要上传一次,后期增加了jar包则将jar包加入到jar包文件夹内就可以了。配置文件也是一样,每次修改了才需要修改服务器文件,如果只是单纯的代码更新,我们直接打包上传源码jar包就可以了。直接上maven 的pom.xml<build>块配置。
- 设置两个自定义属性
	<properties>
		<output.dependence.file.path>lib/</output.dependence.file.path>
		<output.resource.file.path>resources/</output.resource.file.path>
	</properties>
- 引入各种maven插件进行打包
	<build>
		<!--最终打包名-->
		<finalName>${project.artifactId}-${project.version}-${timestamp}</finalName>

		<!--打包加GMT+8时间插件(默认是UTC时间少8小时)-->
		<plugins>
			<plugin>
				<groupId>org.codehaus.mojo</groupId>
				<artifactId>buildnumber-maven-plugin</artifactId>
				<version>1.4</version>
				<configuration>
					<timestampFormat>yyyyMMddHHmmss</timestampFormat>
				</configuration>
				<executions>
					<execution>
						<goals>
							<goal>create-timestamp</goal>
						</goals>
					</execution>
				</executions>
				<inherited>false</inherited>
			</plugin>

			<!-- 打JAR包,不包含依赖文件;显式剔除配置文件 -->
			<plugin>
				<groupId>org.apache.maven.plugins</groupId>
				<artifactId>maven-jar-plugin</artifactId>
				<configuration>
					<!-- 剔除配置文件 -->
					<excludes>
						<exclude>*.properties</exclude>
						<exclude>*.yml</exclude>
						<exclude>*/*.properties</exclude>
						<exclude>*/*.yml</exclude>
					</excludes>
					<archive>
						<manifest>
							<addClasspath>true</addClasspath>
							<!-- MANIFEST.MF 中 Class-Path 各个依赖加入前缀 -->
							<!--lib文件夹内容,需要 maven-dependency-plugin插件补充 (依赖包剥离位置)-->
							<classpathPrefix>${output.dependence.file.path}</classpathPrefix>
							<!-- jar包不包含唯一版本标识 -->
							<useUniqueVersions>false</useUniqueVersions>
							<!--指定入口类 -->
							<mainClass>com.egos.main.EgosQaApplication</mainClass>
						</manifest>
						<manifestEntries>
							<!--MANIFEST.MF 中 Class-Path 加入自定义路径,多个路径用空格隔开 -->
							<!--此处resources文件夹的内容,需要maven-resources-plugin插件补充上 (配置文件剥离位置)-->
							<Class-Path>./${output.resource.file.path}</Class-Path>
						</manifestEntries>
					</archive>
					<!--输出目录-->
					<outputDirectory>${project.build.directory}</outputDirectory>
				</configuration>
			</plugin>

			<!-- 复制依赖的jar包到指定的文件夹里 -->
			<plugin>
				<groupId>org.apache.maven.plugins</groupId>
				<artifactId>maven-dependency-plugin</artifactId>
				<executions>
					<execution>
						<id>copy-dependencies</id>
						<phase>package</phase>
						<goals>
							<goal>copy-dependencies</goal>
						</goals>
						<configuration>
							<outputDirectory>${project.build.directory}/${output.dependence.file.path}</outputDirectory>
						</configuration>
					</execution>
				</executions>
			</plugin>

			<!-- 用于复制指定的文件 -->
			<plugin>
				<artifactId>maven-resources-plugin</artifactId>
				<executions>
					<!-- 复制配置文件 -->
					<execution>
						<id>copy-resources</id>
						<phase>package</phase>
						<goals>
							<goal>copy-resources</goal>
						</goals>
						<configuration>
							<!-- 复制哪些目录下的哪些文件到指定目录 -->
							<resources>
								<resource>
									<directory>src/main/resources</directory>
									<includes>
										<include>*.properties</include>
										<include>*.yml</include>
										<include>*/*.properties</include>
										<include>*/*.properties</include>
									</includes>
								</resource>
							</resources>
							<outputDirectory>${project.build.directory}/${output.resource.file.path}</outputDirectory>
						</configuration>
					</execution>
				</executions>
			</plugin>

			<!-- spring-boot-maven-plugin可以不使用,可当做一般jar包来运行 -->
			<!-- spring-boot-maven-plugin可统一包内文件结构-->
			<plugin>
				<groupId>org.springframework.boot</groupId>
				<artifactId>spring-boot-maven-plugin</artifactId>
				<configuration>
					<!--重写包含依赖,包含不存在的依赖,jar里没有pom里的依赖 -->
					<includes>
						<include>
							<groupId>null</groupId>
							<artifactId>null</artifactId>
						</include>
					</includes>
					<outputDirectory>${project.build.directory}</outputDirectory>
				</configuration>
				<executions>
					<execution>
						<goals>
							<goal>repackage</goal>
						</goals>
						<configuration>
							<!--配置jar包特殊标识 配置后,保留原文件,生成新文件 *-run.jar -->
							<!--配置jar包特殊标识 不配置,原文件命名为 *.jar.original,生成新文件 *.jar -->
							<!--<classifier>run</classifier> -->
						</configuration>
					</execution>
				</executions>
			</plugin>


			<!--maven打包时,跳过测试-->
			<plugin>
				<groupId>org.apache.maven.plugins</groupId>
				<artifactId>maven-surefire-plugin</artifactId>
				<configuration>
					<skip>true</skip>
				</configuration>
			</plugin>


			<!-- 指定多个源代码目录、多个资源文件目录 -->
			<plugin>
				<groupId>org.codehaus.mojo</groupId>
				<artifactId>build-helper-maven-plugin</artifactId>
				<version>1.8</version>
				<executions>
					<execution>
						<id>add-source</id>
						<phase>generate-sources</phase>
						<goals>
							<goal>add-source</goal>
						</goals>
						<configuration>
							<sources>
								<source>src/main/java</source>
								<source>src/main/library</source>
							</sources>
						</configuration>
					</execution>
				</executions>
			</plugin>

			<!-- 编译插件 -->
			<plugin>
				<groupId>org.apache.maven.plugins</groupId>
				<artifactId>maven-compiler-plugin</artifactId>
				<configuration>
					<source>1.8</source>
					<target>1.8</target>
				</configuration>
			</plugin>
		</plugins>
	</build>
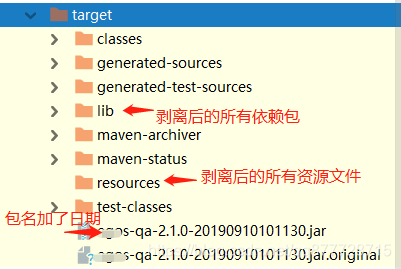
打包后的效果图
-
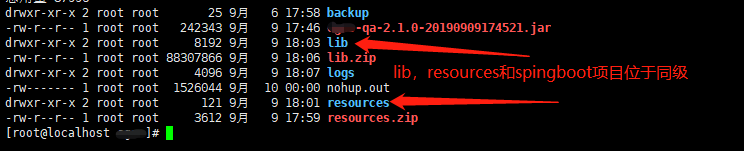
把lib和 resources打包成压缩包上传到springBoot项目所在的服务器并且和springBoot项目位于同级目录
-
nohup java -jar xxx.jar --server.port=端口 &启动项目
-
如果springBoot项目启动报Failed to scan [file:xxxx.jar] from classloader hierarchy,此错误并不会影响到项目的正常运行
原因: 由于springboot项目自带tomcat插件,冲突导致
解决方案:检查pom.xml文件找到以下内容,删除掉。再次启动就不会有警告了!
		<dependency>
			<groupId>org.springframework.boot</groupId>
			<artifactId>spring-boot-starter-tomcat</artifactId>
			<scope>provided</scope>
		</dependency>
		<dependency>
			<groupId>org.apache.tomcat.embed</groupId>
			<artifactId>tomcat-embed-jasper</artifactId>
			<scope>provided</scope>
		</dependency>
maven-compiler-plugin插件描述
maven是个项目管理工具,如果我们不告诉它我们的代码要使用什么样的jdk版本编译的话,它就会用maven-compiler-plugin默认的jdk版本来进行处理,这样就容易出现版本不匹配的问题,以至于可能导致编译不通过的问题。例如代码中要是使用上了jdk1.7的新特性,但是maven在编译的时候使用的是jdk1.6的版本,那这一段代码是完全不可能编译成.class文件的。为了处理这一种情况的出现,在构建maven项目的时候,我习惯性第一步就是配置maven-compiler-plugin插件。
maven的默认编译使用的jdk版本貌似很低,使用maven-compiler-plugin插件可以指定项目源码的jdk版本,编译后的jdk版本,以及编码
<plugin>
    <!-- 指定maven编译的jdk版本,如果不指定,maven3默认用jdk 1.5 maven2默认用jdk1.3 -->
    <groupId>org.apache.maven.plugins</groupId>
    <artifactId>maven-compiler-plugin</artifactId>
    <version>3.1</version>
    <configuration>
        <!-- 一般而言,target与source是保持一致的,但是,有时候为了让程序能在其他版本的jdk中运行(对于低版本目标jdk,源代码中不能使用低版本jdk中不支持的语法),会存在target不同于source的情况 -->
        <source>1.8</source> <!-- 源代码使用的JDK版本 -->
        <target>1.8</target> <!-- 需要生成的目标class文件的编译版本 -->
        <encoding>UTF-8</encoding><!-- 字符集编码 -->
        <skipTests>true</skipTests><!-- 跳过测试 -->
        <verbose>true</verbose>
        <showWarnings>true</showWarnings>
        <fork>true</fork><!-- 要使compilerVersion标签生效,还需要将fork设为true,用于明确表示编译版本配置的可用 -->
        <executable><!-- path-to-javac --></executable><!-- 使用指定的javac命令,例如:<executable>${JAVA_1_4_HOME}/bin/javac</executable> -->
        <compilerVersion>1.3</compilerVersion><!-- 指定插件将使用的编译器的版本 -->
        <meminitial>128m</meminitial><!-- 编译器使用的初始内存 -->
        <maxmem>512m</maxmem><!-- 编译器使用的最大内存 -->
        <compilerArgument>-verbose -bootclasspath ${java.home}\lib\rt.jar</compilerArgument><!-- 这个选项用来传递编译器自身不包含但是却支持的参数选项 -->
    </configuration>
</plugin>
如果jdk1.8版本的项目不使用maven-compiler-plugin指定编译版本maven会报出编译错误

…暂时就这么多,会不定时更新此文章
