一、创建项目并导入依赖
<dependency>
<groupId>org.springframework.boot</groupId>
<artifactId>spring-boot-starter-security</artifactId>
</dependency>
<dependency>
<groupId>org.springframework.boot</groupId>
<artifactId>spring-boot-starter-web</artifactId>
</dependency>
<dependency>
<groupId>org.springframework.boot</groupId>
<artifactId>spring-boot-starter-websocket</artifactId>
</dependency>
<!--https://mvnrepository.com/artifact/org.webjars/sockjs-client-->
<dependency>
<groupId>org.webjars</groupId>
<artifactId>sockjs-client</artifactId>
<version>1.1.2</version>
</dependency>
<!--https://mvnrepository.com/artifact/org.webjars.bower/jquery-->
<dependency>
<groupId>org.webjars.bower</groupId>
<artifactId>jquery</artifactId>
<version>3.4.1</version>
</dependency>
<!--https://mvnrepository.com/artifact/org.webjars/stomp-websocket-->
<dependency>
<groupId>org.webjars</groupId>
<artifactId>stomp-websocket</artifactId>
<version>2.3.3</version>
</dependency>
<!--https://mvnrepository.com/artifact/org.webjars/webjars-locator-core-->
<dependency>
<groupId>org.webjars</groupId>
<artifactId>webjars-locator-core</artifactId>
<version>0.38</version>
</dependency>
注:上面的sockjs-client,jquery,stomp-websocket,webjars-locator-core
属于webjar!webjar就是js,只不过被maven管理方便些。和用js方式一样
二、相关配置和代码
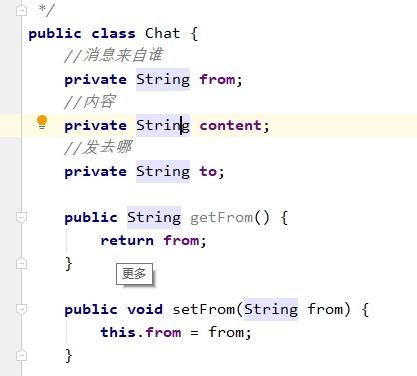
2.1)首先创建一个bean用来存储用户之间点对点发送的信息
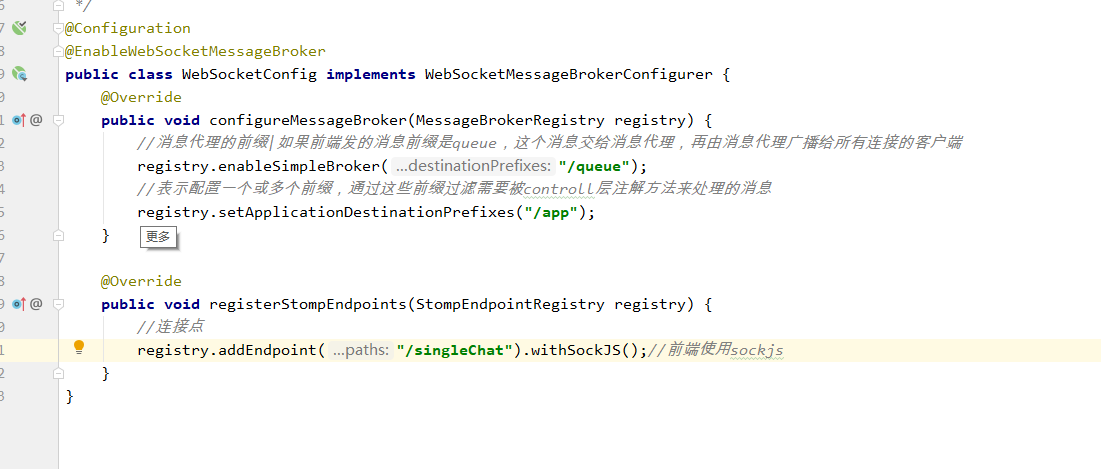
2.2)创建WebSocketConfig配置类并实现WebSocketMessageBrokerConfigurer
2.3)创建SecurityConfig配置类并继承WebSecurityConfigurerAdapter

SecurityConfig配置为了方便只配置最基本配置
2.4)controller层
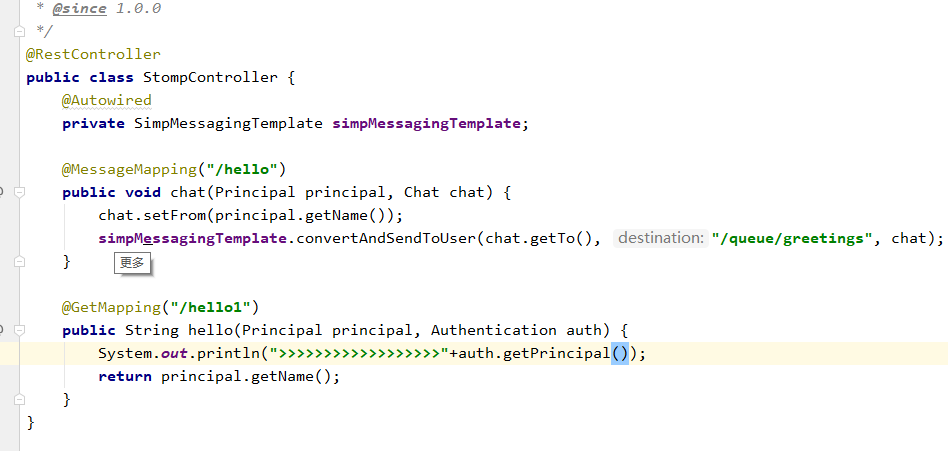
这里说一下Principal类和Authentication类,这俩个类是springsecurity的和websocket无关
这两类存放这用户的信息。不了解可以加springsecurity依赖后在controller试试打印出来。至于为什么这样你就得自己看源码了
2.5)前端html
<!DOCTYPEhtml>
<htmllang="en">
<head>
<metacharset="UTF-8">
<title>群聊室</title>
<scriptsrc="/webjars/jquery/3.4.1/dist/jquery.min.js"></script>
<scriptsrc="/webjars/sockjs-client/1.1.2/sockjs.min.js"></script>
<scriptsrc="/webjars/stomp-websocket/2.3.3/stomp.min.js"></script>
</head>
<body>
<table>
<tr>
<td><inputtype="button"id="connection"value="连接"/></td>
<td><inputtype="button"id="disconnection"disabled="disabled"value="断开"/></td>
</tr>
</table>
<divid="chat"style="display:none">
<table>
<tr>
<td>请输入聊天内容:</td>
<td><inputtype="text"id="content"></td>
<td>请输入要发送到的用户名:</td>
<td><inputtype="text"id="to"></td>
<td><inputtype="button"id="send"value="发送"></td>
</tr>
</table>
<divid="conversation"style="border:1px#ffd86csolid;width:300px;text-align:center">信息框</div>
</div>
<script>
$(function(){
varstompClient=null;
//连接
$("#connection").click(function(){
connection(true)
});
//断开
$("#disconnection").click(function(){
connection(false)
})
//发送
$("#send").click(function(){
send($("#content").val())
})
});
//连接
functionconnection(flag){
if(!flag&&stompClient!=null){
bottomStatus(flag)
showHidenChat(flag)
//断开
stompClient.disconnect();
return
}
bottomStatus(flag)
showHidenChat(flag)
//服务器连接点
varsocket=newSockJS("/singleChat")
//返回客户端对象
stompClient=Stomp.over(socket);
stompClient.connect({},function(successCallback){
//订阅服务器上的消息
stompClient.subscribe("/user/queue/greetings",function(msg){
//服务端返回的对象放在msg.body
showGreeting(JSON.parse(msg.body))
});
});
}
//发信息
functionsend(msg){
stompClient.send("/app/hello",{},JSON.stringify({"to":$("#to").val(),"content":$("#content").val()}))
}
//展示信息的框
functionshowGreeting(msg){
$("#conversation").append("<div>"+msg.from+":"+msg.content+"</div>");
}
//连接断开的按钮状态
functionbottomStatus(flag){
$("#connection").prop("disabled",flag);
$("#disconnection").prop("disabled",!flag);
}
//发送消息输入框的状态
functionshowHidenChat(flag){
if(flag){
$("#chat").show();
}else{
$("#chat").hide();
}
}
</script>
</body>
</html>