SpringCloud之Ribbon实战使用及源码实现
一、Ribbon概述
Ribbon与负载均衡
负载均衡(Load Balance),即利用特定方式将流量分摊到多个操作单元上的一种手段,它对系统吞吐量与系统处理能力有着质的提升,毫不夸张地说,当今极少有企业没有用到负载均衡器或是负载均衡策略的。我们提到负载均衡,往往第一个想到的就是Nginx,或许还会想到LVS,这些大家都不陌生,且不管它们的使用方式,工作在什么层次,本质还是对于流量的疏导。
业界对于负载均衡有不少分类,最常见的有软负载与硬负载,代表产品是Nginx与F5;还有一组分类方式笔者认为最能体现出Ribbon与传统负载均衡的差别,那就是集中式负载均衡与进程内负载均衡。集中式负载均衡指位于因特网与服务提供者之间,并负责把网络请求转发到各个提供单位,这时候Nginx与F5就可以划为一类了,也可以称为服务端负载均衡,其原理如下图所示;进程内负载均衡是指从一个实例库选取一个实例进行流量导入,在微服务的范畴内,实例库一般是存储在Eureka、Consul、Zookeeper、etcd这样的注册中心,而此时的负载均衡器就是类似Ribbon的IPC(Inter-Process Communication,进程间通信)组件,因此,进程内负载均衡也叫作客户端负载均衡,其原理如下二图所示。
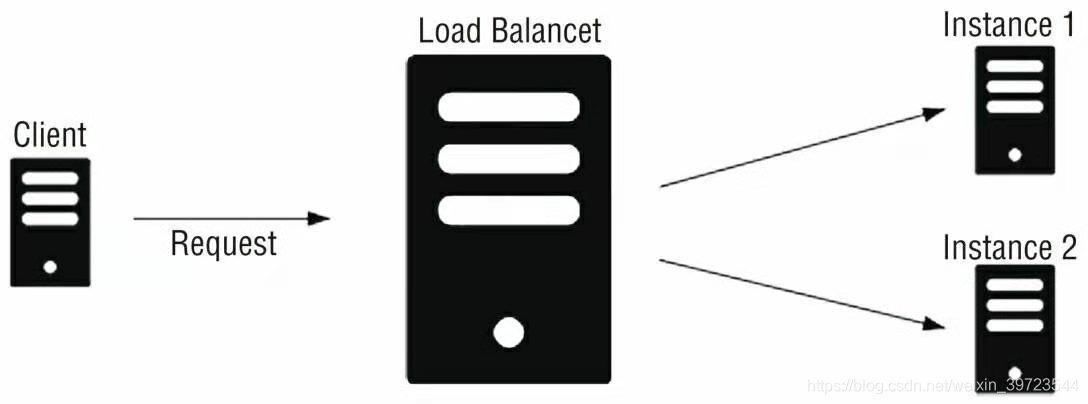
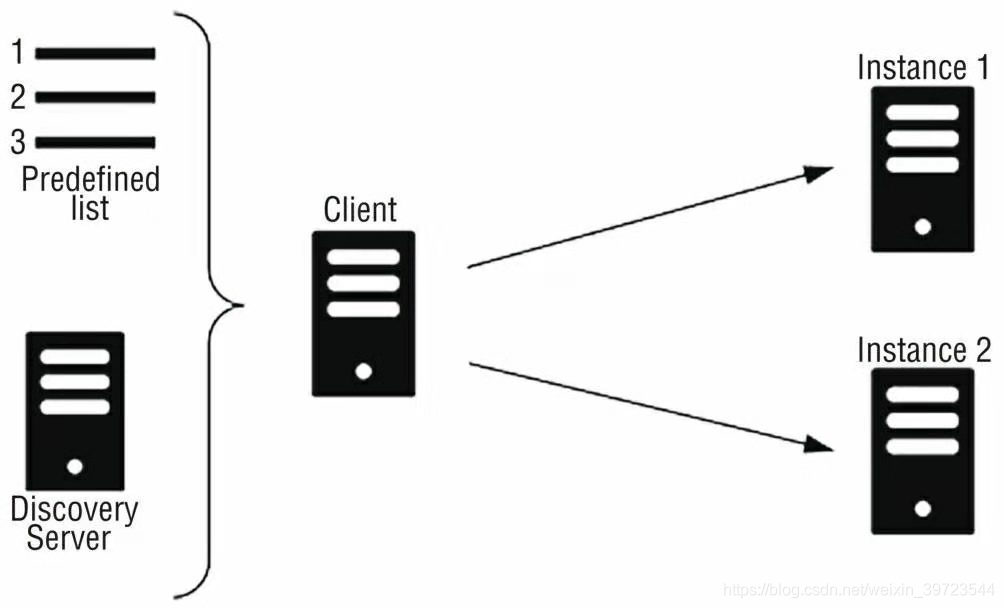
F5是四层负载均衡,Nginx是七层负载均衡。而我们所探讨的Ribbon之类则属于进程内的负载均衡。感兴趣的同学可以深入了解>了负载均衡的技术。
Spring Cloud官方是这样描述Ribbon的:
Ribbon is a client-side load balancer that gives you a lot of control over thebehavior of HTTP and TCP clients.
Ribbon是一个客户端负载均衡器,它赋予了应用一些支配HTTP与TCP行为的能力,可以得知,这里的客户端负载均衡(许多人称之为后端负载均衡)也是进程内负载均衡的一种。它在Spring Cloud生态内是一个不可缺少的组件,少了它,服务便不能横向扩展,这显然是有违云原生12要素的。此外,Feign与Zuul中已经默认集成了Ribbon,在我们的服务之间凡是涉及调用的,都可以集成它并应用,从而使我们的调用链具备良好的伸缩性。
入门案例
在了解了其基本概念之后,来一个快速的入门的案例,来使我们快速了解Ribbon的作用。案例中使用的Spring Cloud的版本号是Finchley,对应的Spring Boot的版本是2.0.3。
1.父工程

pom.xml
<?xml version="1.0" encoding="UTF-8"?>
<project xmlns="http://maven.apache.org/POM/4.0.0"
         xmlns:xsi="http://www.w3.org/2001/XMLSchema-instance"
         xsi:schemaLocation="http://maven.apache.org/POM/4.0.0 http://maven.apache.org/xsd/maven-4.0.0.xsd">
    <modelVersion>4.0.0</modelVersion>

    <groupId>com.gyoomi</groupId>
    <artifactId>ribbon-parent</artifactId>
    <version>1.0-SNAPSHOT</version>
    <modules>
        <module>eureka-server</module>
        <module>client-a</module>
        <module>ribbon-load-balancer</module>
    </modules>
    <packaging>pom</packaging>

    <parent>
        <groupId>org.springframework.boot</groupId>
        <artifactId>spring-boot-starter-parent</artifactId>
        <version>2.0.3.RELEASE</version>
    </parent>

    <!--  利用传递依赖,公共部分  -->
    <dependencies>
        <dependency>
            <groupId>org.springframework.boot</groupId>
            <artifactId>spring-boot-starter-actuator</artifactId>
        </dependency>
        <!-- springboot web -->
        <dependency>
            <groupId>org.springframework.boot</groupId>
            <artifactId>spring-boot-starter-web</artifactId>
        </dependency>
    </dependencies>

    <!-- 管理依赖 -->
    <dependencyManagement>
        <dependencies>
            <dependency>
                <groupId>org.springframework.cloud</groupId>
                <artifactId>spring-cloud-dependencies</artifactId>
                <version>Finchley.RELEASE</version>
                <type>pom</type>
                <scope>import</scope>
            </dependency>
        </dependencies>
    </dependencyManagement>

    <!--注意: 这里必须要添加,否则各种依赖有问题 -->
    <repositories>
        <repository>
            <id>spring-milestones</id>
            <name>Spring Milestones</name>
            <url>https://repo.spring.io/libs-milestone</url>
            <snapshots>
                <enabled>false</enabled>
            </snapshots>
        </repository>
    </repositories>

    <build>
        <plugins>
            <plugin>
                <groupId>org.springframework.boot</groupId>
                <artifactId>spring-boot-maven-plugin</artifactId>
            </plugin>
        </plugins>
    </build>
</project>
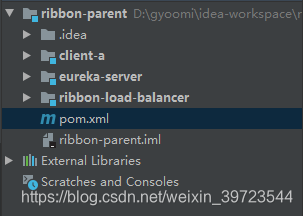
项目结构如下所示:
2.创建提供服务的工程client-a
pom.xml
<?xml version="1.0" encoding="UTF-8"?>
<project xmlns="http://maven.apache.org/POM/4.0.0"
         xmlns:xsi="http://www.w3.org/2001/XMLSchema-instance"
         xsi:schemaLocation="http://maven.apache.org/POM/4.0.0 http://maven.apache.org/xsd/maven-4.0.0.xsd">
    <parent>
        <artifactId>ribbon-parent</artifactId>
        <groupId>com.gyoomi</groupId>
        <version>1.0-SNAPSHOT</version>
    </parent>
    <modelVersion>4.0.0</modelVersion>

    <artifactId>client-a</artifactId>

    <properties>
        <project.build.sourceEncoding>UTF-8</project.build.sourceEncoding>
        <java.version>1.8</java.version>
    </properties>

    <dependencies>
        <dependency>
            <groupId>org.springframework.cloud</groupId>
            <artifactId>spring-cloud-starter-netflix-eureka-client</artifactId>
        </dependency>
    </dependencies>

    <build>
        <plugins>
            <plugin>
                <groupId>org.springframework.boot</groupId>
                <artifactId>spring-boot-maven-plugin</artifactId>
            </plugin>
        </plugins>
    </build>
</project>
application.yml
server:
  port: 7070
spring:
  application:
    name: client-a
eureka:
  client:
    serviceUrl:
      defaultZone: http://${eureka.host:127.0.0.1}:${eureka.port:8888}/eureka/
  instance:
    prefer-ip-address: true
启动类
@SpringBootApplication
@EnableDiscoveryClient
public class ClientAApplication {

    public static void main(String[] args) {
        SpringApplication.run(ClientAApplication.class, args);
    }
}
测试类(提供一个接口进行测试)
@RestController
public class TestController {

	@GetMapping("/add")
	public String add(Integer a, Integer b, HttpServletRequest request){
		return " From Port: "+ request.getServerPort() + ", Result: " + (a + b);
	}
}
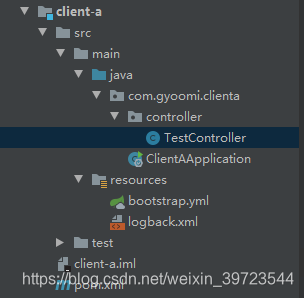
结构如下:
3.创建eureka注册服务中心
pom.xml
<?xml version="1.0" encoding="UTF-8"?>
<project xmlns="http://maven.apache.org/POM/4.0.0"
         xmlns:xsi="http://www.w3.org/2001/XMLSchema-instance"
         xsi:schemaLocation="http://maven.apache.org/POM/4.0.0 http://maven.apache.org/xsd/maven-4.0.0.xsd">
    <parent>
        <artifactId>ribbon-parent</artifactId>
        <groupId>com.gyoomi</groupId>
        <version>1.0-SNAPSHOT</version>
    </parent>
    <modelVersion>4.0.0</modelVersion>

    <artifactId>eureka-server</artifactId>

    <properties>
        <project.build.sourceEncoding>UTF-8</project.build.sourceEncoding>
        <java.version>1.8</java.version>
    </properties>

    <dependencies>
        <dependency>
            <groupId>org.springframework.cloud</groupId>
            <artifactId>spring-cloud-starter-netflix-eureka-server</artifactId>
        </dependency>
    </dependencies>

    <build>
        <plugins>
            <plugin>
                <groupId>org.springframework.boot</groupId>
                <artifactId>spring-boot-maven-plugin</artifactId>
            </plugin>
        </plugins>
    </build>
</project>
application.yml
server:
  port: 8888
eureka:
  instance:
    hostname: localhost
  client:
    registerWithEureka: false
    fetchRegistry: false
    serviceUrl:
      defaultZone: http://${eureka.instance.hostname}:${server.port}/eureka/
启动类
@SpringBootApplication
@EnableEurekaServer
public class EurekaServerApplication {

    public static void main(String[] args) {
        SpringApplication.run(EurekaServerApplication.class, args);
    }
}
4.负载均衡测试入口项目
pom.xml
<?xml version="1.0" encoding="UTF-8"?>
<project xmlns="http://maven.apache.org/POM/4.0.0"
         xmlns:xsi="http://www.w3.org/2001/XMLSchema-instance"
         xsi:schemaLocation="http://maven.apache.org/POM/4.0.0 http://maven.apache.org/xsd/maven-4.0.0.xsd">
    <parent>
        <artifactId>ribbon-parent</artifactId>
        <groupId>com.gyoomi</groupId>
        <version>1.0-SNAPSHOT</version>
    </parent>
    <modelVersion>4.0.0</modelVersion>

    <artifactId>ribbon-load-balancer</artifactId>
    <properties>
        <project.build.sourceEncoding>UTF-8</project.build.sourceEncoding>
        <java.version>1.8</java.version>
    </properties>

    <dependencies>
        <dependency>
            <groupId>org.springframework.cloud</groupId>
            <artifactId>spring-cloud-starter-netflix-ribbon</artifactId>
        </dependency>
        <dependency>
            <groupId>org.springframework.cloud</groupId>
            <artifactId>spring-cloud-starter-netflix-eureka-client</artifactId>
        </dependency>
    </dependencies>

    <build>
        <plugins>
            <plugin>
                <groupId>org.springframework.boot</groupId>
                <artifactId>spring-boot-maven-plugin</artifactId>
            </plugin>
        </plugins>
    </build>

</project>
application.yml
spring:
  application:
    name: ribbon-load-balancer
server:
  port: 7777
eureka:
  client:
    serviceUrl:
      defaultZone: http://${eureka.host:127.0.0.1}:${eureka.port:8888}/eureka/
  instance:
    prefer-ip-address: true
启动类
@SpringBootApplication
@EnableDiscoveryClient
public class RibbonLoadbalancerApplication {

    public static void main(String[] args) {
        SpringApplication.run(RibbonLoadbalancerApplication.class, args);
    }

    // 这里使用具有负载均衡功能的restTemplate进发送Http请求
    @Bean
    @LoadBalanced
    public RestTemplate restTemplate() {
        return new RestTemplate();
    }
}
测试入口类
@RestController
public class TestController {

    @Autowired
    private RestTemplate restTemplate;

	@GetMapping("/add")
	public String add(Integer a, Integer b) {
		String result = restTemplate
				.getForObject("http://CLIENT-A/add?a=" + a + "&b=" + b, String.class);
		System.out.println(result);
		return result;
	}
}
测试并查看效果
- 先启动Eureka-Server工程
- 再启动Ribbon-Load-Banlance工程
- 再然后,先以7070端口启动一个Clinet-a服务;然后再议7075端口启动一个一模一样的服务。
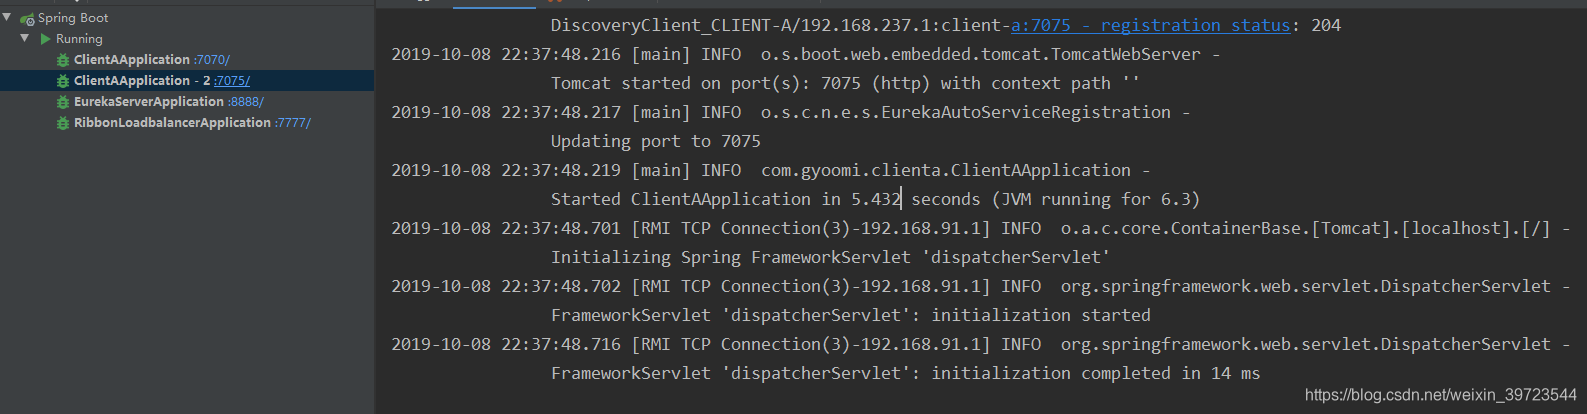
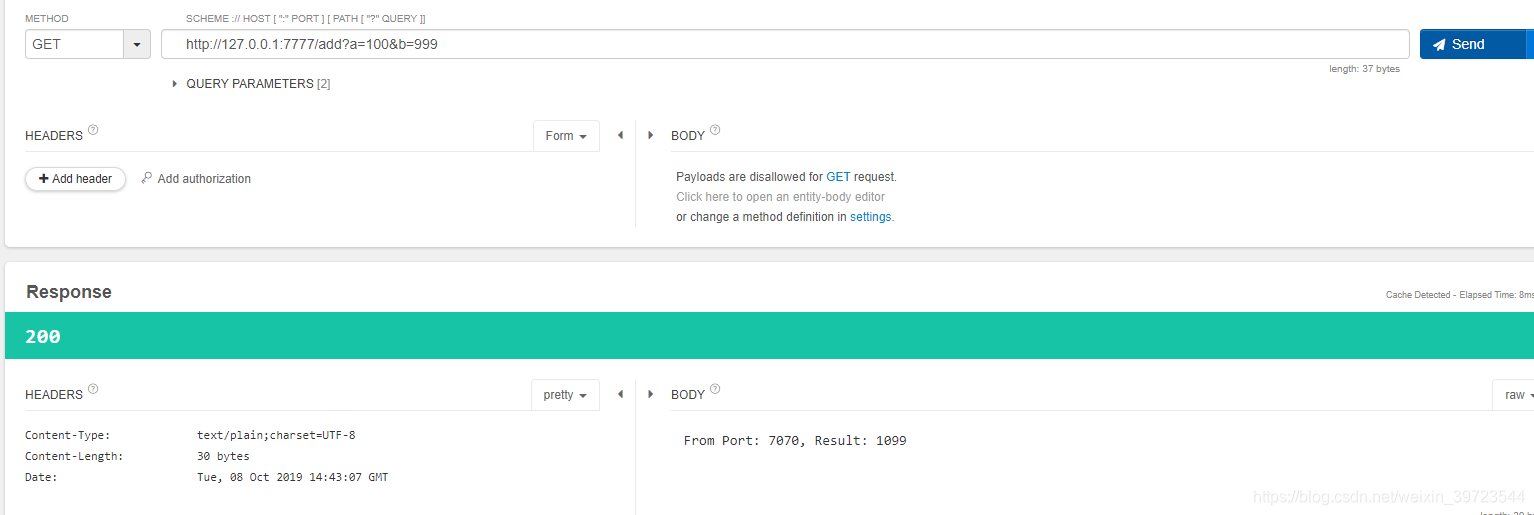
然后使用Rest测试工具,请求http://127.0.0.1:7777/add?a=100&b=999这个Url.我们会发现,返回的结果是From Port: 7070, Result: 1099, From Port: 7075, Result: 1099交替出现。
至此快速入门案例结束。源代码连接在这里源码。
二、Ribbon的实战
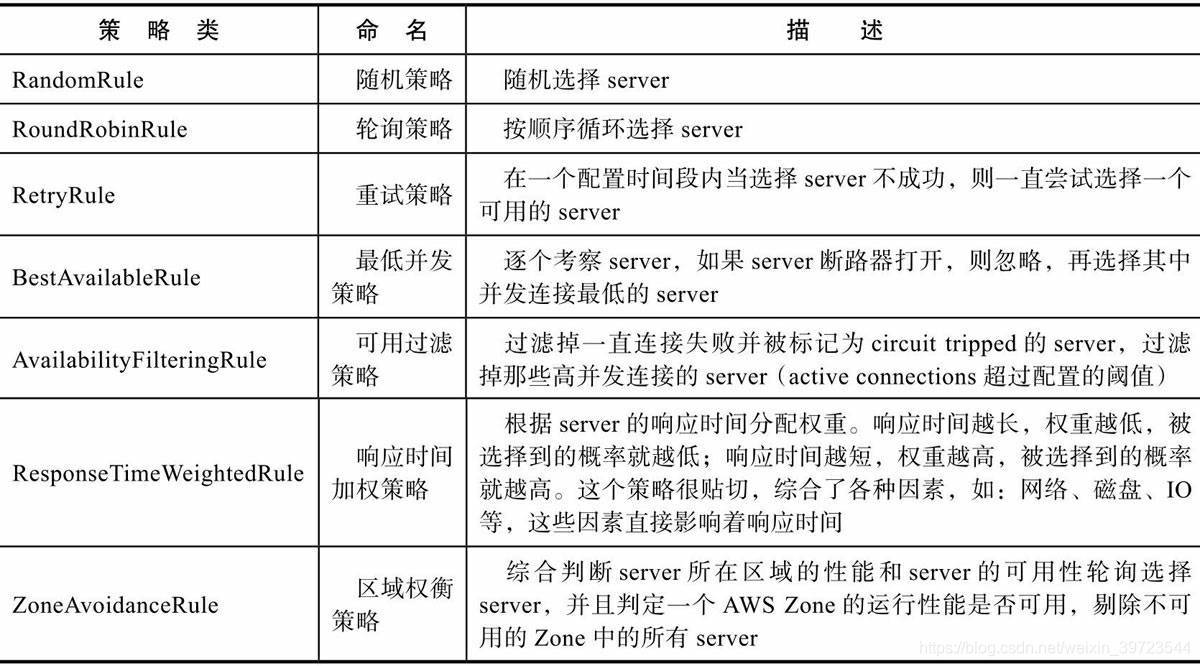
谈到Ribbon,就会谈到负载均衡,而谈到负载均衡,就会衍生出多种负载均衡策略。我们熟知的Nginx有一些非常实用的负载均衡策略,比如:轮询(Round Robin)、权重(Weight)、ip_hash等,丰富的策略能够让我们在构建应用时有充分的余地,可以根据业务场景选择最合适的策略。在Ribbon中,也有丰富的负载均衡策略可供选择,一共有7种,如下图所示。
2.1 全局策略设置
使用Ribbon的时候想要全局更改负载均衡策略,需要加一个配置类,如下代码所示。
        @Configuration
        public class TestConfiguration {
            @Bean
            public IRule ribbonRule() {
                return new RandomRule();
            }
        }
就这样一个简单的配置,加上之后凡是通过Ribbon的请求都会按照配置的规则来进行,需要注意,代码在后续内容会有改动,读者如想测试可以还原。7种自带负载均衡策略,使用只需在这里新建出来即可,后续章节可以这样配置,也可以使用自实现策略。
2.2 基于配置文件的策略设置
其实Ribbon提供注解的配置的方式,但是这种方式强耦合于代码中,所以就不推荐大家使用,感兴趣的同学可以去了解下。实际开发中非常推荐配置文件来对源服务负载策略进行配置,其基本语法是<client name>.ribbon.*,使用它几乎可以不用注解形式的任何配置代码,推荐使用。如:我们可以使用下述配置对client-a服务使用随机策略。
client-a:
  ribbon:
    NFLoadBalancerRuleClassName: com.netflix.loadbalancer.RandomRule
使用HTTP发起请求,免不了要经历极端环境,此时对调用进行时限控制以及时限之后的重试尤为重要。注意,F版中Ribbon的重试机制是默认开启的,需要添加对于超时时间与重试策略的配置,如下代码所示。
client-a:
  ribbon:
    ConnectTimeout: 30000
    ReadTimeout: 30000
    MaxAutoRetries: 1 #对第一次请求的服务的重试次数
    MaxAutoRetriesNextServer: 1 #要重试的下一个服务的最大数量(不包括第一个服务)
    OkToRetryOnAllOperations: true
2.3 Ribbon的饥饿加载
Ribbon在进行客户端负载均衡的时候并不是在启动时就加载上下文,而是在实际请求的时候才去创建,因此这个特性往往会让我们的第一次调用显得颇为疲软乏力,严重的时候会引起调用超时。所以我们可以通过指定Ribbon具体的客户端的名称来开启饥饿加载,即在启动的时候便加载所有配置项的应用程序上下文,如下代码所示。
ribbon:
  eager-load:
    enabled: true
    clients: client-a, client-b, client-c
2.4 利用配置文件自定义Ribbon客户端
Ribbon在1.2.0版本之后,就可以使用配置文件来定制Ribbon客户端了,其实质也就是使用配置文件来指定一些默认加载类,从而更改Ribbon客户端的行为方式,并且使用这种方式优先级最高,优先级高于使用注解@RibbonClient指定的配置和源码中加载的相关Bean。我们可以通过下图中给出的配置来设置。
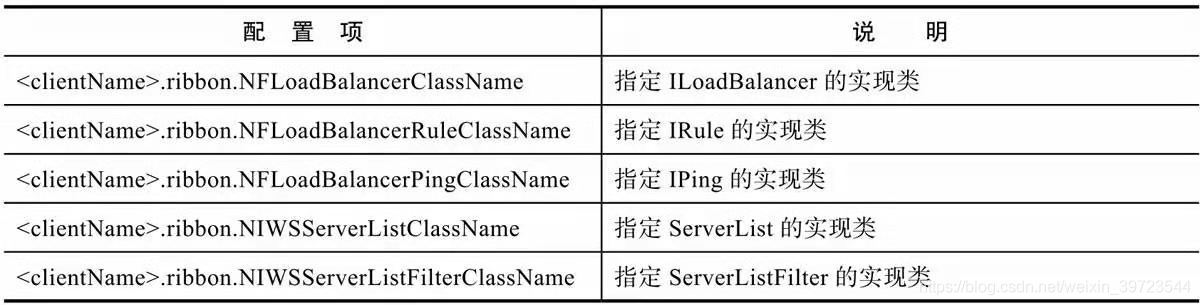
可以使用Ribbon自带实现类,也可以自实现。下面是一个对client源服务的相关定制示例:
client:
  ribbon:
    NIWSServerListClassName: com.netflix.loadbalancer.ConfigurationBasedServerList
    NFLoadBalancerRuleClassName: com.netflix.loadbalancer.WeightedResponseTimeRule
2.5 Ribbon脱离Eureka的使用
在默认情况下,Ribbon客户端会从Eureka注册中心读取服务注册信息列表,来达到一种动态负载均衡的功能。但是有一种情况下则不会推荐这种方式,即如果Eureka是一个供很多人使用的公共注册中心(比如社区公益Eureka,地址:http://eureka.springcloud.cn),此时极易产生服务侵入性问题,所以就不要从Eureka中读取服务列表了,而应该在Ribbon客户端自行指定源服务地址,让Ribbon脱离Eureka来使用。
为了达到这一目的,首先需要在Ribbon中禁用Eureka的功能:
ribbon:
  eureka:
    enabled: false
然后对源服务设定地址列表:
client:
  ribbon:
    listOfServers: http://localhost:7070,http://localhost:7071
三、Ribbon的进阶
3.1 核心工作原理
我们已经了解了Ribbon的一些使用方式,现在让我们来看一看它的核心功能是如何被实现的,关于这部分内容,我会着重讲解官方文档中提到的那些上层接口,以及Ribbon从启动到负载均衡器选择服务实例的过程。
官方文档中提到了Ribbon中的核心接口,它们共同定义了Ribbon的行为特性,如下图所示。
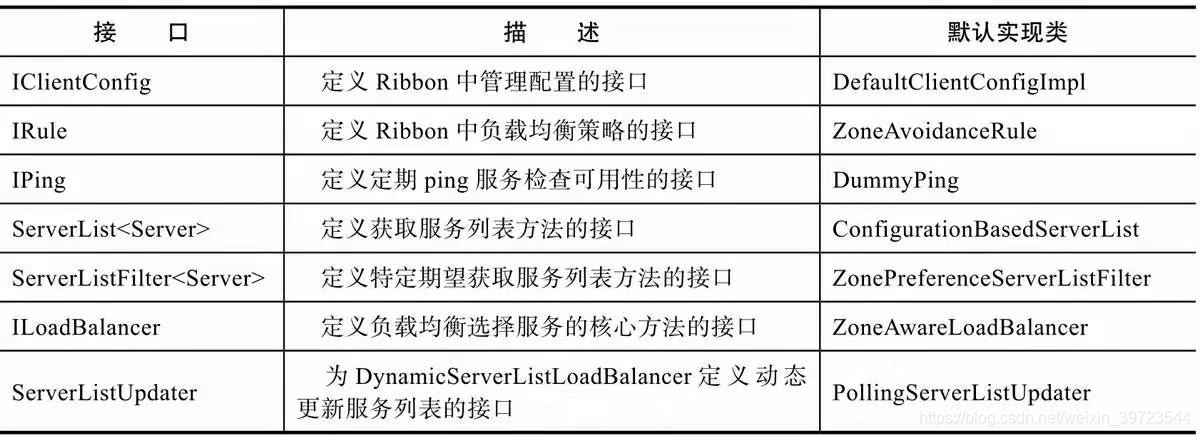
可以说,Ribbon完全是基于这些接口建立起来的,它们就是Ribbon的骨架,对它们追根溯源,可以掌握Ribbon的底层实现,关于它们的解读,这里就不详细展开了,知道每一个接口的作用之后,依靠强大的IDE,相信读者掌握它们并不是难事。其实很多读者对于Ribbon最关心的是它是如何做到使用RestTemplate达到负载均衡的,下面我们对这部分重要原理进行讲解。
在上一节中,我们知道了如何使用Ribbon来对客户端实例进行负载均衡,其基本的使用方式都需要注入一个RestTemplate的Bean,并且使用@LoadBalanced注解才能使其具备负载均衡的能力,RestTemplate在Spring中由来已久,为什么一个简单的注解就可以让它具备如此强悍的功能呢?打开其源码如下:
/**
 * Annotation to mark a RestTemplate bean to be configured to use a LoadBalancerClient
 * @author Spencer Gibb
 */
@Target({ ElementType.FIELD, ElementType.PARAMETER, ElementType.METHOD })
@Retention(RetentionPolicy.RUNTIME)
@Documented
@Inherited
@Qualifier
public @interface LoadBalanced {
}
这里注释写得比较清楚了,这个注解是标记一个RestTemplate来使用LoadBalancerClient, LoadBalancerClient是什么?搜索发现:
它是扩展自ServiceInstanceChooser接口的,ServiceInstanceChooser内容如下:
/**
 * Represents a client side load balancer
 * @author Spencer Gibb
 */
public interface LoadBalancerClient extends ServiceInstanceChooser {

	/**
	 * execute request using a ServiceInstance from the LoadBalancer for the specified
	 * service
	 * @param serviceId the service id to look up the LoadBalancer
	 * @param request allows implementations to execute pre and post actions such as
	 * incrementing metrics
	 * @return the result of the LoadBalancerRequest callback on the selected
	 * ServiceInstance
	 */
	<T> T execute(String serviceId, LoadBalancerRequest<T> request) throws IOException;

	/**
	 * execute request using a ServiceInstance from the LoadBalancer for the specified
	 * service
	 * @param serviceId the service id to look up the LoadBalancer
	 * @param serviceInstance the service to execute the request to
	 * @param request allows implementations to execute pre and post actions such as
	 * incrementing metrics
	 * @return the result of the LoadBalancerRequest callback on the selected
	 * ServiceInstance
	 */
	<T> T execute(String serviceId, ServiceInstance serviceInstance, LoadBalancerRequest<T> request) throws IOException;

	/**
	 * Create a proper URI with a real host and port for systems to utilize.
	 * Some systems use a URI with the logical serivce name as the host,
	 * such as http://myservice/path/to/service.  This will replace the
	 * service name with the host:port from the ServiceInstance.
	 * @param instance
	 * @param original a URI with the host as a logical service name
	 * @return a reconstructed URI
	 */
	URI reconstructURI(ServiceInstance instance, URI original);
}
❑ ServiceInstance choose(String serviceId):根据serviceId,结合负载均衡器选择一个服务实例。
❑ T execute(String serviceId, LoadBalancerRequest request):使用来自LoadBalancer的ServiceInstance为指定的服务执行请求。
❑ T execute(String serviceId, ServiceInstance serviceInstance, LoadBalancerRequestrequest):使用来自LoadBalancer的ServiceInstance为指定的服务执行请求,是上一个方法的重载,在实现类中可以看到它们的关系,其实就是前一个方法的细节实现。
❑ URI reconstructURI(ServiceInstance instance, URI original):使用主机ip和port构建特定的URI以供Ribbon内部使用。Ribbon使用具有逻辑服务名称的URI作为host,例如http://myservice/path/to/service。
由这些方法可以看出,这两个接口非同一般。有了这个线索,我们继续查找它在哪里被初始化,结果在同一个包下面发现了LoadBalancerAutoConfiguration,阅读发现,它正是Ribbon功能的核心配置类,其部分重要源码如下:
/**
 * Auto configuration for Ribbon (client side load balancing).
 *
 * @author Spencer Gibb
 * @author Dave Syer
 * @author Will Tran
 * @author Gang Li
 */
@Configuration
@ConditionalOnClass(RestTemplate.class)
@ConditionalOnBean(LoadBalancerClient.class)
@EnableConfigurationProperties(LoadBalancerRetryProperties.class)
public class LoadBalancerAutoConfiguration {

	@LoadBalanced
	@Autowired(required = false)
	private List<RestTemplate> restTemplates = Collections.emptyList();

	@Bean
	public SmartInitializingSingleton loadBalancedRestTemplateInitializerDeprecated(
			final ObjectProvider<List<RestTemplateCustomizer>> restTemplateCustomizers) {
		return () -> restTemplateCustomizers.ifAvailable(customizers -> {
            for (RestTemplate restTemplate : LoadBalancerAutoConfiguration.this.restTemplates) {
                for (RestTemplateCustomizer customizer : customizers) {
                    customizer.customize(restTemplate);
                }
            }
        });
	}

	@Autowired(required = false)
	private List<LoadBalancerRequestTransformer> transformers = Collections.emptyList();

	@Bean
	@ConditionalOnMissingBean
	public LoadBalancerRequestFactory loadBalancerRequestFactory(
			LoadBalancerClient loadBalancerClient) {
		return new LoadBalancerRequestFactory(loadBalancerClient, transformers);
	}

	@Configuration
	@ConditionalOnMissingClass("org.springframework.retry.support.RetryTemplate")
	static class LoadBalancerInterceptorConfig {
		@Bean
		public LoadBalancerInterceptor ribbonInterceptor(
				LoadBalancerClient loadBalancerClient,
				LoadBalancerRequestFactory requestFactory) {
			return new LoadBalancerInterceptor(loadBalancerClient, requestFactory);
		}

		@Bean
		@ConditionalOnMissingBean
		public RestTemplateCustomizer restTemplateCustomizer(
				final LoadBalancerInterceptor loadBalancerInterceptor) {
			return restTemplate -> {
                List<ClientHttpRequestInterceptor> list = new ArrayList<>(
                        restTemplate.getInterceptors());
                list.add(loadBalancerInterceptor);
                restTemplate.setInterceptors(list);
            };
		}
	}

	@Configuration
	@ConditionalOnClass(RetryTemplate.class)
	public static class RetryAutoConfiguration {

		@Bean
		@ConditionalOnMissingBean
		public LoadBalancedRetryFactory loadBalancedRetryFactory() {
			return new LoadBalancedRetryFactory() {};
		}
	}

	@Configuration
	@ConditionalOnClass(RetryTemplate.class)
	public static class RetryInterceptorAutoConfiguration {
		@Bean
		@ConditionalOnMissingBean
		public RetryLoadBalancerInterceptor ribbonInterceptor(
				LoadBalancerClient loadBalancerClient, LoadBalancerRetryProperties properties,
				LoadBalancerRequestFactory requestFactory,
				LoadBalancedRetryFactory loadBalancedRetryFactory) {
			return new RetryLoadBalancerInterceptor(loadBalancerClient, properties,
					requestFactory, loadBalancedRetryFactory);
		}

		@Bean
		@ConditionalOnMissingBean
		public RestTemplateCustomizer restTemplateCustomizer(
				final RetryLoadBalancerInterceptor loadBalancerInterceptor) {
			return restTemplate -> {
                List<ClientHttpRequestInterceptor> list = new ArrayList<>(
                        restTemplate.getInterceptors());
                list.add(loadBalancerInterceptor);
                restTemplate.setInterceptors(list);
            };
		}
	}
}
从类的注解就可以看出,它配置加载的时机一是当前工程环境必须有RestTemplate的实例,二是在工程环境中必须初始化了LoadBalancerClient的实现类。整个配置类只截取了重要部分,其中,LoadBalancerRequestFactory用于创建LoadBalancerRequest供LoadBalancer-Interceptor使用,它在低版本中是没有的;LoadBalancerInterceptorConfig中则维护了Load-BalancerInterceptor与RestTemplateCustomizer的实例,它们的作用如下:
❑ LoadBalancerInterceptor:拦截每一次HTTP请求,将请求绑定进Ribbon负载均衡的生命周期。
❑ RestTemplateCustomizer:为每个RestTemplate绑定LoadBalancerInterceptor拦截器。
LoadBalancerInterceptor看来已经很接近我们要找的答案了,我们截取其源码:
/**
 * @author Spencer Gibb
 * @author Dave Syer
 * @author Ryan Baxter
 * @author William Tran
 */
public class LoadBalancerInterceptor implements ClientHttpRequestInterceptor {

	private LoadBalancerClient loadBalancer;
	private LoadBalancerRequestFactory requestFactory;

	public LoadBalancerInterceptor(LoadBalancerClient loadBalancer, LoadBalancerRequestFactory requestFactory) {
		this.loadBalancer = loadBalancer;
		this.requestFactory = requestFactory;
	}

	public LoadBalancerInterceptor(LoadBalancerClient loadBalancer) {
		// for backwards compatibility
		this(loadBalancer, new LoadBalancerRequestFactory(loadBalancer));
	}

	@Override
	public ClientHttpResponse intercept(final HttpRequest request, final byte[] body,
			final ClientHttpRequestExecution execution) throws IOException {
		final URI originalUri = request.getURI();
		String serviceName = originalUri.getHost();
		Assert.state(serviceName != null, "Request URI does not contain a valid hostname: " + originalUri);
		return this.loadBalancer.execute(serviceName, requestFactory.createRequest(request, body, execution));
	}
}
原来它是利用ClientHttpRequestInterceptor来对每次HTTP请求进行拦截的,此类是Spring中维护的请求拦截器,实现它的intercept方法就可以使请求进入方法体,从而做一些处理。可以看出这里把请求拦截下来之后使用了LoadBalancerClient的execute方法来处理请求,顺便提一下,由于我们在RestTemplate中使用的URI是形如http://myservice/path/to/service的,所以这里的getHost()方法实际取到的就是服务名myservice。LoadBalancerClient接口只有一个实现类,即RibbonLoadBalancerClient,这里的execute方法体如下:
	@Override
	public <T> T execute(String serviceId, LoadBalancerRequest<T> request) throws IOException {
		ILoadBalancer loadBalancer = getLoadBalancer(serviceId);
		Server server = getServer(loadBalancer);
		if (server == null) {
			throw new IllegalStateException("No instances available for " + serviceId);
		}
		RibbonServer ribbonServer = new RibbonServer(serviceId, server, isSecure(server,
				serviceId), serverIntrospector(serviceId).getMetadata(server));

		return execute(serviceId, ribbonServer, request);
	}
首先要得到一个ILoadBalancer,再使用它去得到一个Server,顾名思义,这个Server就是具体服务实例的封装了,实际上查看源码也验证了笔者的猜测,所以,getServer (loadBalancer)就是发生负载均衡过程的地方!我们再看一看它的实现:
	protected Server getServer(ILoadBalancer loadBalancer) {
		if (loadBalancer == null) {
			return null;
		}
		return loadBalancer.chooseServer("default"); // TODO: better handling of key
	}
运用ILoadBalancer的chooseServer方法,查看ILoadBalancer的实现类的该方法实现:
    /*
     * Get the alive server dedicated to key
     *
     * @return the dedicated server
     */
    public Server chooseServer(Object key) {
        if (counter == null) {
            counter = createCounter();
        }
        counter.increment();
        if (rule == null) {
            return null;
        } else {
            try {
                return rule.choose(key);
            } catch (Exception e) {
                logger.warn("LoadBalancer [{}]:  Error choosing server for key {}", name, key, e);
                return null;
            }
        }
    }
我们发现,rule.choose(key)中的rule其实就是IRule,至此,拦截的HTTP请求与负载均衡策略得以关联起来。
参考书籍和文献
- 《重新定义SpringCloud实战》
- SpringCloud 企业级脚手架项目源码 喜欢的老铁给个星吧!!!
