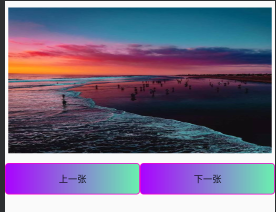
利用图形切换控件中轮流显示图片,并有慢进慢出的动画效果
ImageSwitcher控件可以在不同的图像之间切换,其中的切换过程可以采用动画的方法,如淡入淡出的效果。
(一)、图形切换控件轮流显示图片步骤如下:
1、既然要设置图形切换控件,首先我们得设计自己的界面,将图形切换控件布置到我们的页面上面,设计的XML的代码如下:
<?xml version="1.0" encoding="utf-8"?>
<LinearLayout xmlns:android="http://schemas.android.com/apk/res/android"
    xmlns:tools="http://schemas.android.com/tools"
    android:layout_width="match_parent"
    android:orientation="vertical"
    android:layout_height="match_parent"
    tools:context=".work7">
    <ImageSwitcher
        android:layout_marginTop="10dp"
        android:layout_width="match_parent"
        android:layout_height="wrap_content"
        android:layout_marginLeft="5dp"
        android:layout_marginRight="5dp"
        android:id="@+id/imageSwitcher">
    </ImageSwitcher>
    <LinearLayout
        android:layout_width="match_parent"
        android:layout_marginTop="15dp"
        android:layout_height="wrap_content"
        android:orientation="horizontal">
        <Button
            android:layout_width="match_parent"
            android:layout_height="wrap_content"
            android:layout_weight="1"
            android:id="@+id/imageButton"
            android:background="@drawable/button_shape1"
            android:text="上一张"/>
        <Button
            android:layout_width="match_parent"
            android:layout_height="wrap_content"
            android:layout_weight="1"
            android:id="@+id/imageButton1"
            android:background="@drawable/button_shape1"
            android:text="下一张"/>
    </LinearLayout>

</LinearLayout>
设计的页面如下所示:

2、上面我们进行了界面设计,接下来我们需要来实现图片的切换,图片的切换我们需要借助下面的函数来进行:
1)、对图形切换控件的初始化函数,如下:
private void init(){
        imageSwitcher.setFactory(work7.this);
        imageSwitcher.setImageResource(image[imageIndex]);
    }
2)、ImageSwticher需要一个图像工厂(ViewFactory)来创建用于显示图像的ImageView对象,因此我们需要一个实现Android.Widget.ViewSwitcher.ViewFactory接口的类,如下所示:
public class work7 extends AppCompatActivity implements View.OnClickListener,ViewFactory
 @Override
    public View makeView() {
        ImageView imageView=new ImageView(this);
        return imageView;
    }
3)、对图形切换控件的监听onClick进行功能代码的输入,如下:
@Override
    public void onClick(View view) {
        if(view.getId()==R.id.imageButton){
            imageIndex--;
            if(imageIndex<0){
                imageIndex=image.length-1;
            }
            //以下两句代码在自己设计了渐入淡出效果后就可以去掉注释了
            //imageSwitcher.setInAnimation(this,R.anim.right_in);//
            //imageSwitcher.setOutAnimation(this,R.anim.left_out);
        }else if(view.getId()==R.id.imageButton1){
            imageIndex++;
            if(imageIndex>4){
                imageIndex=0;
            }
             //以下两句代码在自己设计了渐入淡出效果后就可以去掉注释了
            //imageSwitcher.setInAnimation(this,R.anim.left_in);
            //imageSwitcher.setOutAnimation(this,R.anim. right_out);
        }
        imageSwitcher.setImageResource(image[imageIndex]);
    }
如上步骤,我们就可以实现图形切换控件轮流显示图片了,接下来,我们就要实现如何实现图片的渐入淡出。
(二)、实现图片的渐入淡出效果!
1、首先,我们在res目录下新建一个效果的文件夹,我的命名为anim,如下三步,建立anim,在点击出来的框中输入名称就好

2、实现图片的左边渐入、渐出;右边淡出、淡入,我们需要在新建的文件夹下面建立资源文件,如下所示,建立的名称可以为left_in,如下三步建立,

3、左边渐入的代码如下:
<?xml version="1.0" encoding="utf-8"?>
<set xmlns:android="http://schemas.android.com/apk/res/android">
    <translate
        android:duration="600"
        android:fromXDelta="-100%p"
        android:toXDelta="0" />

    <alpha
        android:duration="600"
        android:fromAlpha="0.1"
        android:toAlpha="1.0" />
</set>
4、右边淡出效果的代码如下:
<?xml version="1.0" encoding="utf-8"?>
<set xmlns:android="http://schemas.android.com/apk/res/android">
    <translate
        android:duration="600"
        android:fromXDelta="0"
        android:toXDelta="100%p" />
    <alpha
        android:duration="600"
        android:fromAlpha="1.0"
        android:toAlpha="0.1" />
</set>
5、左边渐出的代码如下:
<?xml version="1.0" encoding="utf-8"?>
<set xmlns:android="http://schemas.android.com/apk/res/android">
    <translate
        android:duration="600"
        android:fromXDelta="0"
        android:toXDelta="-100%p" />

    <alpha
        android:duration="600"
        android:fromAlpha="1.0"
        android:toAlpha="0.1" />
</set>
6、右边渐入的代码如下:
<?xml version="1.0" encoding="utf-8"?>
<set xmlns:android="http://schemas.android.com/apk/res/android">
    <translate
        android:duration="600"
        android:fromXDelta="100%p"
        android:toXDelta="0" />
    <alpha
        android:duration="600"
        android:fromAlpha="0.1"
        android:toAlpha="1.0" />
</set>
通过如上步骤,我们就可以实现图片的渐变效果了。希望能对大家有所帮助哦!
(三)、该项目的整体实现类的java代码,界面设计代码在上面已经给出!
1、整体实现类的java代码如下所示:
package *****;//填写自己的项目包名哦
import androidx.appcompat.app.AppCompatActivity;
import android.os.Bundle;
import android.view.View;
import android.widget.Button;
import android.widget.ImageSwitcher;
import android.widget.ImageView;
import android.widget.ViewSwitcher.ViewFactory;
public class work7 extends AppCompatActivity implements View.OnClickListener,ViewFactory {
    private ImageSwitcher imageSwitcher;
    private Button imageButton;
    private Button iamgeButton1;
    private int image[]={R.drawable.s1,R.drawable.s2,R.drawable.s3,R.drawable.s4,R.drawable.s5};
    private String image1[]={"https://c-ssl.duitang.com/uploads/item/201712/03/20171203153850_NxjMi.jpeg","https://c-ssl.duitang.com/uploads/item/201805/25/20180525210744_8FByW.jpeg"};
    private int imageIndex=0;
    @Override
    protected void onCreate(Bundle savedInstanceState) {
        super.onCreate(savedInstanceState);
        setContentView(R.layout.activity_work7);
        imageButton=(Button)findViewById(R.id.imageButton);
        iamgeButton1=(Button)findViewById(R.id.imageButton1);
        imageSwitcher=(ImageSwitcher)findViewById(R.id.imageSwitcher);
        imageButton.setOnClickListener(this);
        iamgeButton1.setOnClickListener(this);
        init();
    }
    @Override
    public void onClick(View view) {
        if(view.getId()==R.id.imageButton){
            imageIndex--;
            if(imageIndex<0){
                imageIndex=image.length-1;
            }
            imageSwitcher.setInAnimation(this,R.anim.right_in);
            imageSwitcher.setOutAnimation(this,R.anim.left_out);
        }else if(view.getId()==R.id.imageButton1){
            imageIndex++;
            if(imageIndex>4){
                imageIndex=0;
            }
            imageSwitcher.setInAnimation(this,R.anim.left_in);
            imageSwitcher.setOutAnimation(this,R.anim. right_out);
        }
        imageSwitcher.setImageResource(image[imageIndex]);
    }
    @Override
    public View makeView() {

        ImageView imageView=new ImageView(this);
        return imageView;
    }
    private void init(){
        imageSwitcher.setFactory(work7.this);
        imageSwitcher.setImageResource(image[imageIndex]);
    }
}
以上就是本次博客的全部内容哦,谢谢学弟学妹们观看,希望对你们有所帮助,有喜欢的记得点个赞留言评论加关注哦!
