最近在项目中总是感觉写的好多页面的代码是重复,想着有没有更好的框架或者设计模式能让我们的代码尽可能的简洁不重复,后来就看到了mvvm+dataBindding这个框架,其实吧,网上我们看的时候一番就是一大篇,但是有些细节对于初学者还是有问题的,因此我这篇博客也是自己学习后的一点心得和理解吧,如果对你有帮助,你可以看看,否则欢迎拍砖!
下面我通过最近自己学习的一个案例来说明,案例了主要是通过dataBinding+mvvm+recyclerView实现的recyclerView的多布局,通过该案例您一定能够初步掌握如何通过dataBinding 来绑定文本和图片,怎么样实现点击事件等等,下面就开始创建项目,开始代码部分,首先创建我们要操作的实体类UserInfoBean.java,让其集成BaseObservable,如果熟练观察者模式的一定会明白,因为它也是基于观察者模式的,当坚挺到UserInfo的属性有变化时,会自动刷新,更改,这样便可以保持数据同步
“`
package test.dmdfchina.com.mvvmdemo2;
import android.databinding.BaseObservable;
import android.databinding.Bindable;
import android.databinding.BindingAdapter;
import android.view.View;
import android.widget.ImageView;
import android.widget.Toast;
import com.bumptech.glide.Glide;
import test.dmdfchina.com.mvvmdemo2.BR;
/**
* Created by mkt on 2018/1/4.
*/
public class UserInfoBean extends BaseObservable{
private String name;
private int age;
private String imgUrl;
@Bindable
public String getName() {
    return name;
}

public void setName(String name) {
    this.name = name;
    notifyPropertyChanged(BR.name);
}
@Bindable
public int getAge() {
    return age;
}

public void setAge(int age) {
    this.age = age;
}
@Bindable
public String getImgUrl() {
    return imgUrl;
}

public void setImgUrl(String imgUrl) {
    this.imgUrl = imgUrl;
}

/*定义加载图片的方法,注意一定静态的,其次一定要添加注解*/

@BindingAdapter({"image"})
public static void getImageFrom(ImageView imageView,String imgUrl){
    Glide.with(imageView.getContext()).load(imgUrl).into(imageView);
}

/*设置图片的点击事件*/
public void getItemListener(View view){
    Toast.makeText(view.getContext(),"您点击了",Toast.LENGTH_SHORT).show();
    setName("lina宝贝");
}
}
“`好到这里我们的类就创建好,细心的同学会发现,我们在每个属性的get()方法中加上了@Bindable这样的注解,这是为了绑定,还会有一个BR这样的常量类,但是自己写的时候就是找不到什么原因了,因为你没有配置dataBinding的环境,怎么配置了简单,打开你的项目的build.gradle,在其中的android{}选项中配置
dataBinding{ enabled true},如图所示,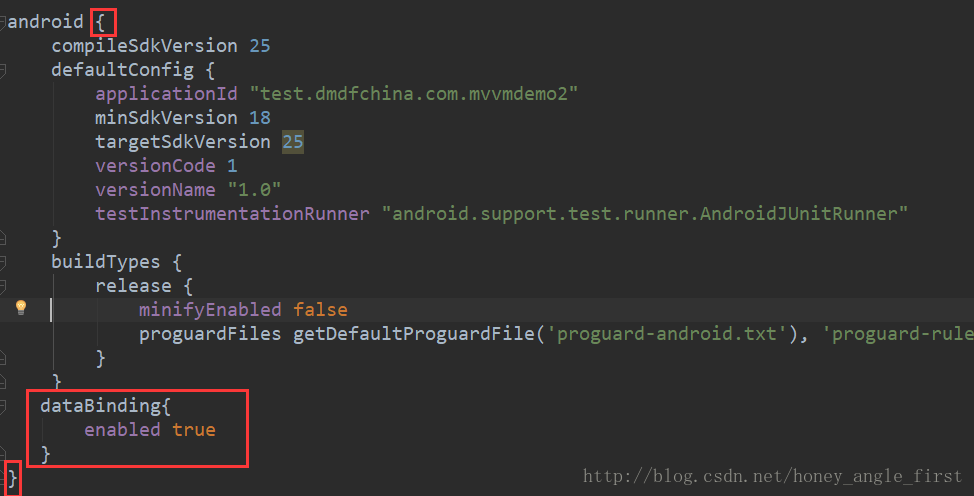
我们的案例是要实现RecyclerView实现多布局,因此在MainActivity的布局中我们需要引入RecyclerView,代码如下:
<android.support.v7.widget.RecyclerView
        android:id="@+id/recyclerView"
        android:layout_width="wrap_content"
        android:layout_height="wrap_content"
         />
好,在MainActivity中findViewById(R.id.recyclerView)找到它,接下来核心问题就是适配器了,因为我们要实现多布局,因此需要定义两个布局,而数据的绑定就是在布局中来实现的,由于截图不便,这里不再提,聪明的你一定能看懂简单的布局,直接来布局了,两布局分别是:layout_one_user.xml和second_layout.xml,贴一下代码
layout_one_user.xml:
<?xml version="1.0" encoding="utf-8"?>
<layout>
    <data>
    <variable
        name="userInfo"
        type="test.dmdfchina.com.mvvmdemo2.UserInfoBean"/>
<!--点击事件-->
        <variable
            name="clickListener"
            type="android.view.View.OnClickListener" />
    </data>
    <LinearLayout xmlns:android="http://schemas.android.com/apk/res/android"
        android:layout_width="match_parent"
        android:layout_height="wrap_content"
        android:layout_margin="10dp"
        android:orientation="horizontal">
        <TextView
            android:layout_width="wrap_content"
            android:layout_height="40dp"
            android:textSize="15sp"
            android:textColor="#54512a"
            android:layout_marginRight="9dp"
            android:text="@{userInfo.name}"/>
        <TextView
            android:layout_width="wrap_content"
            android:layout_height="40dp"
            android:textSize="15sp"
            android:textColor="#54512a"
            android:layout_marginRight="9dp"
            android:text="@{String.valueOf(userInfo.age)}"/>
    </LinearLayout>
</layout>
以上是第一个布局,接着第二个布局:second_layout.xml
<?xml version="1.0" encoding="utf-8"?>
<layout xmlns:app="http://schemas.android.com/apk/res-auto">
    <data>
        <variable
            name="userImage"
            type="test.dmdfchina.com.mvvmdemo2.UserInfoBean"/>
    </data>

    <LinearLayout
        xmlns:android="http://schemas.android.com/apk/res/android"
        android:orientation="horizontal"
        android:layout_width="match_parent"
        android:layout_margin="10dp"
        android:layout_height="80dp">
       <ImageView
           android:layout_width="113dp"
           android:layout_height="80dp"
           android:src="@mipmap/ic_launcher"
           app:image="@{userImage.imgUrl}"
           android:onClick="@{userImage.getItemListener}"/>
        <TextView
            android:layout_width="wrap_content"
            android:layout_height="match_parent"
            android:layout_gravity="center_horizontal|center_vertical"
            android:gravity="center_vertical"
            android:text="@{userImage.name}"/>

        <TextView
            android:layout_width="wrap_content"
            android:layout_height="match_parent"
            android:layout_gravity="center_horizontal|center_vertical"
            android:gravity="center_vertical"
            android:text="@{String.valueOf(userImage.age)}"/>

    </LinearLayout>
</layout>
好 ,你会发现和我们之前的布局写法略有不同,使用<layout></layout>将布局包裹起来,然后在里面定义了<data><variable></variable></data>这样的字段,其中variable有type和name两个属性,分别是我们定义的实体类的一个引用和类,写好之后会看到如果是<TextVie>则它的text属性就是通过dataBinding来邦定了,写法是android:text=”@{xx.属性}”的格式,注意一定要写正确,而在第二个布局中我们看到了图片的绑定,
<ImageView
           android:layout_width="113dp"
           android:layout_height="80dp"
           android:src="@mipmap/ic_launcher"
           app:image="@{userImage.imgUrl}"
           android:onClick="@{userImage.getItemListener}"/>
使用了app:image=”@{userImage.imgUrl}”这个属性,这个属性就是我们在定义实体类时自定义的属性,注意在布局中需要添加自定义的命名空间xmlns:app=”http://schemas.android.com/apk/res-auto”,这样我们就写好了布局部分,接下来我们通过适配器将布局设置进去。首先定义一个适配器的类SecondAdapter.java,大体结构是不变的,代码如下:
public class SecondAdapter<T> extends RecyclerView.Adapter<SecondAdapter.RecHolder> {
    private List<T> mList;
    private static final int TYPE_ONE = 1;
    private static final int TYPE_TWO = 2;

    private int firstVariableId;
    private int secondVariableId;

    private int firstLayoutId;
    private int secondLayoutId;

    public SecondAdapter(List<T> mList, int firstVariableId, int secondVariableId, int firstLayoutId, int secondLayoutId) {
        this.mList = mList;
        this.firstVariableId = firstVariableId;
        this.secondVariableId = secondVariableId;
        this.firstLayoutId = firstLayoutId;
        this.secondLayoutId = secondLayoutId;
    }

    @Override
    public int getItemViewType(int position) {
        if (position % 2 == 0) {
            return TYPE_ONE;
        }
        return TYPE_TWO;
    }

    @Override
    public RecHolder onCreateViewHolder(ViewGroup parent, int viewType) {
        ViewDataBinding binding=null;
        if (viewType == TYPE_ONE) {
            binding = DataBindingUtil.inflate(LayoutInflater.from(parent.getContext()), firstLayoutId, parent, false);
        } else {
            binding = DataBindingUtil.inflate(LayoutInflater.from(parent.getContext()), secondLayoutId, parent, false);
        }
        SecondAdapter.RecHolder holder = new SecondAdapter.RecHolder(binding.getRoot());
        holder.setBinding(binding);
        return holder;
    }

    @Override
    public void onBindViewHolder(SecondAdapter.RecHolder holder, int position) {
        if (getItemViewType(position) == TYPE_ONE) {
            holder.getBinding().setVariable(firstVariableId, mList.get(position));
        } else {
            holder.getBinding().setVariable(secondVariableId, mList.get(position));
        }

        holder.getBinding().executePendingBindings();
    }

    @Override
    public int getItemCount() {
        return mList == null ? 0 : mList.size();
    }


    /*内容布局器*/
    class RecHolder extends RecyclerView.ViewHolder {
        private ViewDataBinding binding;

        public RecHolder(View itemView) {
            super(itemView);
        }

        public ViewDataBinding getBinding() {
            return binding;
        }

        public void setBinding(ViewDataBinding binding) {
            this.binding = binding;
        }
    }
}
我们会看到dataBinding让我们的代码简洁了好多,不会有一大片的findViewById()的操作,里面任然有几个小问题需要注意,如下图所示:
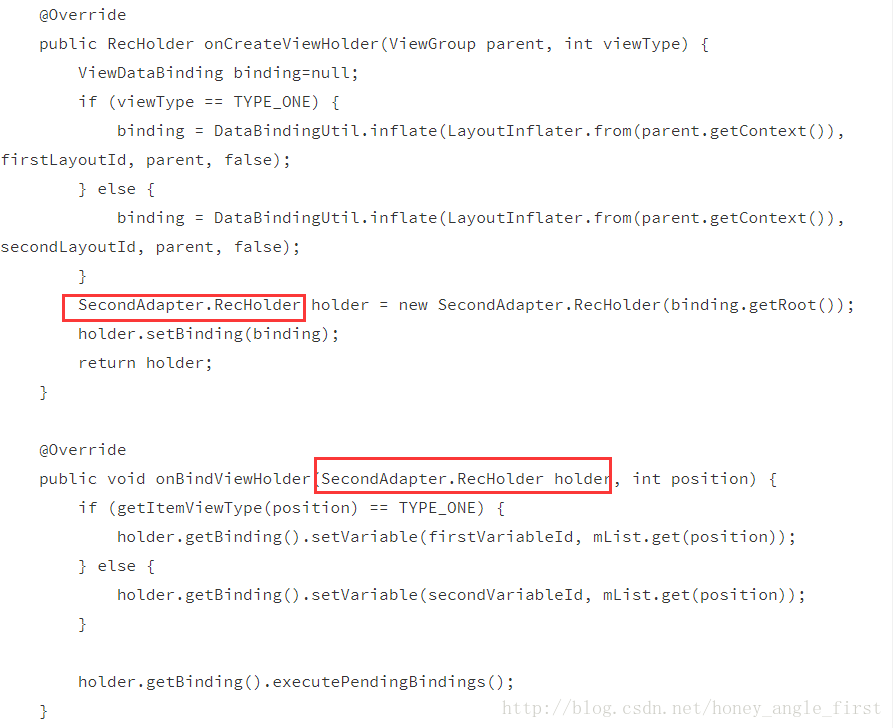
要注意的就是我图中框出的地方,一定要写成这种形式,否则在运行时会报错,说该适配器类不是抽象类,什么什么的错误,这是我遇到的一个bug,这样改掉了,你可以试试有没有更好的办法,第二就是在ViewHolder中使用DataBiding来绑定数据
最后,在MainActivity中引用,和之前的写法是一样,如果你的BR类找不到,重新编译项目即可,我这里也不多说了,直接贴代码了:
package test.dmdfchina.com.mvvmdemo2;

import android.support.v7.app.AppCompatActivity;
import android.os.Bundle;
import android.support.v7.widget.LinearLayoutManager;
import android.support.v7.widget.RecyclerView;
import android.view.Window;

import java.util.ArrayList;
import java.util.List;

public class MainActivity extends AppCompatActivity {
    private RecyclerView mRecyclerView;
    private SecondAdapter<UserInfoBean> adapter;
    private List<UserInfoBean> mList;

    @Override
    protected void onCreate(Bundle savedInstanceState) {
        super.onCreate(savedInstanceState);
        supportRequestWindowFeature(Window.FEATURE_NO_TITLE);
        setContentView(R.layout.activity_main);
        mRecyclerView = (RecyclerView) findViewById(R.id.recyclerView);
        mList = new ArrayList<>();
        for (int i = 0; i < 30; i++) {
            UserInfoBean userInfoBean = new UserInfoBean();
            userInfoBean.setName("哈密" + i);
            userInfoBean.setAge(i);
            userInfoBean.setImgUrl("http://img.bimg.126.net/photo/DCi7Q__VN3NJ_63cq7sosA==/3439905690381537164.jpg");
            mList.add(userInfoBean);
        }
        adapter=new SecondAdapter<>(mList,BR.userInfo,BR.userImage,R.layout.layout_one_user,R.layout.second_layout);
        LinearLayoutManager manager=new LinearLayoutManager(this,LinearLayoutManager.VERTICAL,false);
        mRecyclerView.setLayoutManager(manager);
        mRecyclerView.setAdapter(adapter);
    }
}
到这里我的简单案例就结束了,希望对你有帮助,或者指正我的不足哦!
