Thymeleaf崇尚模板是纯正的html代码,脱离模板引擎,在纯静态环境也可以直接运行。现在如果我们直接在html中编写 ${}这样的表达式,显然在静态环境下就会出错,这不符合Thymeleaf的理念。Thymeleaf中所有的表达式都需要写在"指令"中,指令是HTML5中的自定义属性,在Thymeleaf中所有指令都是以th:开头。因为表达式${}是写在自定义属性中,因此在静态环境下,表达式的内容会被当做是普通字符串,浏览器会自动忽略这些指令,这样就不会报错了。
如果我们不经过SpringMVC,而是直接用浏览器打开编写的页面:在静态环境下,th指令不会被识别,但是也不会报错,而是显示原本的默认值。指令的设计,正是Thymeleaf的高明之处,也是它优于其它模板引擎的原因。动静结合的设计,使得无论是前端开发人员还是后端开发人员可以完美契合。
一、先搭建一个简单的Spring MVC
参考文章:Spring MVC 访问不同路径的页面。
二、整合Thymeleaf模版
1、将下面的Thymeleaf的相关依赖包添加到pom.xml文件中。
<!--thymeleaf-->
<dependency>
    <groupId>org.thymeleaf</groupId>
    <artifactId>thymeleaf-spring4</artifactId>
    <version>3.0.11.RELEASE</version>
</dependency>
2、修改WEB-INF -- html-dispatcher.xml文件。
<?xml version="1.0" encoding="UTF-8"?>
<beans xmlns="http://www.springframework.org/schema/beans"
       xmlns:context="http://www.springframework.org/schema/context"
       xmlns:mvc="http://www.springframework.org/schema/mvc"
       xmlns:xsi="http://www.w3.org/2001/XMLSchema-instance"
       xsi:schemaLocation="
           http://www.springframework.org/schema/beans
           http://www.springframework.org/schema/beans/spring-beans.xsd
           http://www.springframework.org/schema/context
           http://www.springframework.org/schema/context/spring-context.xsd
           http://www.springframework.org/schema/mvc
           http://www.springframework.org/schema/mvc/spring-mvc.xsd">

    <context:component-scan base-package="com.xiaojie.spring.mvc"/>
    <context:annotation-config/>

    <!-- 配置注解驱动 一些注解要用到的 -->
    <mvc:annotation-driven/>

    <!--静态资源映射  默认-->
    <!--<mvc:default-servlet-handler />-->
    <!--静态资源映射  自定义 可配置cache-period参数-->
    <mvc:resources mapping="/css/**" location="/statics/css/"/>
    <mvc:resources mapping="/js/**" location="/statics/js/"/>
    <mvc:resources mapping="/image/**" location="/statics/images/"/>

    <!--<bean class="org.springframework.web.servlet.view.InternalResourceViewResolver">
        <property name="prefix" value="/views/test/html/"/>
        <property name="suffix" value=".html"/>
    </bean>-->


    <!--ThymeLeaf的配置-->

    <bean id="viewResolver" class="org.thymeleaf.spring4.view.ThymeleafViewResolver">
        <property name="order" value="1"/>
        <property name="characterEncoding" value="UTF-8"/>
        <property name="templateEngine" ref="templateEngine"/>
    </bean>

    <bean id="templateEngine" class="org.thymeleaf.spring4.SpringTemplateEngine">
        <property name="templateResolver" ref="templateResolver" />
    </bean>

    <bean id="templateResolver" class="org.thymeleaf.spring4.templateresolver.SpringResourceTemplateResolver">
        <property name="prefix" value="/views/test/html/"/>
        <property name="suffix" value=".html"/>
        <property name="templateMode" value="HTML5"/>
        <property name="cacheable" value="false" />
        <property name="characterEncoding"  value="UTF-8" />
    </bean>
</beans>
三、动态网页
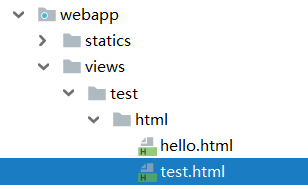
1、新增test.html网页。
<!DOCTYPE html>
<html lang="en" xmlns:th="http://www.thymeleaf.org">
<head>
    <meta charset="UTF-8">
    <title>view-test-html-hello</title>
</head>
<body th:text="'姓名:' + ${name} + ', 年龄:' + ${age}">
静态界面默认文本
</body>
</html>
2、修改HtmlController。
package com.xiaojie.spring.mvc.controller;

import org.springframework.stereotype.Controller;
import org.springframework.ui.Model;
import org.springframework.web.bind.annotation.RequestMapping;
import org.springframework.web.servlet.ModelAndView;

/**
 * ModelAndView多级目录可以使用相对路径,上一级的话使用../。
 * 如果<property name="suffix" value=".jsp"/>,那么不支持同时支持jsp和html。
 * 如果<property name="suffix" value=""/>,那么new ModelAndView()都要加上后缀。
 **/
@Controller
@RequestMapping("/html")
public class HtmlController {

    /**
     * 如果要使用的话,要将testDispatcher先注释掉
     */
    @RequestMapping("/hello")
    public ModelAndView hello(Model model) {
        return new ModelAndView("hello");
    }

    @RequestMapping("/test")
    public ModelAndView test(Model model) {
        model.addAttribute("name", "卓小杰");
        model.addAttribute("age", 24);
        return new ModelAndView("test");
    }
}
四、测试
1、通过tomcat启动项目,访问目标网页http://localhost:8080/mvc/html/html/test。

2、直接再本地打开静态网页file:///G:/1269100463zxj.zhuoxiaojie/project/zxj-spring-mvc/src/main/webapp/views/test/html/test.html。


