此示例是使用Spring Security实现登录功能。
1.pom.xml
thymeleaf-extras-springsecurity5是springsecurity针对thymeleaf模板引擎而开发的一套标签库,可以在thymeleaf中引入该标签库,然后就可以在thymeleaf中使用springsecurity提供的标签了。
注意:Spring Boot 2.x 要用thymeleaf-extras-springsecurity5; Spring Boot 1.x用thymeleaf-extras-springsecurity4
<?xml version="1.0" encoding="UTF-8"?>
<project xmlns="http://maven.apache.org/POM/4.0.0" xmlns:xsi="http://www.w3.org/2001/XMLSchema-instance"
         xsi:schemaLocation="http://maven.apache.org/POM/4.0.0 http://maven.apache.org/xsd/maven-4.0.0.xsd">
    <modelVersion>4.0.0</modelVersion>
    <parent>
        <groupId>org.springframework.boot</groupId>
        <artifactId>spring-boot-starter-parent</artifactId>
        <version>2.1.4.RELEASE</version>
        <relativePath/>
    </parent>
    <groupId>com.example</groupId>
    <artifactId>spring-security-example</artifactId>
    <version>0.0.1-SNAPSHOT</version>
    <name>spring-security-example</name>
    <description>Demo project for Spring Boot</description>

    <properties>
        <java.version>1.8</java.version>
    </properties>

    <dependencies>
        <dependency>
            <groupId>org.springframework.boot</groupId>
            <artifactId>spring-boot-starter-security</artifactId>
        </dependency>
        <dependency>
            <groupId>org.thymeleaf.extras</groupId>
            <artifactId>thymeleaf-extras-springsecurity5</artifactId>
        </dependency>
        <dependency>
            <groupId>org.springframework.boot</groupId>
            <artifactId>spring-boot-starter-thymeleaf</artifactId>
        </dependency>
        <dependency>
            <groupId>org.springframework.boot</groupId>
            <artifactId>spring-boot-starter-web</artifactId>
        </dependency>
        <dependency>
            <groupId>org.projectlombok</groupId>
            <artifactId>lombok</artifactId>
            <version>1.18.6</version>
        </dependency>

        <dependency>
            <groupId>org.springframework.boot</groupId>
            <artifactId>spring-boot-starter-test</artifactId>
            <scope>test</scope>
        </dependency>
    </dependencies>

    <build>
        <plugins>
            <plugin>
                <groupId>org.springframework.boot</groupId>
                <artifactId>spring-boot-maven-plugin</artifactId>
            </plugin>
        </plugins>
    </build>
</project>
2. html
login.html
<!DOCTYPE html>
<html lang="en"
      xmlns="http://www.w3.org/1999/xhtml"
      xmlns:th="http://www.thymeleaf.org">
<head>
    <meta charset="utf-8">
    <title>登录</title>
</head>
<body>
<form method="post" action="/login">
    <h2 class="form-signin-heading">登录</h2>
    <span th:if="${param.error}" th:text="${session.SPRING_SECURITY_LAST_EXCEPTION.message}"></span>
    <p>
        <label for="username">用户名</label>
        <input type="text" id="username" name="username" required autofocus>
    </p>
    <p>
        <label for="password">密码</label>
        <input type="password" id="password" name="password" required>
    </p>

    <button type="submit">登录</button>
</form>
</body>
</html>
index.html
引入标签库xmlns:sec=“http://www.thymeleaf.org/thymeleaf-extras-springsecurity4”,引入标签库这里使用thymeleaf-extras-springsecurity4,标签库就是对应于org.springframework.security.access.expression.SecurityExpressionRoot这个类。
常用的标签库
- sec:authorize 权限
- sec:authentication 认证
- sec:authorize-url : 不能直接使用还需额外的配置 (也不建议使用该标签,因为该标签不支持restful风格)
SecurityExpressionRoot常用的表达式
- boolean hasAuthority(String authority)
- boolean hasAnyAuthority(String… authorities)
- boolean hasRole(String role)
- hasAnyRole(String… roles)
- Authentication getAuthentication()
- Object getPrincipal()
- boolean isAnonymous()
- boolean isAuthenticated()
- boolean isRememberMe()
<!DOCTYPE html>
<html xmlns="http://www.w3.org/1999/xhtml"
      xmlns:th="http://www.thymeleaf.org"
      xmlns:sec="http://www.thymeleaf.org/thymeleaf-extras-springsecurity4">
<head>
    <meta charset="utf-8">
</head>
<body>
<div sec:authorize="isAuthenticated()">
    <p>登录名:<span sec:authentication="name"></span></p>
    <p>角色:<span sec:authentication="principal.authorities"></span></p>
    <p>Username:<span sec:authentication="principal.username"></span></p>

    <div sec:authorize="hasAuthority('ROLE_user:view:GET')">用户列表</div>
    <div sec:authorize="hasRole('user:add:POST')">添加用户</div>
    <div sec:authorize="hasAuthority('ROLE_user:update:PUT')">修改用户</div>
    <div sec:authorize="hasAuthority('ROLE_user:delete:DELETE')">删除用户</div>
</div>
</body>
</html>
userList.html
<!DOCTYPE html>
<html lang="en">
<head>
    <meta charset="utf-8">
</head>
<body>
用户列表
</body>
</html>
orderList.html
<!DOCTYPE html>
<html lang="en">
<head>
    <meta charset="utf-8">
</head>
<body>
订单列表
</body>
</html>
3. WebMvcConfiguration
@Configuration
public class WebMvcConfiguration implements WebMvcConfigurer {

    @Override
    public void addViewControllers(ViewControllerRegistry registry) {
        registry.addViewController("/login").setViewName("login");
        registry.addViewController("/index").setViewName("index");
        registry.addViewController("/getUserList").setViewName("userList");
        registry.addViewController("/getOrderList").setViewName("orderList");
    }
}
4. model
权限实体实现GrantedAuthority接口,重写getAuthority方法,该方法唯一标识一个权限
@Data
@ToString
@AllArgsConstructor
@RequiredArgsConstructor
public class SysPermission implements GrantedAuthority {
    private Long id;
    private String name;
    private String code;
    private String url;
    private String method;

    @Override
    public String getAuthority() {
        return "ROLE_" + this.code + ":" + this.method.toUpperCase();
    }
}
@Data
@ToString
@AllArgsConstructor
@RequiredArgsConstructor
public class SysUser {
    private Long id;
    private String username;
    private String password;

    private List<SysPermission> sysPermissions;
}
5. UserDetailsService
从数据库中获取用户的信息和权限列表
@Component
public class MyUserDetailsService implements UserDetailsService {
    @Override
    public UserDetails loadUserByUsername(String username) throws UsernameNotFoundException {
        // 模拟根据用户名查询用户信息和权限
        SysUser user = new SysUser(1L, "admin", "$2a$10$nm5H9QvnoWao.l7NbxQGZeZoR0Cn.VqCpsl3E/FhglPa954Zg9ccm", Arrays.asList(
                new SysPermission(1L, "用户列表", "user:view", "/getUserList", "GET"),
                new SysPermission(2L, "添加用户", "user:add", "/addUser", "POST"),
                new SysPermission(3L, "修改用户", "user:update", "/updateUser", "PUT")
        ));
        if (user == null) {
            throw new UsernameNotFoundException(username);
        }

        return new User(user.getUsername(), user.getPassword(), user.getSysPermissions());
    }

    public static void main(String[] args) {
        System.out.println(new BCryptPasswordEncoder().encode("123456"));
    }
}
登录成功后处理的逻辑,默认是重定向到上一个url,也可以在这里自定义自己的逻辑。
@Slf4j
@Component
public class MyAuthenticationSuccessHandler implements AuthenticationSuccessHandler {

    @Autowired
    private ObjectMapper objectMapper;

    @Override
    public void onAuthenticationSuccess(HttpServletRequest request, HttpServletResponse response, Authentication authentication) throws IOException, ServletException {
        log.info("login sucesssful {}", objectMapper.writeValueAsString(authentication));

        response.sendRedirect("/index");
    }
}
Spring Security的核心配置,注意BCryptPasswordEncoder是用于加密解密密码的,每次加密的密文都不一样。
@Configuration
@EnableWebSecurity
public class SecurityConfiguration extends WebSecurityConfigurerAdapter {

    @Autowired
    private MyUserDetailsService myUserDetailsService;

    @Autowired
    private MyAuthenticationSuccessHandler myAuthenticationSuccessHandler;

    @Override
    protected void configure(HttpSecurity http) throws Exception {
        http.csrf().disable()
                // 配置需要认证的请求
                .authorizeRequests()
                    .anyRequest()
                    .authenticated()
                    .and()
                // 登录表单相关配置
                .formLogin()
                    .loginPage("/login")
                    .usernameParameter("username")
                    .passwordParameter("password")
                    .successHandler(myAuthenticationSuccessHandler)
                    .failureUrl("/login?error")
                    .permitAll()
                    .and()
                // 登出相关配置
                .logout()
                    .permitAll();

    }

    @Override
    public void configure(AuthenticationManagerBuilder auth) throws Exception {
        auth.userDetailsService(myUserDetailsService).passwordEncoder(passwordEncoder());
    }

    @Override
    public void configure(WebSecurity web) {
        web.ignoring().antMatchers("/static/**");
    }

    @Bean
    public PasswordEncoder passwordEncoder() {
        return new BCryptPasswordEncoder();
    }
}
6. 运行结果
- 访问http://localhost:8080/getUserList跳转到登录页面http://localhost:8080/login
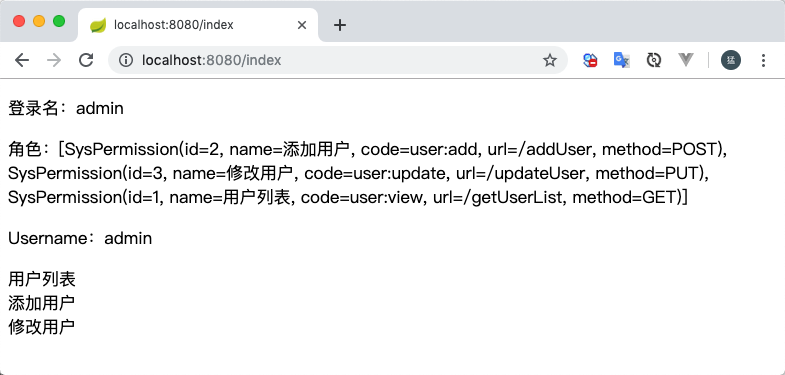
- 输入用户名密码登录成功后跳转到首页index.html(登录成功后的逻辑是在AuthenticationSuccessHandler中处理的),因admin用户只有用户列表、添加用户、修改用户 所以在页面上只能看到这三个按钮没有删除用户的按钮。
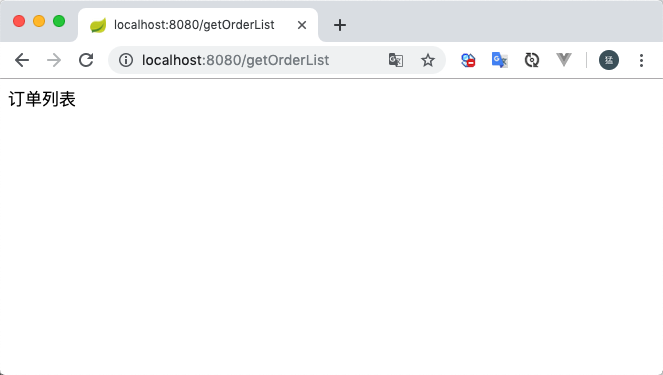
- 访问http://localhost:8080/getOrderList可以看到订单页面,虽然用户的权限列表中并没有订单相关的权限,但是仍然能访问。此问题属于权限校验,在后面解决这个问题。