在上文中我们已经完成了
1)JDBC进行
2)MyBatis提供的selectList等方法
3)接口绑定
4)动态SQL等阶段来进行开发,那么如果更好的优化这个过程呢?
之前在进行接口绑定的时候,我们将Mapper.xml文件和Mapper接口同时放到了mapper目录下,为了代码的美观,我们先将所有的配置文件均放到resources目录下,但是为了保证映射文件和对应的接口文件在同一位置,是需要放到同一深度的.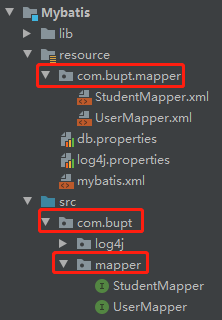
但是这样并不影响接口绑定,放到统一位置的规范,因为IDEA,编译之后就会把这两类文件放到一起,配置文件加载项目启动时就加载了,但不编译,只有java会被编译成字节码,这也就是软编码的好处,我们可以通过修改配置文件来避免改变运行中的代码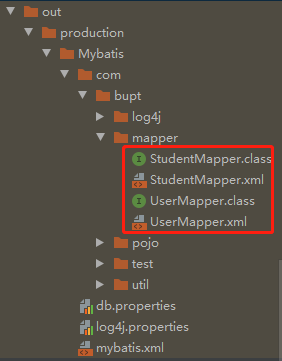
MyBatis的原理
其实我们在使用MyBatis时DML操作根本没有用到映射,所以创建这些实体类对于他们而言没有用,真正有用的是DQL语句,他需要实体类来指定反射上创建的对象类型,这就是MyBatis的原理
具体可以查看我们之前的自定义DML和DQL操作
那么到此我们基本上已经有一套MyBatis的基本结构,我们通过这个结构可以实现单表查询和多表关联查询
这里详细讲下多表关联查询,多表关联主要是多对一和一对多的关系,
我们的思路是多对一:比如学生表对应班级表,我们需要加入班级对象到学生属性中.
一对多:我们需要将一个个学生对象放到list集合中.
1 准备表和数据
# 创建班级表
create table tb_class (
    id integer primary key auto_increment,
    name varchar(10) not null,
    room varchar(10)
);

# 创建学生表
create table tb_student (
    id integer primary key auto_increment,
    name varchar(20) not null,
    gender char(1),
    birthday date,
    cid integer
);

# 建立约束
alter table tb_student add constraint fk_cid foreign key (cid) references tb_class (id);

# 添加数据
insert into tb_class values
(default, '1班', '508'),
(default, '2班', '510'),
(default, '3班', '405');

insert into tb_student values
(default, '张无忌', '男', '1998-12-12', 1),
(default, '赵敏', '女', '1999-12-12', 2),
(default, '谢逊', '男', '1998-12-12', 2),
(default, '成昆', '男', '1998-12-12', 3),
(default, '周芷若', '女', '1998-12-12', 3),
(default, '小昭', '女', '1998-12-12', 3);
- 1多对一(通过查询学生信息同时查询班级信息)
POJO:应该提供一个班级类型的对象作为属性,用来表示班级信息.这里有一个开发小技巧我们一般在定义POJO类型int属性时,一般将其定义为对应的包装类Integer可以防止加入null数据的时候其实时加入0
public class Student implements Serializable {
    private Integer id;
    private String name, gender;
    private Date birthday;
    private Integer cid;
    private Clazz clazz;
}
public class Clazz implements Serializable {
    private Integer id;
    private String name,room;
1.1.1实现方式一
关联方式
:指的是通过SQL语句关联查询的方式实现即一条SQL语句查询. 表1 join 表2 on 关联条件. 在MyBatis中, 关联单个对象需要使用标签进行.
1)首先写出多对一的SQL语句
 2)
2)
映射文件
<?xml version="1.0" encoding="UTF-8" ?>
<!DOCTYPE mapper
        PUBLIC "-//mybatis.org//DTD Mapper 3.0//EN"
        "http://mybatis.org/dtd/mybatis-3-mapper.dtd">
<mapper namespace="com.bupt.mapper.StudentMapper">
    <!--手动定义映射关系-->
<resultMap id="stuMap" type="student" autoMapping="true">
    <!--关联单个对象,理解为小的resultMap即可-->
    <association property="clazz" javaType="clazz" autoMapping="true">
        <id column="cid" property="id"/>
        <result column="cname" property="name"/>
    </association>
</resultMap>
    <select id="selAll" resultMap="stuMap">
        select s.*,c.name cname,c.room from tb_student s join tb_class c on s.cid=c.id
    </select>
</mapper>

1.1.2 N+1方式实现
StudentMapper.xml
<?xml version="1.0" encoding="UTF-8" ?>
<!DOCTYPE mapper
        PUBLIC "-//mybatis.org//DTD Mapper 3.0//EN"
        "http://mybatis.org/dtd/mybatis-3-mapper.dtd">
<mapper namespace="com.bupt.mapper.StudentMapper">
    <resultMap id="stuMap2" type="student">
        <result column="cid" property="cid"/>
        <association property="clazz"
                     javaType="clazz"
                     select="com.bupt.mapper.ClazzMapper.selById"
                     column="cid"/>
    </resultMap>
    <select id="selAllNAndOne" resultMap="stuMap2">
        select * from tb_student
    </select>
ClazzMapper.xml
<?xml version="1.0" encoding="UTF-8" ?>
<!DOCTYPE mapper
        PUBLIC "-//mybatis.org//DTD Mapper 3.0//EN"
        "http://mybatis.org/dtd/mybatis-3-mapper.dtd">
<mapper namespace="com.bupt.mapper.ClazzMapper">
    <select id="selById" resultType="clazz">
        select * from tb_class where id=#{id}
    </select>
</mapper>
ClazzMapper接口
public interface ClazzMapper {
    List<Clazz> selById(int id);
}
StudentMapper.xml
public interface StudentMapper {
    List<Student> selAll();
    List<Student> selAllNAndOne();
}

小结:关联查询,resultMap自动映射默认关闭,N+1查询默认开启.
以上我们就完成了多对一的实现,接下来继续看一对多(查询班级信息时同时把当前班级的学生信息也查到)
- 2 一对多
POJO
班级类
学生类:
public class Student implements Serializable {
    private Integer id;
    private String name, gender;
    private Date birthday;
    private Integer cid;
1.2.1 实现方式一
关联方式实现
<?xml version="1.0" encoding="UTF-8" ?>
<!DOCTYPE mapper
        PUBLIC "-//mybatis.org//DTD Mapper 3.0//EN"
        "http://mybatis.org/dtd/mybatis-3-mapper.dtd">
<mapper namespace="com.bupt.mapper.ClazzMapper">
    <resultMap id="claMap" type="clazz" autoMapping="true">
        <collection property="list" javaType="list" ofType="Student" autoMapping="true">
            <id column="sid" property="id"/>
            <result column="sname" property="name"/>
            <result column="id" property="cid"/>
        </collection>
    </resultMap>
    <select id="selAll" resultMap="claMap">
        select c.*, s.id sid, s.name sname, s.gender, s.birthday from tb_class c join tb_student s on c.id=s.cid
    </select>
</mapper>

1.2.2 N+1
ClazzMapper.xml
<?xml version="1.0" encoding="UTF-8" ?>
<!DOCTYPE mapper
        PUBLIC "-//mybatis.org//DTD Mapper 3.0//EN"
        "http://mybatis.org/dtd/mybatis-3-mapper.dtd">
<mapper namespace="com.bupt.mapper.ClazzMapper">
    <resultMap id="claMap2" type="clazz">
        <id column="id" property="id"/>
        <collection property="list"
                    javaType="list"
                    ofType="student"
                    select="com.bupt.mapper.StudentMapper.selByCid"
                    column="id">
        </collection>
    </resultMap>
    <select id="selAllNAndOne" resultMap="claMap2">
        select * from tb_class
    </select>
StudentMapper.xml
<?xml version="1.0" encoding="UTF-8" ?>
<!DOCTYPE mapper
        PUBLIC "-//mybatis.org//DTD Mapper 3.0//EN"
        "http://mybatis.org/dtd/mybatis-3-mapper.dtd">
<mapper namespace="com.bupt.mapper.StudentMapper">
    <select id="selByCid" resultType="student">
        select * from tb_student where cid=#{cid}
    </select>
</mapper>
ClazzMapper
public interface ClazzMapper {
    List<Clazz> selAllNAndOne();
}
Student
public interface StudentMapper {
    List<Student> selByCid(int id);
}

小结:关联方式和N+1的区别在于,关联方式使用的是association标签,而N+1使用的是collection标签
2.在实际开发中,我们常常省略JDBC的类型,是为了满足各种不同数据库的基本数据类型的不同来保持配置文件的灵活性,即不同的数据库(mysql,Oracle)依然可以使用同样的配置文件
JAVA类型和对应的JDBC类型(来自官网)


- 业务装配方式查询
一般在比较复杂的自连接情况查询时使用,业务装配指的是在自连接中,一次把所有的数据都查到,通过后续程序员自己写代码的方式,将查到数据组装成指定格式的方式.
例如:员工信息表,上下级关系,查询所有的员工信息,并将当前员工的下级员工也查出来,展示为树状结构.
我们先用N+1方式实现:为什么不用关联方式,因为我们不知道职级有多少层.
POJO:

mapper接口
public interface EmpMapper {
    List<Emp> selByN1(@Param("mgr") Integer mgr);
}
mapper映射文件
<?xml version="1.0" encoding="UTF-8" ?>
<!DOCTYPE mapper
        PUBLIC "-//mybatis.org//DTD Mapper 3.0//EN"
        "http://mybatis.org/dtd/mybatis-3-mapper.dtd">
<mapper namespace="com.bupt.mapper.EmpMapper">
    <resultMap id="emap" type="emp">
        <id column="empno" property="empno"/>
        <collection property="emps"
                    javaType="list"
                    ofType="emp"
                    select="selByN1"
                    column="empno"/>
    </resultMap>
    <select id="selByN1" resultMap="emap">
        select * from emp where
        <choose>
            <when test="mgr ==null">
                mgr is null
            </when>
            <otherwise>
                mgr=#{mgr}
            </otherwise>
        </choose>
    </select>
</mapper>
缺点就是我们需要去数据库不断地查询

下面我们通过业务装配的方式来实现
我们发现只需要执行一次SQL语句,其他交给代码业务逻辑
测试方法
    @Test
    public void testService() {
        SqlSession session = MybatisUtils.getSqlSession();
        EmpMapper mapper = session.getMapper(EmpMapper.class);
        List<Emp> emps = mapper.selTree();
        List<Emp> tree = toTree(emps);
        System.out.println(tree);
        session.close();
    }

    /**
     * 将平级员工列表转换成树结构员工列表
     *
     * @param emps 平级列表
     * @return 树列表
     */
    private List<Emp> toTree(List<Emp> emps) {
        List<Emp> result = new ArrayList<>();

        // 将所有员工的编号和员工对应起来, 做一个Map集合, 方便通过编号查找员工
        Map<Integer, Emp> map = new HashMap<>();
        for (Emp emp : emps) {
            map.put(emp.getEmpno(), emp);
        }

        for (Emp emp : emps) {
            // 判断是否顶级
            if(emp.getMgr() == null) {
                // 直接加入result中即可
                result.add(emp);
                continue;
            }
            // 不是顶级, 找直接上级
            map.get(emp.getMgr()).getEmps().add(emp);
        }

        return result;
    }
接口
List<Emp> selTree();
映射文件
    <select id="selTree" resultType="emp">
        select * from emp
    </select>

