ChannelOutboundHandler
基于ChannelHandler,扩展了一些Outbound事件。
public interface ChannelOutboundHandler extends ChannelHandler {
    // 端口绑定
    void bind(ChannelHandlerContext ctx, SocketAddress localAddress, ChannelPromise promise) throws Exception;

    // 连接
    void connect(
            ChannelHandlerContext ctx, SocketAddress remoteAddress,
            SocketAddress localAddress, ChannelPromise promise) throws Exception;

    // 断开连接
    void disconnect(ChannelHandlerContext ctx, ChannelPromise promise) throws Exception;

    // 关闭
    void close(ChannelHandlerContext ctx, ChannelPromise promise) throws Exception;

    // 取消注册
    void deregister(ChannelHandlerContext ctx, ChannelPromise promise) throws Exception;

    /**
     * Intercepts {@link ChannelHandlerContext#read()}.
     */
    void read(ChannelHandlerContext ctx) throws Exception;

    // 写数据时调用
    void write(ChannelHandlerContext ctx, Object msg, ChannelPromise promise) throws Exception;

    // 刷新写过的数据
    void flush(ChannelHandlerContext ctx) throws Exception;
}
与ChannelInboundHandler对比可以发现,ChannelInboundHandler更多的是一些被动触发的回调,而ChannelOutboundHandler提供的大部分是需要用户主动执行的操作,特别是write与flush。
事件传播过程
定义三个自定义的OutBoundHandler类:
OutBoundHandlerA
public class OutBoundHandlerA extends ChannelOutboundHandlerAdapter {

    @Override
    public void write(ChannelHandlerContext ctx, Object msg, ChannelPromise promise) throws Exception {
        System.out.println("OutBoundHandlerA: " + msg);
        ctx.write(msg, promise);
    }
}
OutBoundHandlerB
public class OutBoundHandlerB extends ChannelOutboundHandlerAdapter {
    @Override
    public void write(ChannelHandlerContext ctx, Object msg, ChannelPromise promise) throws Exception {
        System.out.println("OutBoundHandlerB: " + msg);
        ctx.write(msg, promise);
    }


    @Override
    public void handlerAdded(final ChannelHandlerContext ctx) {
        // 定时调用write
        ctx.executor().schedule(() -> {
            ctx.channel().write("hello world");
        }, 3, TimeUnit.SECONDS);
    }
}
OutBoundHandlerC
public class OutBoundHandlerC extends ChannelOutboundHandlerAdapter {

    @Override
    public void write(ChannelHandlerContext ctx, Object msg, ChannelPromise promise) throws Exception {
        System.out.println("OutBoundHandlerC: " + msg);
        ctx.write(msg, promise);
    }
}
在启动类中添加这三个handler
public static void main(String[] args) throws Exception {
// 配置服务端的 NIO线程组
// boss线程组用于网络事件的监听
EventLoopGroup bossGroup = new NioEventLoopGroup(1);
// worker线程组用于SocketChannel的网络读写
EventLoopGroup workerGroup = new NioEventLoopGroup();
try {
// NIO服务端的辅助启动类,目的是降低服务端开发的复杂度
ServerBootstrap b = new ServerBootstrap();
// 配置两大线程组
b.group(bossGroup, workerGroup)
// 配置服务端channel,在服务启动时通过反射创建channel实例
.channel(NioServerSocketChannel.class)
// 配置TCP基本属性
.childOption(ChannelOption.TCP_NODELAY, true)
// 客户端创建连接时绑定基本属性
.childAttr(AttributeKey.newInstance("childAttr"), "childAttrValue")
// 配置服务端启动过程逻辑处理器
.handler(new ServerHandler())
// 配置业务处理链 handler pipeline
.childHandler(new ChannelInitializer<SocketChannel>() {
@Override
public void initChannel(SocketChannel ch) {
// Outbound事件传播
ch.pipeline().addLast(new OutBoundHandlerA());
ch.pipeline().addLast(new OutBoundHandlerB());
ch.pipeline().addLast(new OutBoundHandlerC());
}
});
// 前面都是一些属性配置的逻辑,真正的服务端启动在此处开始
// 绑定端口,正式启动server端服务
ChannelFuture f = b.bind(8888).sync();
// 同步等待,直至服务端监听端口关闭
f.channel().closeFuture().sync();
} finally {
// 优雅退出,释放线程池资源
bossGroup.shutdownGracefully();
workerGroup.shutdownGracefully();
}
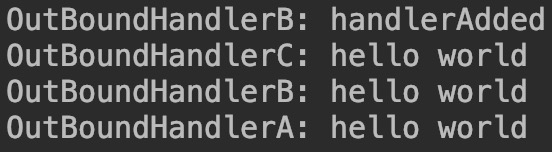
}启动服务端,通过“telnet 127.0.0.1 8888”测试一下调用结果:
write方法源码
    private void write(Object msg, boolean flush, ChannelPromise promise) {
        // findContextOutbound方法找到下一个outbound节点
        AbstractChannelHandlerContext next = findContextOutbound();
        final Object m = pipeline.touch(msg, next);
        EventExecutor executor = next.executor();
        if (executor.inEventLoop()) {
            if (flush) {
                next.invokeWriteAndFlush(m, promise);
            } else {
                // 执行下一节点的write方法
                next.invokeWrite(m, promise);
            }
        } else {
            AbstractWriteTask task;
            if (flush) {
                task = WriteAndFlushTask.newInstance(next, m, promise);
            }  else {
                task = WriteTask.newInstance(next, m, promise);
            }
            safeExecute(executor, task, promise, m);
        }
    }
head节点的write方法
        @Override
        public void write(ChannelHandlerContext ctx, Object msg, ChannelPromise promise) throws Exception {
            unsafe.write(msg, promise);
        }
执行过程总结:
因为OutBoundHandlerB实现了handlerAdded方法,所以在handle添加完成后会首先调用该方法。
在handlerAdded方法中,是通过 “ctx.channel().write("hello world");” 从tail节点开始事件传播,顺序为:tail->C->B->A->head,与添加时的顺序正好相反。
而在write方法中,是通过“ctx.write(msg, promise);”从当前节点开始向上传播,直到head。
write方法是从head节点或当前节点开始传播,先找到下一个outbound节点,然后再执行其write方法,最后由head节点调用unsafe.write方法完成事件的写出。
