适配器模式
源码:https://github.com/GiraffePeng/design-patterns
1、定义
将一个类的接口转换成客户希望的另外一个接口,使得原本由于接口不兼容而不能一起工作的那些类能一起工作。
适配器模式分为类结构型模式和对象结构型模式两种,前者类之间的耦合度比后者高,且要求程序员了解现有组件库中的相关组件的内部结构,所以应用相对较少些。
2、应用场景
- 以前开发的系统存在满足新系统功能需求的类,但其接口同新系统的接口不一致。
- 使用第三方提供的组件,但组件接口定义和自己要求的接口定义不同。
- 适配器模式不是软件设计阶段考虑的设计模式,是随着软件维护,由于不同产品、不
同厂家造成功能类似而接口不相同情况下的解决方案。
3、模式结构
适配器模式(Adapter)包含以下主要角色。
- 目标(Target)接口:当前系统业务所期待的接口,它可以是抽象类或接口。
- 适配者(Adaptee)类:它是被访问和适配的现存组件库中的组件接口。
- 适配器(Adapter)类:它是一个转换器,通过继承或引用适配者的对象,把适配者接口转换成目标接口,让客户按目标接口的格式访问适配者。
4、应用实例
4.1、集成三方短信发送(基础功能服务)
在实际开发中,经常会遇到对接外部三方服务,比如:存储,短信等基础服务。这时三方平台可能会提供api接口让我们自己组装数据报文去请求,也有提供给我们相应的SDK让我们依赖SDK就像调用项目内的接口一样去使用三方服务。
下面我们来模拟三方短信发送时使用到的适配器模式。
正常来说,假如三方平台提供的为api接口需要我们进行调用,我们可以这么写。
作为基础功能,方面服务调用,故作为接口或者工具类均可。该例子是采用了作为接口的方式,该接口就相当于上述模式结构中的目标接口,是当前业务系统所期待的接口。
/**
 * 短信发送接口声明
 */
public interface SmsService {

	/**
	 * 短信发送
	 * @param content 短信的内容
	 * @return 是否发送成功
	 */
	public Boolean sendSms(String content);
}
创建适配器类
public class SmsServiceImpl implements SmsService{


	private String smsKey = "ssajwi12wwe";

	private String templateId = "tejsi1221s";

	@Override
	public Boolean sendSms(String content) {
		//处理短信发送逻辑
		CloseableHttpClient httpclient = HttpClients.createDefault();
		HttpPost httpPost = new HttpPost("三方短信平台接口地址");
		// 创建参数队列
        List<NameValuePair> formparams = new ArrayList<NameValuePair>();
        formparams.add(new BasicNameValuePair("smsKey", smsKey));
        formparams.add(new BasicNameValuePair("templateId", templateId));
        UrlEncodedFormEntity uefEntity;
        try {
			uefEntity = new UrlEncodedFormEntity(formparams, "UTF-8");
			httpPost.setEntity(uefEntity);
			CloseableHttpResponse execute = httpclient.execute(httpPost);
			HttpEntity entity = execute.getEntity();
		} catch (Exception e) {
			e.printStackTrace();
		}
		System.out.println("短信发送成功");
		return true;
	}

}
因为提供的为api对接,故采用http请求去调用三方平台的接口,这个实现类其实就相当于适配器类,只不过适配者类(被访问和适配的现存组件库中的组件接口)是一种对外暴露的http协议接口罢了。
为了更好的体现适配器模式,我们假如三方平台提供的服务是使用了SDK嵌入的方法,我们需要使用其提供了的SDK来完成服务的调用,我们来改造下我们的代码,来模拟SDK场景下适配器的使用。
首先模拟一个SDK中的方法,该方法是由三方平台提供。
/**
 * 适配者类,(需要被进行适配的类)
 */
public class SmsSDK {

	public Boolean sendSms(String smsKey,String templateId,String content) {
		//这里不探究SDK中封装的方法是如何完成短信发送的,只是模拟
		System.out.println("发送短信成功");
		return true;
	}
}
结合刚才的SmsService接口,创建新的实现类,即适配器类
/**
 * 适配器,将原有的sdk需要传入的smsKey与templateId给自行适配。对外暴露的接口,只传入短信内容即可。
 * 这种方式也符合了迪米特原则,即最少知识原则。
 */
public class SmsSDKServiceImpl implements SmsService{

	private SmsSDK smsSDK;

	private String smsKey = "2121sjww";

	private String templateId = "2j1wiqsw";

	public SmsSDKServiceImpl() {
		smsSDK = new SmsSDK();
	}

	@Override
	public Boolean sendSms(String content) {
		Boolean sendSms = smsSDK.sendSms(smsKey, templateId, content);
		return sendSms;
	}
}
这样在系统要使用发短信功能时,只需要传入短信内容即可,无需关心其他参数的传递。
上述应用场景是针对于:使用第三方提供的组件,但组件接口定义和自己要求的接口定义不同的情况下使用适配器模式。
4.2、登录功能
该示例是针对适配器的另一种应用场景,即以前开发的系统存在满足新系统功能需求的类,但其接口同新系统的接口不一致。实际场景:目前有一套通过账号密码登陆的方法,现在要加入根据微信的openId来默认免登,业务端只需要传入openId即可登陆。这时我们可以使用适配器模式,将openId查询到的用户数据组装成满足原有登陆接口的入参来实现登陆。
创建入参类
/**
 * 创建登陆接口入参值
 */
public class TokenEndpointEntity {

	private String grant_type;

	private String username;

	private String password;

	public String getGrant_type() {
		return grant_type;
	}

	public void setGrant_type(String grant_type) {
		this.grant_type = grant_type;
	}

	public String getUsername() {
		return username;
	}

	public void setUsername(String username) {
		this.username = username;
	}

	public String getPassword() {
		return password;
	}

	public void setPassword(String password) {
		this.password = password;
	}
}
创建登陆出参类
/**
 * 创建登陆接口 返回实体
 */
public class AccessToken {

	private String access_token;

	private String token_type;

	private String refresh_token;

	private Long expires_in;

	private String scope;

	public String getAccess_token() {
		return access_token;
	}

	public void setAccess_token(String access_token) {
		this.access_token = access_token;
	}

	public String getToken_type() {
		return token_type;
	}

	public void setToken_type(String token_type) {
		this.token_type = token_type;
	}

	public String getRefresh_token() {
		return refresh_token;
	}

	public void setRefresh_token(String refresh_token) {
		this.refresh_token = refresh_token;
	}

	public Long getExpires_in() {
		return expires_in;
	}

	public void setExpires_in(Long expires_in) {
		this.expires_in = expires_in;
	}

	public String getScope() {
		return scope;
	}

	public void setScope(String scope) {
		this.scope = scope;
	}


	public AccessToken() {
		super();
	}

	public AccessToken(String access_token, String token_type, String refresh_token, Long expires_in, String scope) {
		super();
		this.access_token = access_token;
		this.token_type = token_type;
		this.refresh_token = refresh_token;
		this.expires_in = expires_in;
		this.scope = scope;
	}

	static class AccessTokenBuilder{
		private String access_token;

		private String token_type;

		private String refresh_token;

		private Long expires_in;

		private String scope;

		public AccessTokenBuilder access_token(String access_token) {
			this.access_token = access_token;
			return this;
		}

		public AccessTokenBuilder token_type(String token_type) {
			this.token_type = token_type;
			return this;
		}

		public AccessTokenBuilder refresh_token(String refresh_token) {
			this.refresh_token = refresh_token;
			return this;
		}

		public AccessTokenBuilder expires_in(Long expires_in) {
			this.expires_in = expires_in;
			return this;
		}

		public AccessTokenBuilder scope(String scope) {
			this.scope = scope;
			return this;
		}

		public AccessToken build() {
			return new AccessToken(access_token, token_type, refresh_token, expires_in, scope);
		}
	}

	public static AccessTokenBuilder builder() {
		return new AccessTokenBuilder();
	}
}
上述类里面使用了建造者模式来模拟 lombok提供的@Builder注解实现的功能,好处在于为一个类赋值时不用在一行一行的调用属性的set方法来赋值,可以直接使用该类的静态方法赋值,不用在显式的位置进行实例化对象。
以AccessToken为例,改造前我们需要赋值怎么赋值,用构造方法或者set方法。
AccessToken accessToken = new AccessToken();
accessToken.setScope("service");
accessToken.setToken_type("");
改造后可以这么赋值,方便了很多。
AccessToken accessToken = AccessToken.builder().access_token(String.valueOf(UUID.randomUUID())).expires_in(1000L)
	.refresh_token(String.valueOf(UUID.randomUUID())).scope("service").token_type("barear").build()
回归正题,我们继续创建原有的登录接口
//声明登陆信息操作接口
public interface LoginService {

	AccessToken login(TokenEndpointEntity tokenEndpointEntity);
}
创建其实现类
public class LoginServiceImpl implements LoginService {

	@Override
	public AccessToken login(TokenEndpointEntity tokenEndpointEntity) {
		// 交互数据库取出用户信息进行比对

		// 拼装返回数据
		return AccessToken.builder().access_token(String.valueOf(UUID.randomUUID())).expires_in(1000L)
				.refresh_token(String.valueOf(UUID.randomUUID())).scope("service").token_type("barear").build();
	}
}
这时一个原有的登录功能就实现了,那我们要符合开闭原则,在不修改原有代码的基础上去进行完成新的功能,即通过微信openId登录。根据依赖倒置原则,我们要面向接口编程,我们先来创建目标接口
//声明登陆适配器接口
public interface LoginAdapter {

	/**
	 * 登陆
	 * @param onlyFlag 传入 唯一标识 比如微信的openId
	 * @return
	 */
	AccessToken login(String onlyFlag);
}
创建其实现类,即适配器类
public class LoginAdapterForWechat extends LoginServiceImpl implements LoginAdapter{

	@Override
	public AccessToken login(String onlyFlag) {
		//根据onlyFlag(即openId)去查询 用户信息
		//根据查询出来的数据 组装TokenEndpointEntity
		TokenEndpointEntity tokenEndpointEntity = new TokenEndpointEntity();
		tokenEndpointEntity.setUsername("");
		tokenEndpointEntity.setPassword("");
		tokenEndpointEntity.setGrant_type("password");
		return login(tokenEndpointEntity);
	}
}
这里和示例1不同,示例1采用了对象结构型适配器(引用被适配者对象,调用对象中的方法),该示例采用了第二种方式即类适配器,通过继承被适配者对象,直接调用父级方法来完成适配。
如果有其他需要登陆方式的方法,比如QQ,新浪等第三方登陆,只要满足接口声明方法的入参条件,都可以通过派生新的实现类来完成适配器,意思就是根据被适配类,适配器可以有多个来满足不同的场景。
5、拓展
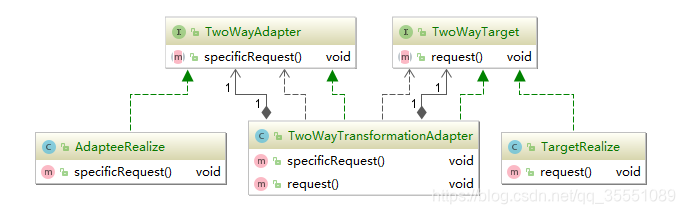
为了满足适配器的灵活性,某些场景下可能会出现 适配器调用目标对象,反过来目标对象也可能调用适配器的情况发生,这时就需要双向适配器来完成。
创建目标接口
//目标接口
public interface TwoWayTarget {
	public void request();
}
创建目标接口实现类
//目标实现
public class TargetRealize implements TwoWayTarget{

	@Override
	public void request() {
		System.out.println("目标代码被调用!");
	}
}
创建适配器接口
//适配者接口
public interface TwoWayAdapter {
	public void specificRequest();
}
创建适配器接口实现类
//适配者实现
public class AdapteeRealize implements TwoWayAdapter{

	@Override
	public void specificRequest() {
		System.out.println("适配者代码被调用!");
	}
}
重点:创建双向适配器类,持有适配器以及目标类的引用,并实现于双方的接口。
//双向转换适配器
public class TwoWayTransformationAdapter implements TwoWayTarget, TwoWayAdapter {

	private TwoWayTarget target;
	private TwoWayAdapter adapter;

	public TwoWayTransformationAdapter(TwoWayTarget target) {
		this.target = target;
	}

	public TwoWayTransformationAdapter(TwoWayAdapter adapter) {
		this.adapter = adapter;
	}

	@Override
	public void specificRequest() {
		target.request();
	}

	@Override
	public void request() {
		adapter.specificRequest();
	}
}
双向适配器类图如下:
6、优缺点
该模式的主要优点如下。
- 客户端通过适配器可以透明地调用目标接口。
- 复用了现存的类,程序员不需要修改原有代码而重用现有的适配者类。
- 将目标类和适配者类解耦,解决了目标类和适配者类接口不一致的问题。
主要缺点如下:
- 适配器编写过程需要全面考虑,可能会增加系统的复杂性。
- 增加代码阅读难度,降低代码可读性,过多使用适配器会使系统代码变得凌乱。
