1,AOP的概念
AOP为Aspect Oriented Programming的缩写,意思为面向切面编程,是通过预编译方式和运行期动态代理实现程序功能的统一维护的一种技术
2,AOP的作用
利用AOP可以对业务逻辑的各个部分进行分离,从而使得业务逻辑各部分之间的耦合度降低,提高程序的可用性,同时提高了开发效率
3,AOP的底层实现
AOP的底层是通过Spring提供的动态代理技术实现的,在运行期间Spring通过动态代理技术动态的生成代理对象
代理对象方法执行时进行增强功能的介入,再去调用目标对象的方法,从而完成功能的增强
AOP底层常用的两种动态代理技术
(在使用时,spring框架会根据目标类是否实现了接口来决定采用哪种动态代理的方式)
JDK代理:基于接口的动态代理技术
cglib代理:基于父类的动态代理
首先演示通过XML配置完成功能的增强
XML配置如下:
需要用到的类下面依次列出,具体类的介绍以及功能在注释中阐述:
package com.itcast.proxy.anno;
/**
* 切面
*/
public class MyAspect {
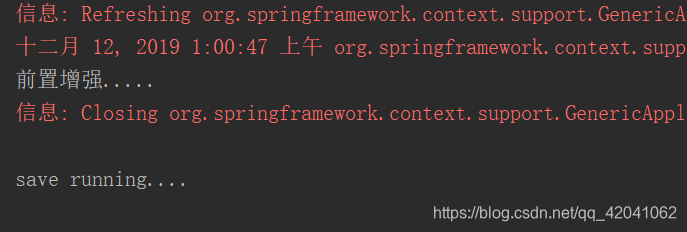
public void before() {
System.out.println("前置增强.....");
}
public void afterReturn() {
System.out.println("后置增强.....");
}
}
package com.itcast.proxy.anno;
import org.springframework.stereotype.Component;
/**
 * 目标对象
 */

public class Target implements TargetInterface {
    @Override
    public void save() {

        System.out.println("save running....");
    }
}
package com.itcast.proxy.anno;
/**
 * 接口
 */
public interface TargetInterface {

    public void save();
}
import org.junit.runner.RunWith;
import org.springframework.beans.factory.annotation.Autowired;
import org.springframework.test.context.ContextConfiguration;
import org.springframework.test.context.junit4.SpringJUnit4ClassRunner;

/**
 * 测试类
 */
@RunWith(SpringJUnit4ClassRunner.class)
@ContextConfiguration("classpath:spring.xml")  //指定配置文件
public class AopTest {

    //测试目标方法有没有进行前置增强
    @Autowired //注入目标方法
    private TargetInterface target;


    @Test
    public void test1(){
        target.save();
    }

}
运行结果如下:
相关jar包导入这里不做阐述
接着演示通过注解完成功能的增强
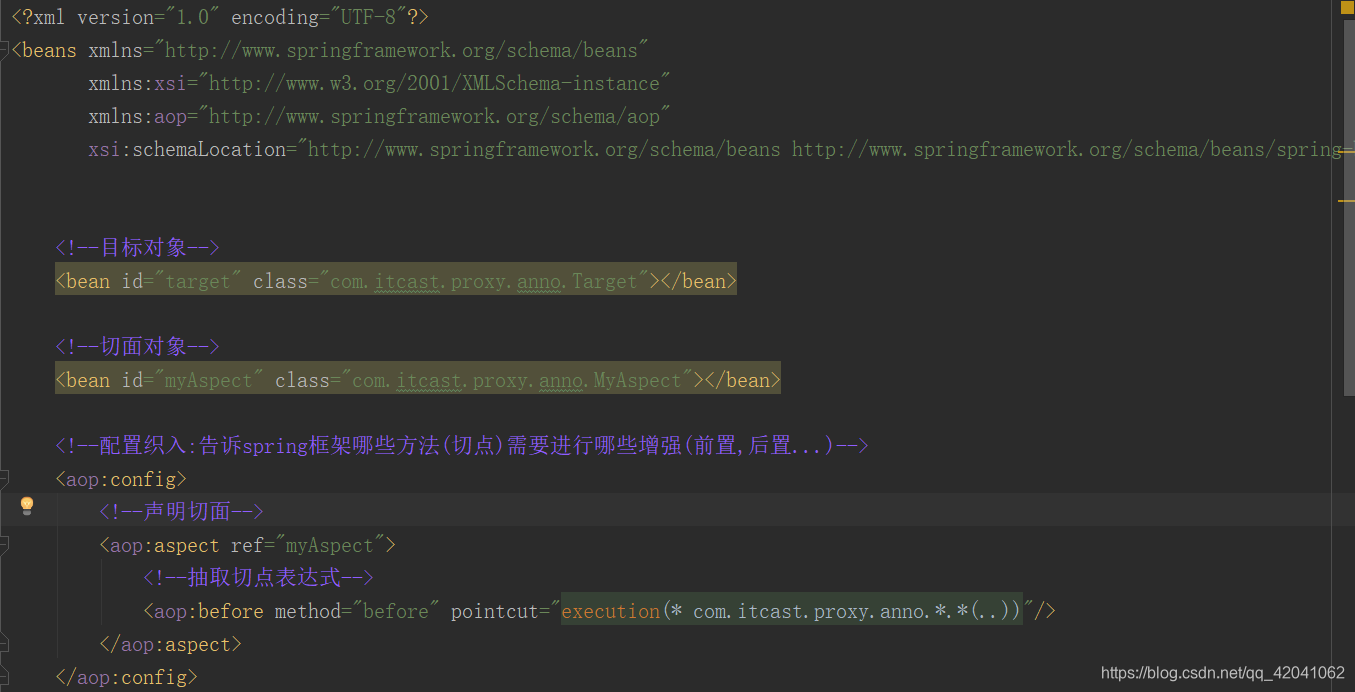
XML需要配置组件扫描和aop自动代理具体如下图:
 注解配置如下:
package com.itcast.proxy.anno;

import org.aspectj.lang.annotation.Aspect;
import org.aspectj.lang.annotation.Before;
import org.springframework.stereotype.Component;

/**
 * 切面
 */
@Component("myAspect")
@Aspect //标注MyAspect是一个切面类
public class MyAspect {

    @Before("execution(* com.itcast.proxy.anno.*.*(..))")
    public void before() {
        System.out.println("前置增强.....");
    }

    public void afterReturn() {
        System.out.println("后置增强.....");
    }

}
package com.itcast.proxy.anno;
import org.springframework.stereotype.Component;
/**
 * 目标对象
 */

@Component("target") //目标方法交给spring容器
public class Target implements TargetInterface {
    @Override
    public void save() {

        System.out.println("save running....");
    }
}
package com.itcast.proxy.anno;
/**
 * 接口
 */
public interface TargetInterface {

    public void save();
}
package com.itcast.proxy.anno;

import org.junit.Test;
import org.junit.runner.RunWith;
import org.springframework.beans.factory.annotation.Autowired;
import org.springframework.test.context.ContextConfiguration;
import org.springframework.test.context.junit4.SpringJUnit4ClassRunner;

/**
 * 测试类
 */
@RunWith(SpringJUnit4ClassRunner.class)
@ContextConfiguration("classpath:spring.xml")  //指定配置文件
public class AopTest {

    //测试目标方法有没有进行前置增强
    @Autowired //注入目标方法
    private TargetInterface target;


    @Test
    public void test1(){
        target.save();
    }

}
运行结果如下:

以上内容仅演示一种前置增强的效果…
初次接触框架,技术有待精进,望多指教,晚安好梦!
